


This topic describes how to use Compliance Scanner for VMware Tanzu.
Compliance Scanner performs one errand that starts scanning. When this errand is triggered, it starts the scanning errand on each VM, including the oscap_store VM that the tile creates.
The scanning errand is set to Off by default. This is because Compliance Scanner only scans tiles that are already present when you deploy it. If you install other tiles during the same time Compliance Scanner is installed, the additional tiles are not scanned.
The scan errand on each VM does generate the Security Content Automation Protocol (SCAP) tests each time by running XGen on XFiles.
Ways to Scan VMs
You can scan VMs using the tile UI or the command line:
- When performing an audit, see Scan Using the Compliance Scanner Tile.
- When setting up automated scans of your VMs, see Scan Using the Command Line.
Scan Using the Compliance Scanner Tile
Scanning VMs involves three procedures:
Scan the VMs
To begin scanning:
-
Confirm that your scan is configured correctly with the benchmarks and log formats you want output.
For more information about configuring your scan, see Configure Scans.
-
Go to the Tanzu Operations Manager Installation Dashboard.
-
Click REVIEW PENDING CHANGES.
-
Enable the check boxes for the Compliance Scanner tile and the Run configured scans errand.
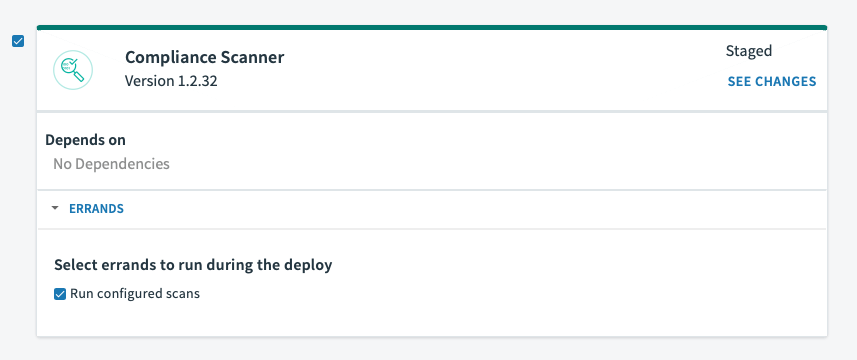
A scan is triggered at the end.
If there are configuration changes from add-ons or tiles other than Compliance Scanner, leave those products and errands check boxes enabled if you want those changes to be applied. If there are no changes from other sources, only the Compliance Scanner tile needs to have its check box enabled.
-
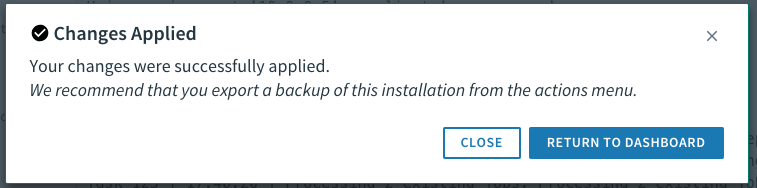
Click APPLY CHANGES.
When scanning is finished, a second errand is triggered by the
Run-config-scans-on-PASerrand to retrieve the logs from each VM. On each VM, there is only one log file per format and one ZIP log file at a time. If you run any subsequent scans these files are overwritten.
Retrieve Log Files
When an external store is configured, the log files do not contain the scan output. For instructions on accessing the scan output when an external store is configured, see the following section, Find Scan Output. For instructions on configuring an external store, see Installing and Configuring.
To review the logs for a completed scan using the Compliance Scanner tile:
-
When the changes have been applied, return to the Installation Dashboard and click the Compliance Scanner tile.
-
Click Status and download the
oscap_storelog file.
This downloads the log file containing scan results from theoscap_storeVM to Tanzu Operations Manager. If you select the download icon multiple times, a list of ZIP files is created in Tanzu Operations Manager, each with a different timestamp. -
Click Logs and click the filename of the ZIP log file.
This downloads the scan results from the Tanzu Operations Manager to your local machine. The timestamp indicates when the scan was initiated.
-
Decompress the downloaded file.
The contents of the downloaded file depend on the formats and benchmarks you selected during configuration. For example, a report in HTML format from the Base Xenial benchmark, might look like this.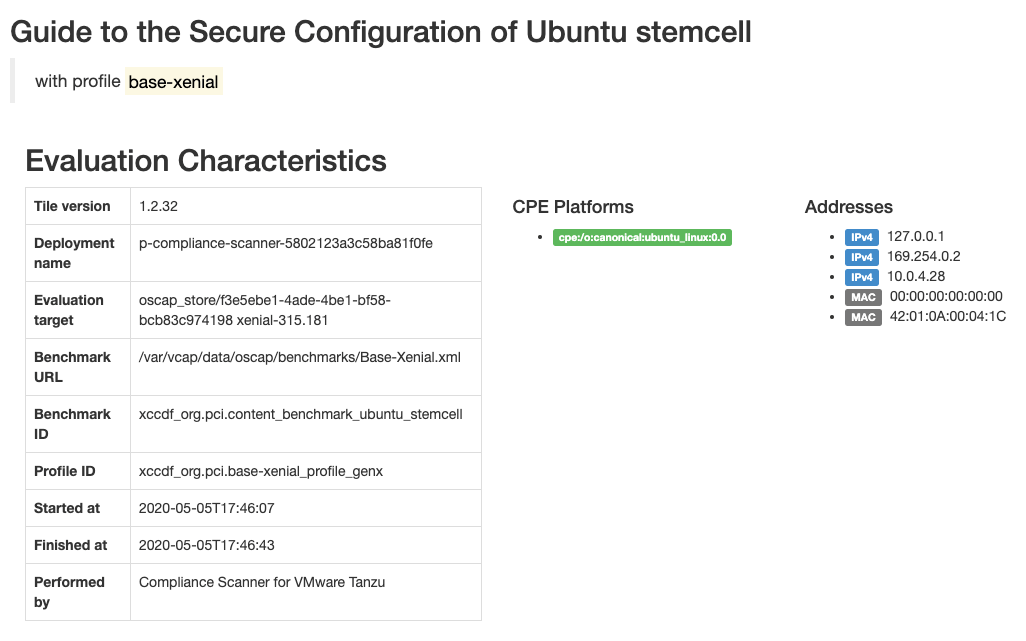
Find Scan Output
The method of finding the scan output depends on whether or not an external store is configured for scan results. For instructions on configuring an external store, see Installing and Configuring.
-
Find scan output if using an external store:
- Scan output is uploaded to the external store as an archive.
- The scan output filename contains the timestamp of the scan and takes the form
compliance_scanner_YYYY-MM-DDTHHMMSS.tar.gz. - To retrieve the scan results, download and extract this archive.
-
Find scan output if not using an external store:
- The
oscap_storeZIP file contains scan results from theoscap_storeVM. - The results of the scan are at
oscap_store/scanner/scan_results/output.
- The
The naming syntax for each log file is below:
BENCHMARK_COMPONENT_UUID.FORMAT
Where:
BENCHMARKis the benchmark that was used for the scan.COMPONENTis the VM that was scanned.UUIDis the UUID for the VM that was scanned.FORMATis the format of the file and is one of the formats that you configured in Configure Scans.
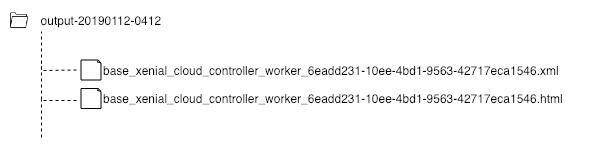
For example, the oscap_store directory looks similar to the following image:

The number of log files in the output directory can be calculated as follows:
(v + i) * f * b
Where:
vis the number of VMs in your deployment.iis the number of additional instances for any VM in your deployment.fis the number of formats you configured in Configure Scans.bis the number of benchmarks you configured in Configure Scans.
Scan Using the Command Line
When an external store is configured, the log files do not contain the scan output. For instructions on accessing the scan output when an external store is configured, see the preceding section, Find Scan Output. For instructions on configuring an external store, see Installing and Configuring.
You also have the option of scanning VMs through the CLI. There are two ways to do this:
Scan and Retrieve Log Files
To start a new scan and retrieve the logs for the completed scan using the CLI:
-
Log in to the BOSH Director.
-
On the Tanzu Operations Manager VM, create an alias in the BOSH CLI for your BOSH Director IP address. For example:
$ bosh alias-env my-env -e 10.0.0.3 -
Log in to the BOSH Director, specifying the newly created alias. For example:
$ bosh -e my-env log-in
-
-
Run
bosh deploymentsto list all the deployment names. For example:$ bosh deployments Name Releases Stemcells container-service backup-and-restore-sdk/1.8.0 bosh-google-kvm-ubuntu-xenial-go\_agent/97.47 - bosh-dns/1.10.0 bosh-dns-aliases/0.0.3 bpm/0.6.0 cf-mysql/36.14.0 docker/32.0.3 kubo/0.21.13 kubo-service-adapter/1.2.5 oscap/0.1.61 pks-telemetry/0.9.4 scanner-f9822a33c2e0d04cb bosh-dns/1.10.0 bosh-google-kvm-ubuntu-xenial-go\_agent/170.19 - bosh-dns-aliases/0.0.3 clamav/1.4.41 ipsec/1.9.14 ipsec-verifier/1.9.14 oscap/0.1.61 service-instance bosh-dns/1.10.0 bosh-google-kvm-ubuntu-xenial-go\_agent/97.47 bosh-dns-aliases/0.0.3 container-service bpm/0.6.0 cfcr-etcd/1.4.1 kubo/0.21.13 -
Find the
scannerdeployment in the list. It appears asscanner-DEPLOYMENT-UUID, whereDEPLOYMENT-UUIDis the UUID of your deployment. -
Run the following command to start the scan and download the logs:
bosh -e my-env -d scanner-DEPLOYMENT-UUID run-errand scan_results --download-logs --logs-dir PATH-TO-SAVE-SCAN-RESULTSWhere:
scanner-DEPLOYMENT-UUIDis the name of your scanner deployment.PATH-TO-SAVE-SCAN-RESULTSis the directory where you want to save the logs. You can omit--logs-dir PATH-TO-SAVE-SCAN-RESULTSif you want the logs to be saved to your current directory.
For example:
$ bosh -e my-env -d scanner-f9822a33c2e0d04cb run-errand scan_results --download-logs --logs-dir scanner/logs/20190131
The files generated use the most recent configuration of your tile. To see what the current settings are, see Configure Scans.
Retrieve Existing Log Files
To retrieve existing logs for the most recent completed scan using the CLI, run:
bosh -e my-env -d scanner-DEPLOYMENT-UUID logs --only=scan_results --dir PATH-TO-SAVE-SCAN-RESULTS
Where:
scanner-DEPLOYMENT-UUIDis the name of your scanner deployment.PATH-TO-SAVE-SCAN-RESULTSis the directory in which you save your logs. Omit--dir PATH-TO-SAVE-SCAN-RESULTSto save the logs to your current directory.
For example:
$ bosh -e my-env -d scanner-f9822a33c2e0d04cb logs --only=scan_results --dir scanner/logs/20190131
Access Log Files
To access your saved logs, unzip the output ZIP file.
The naming syntax for each log file is below:
BENCHMARK_COMPONENT_UUID.FORMAT
Where:
BENCHMARKis the benchmark that was used for the scan.COMPONENTis the VM that was scanned.UUIDis the UUID for the VM that was scanned.FORMATis the format of the file and is one of the formats that you configured in Configure Scans.
For example, the output directory looks similar to the following image:
View Tests on VMs
For every configuration rule that is checked, there is a corresponding test written in YAML test files residing on each VM. You can use these files as reference for internal test development or to validate that the test matches the description.
In the beta release of Compliance Scanner, you cannot write your own YAML tests or convert these tests to the SCAP format.
To view tests on VMs:
- Use the BOSH CLI to SSH into a component VM. For more information, see BOSH SSH.
-
Navigate to the following path:
/var/vcap/packages/oscap/xfiles -
Search for the test ID and open the corresponding file.
Cancel a Running Scan
To cancel a running scan:
-
Log in to the BOSH Director.
-
On the Tanzu Operations Manager VM, create an alias in the BOSH CLI for your BOSH Director IP address:
bosh alias-env ENVIRONMENT-ALIAS -e IP-ADDRESSFor example:
$ bosh alias-env my-env -e 10.0.0.3
-
Log in to the BOSH Director, specifying the newly created alias:
bosh -e ENVIRONMENT-ALIAS log-inFor example:
$ bosh -e my-env log-in
-
-
Get the task ID of the
scan_resultserrand by running:bosh -e ENVIRONMENT-ALIAS tasksFor example:
$ bosh -e my-env tasks

ID  State       Started At                    Last Activity At              User   Deployment    Description                                            Result
65  processing  Fri Sep  6 19:06:53 UTC 2019  Thu Jan  1 00:00:00 UTC 1970  admin  my-deployment run errand scan_results from deployment my-deployment  -

1 tasks
In this example, the task ID is
65.If you started the scan using the command line as described in Scan Using the Command Line, you can press
CTRL + Cwhile the scan is running to stop waiting for the scan to complete. This does not cancel the scan, but allows you to issue new commands through the CLI. -
Cancel the
scan_resultserrand by running:bosh -e ENVIRONMENT-ALIAS cancel-task TASK-IDFor example:
$ bosh -e my-env cancel-task 65
Using environment '10.0.0.5' as client 'ops_manager'

Succeeded
Errand Logs After Cancelling a Scan
After running the BOSH cancel-task command, the scan_results errand outputs Received signal terminated, and attempts to cancel the scan on every VM. When a VM receives the cancel message, it terminates the running scan process.
After the scan has cancelled, the store.log file in the output directory looks similar to the following example:
2019/09/06 19:06:54 Starting store on port 28894
2019/09/06 19:06:54 [10.0.0.12 10.0.0.11 10.0.0.9 10.0.0.10] <nil>
2019/09/06 19:06:54 Starting scan on 10.0.0.12
2019/09/06 19:06:54 Starting scan on 10.0.0.11
2019/09/06 19:06:54 Starting scan on 10.0.0.9
2019/09/06 19:06:54 Starting scan on 10.0.0.10
2019/09/06 19:06:59 Received signal terminated
2019/09/06 19:06:59 Attempting to cancel scan on host 10.0.0.10
2019/09/06 19:06:59 Attempting to cancel scan on host 10.0.0.12
2019/09/06 19:06:59 Attempting to cancel scan on host 10.0.0.11
2019/09/06 19:06:59 Attempting to cancel scan on host 10.0.0.9
2019/09/06 19:06:59 Host 10.0.0.10 successfully acknowledged cancel request
2019/09/06 19:06:59 Host 10.0.0.12 successfully acknowledged cancel request
2019/09/06 19:06:59 Host 10.0.0.11 successfully acknowledged cancel request
2019/09/06 19:06:59 Host 10.0.0.9 successfully acknowledged cancel request
2019/09/06 19:06:59 Shutdown
To retrieve the errand log, see Retrieve Existing Log Files.
The errand log can also be found at the path /var/vcap/sys/log/scan_results/store.log on the store VM.
If you started the scan using Tanzu Operations Manager, you can view the log output for the scan_results errand in Tanzu Operations Manager.
After the scan has cancelled, the Tanzu Operations Manager log output for the errand looks similar to the following example:
Task 65 | 19:06:53 | Preparing deployment: Preparing deployment (00:00:01)
Task 65 | 19:06:54 | Running errand: oscap-store/fa844bb0-5739-497a-a3db-f96a86a3dc2a (0) (00:00:05)
                  L Error: Task 65 cancelled
Task 65 | 19:07:00 | Fetching logs for oscap-store/fa844bb0-5739-497a-a3db-f96a86a3dc2a (0): Finding and packing log files (00:00:01)
Task 65 | 19:07:01 | Error: Task 65 cancelled

Task 65 Started  Fri Sep  6 19:06:53 UTC 2019
Task 65 Finished Fri Sep  6 19:07:01 UTC 2019
Task 65 Duration 00:00:08
Task 65 cancelled

Running errand 'scan_results':
 Expected task '65' to succeed but state is 'cancelled'

Exit code 1
