This topic tells you how to set up PingFederate as your identity provider by configuring SAML integration in both Single Sign‑On for VMware Tanzu Application Service and PingFederate.

Overview

To set up PingFederate as your identity provider through SAML integration:

  1. Set up SAML in Single Sign‑On
  2. Configure the Connection
  3. Configure Browser SSO
  4. Configure Assertion Creation
  5. Configure Protocol Settings
  6. Configure Credentials

Set up SAML in Single Sign‑On

To set up SAML in Single Sign‑On, follow the steps in Configure SAML Settings.

Configure the Connection

To configure the connection:

  1. Sign in as a PingFederate admin.

  2. Navigate to your identity provider configurations by clicking on the IDP Configuration tab.

  3. Under SP Connections, click Create New

    The IdP Configuration tab within the PingFederate UI.
There are links below the headers Application Integration, Authentication Policies, and
Federation Info.
There are Manage All and Create New buttons below the header SP Affiliations.
There are Manage All, Crete New, and Import buttons below the header SP Connections, and a
red box is drawn around the Create New button.

  4. Select the Browser SSO Profiles connection template on the Connection Type tab and click Next.

  5. Select Browser SSO on the Connection Options tab and click Next.

  6. Select File as the method for importing metadata and click Choose file to choose the SSO metadata on the Import Metadata tab. Click Next.

    The SP Connection section within the IdP Configuration tab within the PingFederate UI.
There is a row of tabs across the top. The Import Metadata tab is selected.
There are the Metadata radio buttons None, File, and URL.
There is a red box drawn around the File radio button.
Next to spring_saml_metadata.xml is a Choose file button, which also has a red box around it.
At the bottom right are Cancel, Previous, and Next buttons.

  7. Review the information about the Metadata Summary tab and click Next.

  8. Ensure that the Partner’s Entity ID, Connection Name, and Base URL fields pre-populate based on the metadata. Click Next.
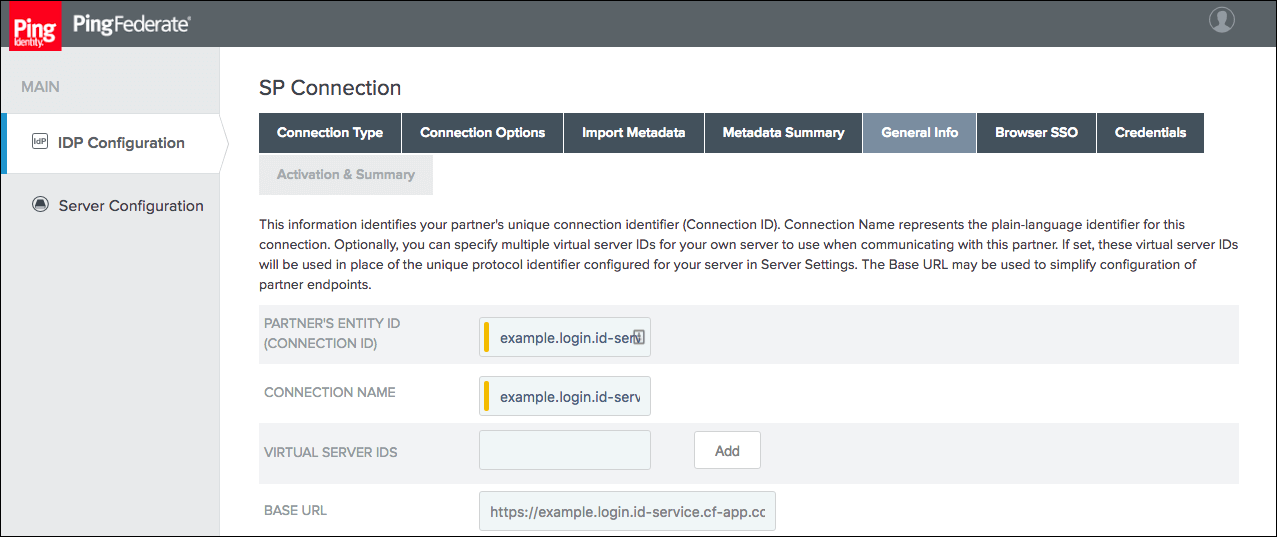
    The SP Connection section within the IdP Configuration tab within the PingFederate UI.
There is a row of tabs across the top. The General Info tab is selected.
There is a paragraph that begins "This information identifies your partner's unique connection
identifier..."
Below this paragraph are fields for Partner Entity ID (Connection ID), Connection Name,
Virtual Server IDs, and Base URL.
There is an Add button next to the Virtual Server IDs field.
The Partner Entity ID (Connection ID), Connection Name and Base URL fields have values as
supplied by the imported metadata.

Configure Browser SSO

To configure browser SSO:

  1. Click Configure Browser SSO on the Browser SSO tab.

  2. Select the IdP-Initiated SSO and SP-Initiated SSO options on the SAML Profiles tab and click Next.
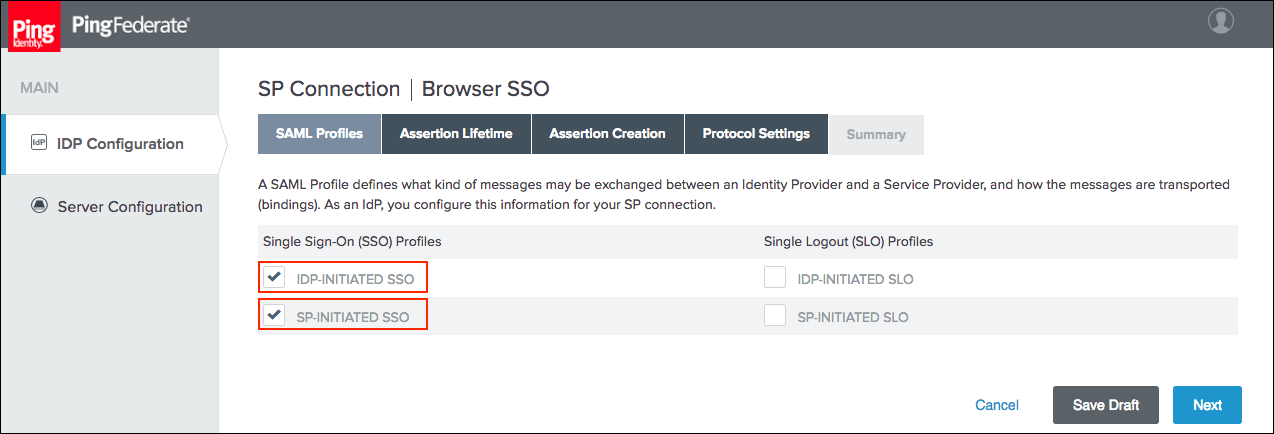
    The Browser SSO section within the IdP Configuration tab within the PingFederate UI.
There is a row of tabs across the top. The SAML Profiles tab is selected.
There are Single Sign-On (SSO) Profiles and Single Logout (SLO) Profiles columns.
In the first row are IDP-INITIATED SSO and IDP-INITIATED SLO checkboxes.
The IDP-INITIATED SSO checkbox is selected and there is a red box drawn around it.
In the second row are SP-INITIATED SSO and SP-INITIATED SLO checkboxes.
The SP-INITIATED SSO checkbox is selected and there is a red box drawn around it.
At the bottom right are Cancel, Save Draft, and Next buttons.

  3. Enter your desired assertion validity time from on the Assertion Lifetime tab and click Next.

  4. (Optional) Select IdP-Initiated SLO and SP-Initiated SLO options if you want to enforce Single Logout.

Configure Assertion Creation

To configure assertion creation:

  1. Click Configure Assertion Creation on the Assertion Creation tab.

  2. Choose the Standard option on the Identity Mapping tab and click Next.

  3. Select a Subject Name Format for the SAML_SUBJECT on the Attribute Contract tab and click Next.
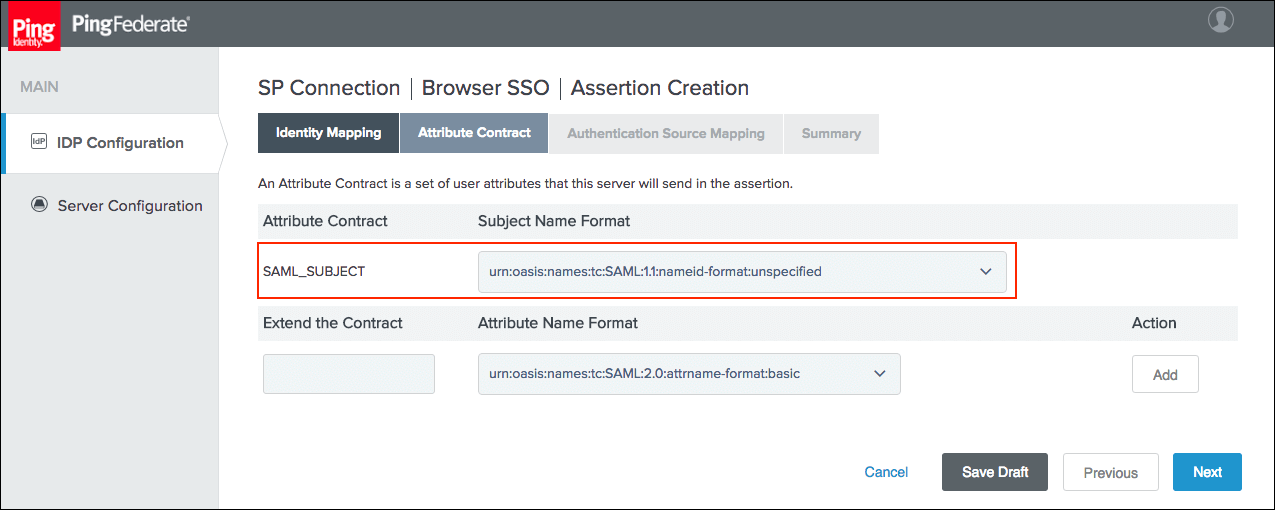
    The Assertion Creation section within the IdP Configuration tab within the PingFederate UI.
There is a row of tabs across the top. The Attribute Contract tab is selected.
There are Attribute Contract and Subject Name Format labels next to one another.
Below these labels are the text SAML_SUBJECT and a dropdown.
A red box is drawn around the text SAML_SUBJECT and a dropdown.
Below are the labels Extend the Contract and Attribute Name Format next to one another.
Below these labels are an empty field and a dropdown.
An Add button is at the far right.
At the bottom right are Cancel, Save Draft, Previous, and Next buttons.

  4. Click Map New Adapter Instance on the Authentication Source Mapping tab.

  5. Select an Adapter Instance and click Next. The adapter must include the user’s email address.
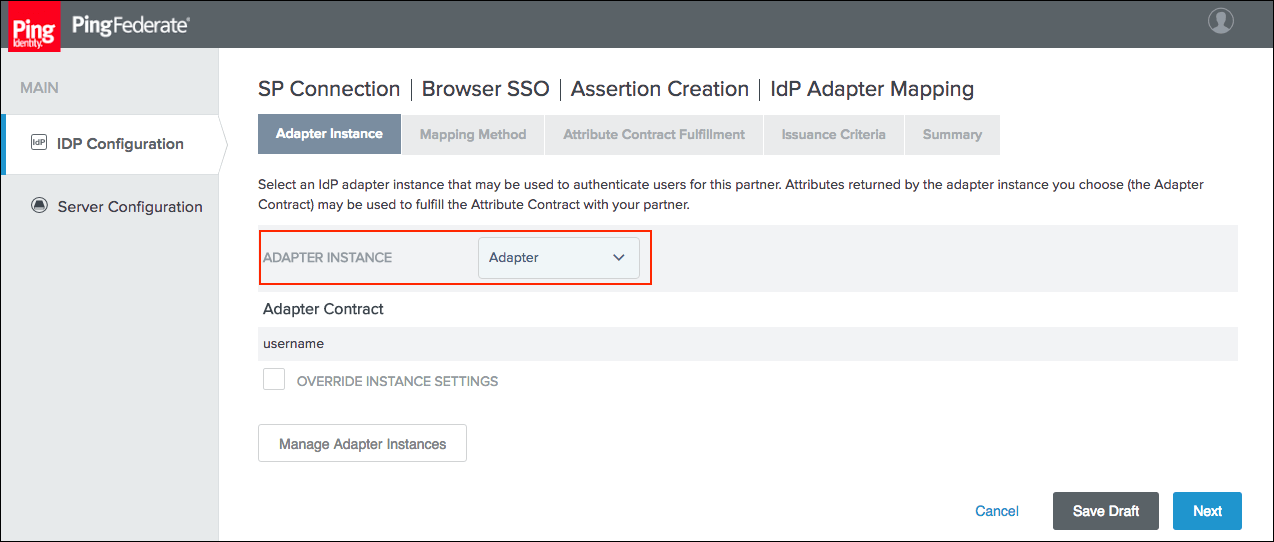
    The IdP Adapter
Mapping section within the IdP Configuration tab within the PingFederate UI.
There is a row of tabs across the top. The Adapter Instance tab is selected.
Next to the Adapter Instance text is a dropdown with the Adapter option selected.
Below the Adapter Contract label is the text username.
Below that is an unselected checkbox labeled Override Instance Settings.
Below that is a Manage Adapter Instances button.
At the bottom right are Cancel, Save Draft, and Next buttons.

  6. Select the Use only the adapter contract values in the SAML assertion option on the Mapping Method tab and click Next.
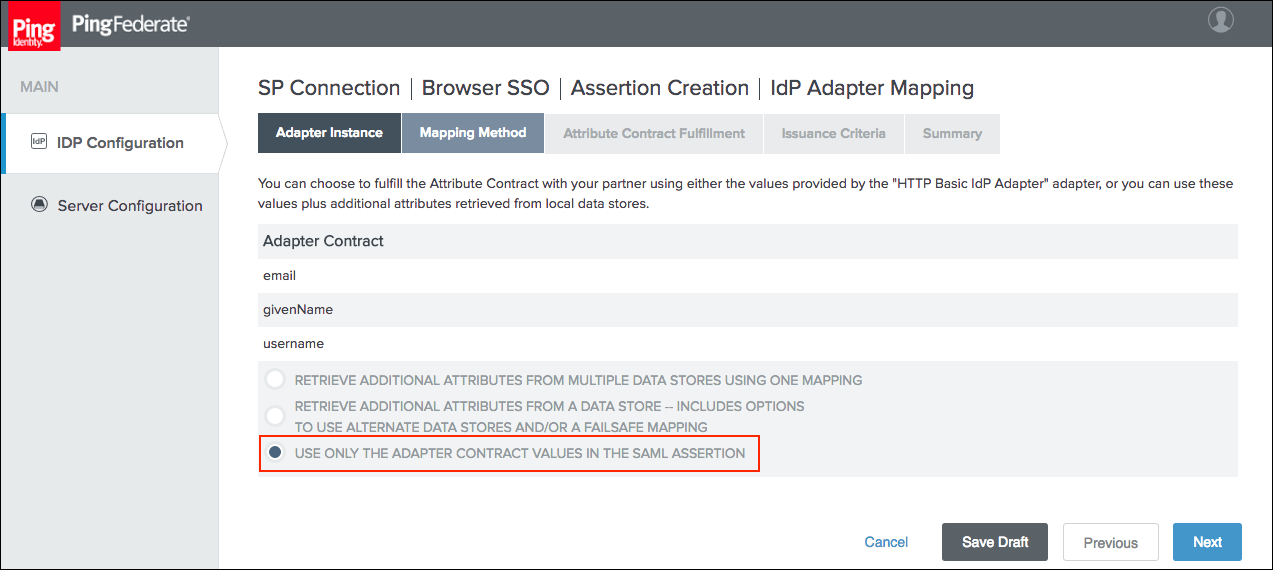
    The IdP Adapter
Mapping section within the IdP Configuration tab within the PingFederate UI.
There is a row of tabs across the top. The Mapping Method tab is selected.
There is an Adapter Contract header and, below it, are the texts email, givenName, and
username.
Below are the radio buttons
RETRIEVE ADDITIONAL ATTRIBUTES FROM MULTIPLE DATA STORES USING ONE MAPPING,
RETRIEVE ADDITIONAL ATTRIBUTES FROM A DATA STORE - INCLUDES OPTIONS,
TO USE ALTERNATE DATA STORES AND/OR A FAILSAFE MAPPING,
and finally USE ONLY THE ADAPTER CONTRACT VALUES IN THE SAML ASSERTION.
The final radio button is selected and a red box is drawn around it.
At the bottom right are Cancel, Save Draft, Previous, and Next buttons.

  7. Select your adapter instance as the Source and the email as the Value on the Attribute Contract Fulfillment tab and click Next.
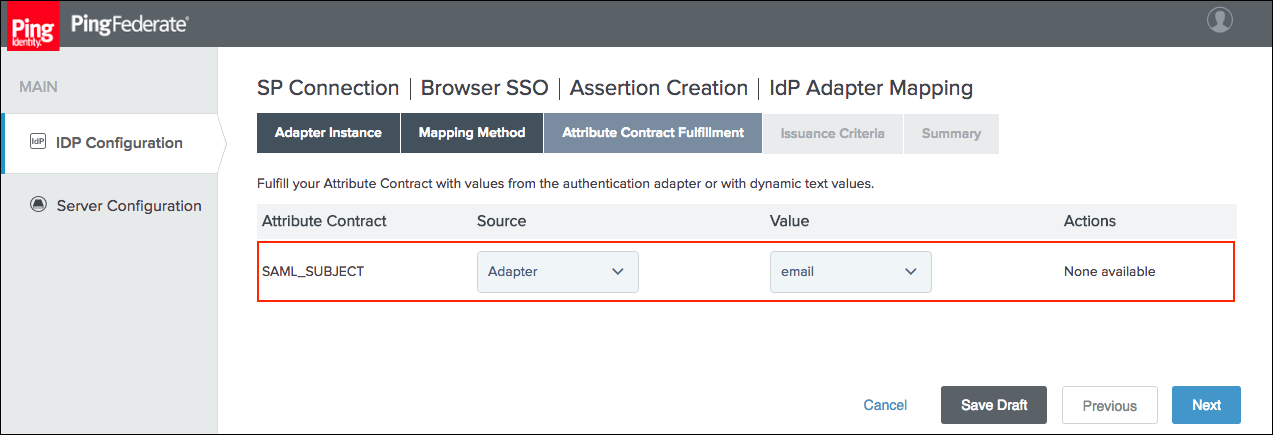
    The IdP Adapter Mapping section within the IdP Configuration tab within the PingFederate UI.
There is a row of tabs across the top. The Attribute Contract Fulfillment tab is selected.
There is a table with Attribute Contract, Source, Value, and Actions columns.
In the single row below is the text SAML_SUBJECT, a dropdown with the option Adapter selected,
a dropdown with the option email selected, and the text None available.
At the bottom right are Cancel, Save Draft, Previous, and Next buttons.

  8. (Optional) Select any authorization conditions you want on the Issuance Criteria tab and then click Next.

  9. Click Done on the Summary tab.

  10. Click Next on the Authentication Source Mapping tab.

  11. Click Done on the Summary tab.

  12. Click Next on the Assertion Creation tab.

Configure Protocol Settings

To configure protocol settings:

  1. Click Configure Protocol Settings on the Protocol Settings tab.

  2. Select POST for Binding and specify the single sign-on endpoint URL in the Endpoint URL field on the Assertion Consumer Service URL tab. Click Next
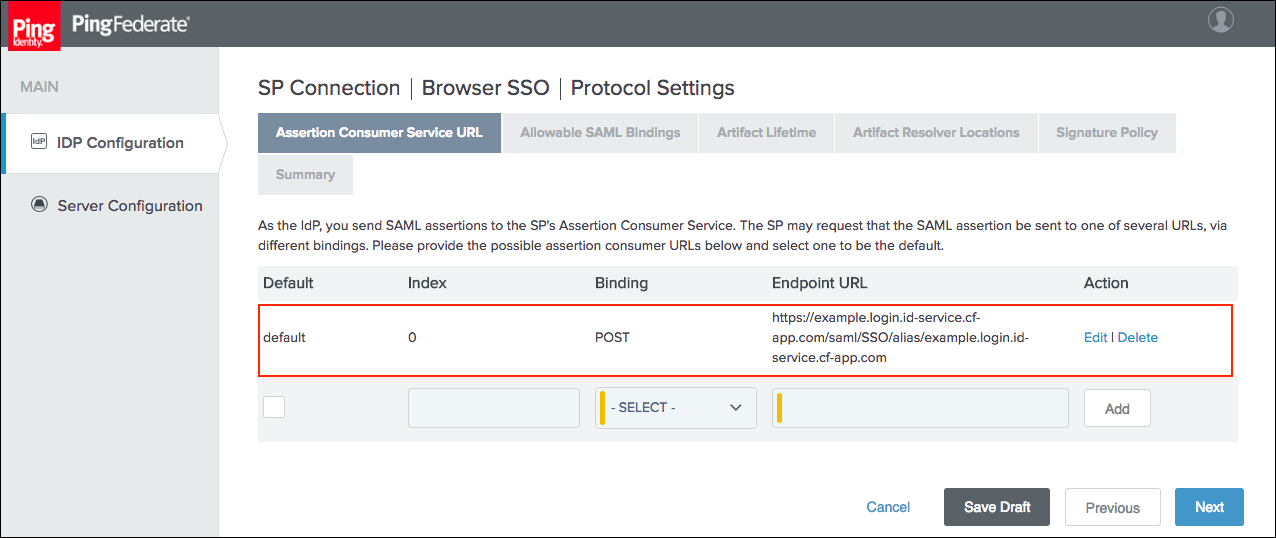
    The Protocol Settings section within the IdP Configuration tab within the PingFederate UI.
There is a row of tabs across the top. The Assertion Consumer Service URL tab is selected.
There is a table with Default, Index, Binding, Endpoint URL, and Action columns.
In the row below is the text default, the number zero, the text POST, an endpoint URL, and
inside the Action column are Edit and Delete links.
In the row below is an unselected checkbox, an empty field, an empty dropdown, an empty field, and
an Add button.
At the bottom right are Cancel, Save Draft, Previous, and Next buttons.

  3. Select POST on the Allowable SAML Bindings tab and click Next.
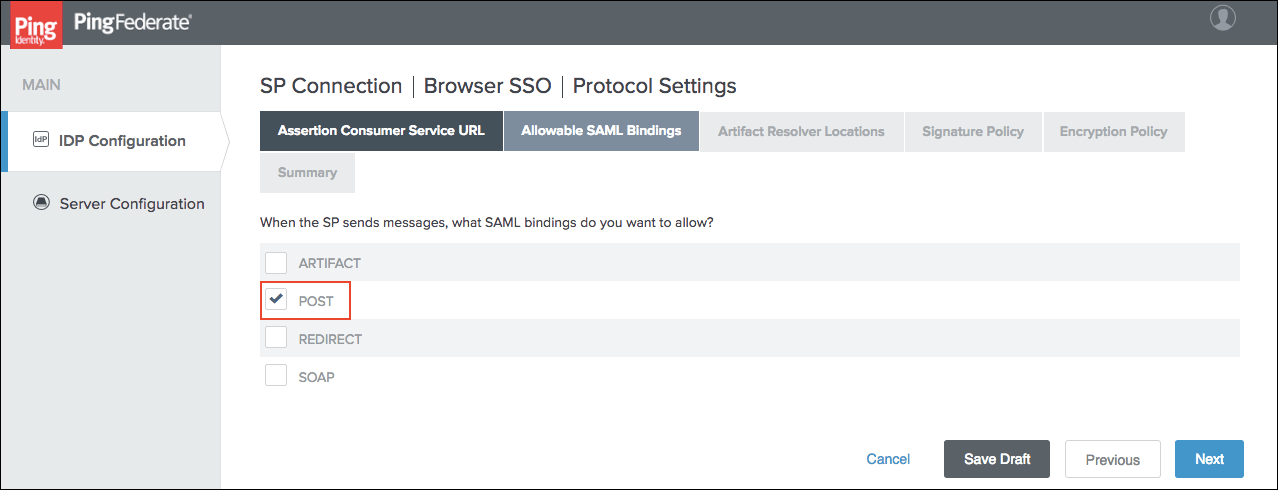
    The Protocol Settings section within the IdP Configuration tab within the PingFederate UI.
There is a row of tabs across the top. The Allowable SAML Bindings tab is selected.
Below is the sentence When the SP sends messages, what SAML bindings do you want to show?"
Below that are the checkboxes ARTIFACT, POST, REDIRECT, AND SOAP.
Only the POST checkbox is selected and there is a red box drawn around it.
At the bottom right are Cancel, Save Draft, Previous, and Next buttons.

  4. Select your desired signature policies for assertions on the Signature Policy tab and click Next.

  5. Select your desired encryption policy for assertions on the Encryption Policy tab and click Next.

  6. Click Done on the Protocol Settings Summary tab.

  7. Click Done on the Browser SSO Summary tab.

Configure Credentials

To configure credentials:

  1. Click Configure Credentials on the Credentials tab.

  2. Select the Signing Certificate to use with the Single Sign‑On for VMware Tanzu Application Service service and select Include the certificate in the signature element . Click Next.
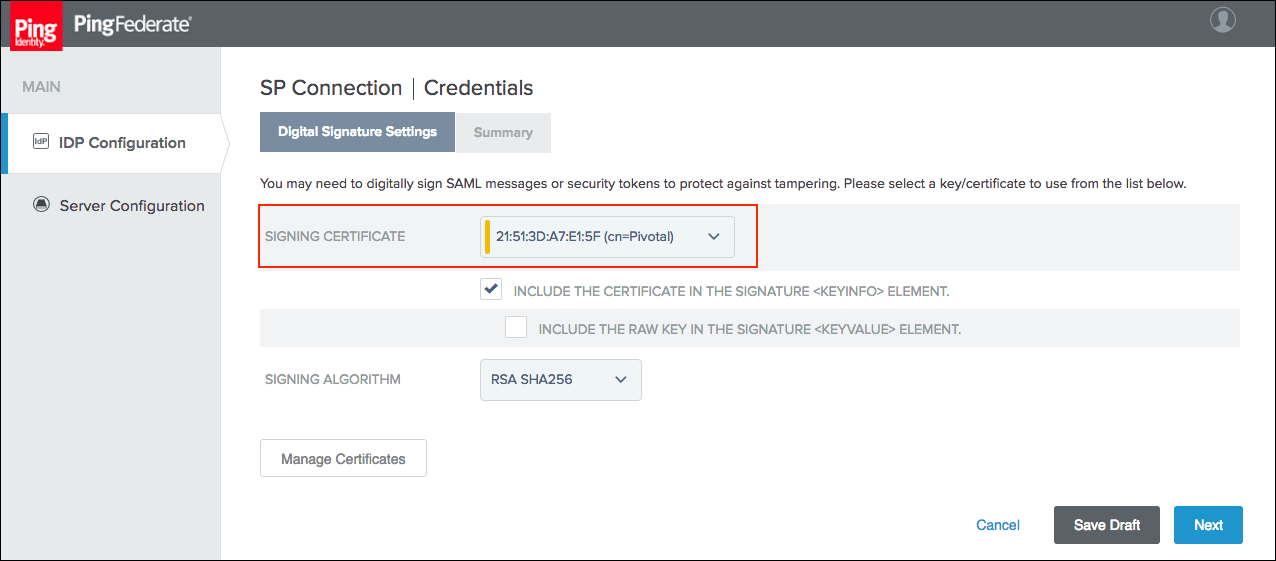
    The Credentials section within the IdP Configuration tab within the PingFederate UI.
There are two tabs across the top. The Digital Signature Settings tab is selected.
Below is the text SIGNING CERTIFICATE and next to it is a dropdown.
Below is the selected checkbox INCLUDE THE CERTIFICATE IN THE SIGNATURE  ELEMENT."
Below that is the unselected checkbox INCLUDE THE RAW KEY IN THE SIGNATURE  ELEMENT."
Below is the text SIGNING ALGORITHM and next to it is a dropdown with the option RSA SHA256"
selected. In the bottom left is the Manage Certificates button.
At the bottom right are Cancel, Save Draft, and Next buttons.

  3. Click Done on the Summary tab.

  4. Click Next on the Credentials tab.

  5. Select Active for the Connection Status on the Activation & Summary tab and click Save.

  6. Click Manage All under SP Connections.

  7. Click Export Metadata for the desired service provider connection.

  8. Choose a Signing Certificate on the Metadata Signing tab and click Next.

  9. Click Export on the Export & Summary tab and click Done.

check-circle-line exclamation-circle-line close-line
Scroll to top icon