


This topic tells you how admins manage Single Sign‑On for VMware Tanzu Application Service service plans.
Single Sign‑On for VMware Tanzu Application Service is a multi-tenant service, which enables a deployment to host multiple tenants as service plans. Each service plan can have its own admins, apps, and users. This lets enterprises isolate access by using separate plans. For example, the following tenants might require separate plans:
-
Business units and geographical locations
-
Employees, consumers, and partners
-
Development, staging, and production instances
You may also want to configure an Single Sign‑On as an OpenID Connect (OIDC) identity provider. For more information, see Plan-to-Plan OIDC Integration Guide.
Create or Edit Service Plans
Admins can create new Single Sign‑On service plans at any time from the SSO Operator Dashboard. You can use the SSO Operator Dashboard to create and configure service plans at any time. You must create at least one plan for any service before your apps can use it.
-
Log into the SSO Operator Dashboard at
https://p-identity.SYSTEM-DOMAINusing your User Account and Authentication (UAA) admin credentials. You can find these credentials in the VMware Tanzu Application Service for VMs tile in Tanzu Operations Manager in the Credentials tab. -
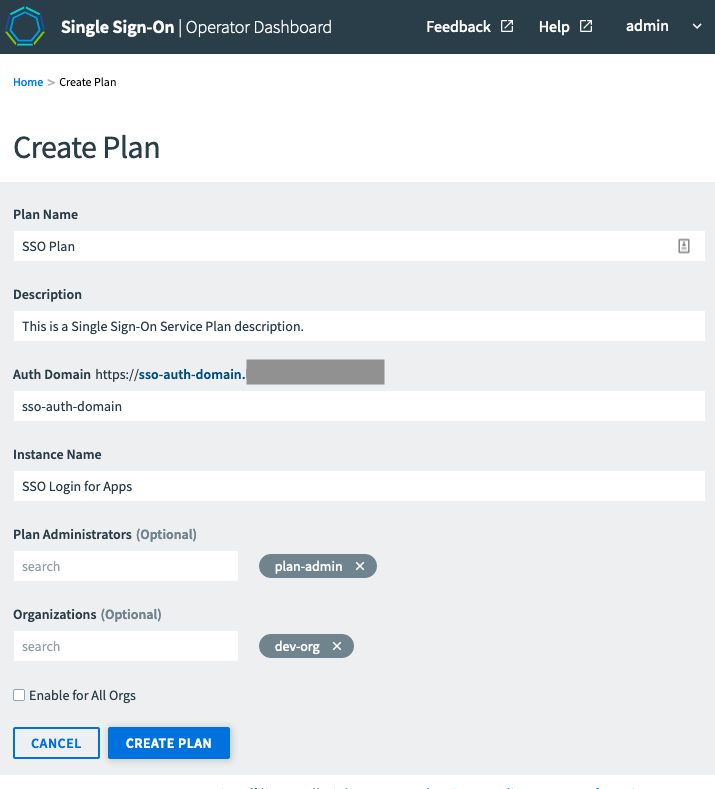
Click Create Plan on the SSO Operator Dashboard to create a new Single Sign‑On service plan.
-
Enter a Plan Name.
-
Enter a Description to appear as a plan feature in the Services Marketplace.
-
Enter an Auth Domain to be the hostname where users authenticate to access apps covered by the service plan.
-
Enter an Instance Name to appear on the login page and in other user-facing content, such as email communications.
-
Add Plan Administrators. These users can view the plan and manage identity providers.
You cannot add system operators to this list. System operators do not appear in this list because they already have Plan Administrator privileges.
-
Under Organizations, select specific orgs in your deployment that can access your Single Sign‑On service plan, or select Enable for all Orgs.
- If you select Enable for all Orgs the plan is available for use and displayed in the Services Marketplace for all developers in any org. This is only recommended for test plans to allow developers to experiment with Single Sign‑On.
- If you do not select any orgs, the plan is not available for use and it is not displayed in the Services Marketplace.
- If you select Enable for all Orgs the plan is available for use and displayed in the Services Marketplace for all developers in any org. This is only recommended for test plans to allow developers to experiment with Single Sign‑On.
-
Click Create Plan. Your new plan appears in the Services Marketplace in the orgs you selected. Users in those orgs view the plan either in Apps Manager or through the cf CLI by entering
cf marketplacein a terminal window.
Delete Service Plans
This action cannot be undone. Deleting a Single Sign‑On service plan removes from the Single Sign‑On database all of the configurations, identity providers, users, app configurations, and resources associated with the plan. It also deletes the associated service instances and service bindings. You must rebind any apps bound to the deleted service instances to new service instances.
-
Log in to the SSO Operator Dashboard at
https://p-identity.SYSTEM-DOMAINusing your UAA admin credentials. You can find these credentials in your TAS for VMs tile in Tanzu Operations Manager under the Credentials tab. -
Select the name of the plan you want to delete, and click the Edit Plan tab.
-
Select Delete at the bottom of the page.
-
In the popup that appears, click Delete Plan to confirm that you want to delete the plan.
Automate Service Plan Creation Using Single Sign‑On API
Admins can create new Single Sign‑On service plans using the Single Sign‑On API. This allows them to automate creating and deleting Single Sign‑On plans. VMware recommends creating a dedicated client for Single Sign‑On plan automation.
To automate service plan creation:
-
To install the UAA CLI, run:
gem install cf-uaac -
To target your Tanzu Operations Manager UAA server, run:
uaac target uaa.SYSTEM-DOMAIN -
To record your admin credentials, do one of the following:
- Obtain Admin Client Credentials from Tanzu Operations Manager.
- Obtain uaa:admin:client_secret from your deployment manifest.
-
To authenticate and obtain an access token for the admin client from the UAA server, run:
uaac token client get admin -s ADMIN-CLIENT-SECRETWhere
ADMIN-CLIENT-SECRETis the admin credentials you recorded in step 3.UAAC stores the token in
~/.uaac.yml. -
To create an automation client with UAAC, run:
uaac client add AUTO-CLIENT-ID --secret AUTO-CLIENT-SECRET \
--authorized_grant_type client_credentials \
--authorities "cloud_controller.admin,zones.write,scim.write,scim.read"
Where:
AUTO-CLIENT-IDis the name of the automation client you want to use.AUTO-CLIENT-SECRETis the secret for the automation client you want to use.
-
To obtain an access token for your automation client, run:
uaac token client get AUTO-CLIENT-ID -s AUTO-CLIENT-SECRETWhere:
AUTO-CLIENT-IDis the name you provided in step 5.AUTO-CLIENT-SECRETis the secret you provided in step 5.
-
To obtain your automation access token, run:
uaac contextFor example:
$ uaac context [1]*[my-auto-client] client_id: my-client-id access_token: aBcdEfg0hIJKlm123.e token_type: bearer expires_in: 43200 scope: cloud_controller.admin zones.write scim.write scim.read jti: 91b3-abcd1233 -
Record the
access_tokenvalue from the output of the previous step. -
To create a new Single Sign‑On plan and record the plan ID, run:
curl -X POST "https://sso-api.SYSTEM-DOMAIN/v1/plans" \
  -H "Authorization: Bearer TOKEN" \
  -H "Content-Type: application/json" \
  -d '{
    "name": "PLAN-NAME",
    "description": "DESCRIPTION",
    "auth_domain": "AUTH-DOMAIN",
    "instance_name": "INSTANCE-NAME"
  }'
Where:
TOKENis the access token you recorded from the previous step.PLAN-NAMEis the name of your plan.DESCRIPTIONis the text you want to appear as a plan feature in the Services Marketplace.AUTH-DOMAINis the Auth Domain you entered in Create or Edit Service Plans.INSTANCE-NAMEis the name of your instance. This text appears in user-facing content, such as email communications.
The above command returns output similar to the following:
HTTP/1.1 201 Created Content-Type: application/json { "id": "1", "name": "some-plan-name", "description": "some-description", "auth_domain": "some-auth-domain", "instance_name": "some-instance-name" } -
Record the
idvalue from the output of the previous step.
Alternatively, you can save the plan ID, by parsing the output from the previous step. For example, you can run:$PLAN-ID=$(curl -X POST "https://sso-api.SYSTEM-DOMAIN/v1/plans" \ -H "Authorization: Bearer TOKEN" \ -H "Content-Type: application/json" \ -d '{ "name": "PLAN-NAME", "description": "DESCRIPTION", "auth_domain": "AUTH-DOMAIN", "instance_name": "INSTANCE-NAME" }' | jq -r '.id')Using
curlinstead ofuaac curlin the example to facilitates parsing the response for ID below. -
To add plan administrators, who can view the plan and manage identity providers, run the following command for each plan administrator:
uaac member add zones.PLAN-ID.admin USER-NAMEWhere:
PLAN-IDis theidrecorded in the previous step.USER-NAMEis the username of the plan administrator you are adding.
-
To authenticate as your automation client, run:
cf api api.SYSTEM-DOMAIN
cf auth AUTO-CLIENT-ID AUTO-CLIENT-SECRET --client-credentials
Where:
AUTO-CLIENT-IDis the name you provided in step 5.AUTO-CLIENT-SECRETis the secret you provided in step 5.
-
To give orgs access to your Single Sign‑On plan, do one of the following:
-
To give specific orgs access to your Single Sign‑On plan, run the following command for each org:
cf enable-service-access p-identity -p AUTH-DOMAIN -o ORG-NAMEWhere
ORG-NAMEis the name of the org you want to have access to your Single Sign‑On plan. -
To give all orgs access to your Single Sign‑On plan, run:
cf enable-service-access p-identity -p AUTH-DOMAINVMware recommends giving all orgs access only to your Single Sign‑On plans for test plans to enable developers to experiment with Single Sign‑On.
-
For more information on how you can manage Single Sign‑On plans using the Single Sign‑On API, see the Single Sign‑On API documentation.
Create a New Admin for Single Sign‑On
Admins can grant users additional permissions to allow them to manage Single Sign‑On plans. These permissions let users act as admins.
If you use external group mappings, create group mappings for these scopes instead. If you follow the below procedure, permissions are directly assigned to your users. For more information, see Grant Admin Permissions to an External Group (SAML or LDAP).
To create a new admin:
-
To install the UAA CLI, run:
gem install cf-uaac -
To target your Tanzu Operations Manager UAA server, run:
uaac target uaa.SYSTEM-DOMAIN -
To record your admin credentials, do one of the following:
- Obtain Admin Client Credentials from Tanzu Operations Manager.
- Obtain uaa:admin:client_secret from your deployment manifest. UAAC stores the token in
~/.uaac.yml.
-
To authenticate and obtain an access token for the admin client from the UAA server, run:
uaac token client get admin -s ADMIN-CLIENT-SECRETWhere
ADMIN-CLIENT-SECRETis the admin credentials you recorded in step 3. -
To allow users to manage Single Sign‑On plans, run:
uaac member add cloud_controller.admin ADMIN-USERNAME
uaac member add scim.read ADMIN-USERNAME
uaac member add zones.read ADMIN-USERNAME
uaac member add zones.write ADMIN-USERNAME
Where
ADMIN-USERNAMEis the username of the user you want to make an admin.
