


Install Tanzu Data Hub
This page explains how to use the Tanzu Data Hub installer (TDH) CLI to install and delete a Tanzu Data Hub control plane. It serves as a walkthrough of TDH control plane installation, deletion and status flow.
Installing a control plane is the first step to using Tanzu Data Hub. From a control plane, platform admins can create Tanzu Data Hub data-planes that enable users to provision service instances.
Once a control plane is installed, platform admins can use Tanzu Data Hub to create data planes that enable users to provision and use database service instances.
Prerequisites
To install and run Tanzu Data Hub, you need:
- Kubernetes Environment: A vSphere with Tanzu or OpenShift Kubernetes environment running two or more clusters, each with at least three worker nodes, with access information. To know the list of permissions required on Kubernetes cluster, see Permissions for RBAC on Kubernetes:
- vSphere: A vSphere account with the Tanzu Kubernetes Grid (TKG) service installed, its access credentials, and its URL or FQDN.
- OpenShift: OpenShift clusters with their console access credentials and a
kubeconfigfile that points to the clusters. - Tanzu Kubernetes Grid multicloud (TKGm): Tanzu Kubernetes Grid multicloud (TKGm) clusters with their
kubeconfigthat points to the clusters
- Image registry (Offline only): For air-gapped or other internet-restricted environments, an image registry and the URL and credentials needed to access it.
- Supported registry types are Harbor, JFrog, and GAR (Google Artifact Registry).
- Online environments use a GAR registry maintained by VMware.
- Domain Name: A domain name to use for your Tanzu Data Hub and the service instances that it creates, and access to a DNS server that manages the domain name and can publish NS records based on the domain name.
- Storage Class: A storage class with minimal
read write once (RWO)mode support. - Email Account (Optional): An email account with an SMTP server. We can configure SMTP post install.
- Workstation: A local machine running Windows, Linux, or MacOS with an AMD or ARM processor, and has access to the Kubernetes cluster that will host the TDH control plane.
- CA certificate (Optional): A CA certificate, self-signed or from a public certificate authority. If you do not provide a CA certificate, Tanzu Data Hub creates and uses its own self-signed certificate
Install Tanzu Data Hub
To install Tanzu Data Hub, you:
- Download and install the Tanzu Data Hub installer CLI on your local machine.
- Run the installer CLI, in either UI mode or file mode.
These steps are described in the sections below.
Install the Installer CLI
To download and install the Tanzu Data Hub installer CLI on your local machine:
-
Navigate to the Tanzu Data Hub page on Broadcom Support.
-
In the Release drop-down, select 1.1.0.
-
Download and unpack the file listed as Tanzu Data Hub installer CLI.
-
Navigate to the
tdh-installersubfolder under the folder that you unpacked.cd tdh-installer -
Make the CLI available to the system:
-
Linux: Install the binary to
/usr/local/bin:sudo install tdh-installer-linux-amd64 /usr/local/bin/tdh-installer -
MacOS: Install the binary to
/usr/local/bin:sudo install tdh-installer-darwin-amd64 /usr/local/bin/tdh-installer -
Windows:
- Create a new
Program Files\tdh-installerfolder. - In the unpacked
clifolder, locate and copy thetdh-installer-windows_amd64.exefile into the newProgram Files\tdh-installerfolder. - Rename
tdh-installer-windows-amd64.exetotdh-installer.exe. - Right-click the
tdh-installerfolder, select Properties > Security, and make sure that your user account has the Full Control permission. - Use Windows Search to search for
env. - Select Edit the system environment variables and click the Environment Variables button.
- Select the
Pathrow under System variables, and click Edit. - Click New to add a new row and enter the path to the
tdh-installerCLI.
- Create a new
-
At the command line in a new terminal, initialize the Tanzu Data Hub installer by running the install command:
tdh-installer install
Installer Main Menu
The main menu for the tdh-installer CLI shows the commands that it supports:
Welcome to Tanzu Data Hub Control Plane Installer
This CLI will support the operations required for managing Tanzu Data Hub Control Plane
Following operations are supported as a part of this CLI:
- install
- status
- delete
- migrate-image

For more details about each command type tdh-installer <Command> --help

Usage:
tdh-installer [command]

Aliases:
tdh-installer, tdh, tdh-installers

Available Commands:
completion    Generate the autocompletion script for the specified shell
delete        To delete the environment of Tanzu Data Hub Control Plane
help          Help about any command
install       To install Tanzu Data Hub Control Plane
migrate-image To migrate the bundles used by Tanzu Data Hub to a target repository
status        To get the status of installation of Tanzu Data Hub Control Plane
version       To display the installer version of Tanzu Data Hub Control Plane

Flags:
-h, --help   help for tdh-installer

Use "tdh-installer [command] --help" for more information about a command.
Each command comes with its own functionality and a help menu displaying its usage and examples.
Run the Installer
To install a Tanzu Data Hub control plane you run the tdh-installer install command.
The installer runs in two modes, described in the sections below:
| Mode | Specified by | Description | Command |
| UI mode | --ui |
Launches a GUI that prompts for configuration values interactively. | tdh-installer install –ui |
| File mode | -f FILENAME |
Reads configuration values from a YAML configuration file. | tdh-installer install -f <file_path> |
Save configuration values: In UI mode, after you enter a set of configuration values, you can save them out as a YAML configuration file to use or modify for running tdh-installer install in file mode later.
If you run tdh-installer install without the --ui or -f option, the installer prompts you for your choice.
The tdh-installer install -h output shows the install options:
./tdh-installer install --help

This command is used for installing Tanzu Data Hub Control Plane.

There are two modes for providing inputs to this command:
- file-mode: to provide input via a yaml file
- ui-mode: Launch an interactive UI from which the user can provide the inputs necessary to create Tanzu Data Hub Control Plane

You can chose the input mode on prompt or can select the input mode by passing with flags

Usage:
tdh-installer install [flags]

Examples:

# To provide inputs from a yaml file directly for installation
tdh-installer install --file ~/.tdh/controlplaneconfigs/config-file-1.yaml

# To launch an interactive UI to provide the inputs necessary to create Tanzu Data Hub Control Plane
tdh-installer install --ui

Flags:
-b, --bind string      Specify the IP and port to bind the Kickstart UI against (e.g. 127.0.0.1:8080). (default "127.0.0.1:8080")
    --browser string   Specify the browser to open the UI on. Use 'none' for no browser. Defaults to OS default browser. Supported: ['chrome', 'firefox', 'safari', 'ie', 'edge', 'none']
-f, --file string      Configuration file to create tanzu data hub control plane
-h, --help             help for install
-u, --ui               Launch interactive tanzu data hub control plane provisioning UI
Install Tanzu Data Hub in UI Mode
In UI mode, the Tanzu Data Hub installer takes you through a wizard interface that prompts for configuration values, with some choices retrieved from your vSphere environment. The installer UI works with all major browsers.
To use the installer in UI mode:
-
Run
tdh-installer install --uitdh-installer install --uiYou can also run
tdh-installer installwith no options, and specify the UI option at the CLI prompt:***************************************************** Welcome to Tanzu Data Hub Control Plane Installer ***************************************************** 1. UI 2. From File Please select a valid installation method (1 | 2) - 1 -
Select
1. UI. The command outputs a confirmation like,Serving kickstart UI at http://127.0.0.1:8080and your default browser opens with the installer UI: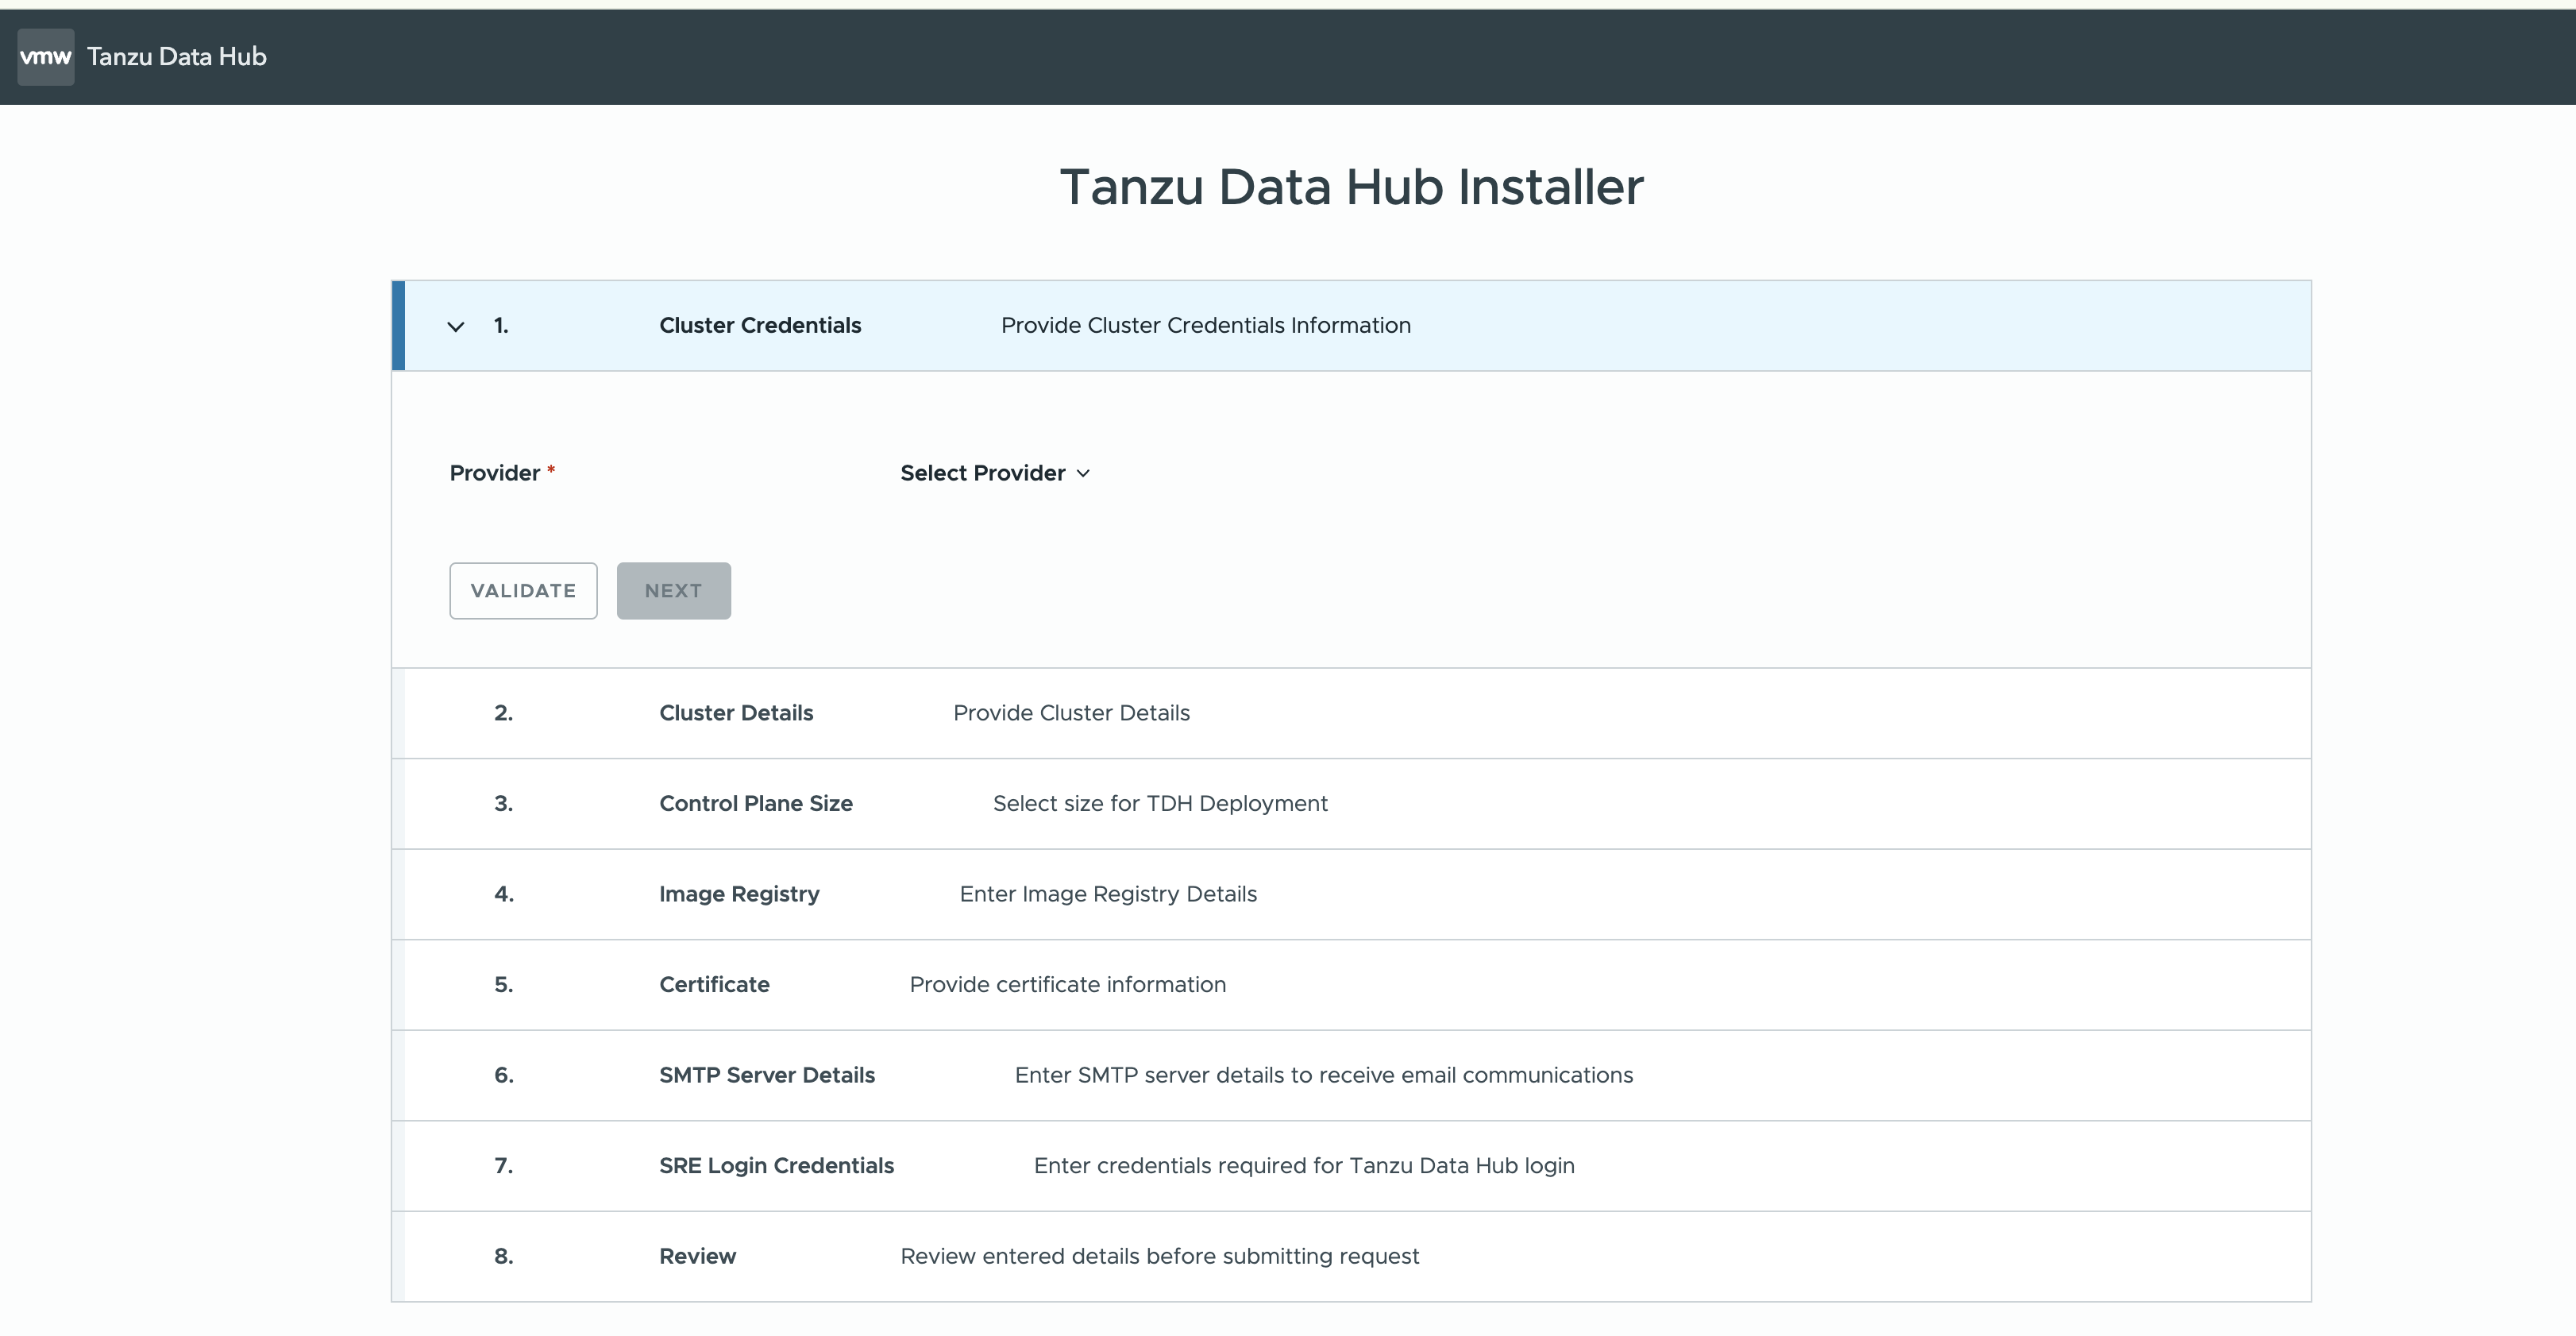
-
Cluster Credentials: Select the provider, Tanzu Kubernetes Grid or OpenShift or Tanzu Kubernetes Grid multicloud (TKGm):
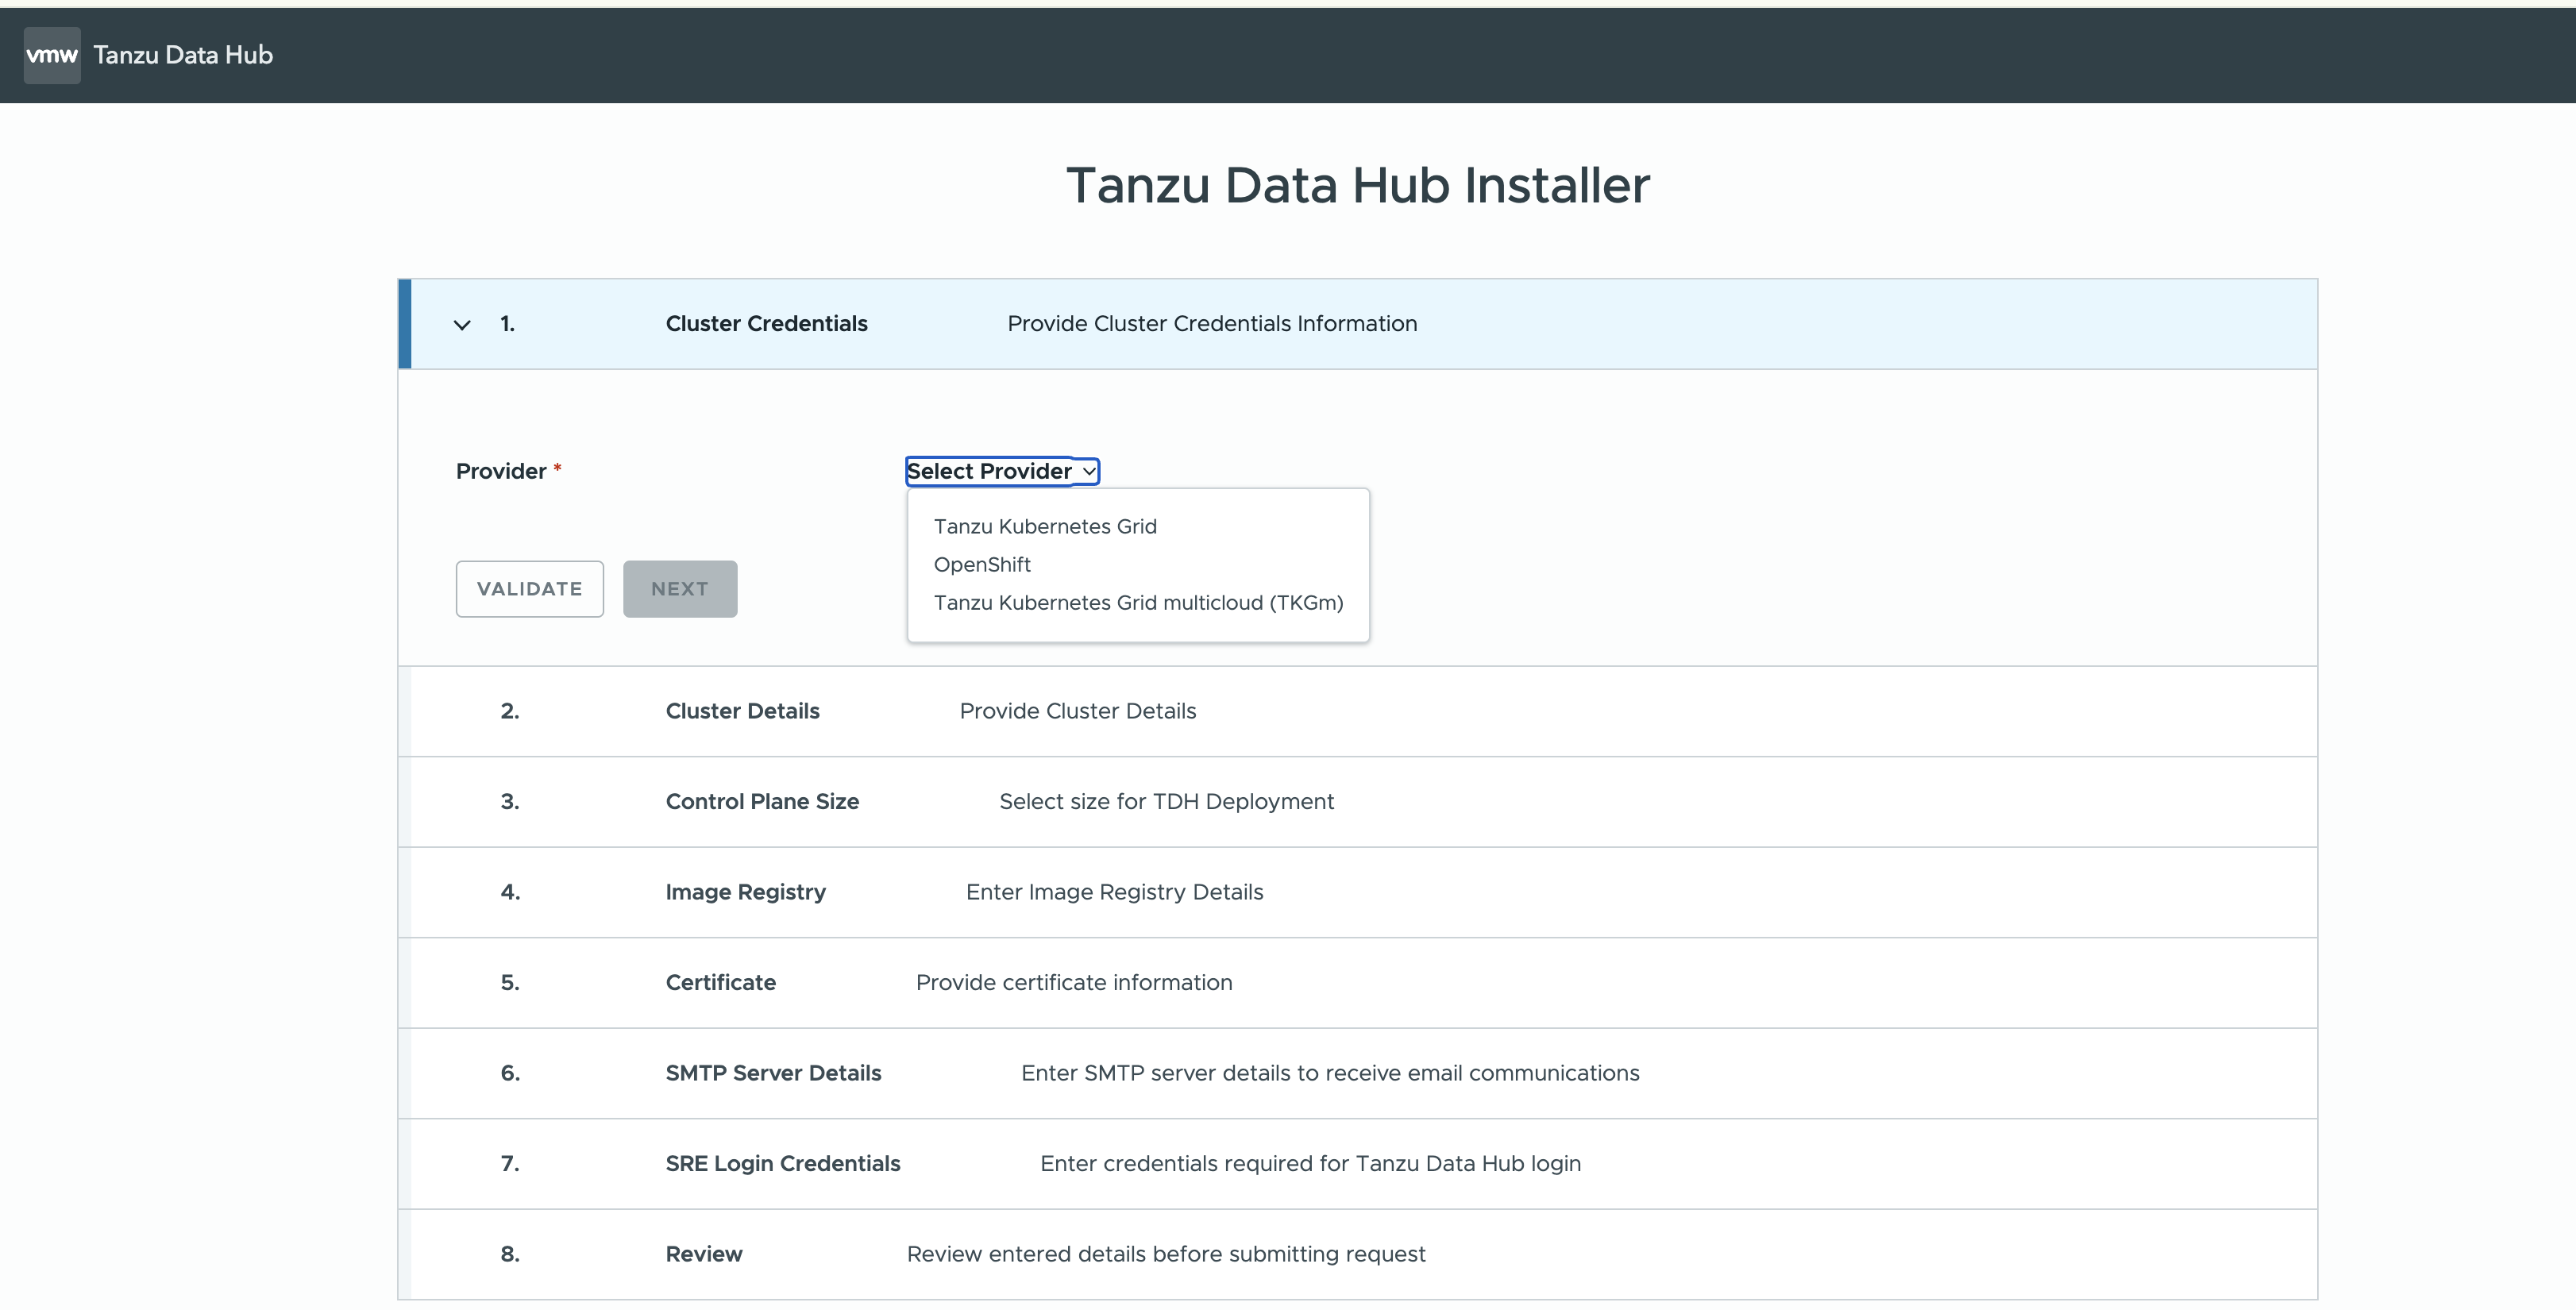
-
Input fields open below based on the provider. For TKG, you can validate with vCenter Credentials or Kubeconfig. For OpenShift and Tanzu Kubernetes Grid multicloud (TKGm), you validate with Kubeconfig:
-
vCenter Credentials: Enter your vCenter credentials and click Validate:

-
Kubeconfig: Run
kubectl config set-contextto set your current context to the cluster that you are deploying the TDH control plane to, and then copy-paste yourkubeconfigfile into the textbox.Note
Installation cannot proceed if
current-contextis not set in thekubeconfig.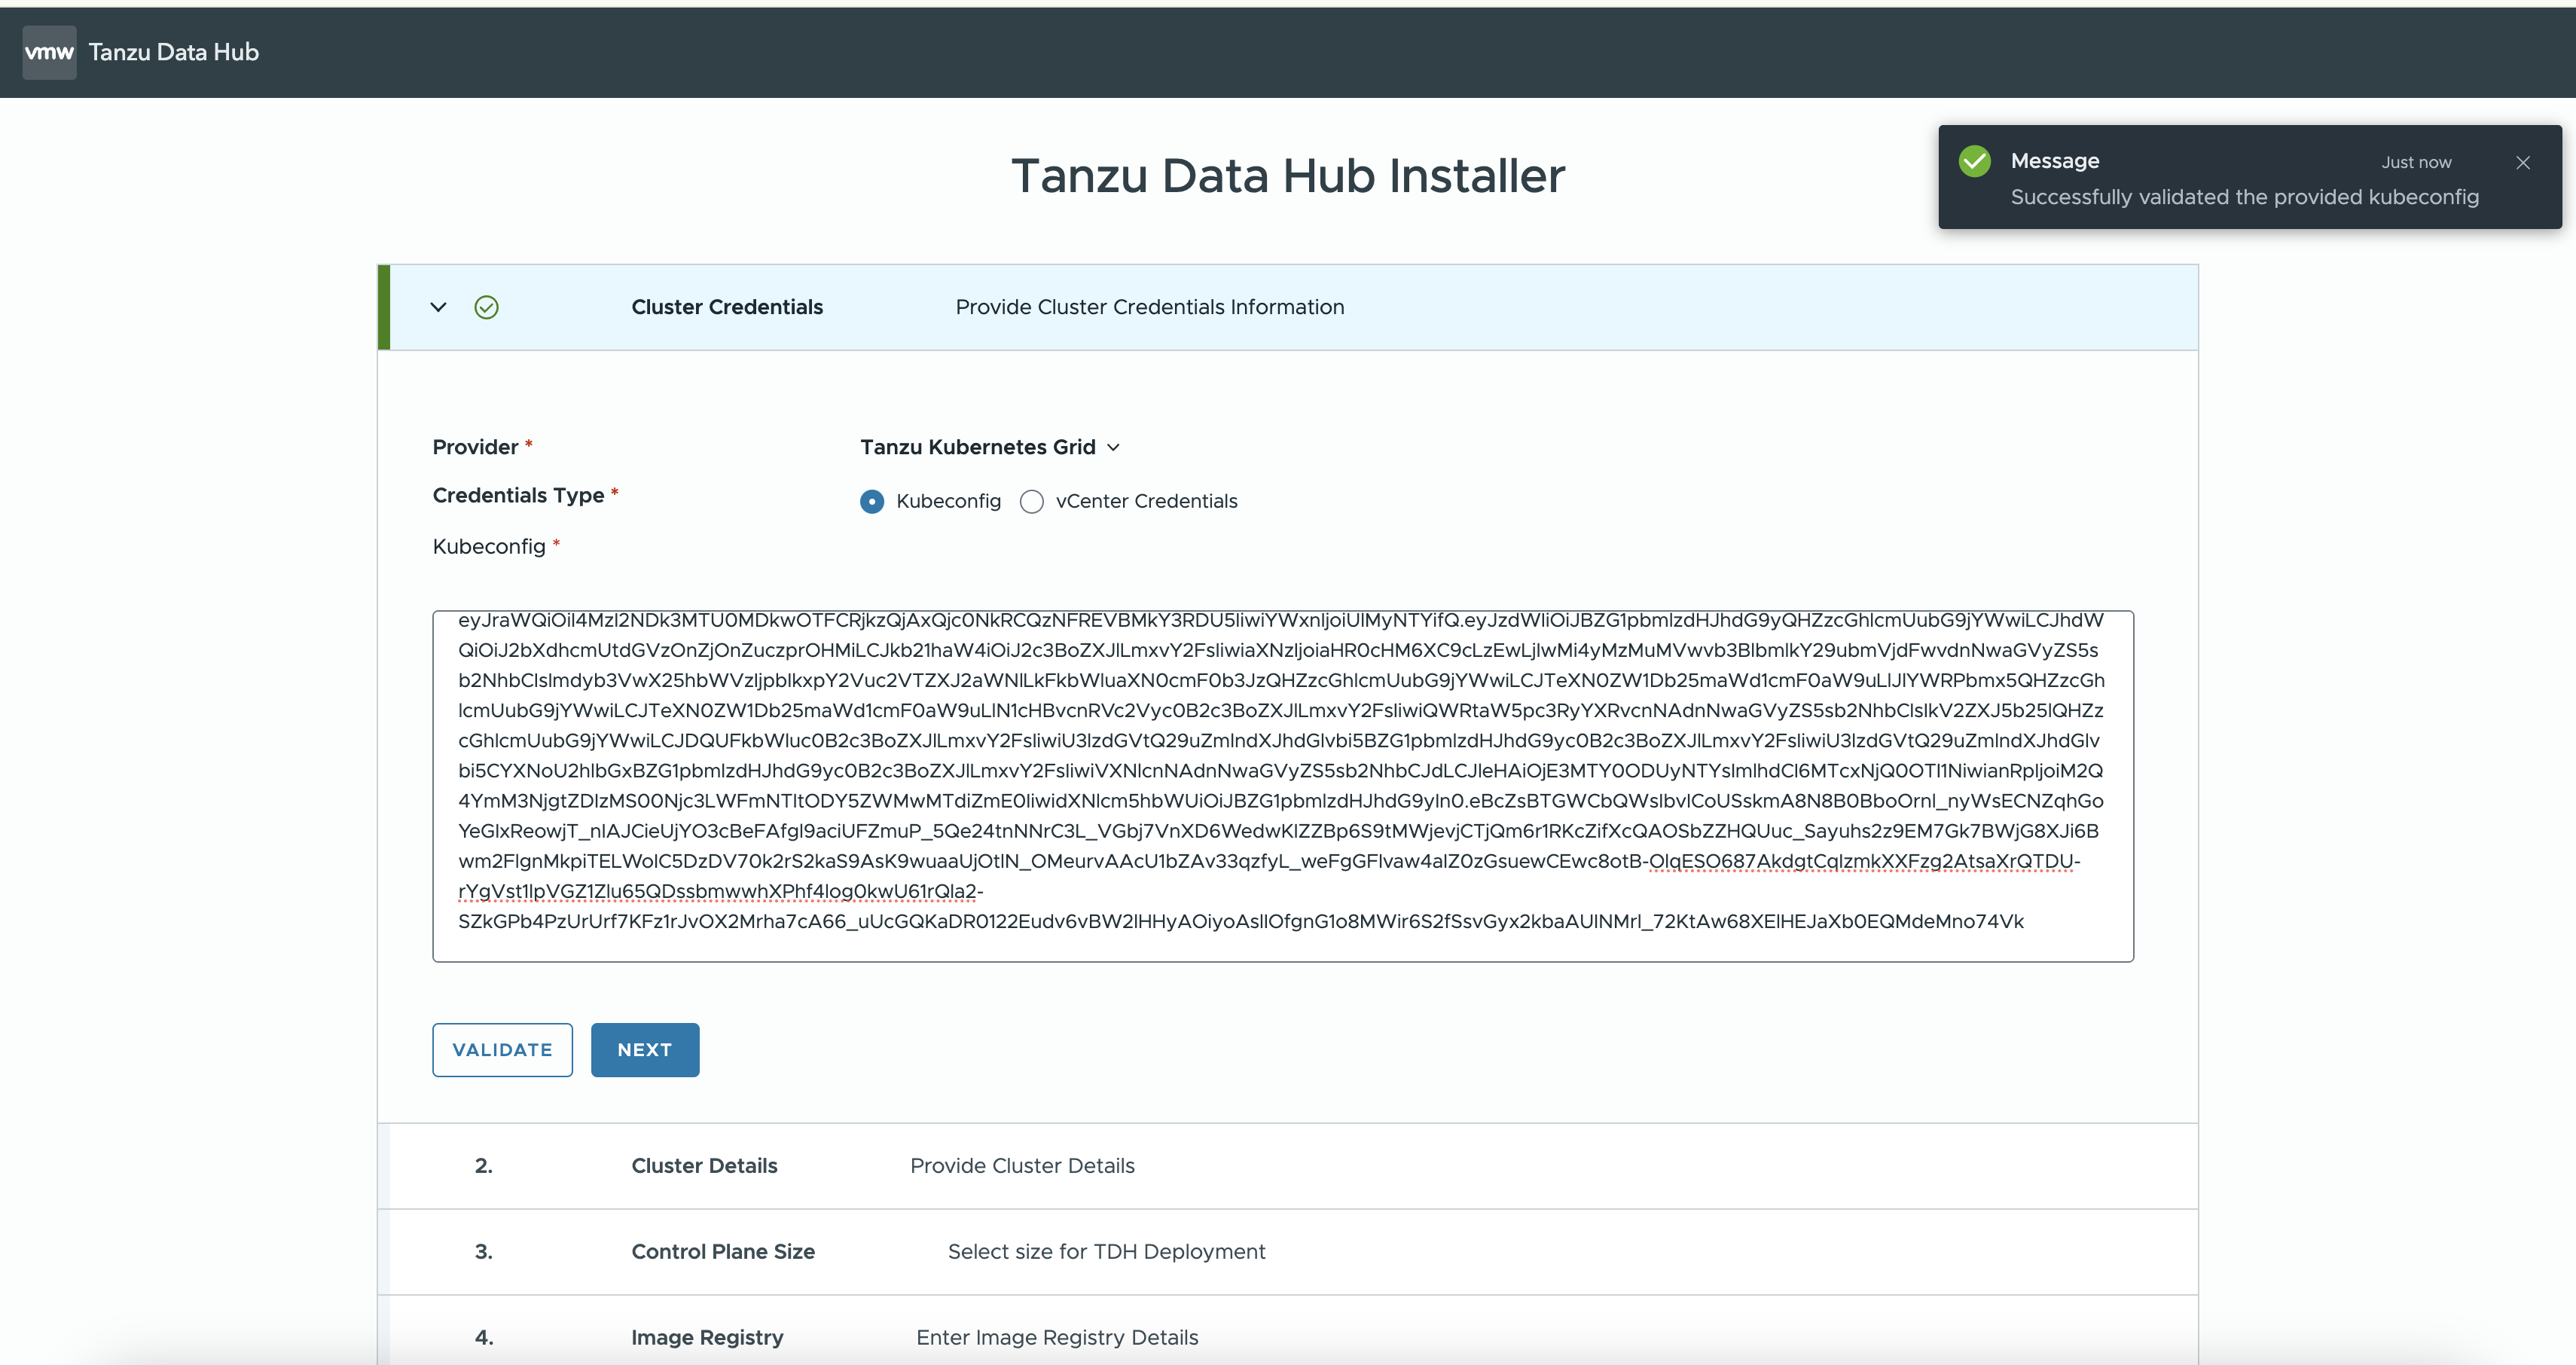
After validation completes, click Next.
-
-
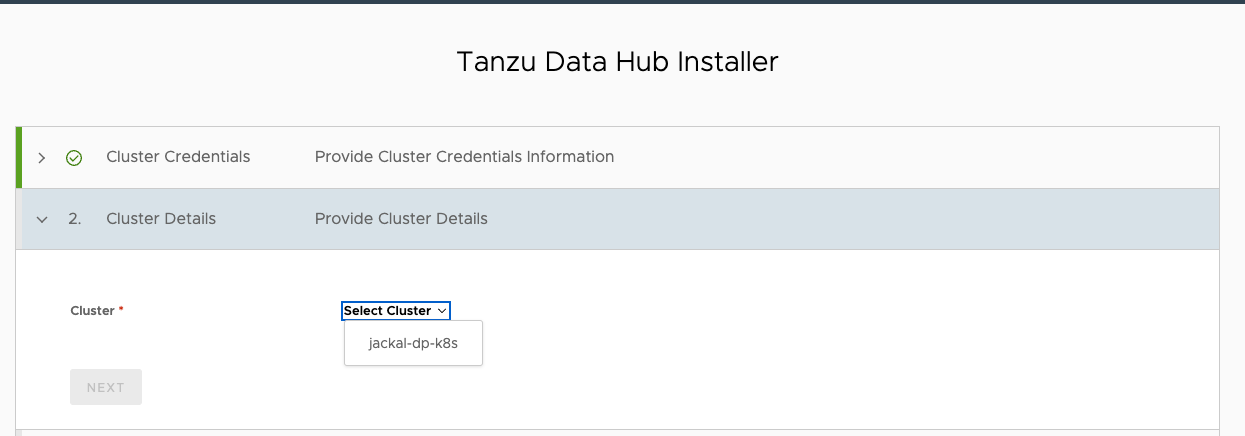
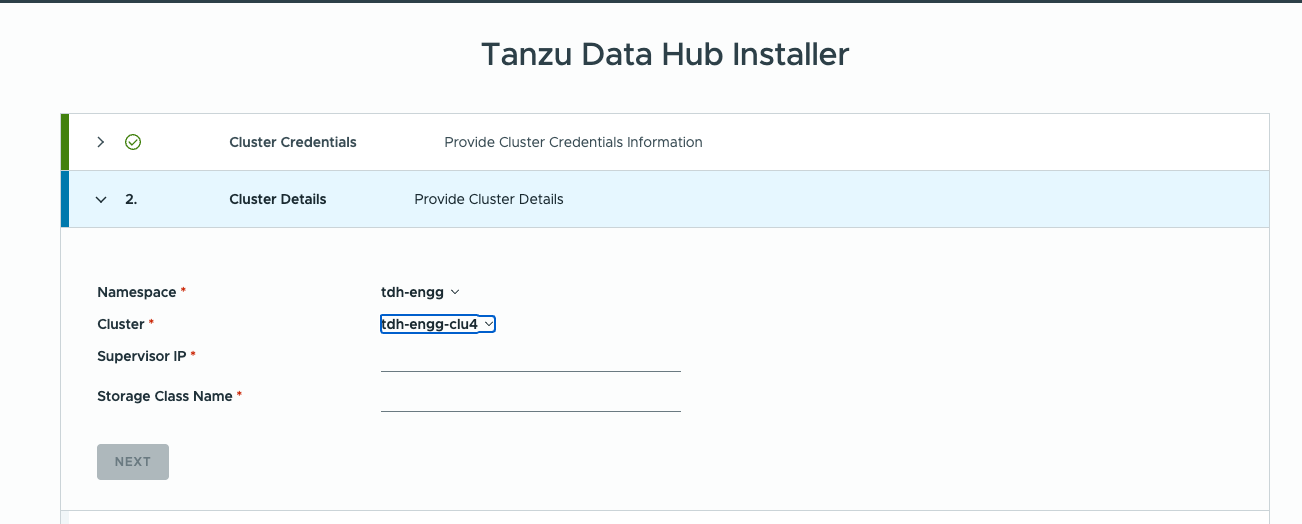
Cluster Details: Select the cluster that you are deploying the control plane to, based on the type of cluster credentials you used:
-
vCenter: Select the vSphere Namespace that hosts the cluster, wait for its cluster list to populate, and then select the cluster:
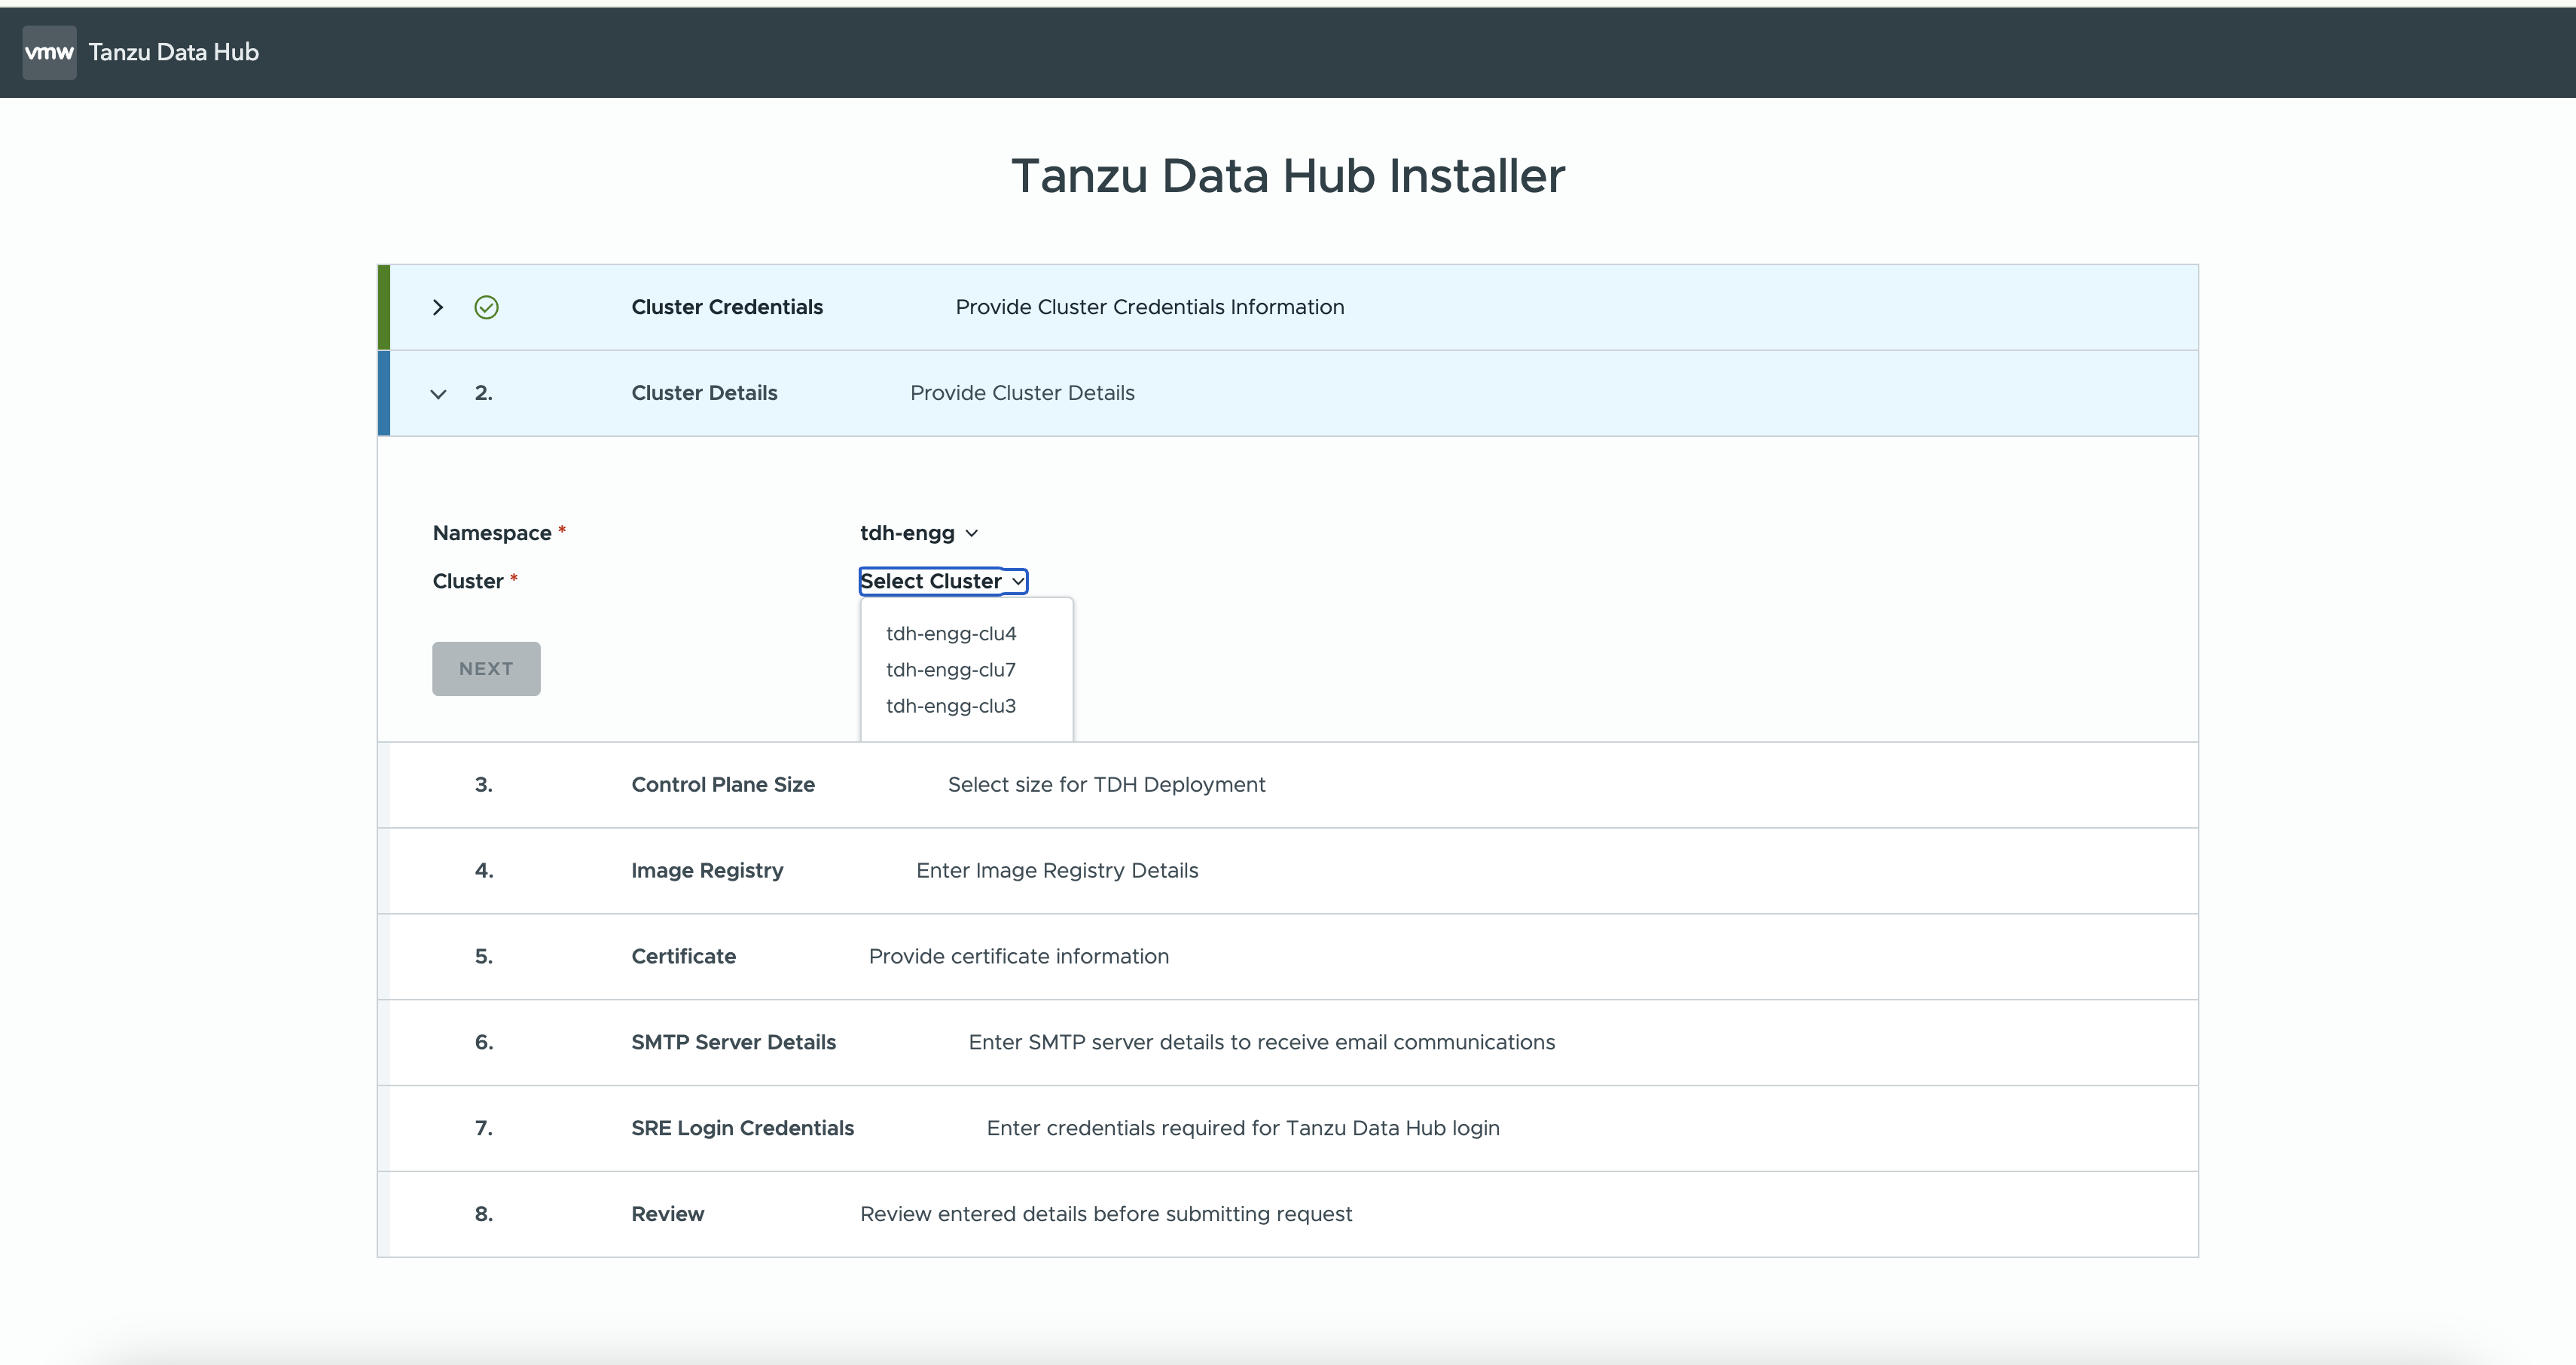
-
Kubeconfig: Select the cluster:
-
-
In the case of vCenter Credentials, enter the supervisor ip and storage class name. In the case of kubeconfig, enter the storage class name as shown below and click Next:
OR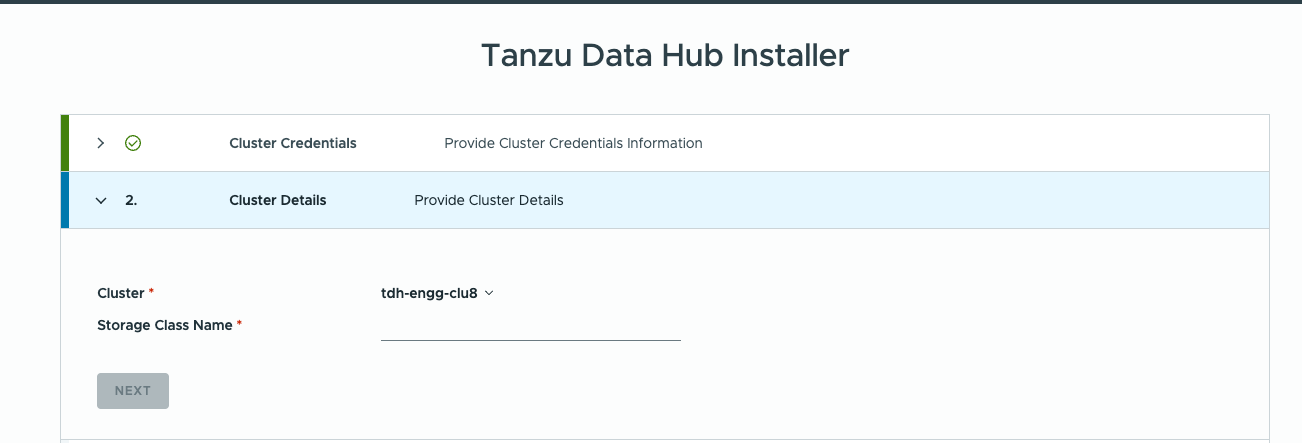
-
Control Plane Size: Select the size of the control plane that you want to deploy, and click Next:
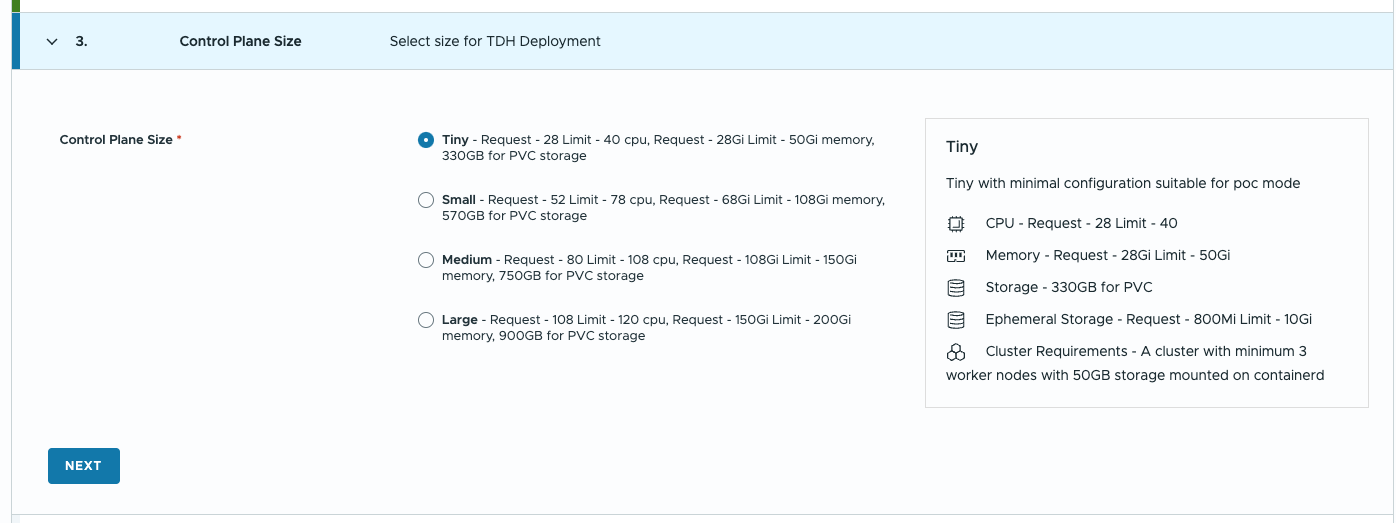
Note: We require a minimum cluster having 3 worker nodes with the minimal capacity as specified for the sizes in order for a successful Control Plane Installation.
Example: For tiny size: We require a minimum 25 CPUs and 28Gi of memory and the resource requirements can go upto 38 CPUs and 50Gi of memory. For small size: We require a minimum 52 CPUs and 68Gi of memory and the resource requirements can go upto 78 CPUs and 108Gi of memory.
-
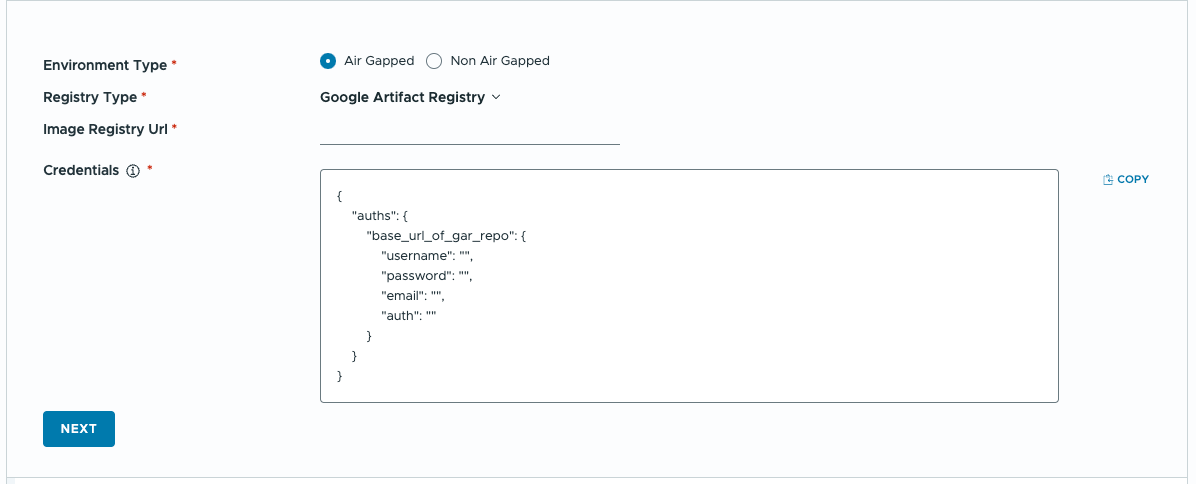
Image Registry: Choose Environment Type, either Air-Gapped or Non Air-Gapped, and choose your image registry type, JFrog, Harbor or GAR (Google Artifact Registry).
-
Enter access credentials for your image registry as JSON. Click Copy for a JSON template, formatted for your provider type, that you can paste into the textbox and fill in. For an air-gapped or otherwise offline registry, enter its URL. Click Next:
Note: For a non air-gapped environment, select registry type as Google Artifacts Registry. We can get the credentials json from the following link GCR-CREDS.
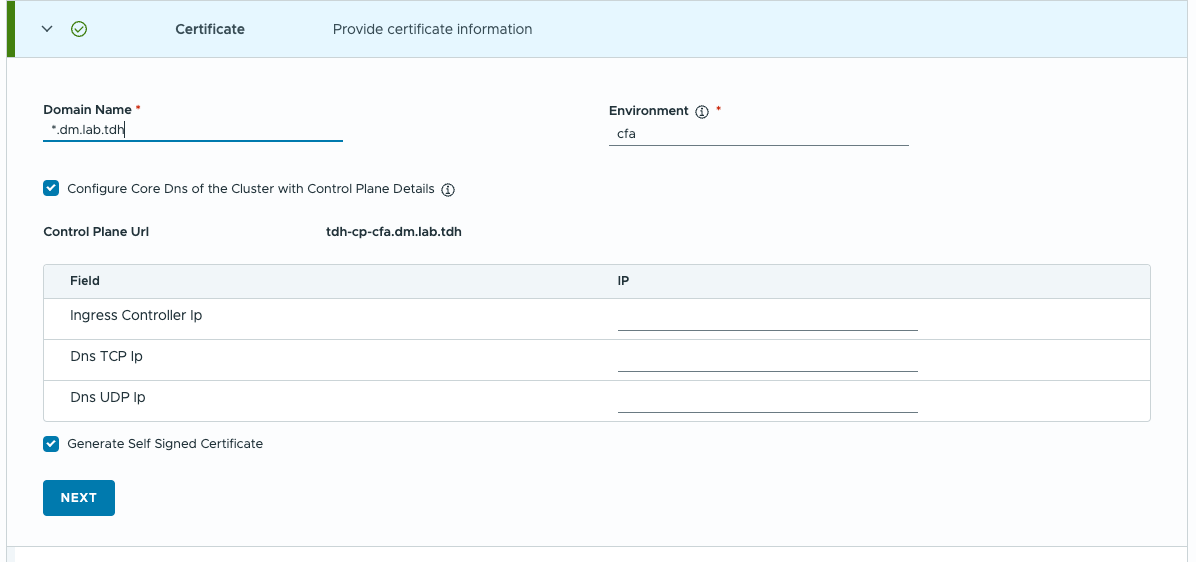
- Certificate: Enter the domain for your certificate, and custom IPs if needed. To have the TDH installer generate a self-signed certificate, enable the Generate Self-Signed Certificate checkbox. Otherwise, paste your CA, certificate, and key into the textboxes below:
 You can enter the certificates in PEM encoded format as shown
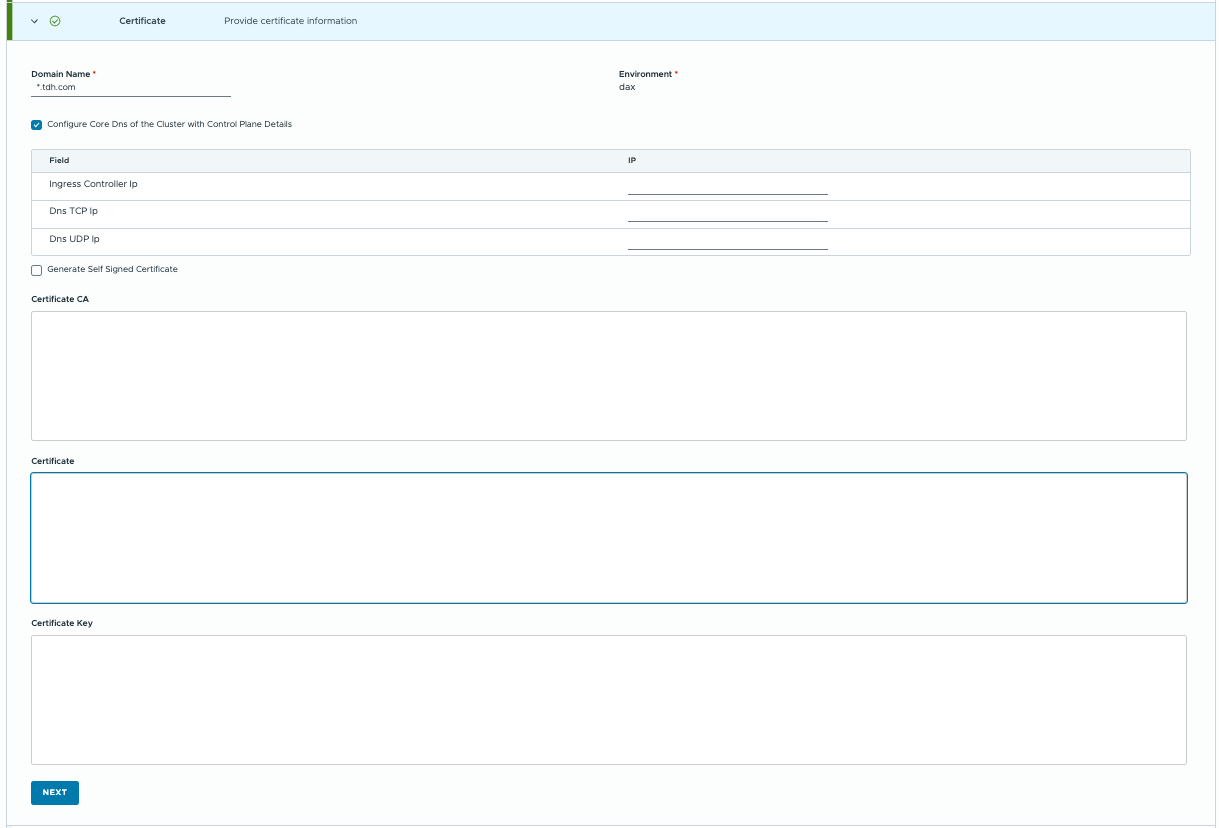
Configure Core Dns: This checkbox is used to enable communication pods of the control plane and the data plane with control plane pods. Disable this only when the TDH base URL has a forwarder set in corporate DNS or for some specific use case.
-
From the top of the pane, record the Control Plane Url value; this is the URLs at which the TDH control plane will be hosted. Click Next.
-
SMTP Server Details: TDH invites and manages user accounts via email. Enter the SMTP details of an email account for TDH to use. This is optional and we can check the
Skip SMTP Detailsand Click Next: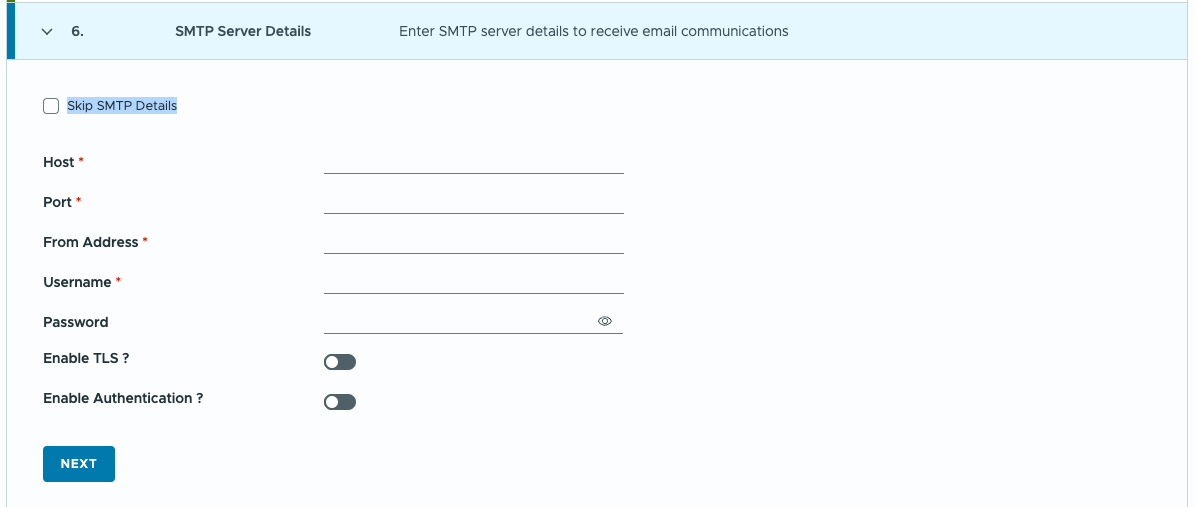
-
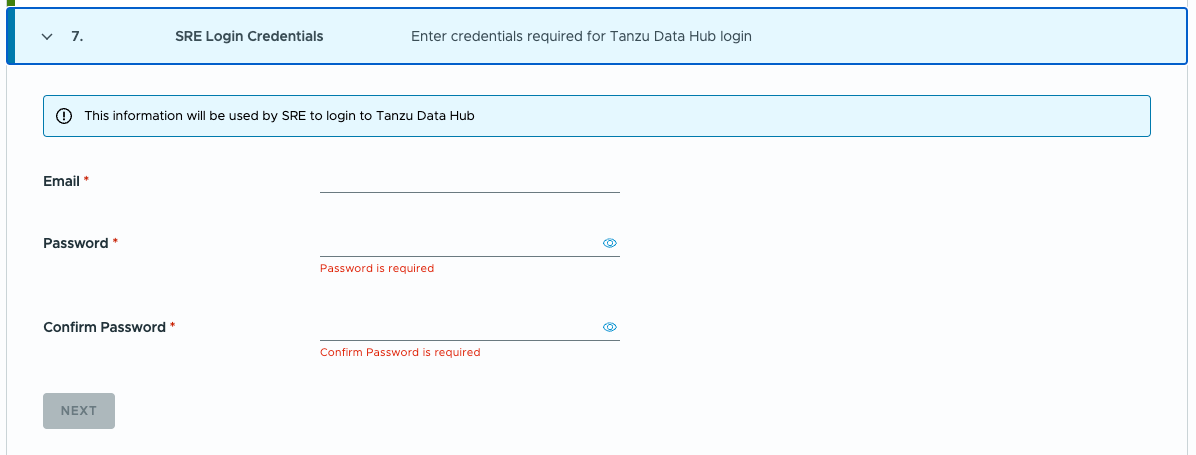
SRE Login Credentials: Enter an email address and password for the first SRE user, who will log into TDH and add other users. Click Next:
-
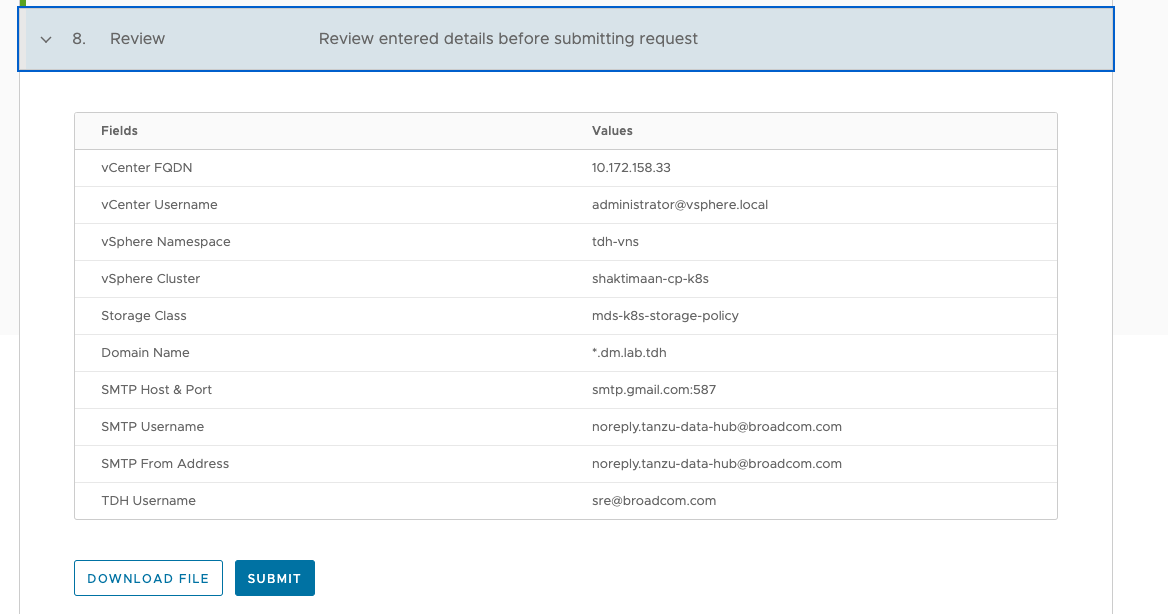
Review: Review the main configuration fields and values provided on the previous panes. From this pane, you have two choices:
- Download File saves the configuration as a YAML file on your local machine. Later you can create a Tanzu Data Hub control plane based on this configuration by passing the file to
tdh-installer install -f. - Submit immediately starts creating a Tanzu Data Hub control plane based on the configuration.

After you click Submit, you can see installation progress in the CLI:
- Download File saves the configuration as a YAML file on your local machine. Later you can create a Tanzu Data Hub control plane based on this configuration by passing the file to
Install Tanzu Data Hub In File Mode
To install Tanzu Data Hub control plane by running the installer in file mode:
-
Create a configuration file. You can use or modify a configuration file written out previously by the installer running in UI mode, and sample code is below: Sample template can also be found in the file Sample Template
-
Pass the file to the
-foption of thetdh-installer installcommand:tdh-installer install -f TDH-CONFIGYou can also run
tdh-installer installwith no options, and specify2. From Fileand the file path at the CLI prompts.After successful installation, the output will look something like this:
[*] Successfully Registered SRE User To Control Plane
[IDP: 10.172.158.73  idp-dev.tdh.kr.com]
[Control Plane: 10.172.158.71  tdh-cp-dev.tdh.kr.com]
[Operations Queue: 10.172.158.70  ops-queue-dev.tdh.kr.com]
Register below DNS Nameserver details for accessing from outside of cluster
[DNSServer TCP: 10.172.158.69]
[DNSServer UDP: 10.172.158.72]
[DNSSecondaryServer TCP: ]
[DNSSecondaryServer UDP: ]
[*] All Charts Deployed Successfully Service Ready to be Used
Monitor Installation Status
To get the status of the currently going installation,the status command is used. The help menu for delete is shown:
This command is used for fetching the status of the installation of Tanzu Data Hub Control Plane.
Usage:
  tdh-installer status [flags]
Examples:
tdh-installer status --id <ID>
Flags:
  -d, --details     To get the detailed status
  -h, --help        help for status
      --id string   Id of the installation of tanzu data hub control plane
For example, to retrieve detailed status of the installation, run:
tdh-installer status –id <ID> –details true
Delete an Installation
To delete the installation of Tanzu Data Hub Control Plane, delete command is used. The help menu for delete is shown:
./tdh-installer delete --help
This command is used for cleaning up the environment of Tanzu Data Hub Control Plane.

Usage:
  tdh-installer delete [flags]

Examples:

tdh-installer delete -f <FILE_PATH>
tdh-installer delete --username username --password password --fqdn fqdn --namespace VSphereNamespace --tkgClusterName tkgClusterName --tkgSupervisorIp tkgSupervisorIp
tdh-installer delete -u username -p password -i fqdn -n VSphereNamespace -t tkgClusterName -s tkgSupervisorIp


Flags:
  -f, --file string              Configuration file to delete tanzu data hub control plane
  -i, --fqdn string              VSphere FQDN
  -h, --help                     help for delete
  -n, --namespace string         VSphere Namespace
  -p, --password string          VSphere Password
  -t, --tkgClusterName string    TKG Cluster Name
  -s, --tkgSupervisorIp string   TKG Supervisor Ip
  -u, --username string          VSphere Username
Examples:
tdh-installer delete -f <file_path>and pass in the configuration file.tdh-installer delete --username username --password password --fqdn fqdn --namespace VSphereNamespace --tkgClusterName tkgClusterName --tkgSupervisorIp tkgSupervisorIptdh-installer delete -u username -p password -i fqdn -n VSphereNamespace -t tkgClusterName -s tkgSupervisorIp
Check Installer Version
This command is used for checking the Tanzu Data Hub Control Plane Installer Version. The help menu for version is shown:
./tdh-installer version -h
This command is used to display the installer version of Tanzu Data Hub Control Plane.

Usage:
  tdh-installer version [flags]

Examples:

tdh-installer version


Flags:
  -h, --help   help for version
Migrate Image Command
To migrate the bundles, Tanzu Data Hub Installer has a migrate-image command that helps ship the required bundles to another Image registry. Supported registry types are Harbor, JFrog, and GAR (Google Artifact Registry) The main menu for the tdh-installer command is:
./tdh-installer migrate-image -h
This command is used for migrating the images and helm bundles which are required by Tanzu Data Hub.
There are two modes for providing inputs to this command:
- file-mode: to provide input via a json file
- ui-mode: Launch an interactive UI from which the user can provide the inputs necessary to migrate bundles of Tanzu Data Hub
You can chose the input mode on prompt or can select the input mode by passing with flags

Usage:
  tdh-installer migrate-image [flags]

Examples:

# To provide inputs from a yaml file directly for installation
tdh-installer migrate-image --file ~/.tdh/controlplaneconfigs/config-file-1.yaml
# To launch an interactive UI to provide the inputs necessary to create Tanzu Data Hub Control Plane
tdh-installer migrate-image --ui


Flags:
  -b, --bind string          Specify the IP and port to bind the Kickstart UI against (e.g. 127.0.0.1:8080). (default "127.0.0.1:8080")
      --browser string       Specify the browser to open the UI on. Use 'none' for no browser. Defaults to OS default browser. Supported: ['chrome', 'firefox', 'safari', 'ie', 'edge', 'none']
      --custom-file string   Configuration file to provide image list
  -f, --file string          Configuration file to create tanzu data hub control plane
  -h, --help                 help for migrate-image
  -c, --isCustom             To provide a custom file containing image list
  -u, --ui                   Launch interactive tanzu data hub control plane provisioning UI
We provide 2 modes for initiating the image-migration:
- UI Mode : tdh-installer migrate-image –ui
- File Mode : tdh-installer migrate-image -f <file_path>
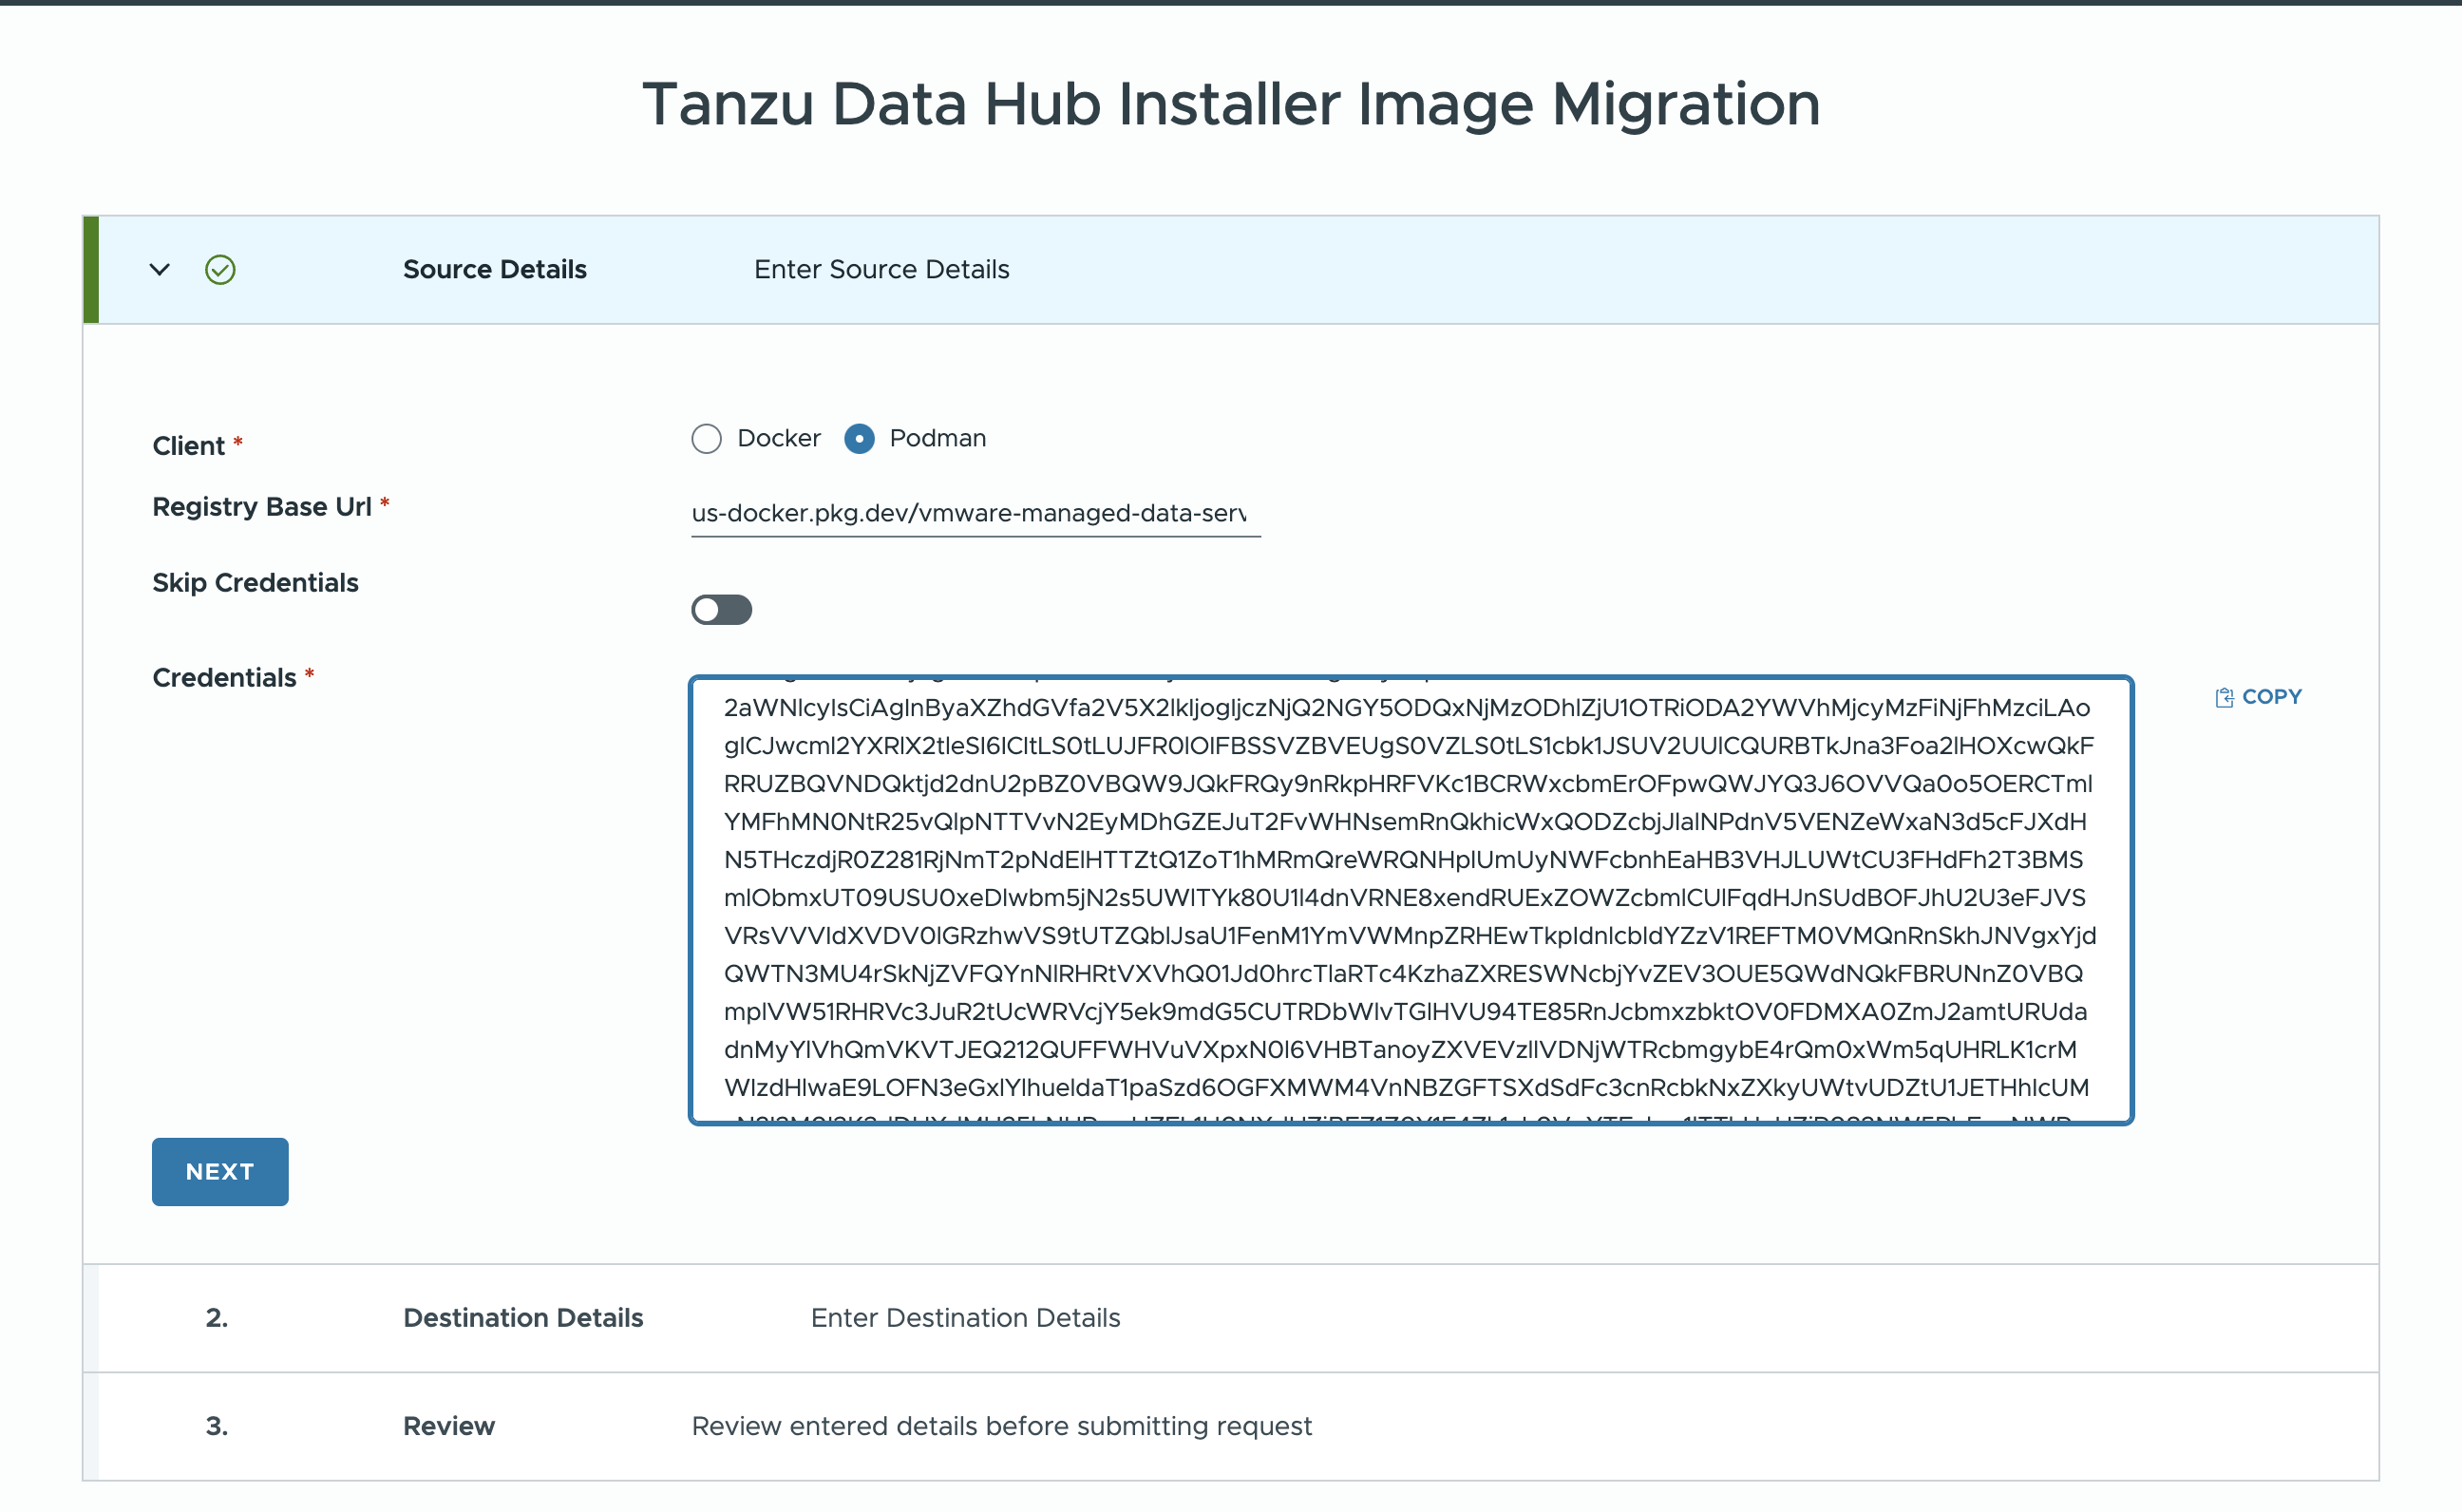
The UI mode opens in the specified browser like this: (Default Location : http://127.0.0.1:8080/image) 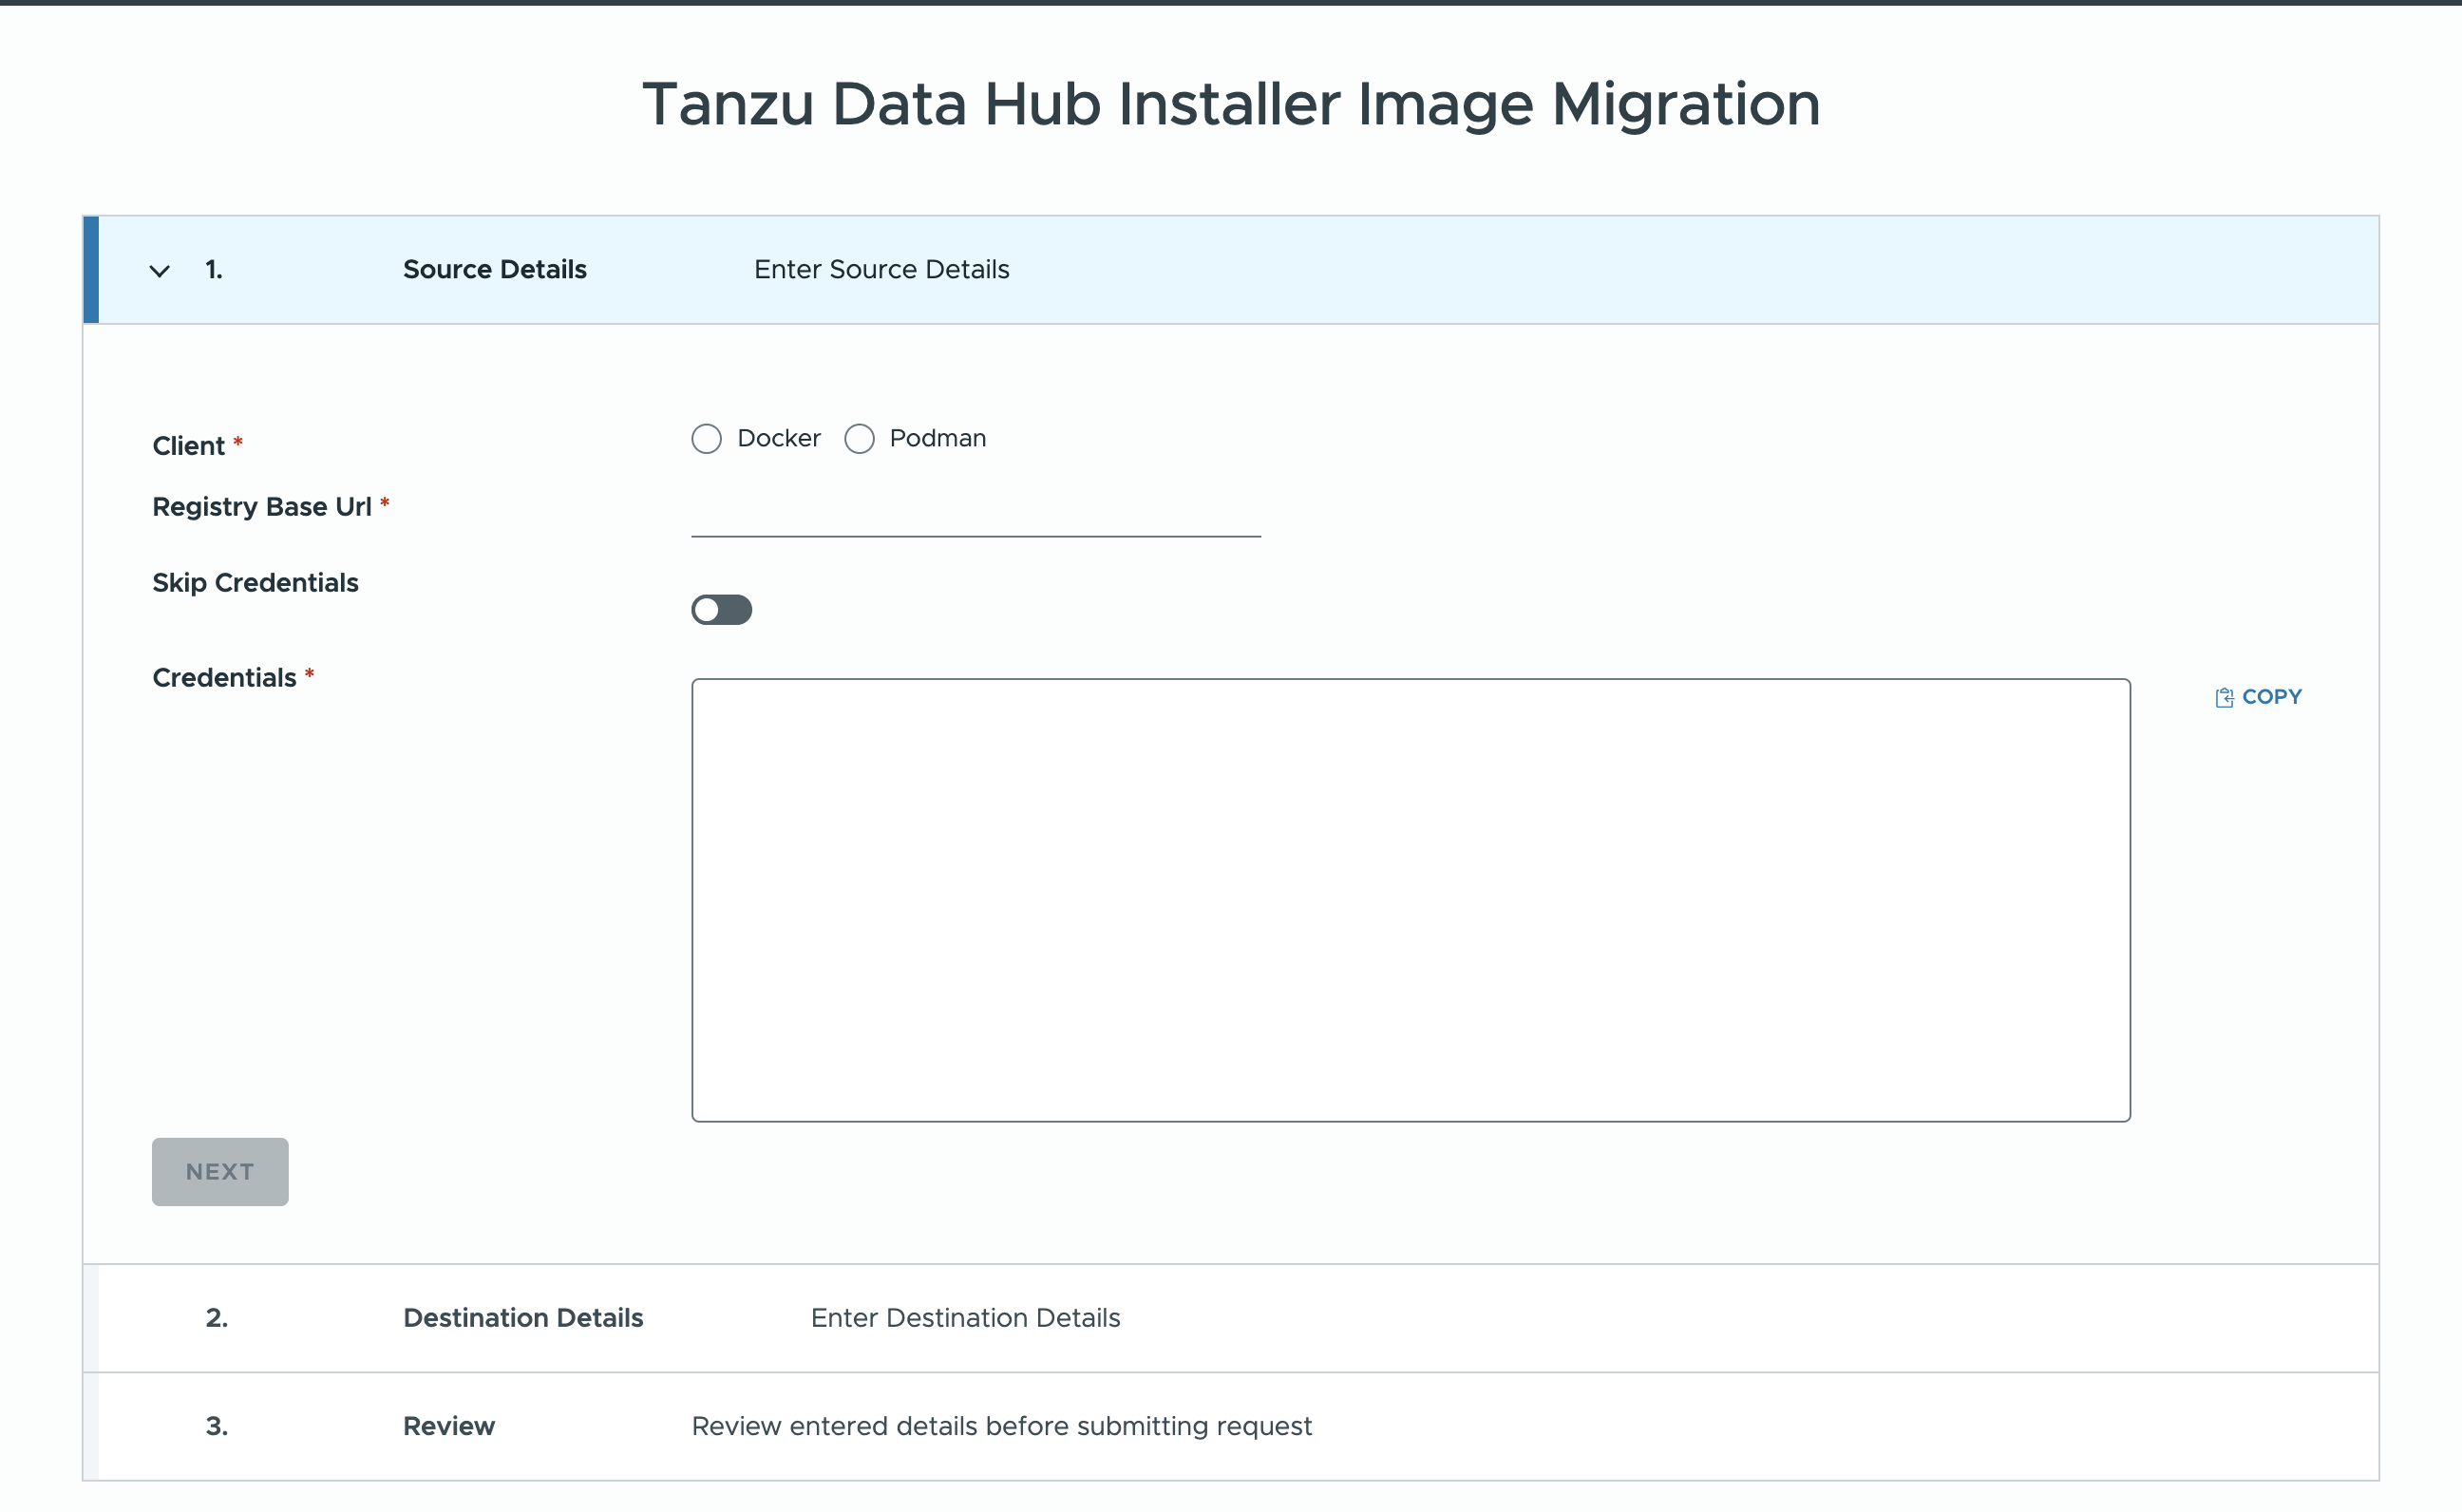
- Select the client from which you want to initiate the image-migration. Note: The selected client should be present on the machine from which you want to initiate the process.
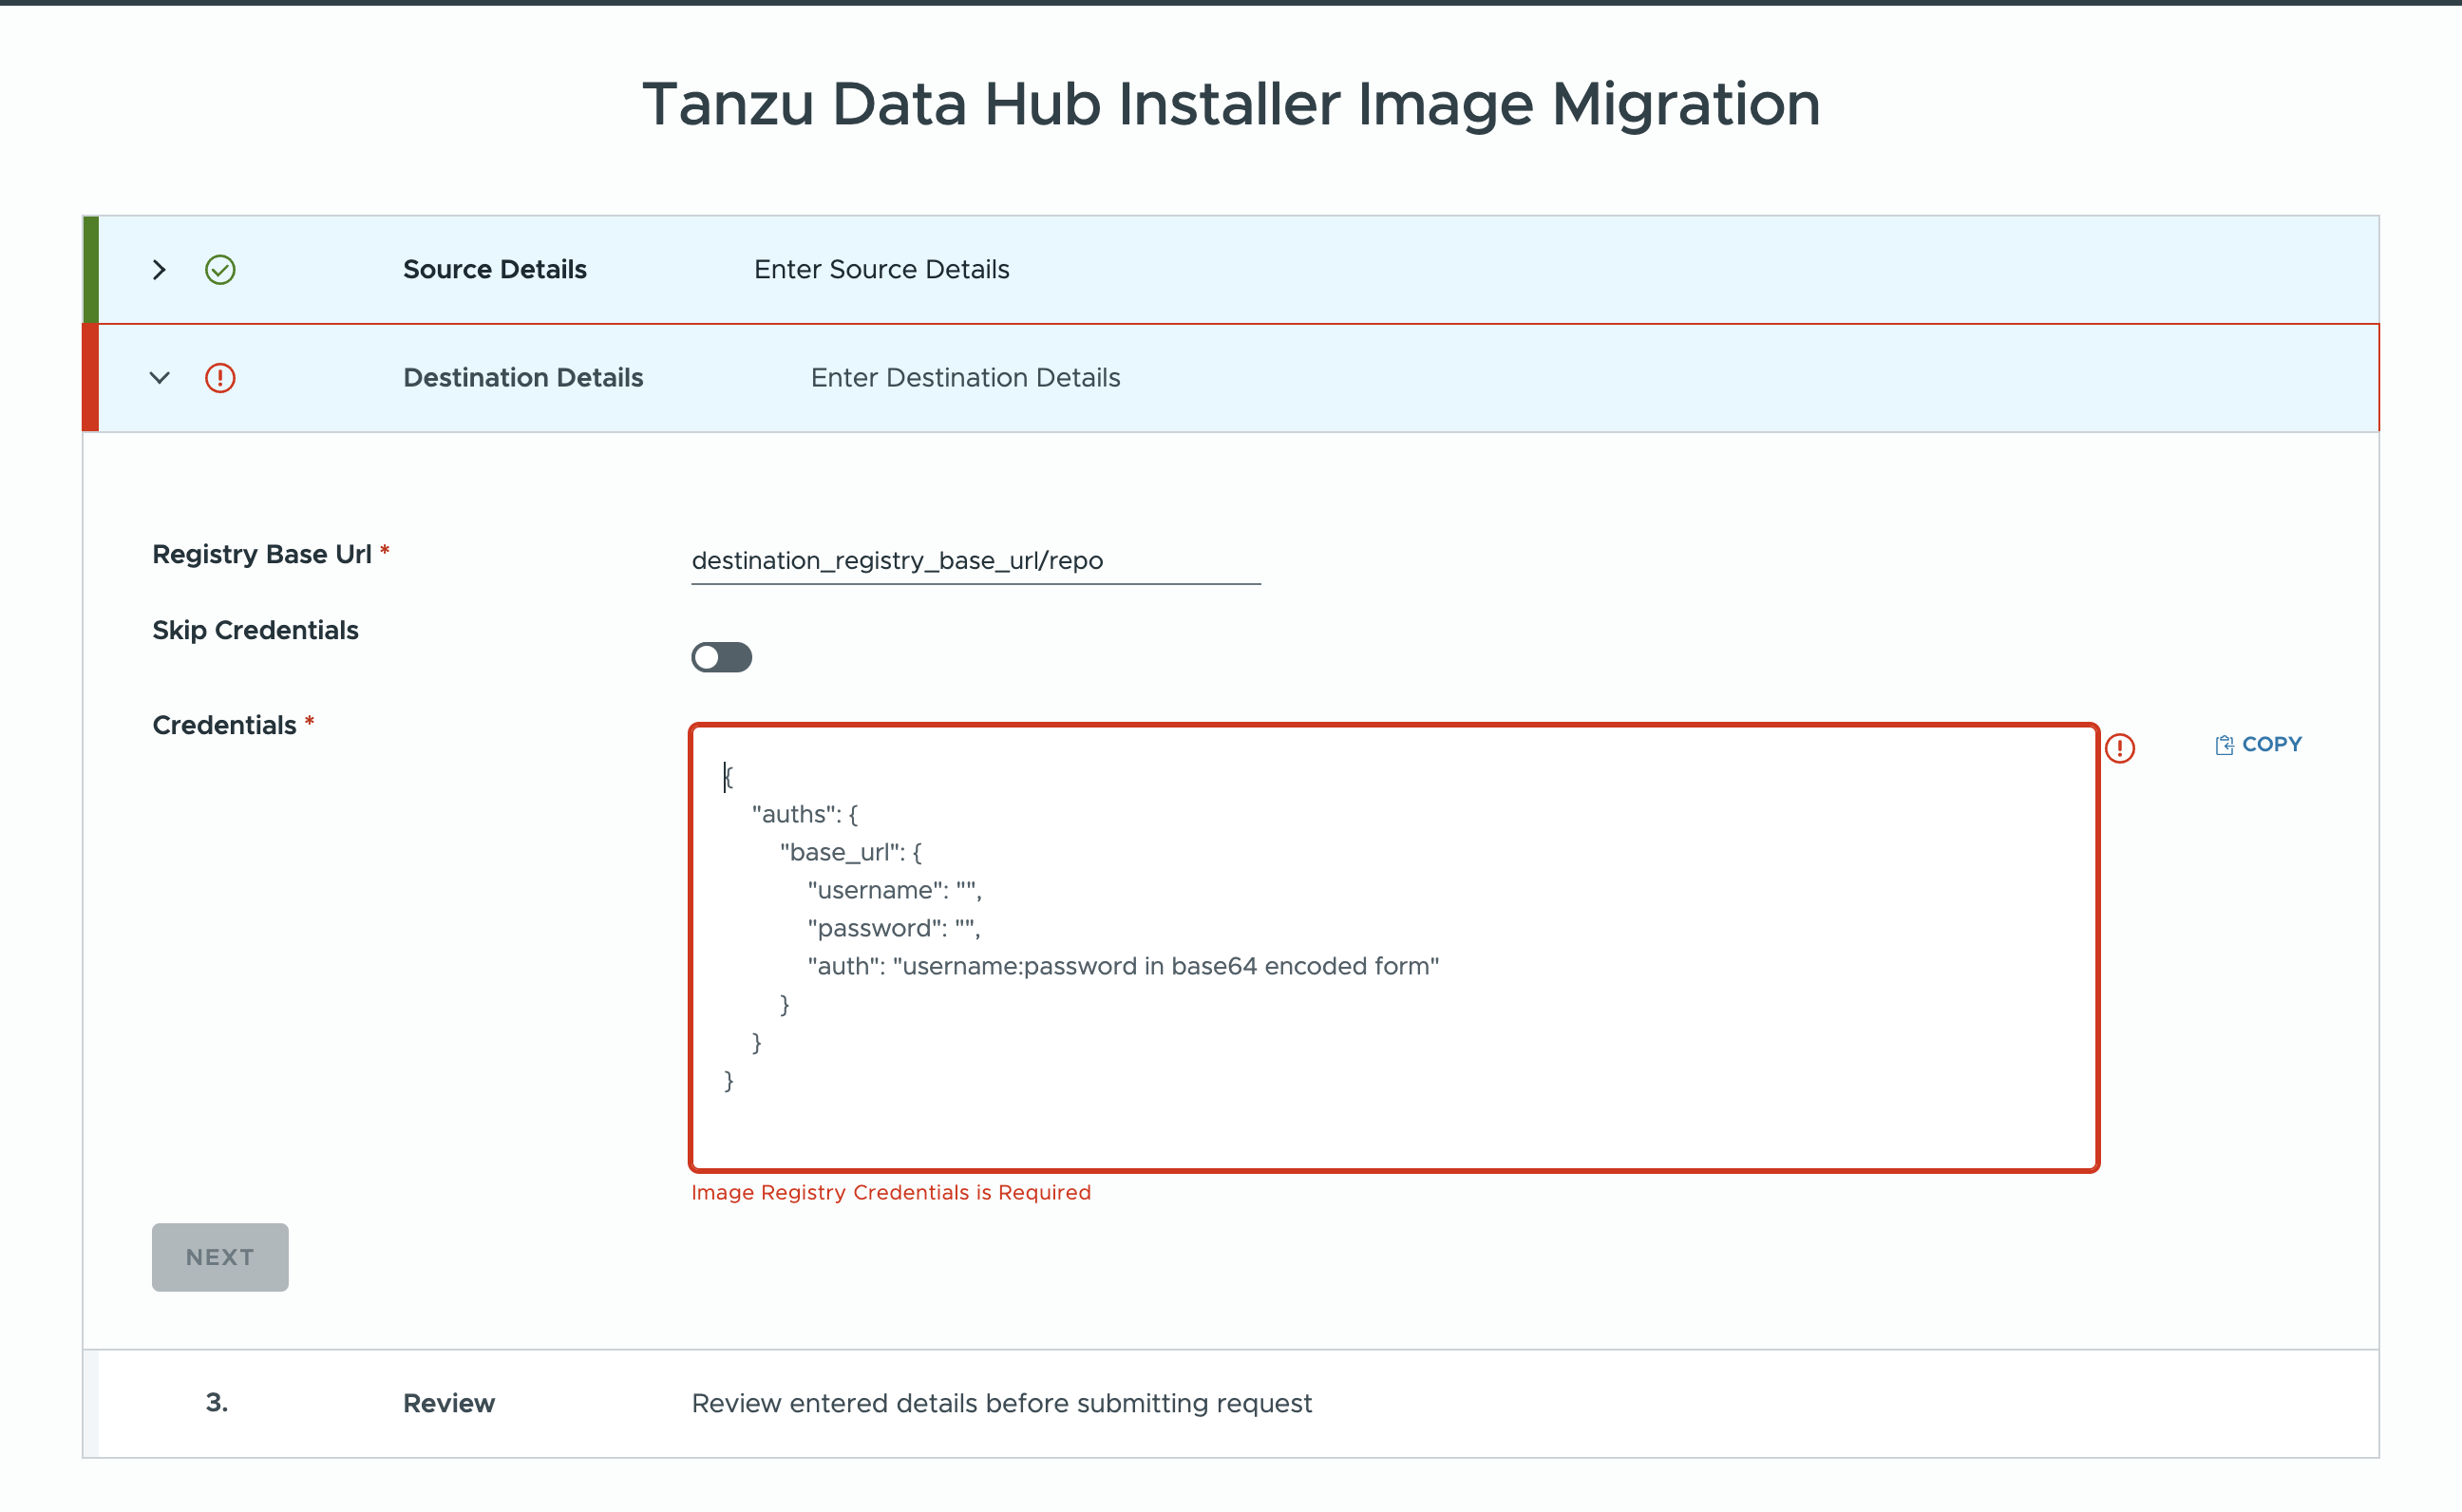
- Enter the registry details as asked. Registry Base Url and Credentials. You can opt for Skip Credentials if you are already logged in to the repository for that client.
- In Source Details Section, enter the Registry Base Url as
us-docker.pkg.dev/vmware-managed-data-services. - You can enter the credentials as present in the following link: Source Image Registry Credentials . The source details would look something like:
- Click on Next Button and proceed to fill the destination details. In Destination Details Section, Enter the Registry Base Url and Credentials in the format as shown: You can opt for Skip Credentials if you are already logged in to the destination image registry on that machine. After filling the details, click on Next Button.
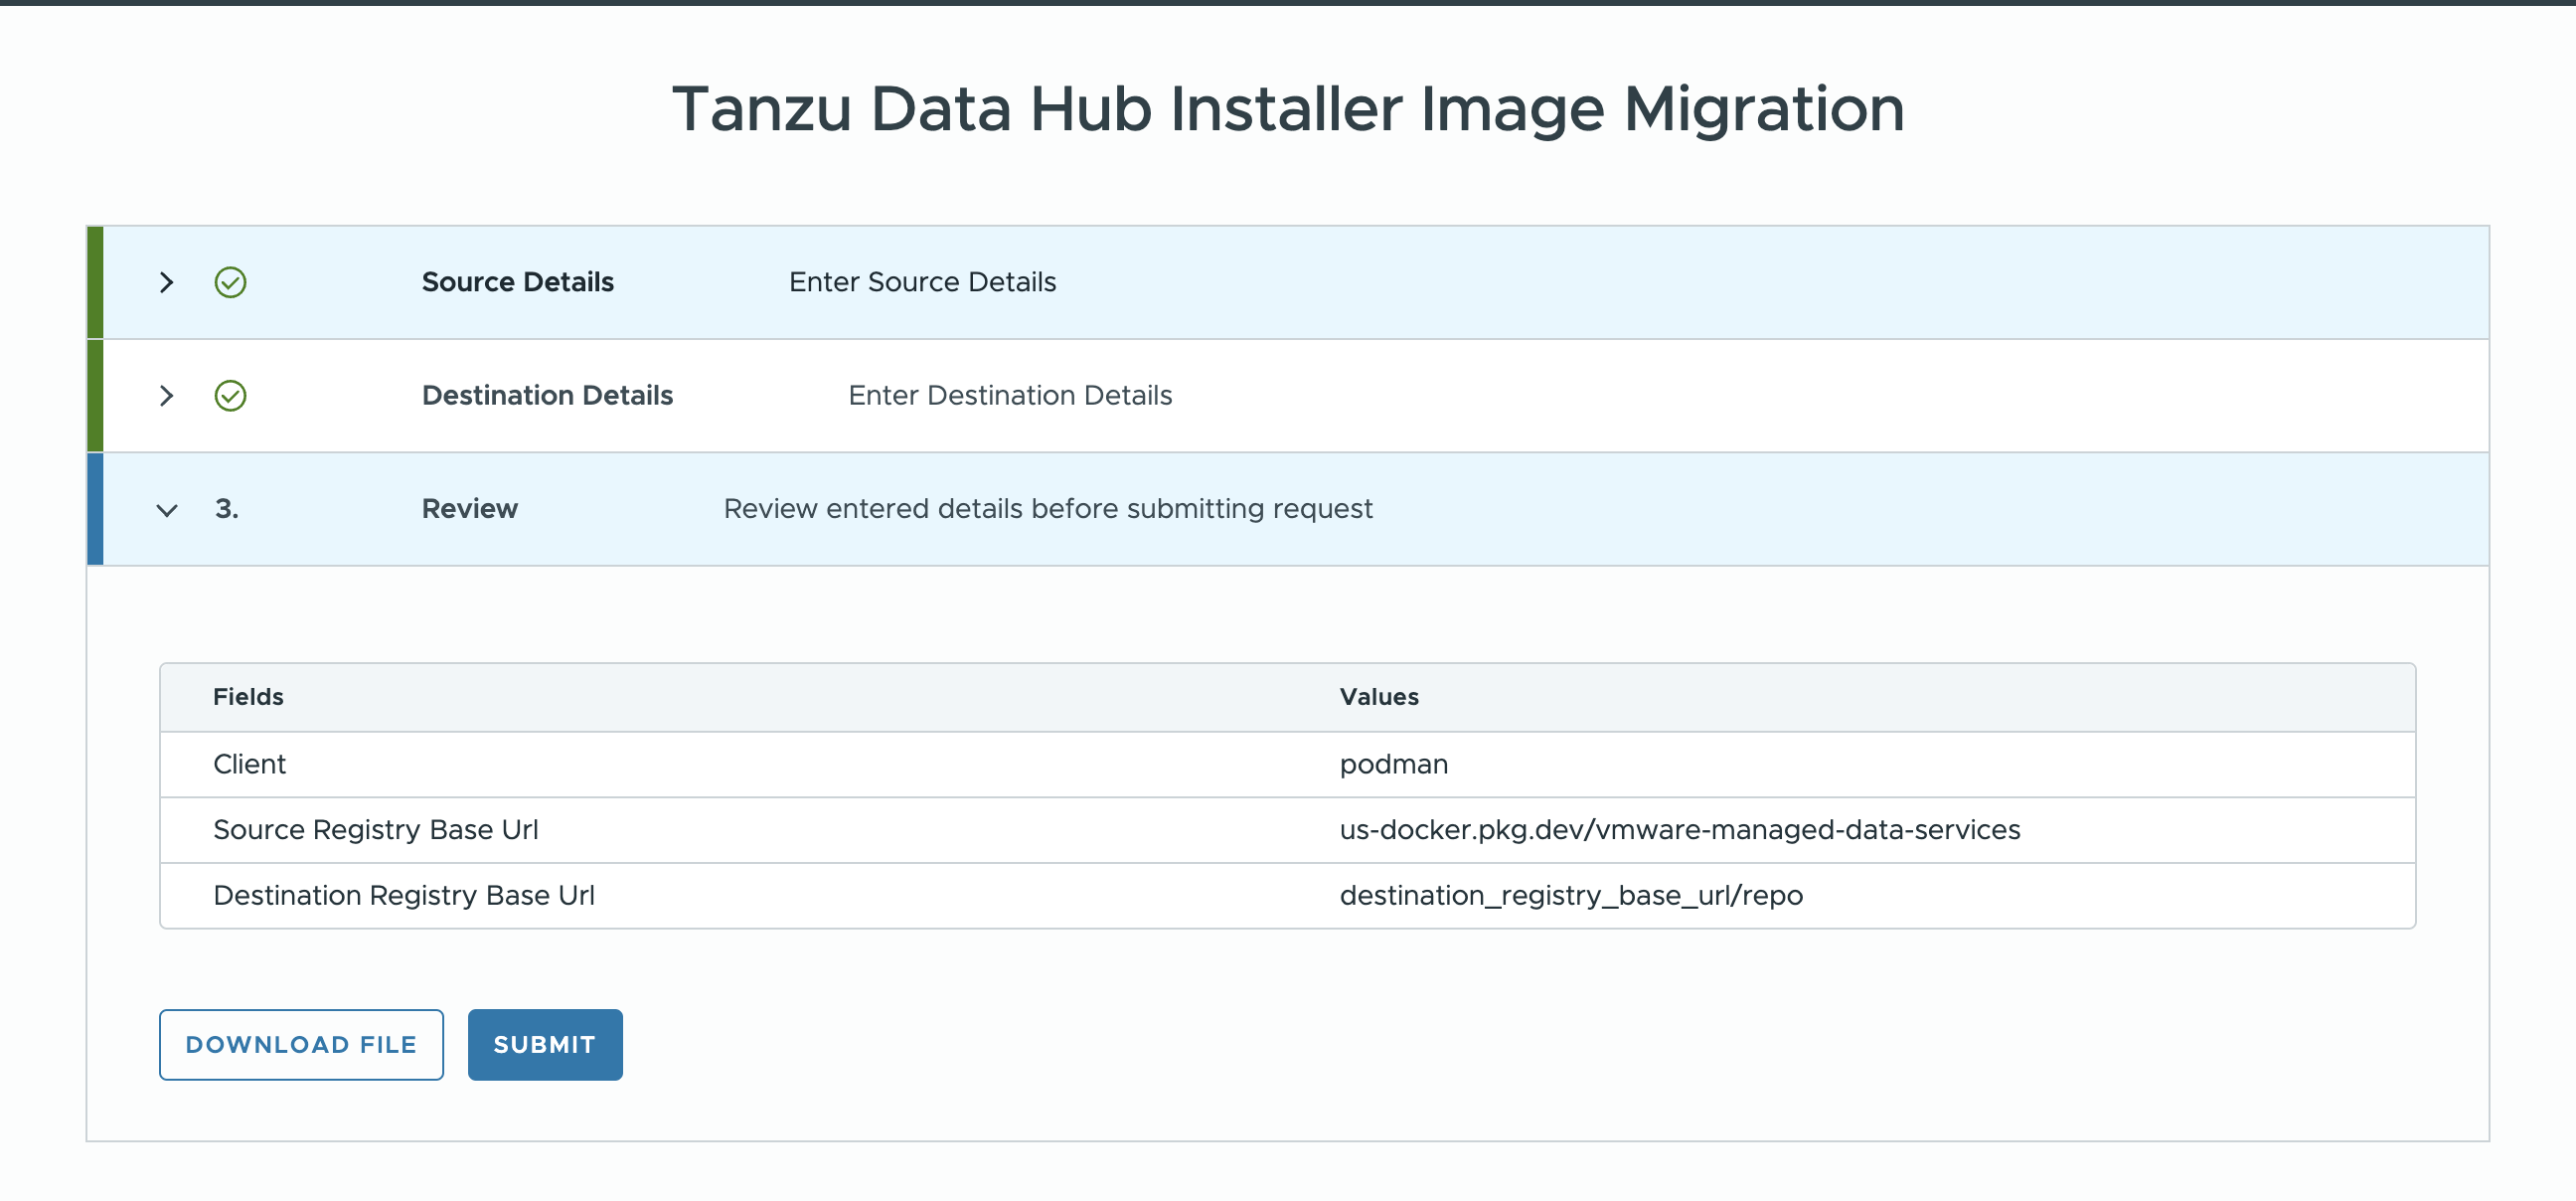
- Review Section displays the client and registry details between which you want to initiate the migration. After confirming the details, you can download the file for future reference or can submit the request directly from UI.
-
The Sample Yaml After Download would be like: Click on Submit button to Initiate Migration. SampleMigrateImageTemplate Image migration can be triggered from file mode directly :
-
Save the yaml file as specified in the above block.
- You can trigger image migration via the following command:
tdh-installer migrate-image --file <file_path>
Note: If Image Migration fails, we maintain a list of all the images which got failed to migrate. We can trigger the migration again by specifying the path of that yaml file. Generally, the failed images list is present in ~/.tdh/images/
IsCustom to true and
CustomFilePath to ~/.tdh/images/<ID>/image-migration-failures.json to continue the migration. Once the image-migration is complete, we can verify that all the images are successfully shipped to the targeted repository.
TDH Installer Command Reference
-
Install UI Mode:
tdh-installer install –ui -
Install File Mode:
tdh-installer install -f <file_path> -
Delete File Mode:
tdh-installer delete -f <file_path> -
Delete With Flags: Either of the following:
tdh-installer delete --username username --password password --fqdn fqdn --namespace VSphereNamespace --tkg tkgClusterNametdh-installer delete -u username -p password -i fqdn -n VSphereNamespace -t tkgClusterName
-
Status of installation: Either of the following:
tdh-installer status –id <ID>tdh-installer status –id <ID> –details true
-
Installer Version Command:
tdh-installer version -
Migrate Image UI Mode:
tdh-installer migrate-image –ui -
Migrate Image File Mode:
tdh-installer migrate-image -f <file_path>
