


As a cloud or project administrator, you have a prescribed naming convention for resources in your environment, and you want the deployed resource to follow those conventions without user interaction. You can create global naming templates for some or all deployments in Automation Assembler.
You can start by creating project-level custom names or organization-level names. Project-level custom names take precedence over organization-level names. This example starts with a simple organization custom name and then adds project-level naming.
Retries exhausted error during deployment on some of those resources. If this scenario is common, you should not apply the new custom name to the projects or organizations where this occurs. Instead, you should use the default system naming, not the custom naming option.
What to do first
- To demonstrate the custom naming capability, these use cases need two projects. One is name Sales and one is named Marketing. For more information about creating projects, see How do I add a project for my Automation Assembler development team.
- As you make choices about organization and project templates, ensure that you understand which naming conventions take precedence. See Resource naming precedence at deployment time.
- As you create a template using the template format, the possible properties are provided. For more information, see Working with template formats.
Create an organization-level custom template
When you want a default custom name template for deployments that do not have project-level templates, create templates that are organizational in scope.
- Select and click New Custom Name.
- Enter a Name.
This example uses Prefix and Timestamp for Org.
- Select Organization as the Scope.
- Click New Naming Template and configure the following options.
Option Sample Value Resource type Machine Validate compute name for uniqueness Select the check box.
Unique resources names ensures that you are never confused about which resource you are working with, even when working in API-based environments.
The number configuration in the following template format increments to ensure uniqueness.
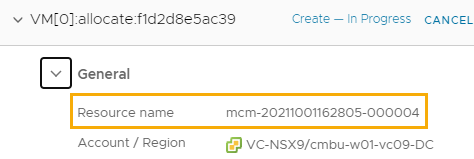
Template format mcm-${timestamp}-${######} Starting counter value 1 Increment step 1 With this configuration, all the deployments across all the projects will increment from this starting point.
In this example, where the starting counter is 1 and the increment is 1, the first deployment is numbered as 2. I you need the deployment to start at 1, then set the starting counter to zero and the increment step to 1.
- Click Add.
- Continue adding templates for other resource types using the following examples.
Resource Type Name Naming Template Format Machine mcm-${timestamp}-${##}Network ntw-${timestamp}-${##}Storage stg-${timestamp}-${##}Load Balancer ldb-${timestamp}-${##}Resource Group rsg-${timestamp}-${##}Gateway gtw-${timestamp}-${##}NAT nat-${timestamp}-${##}Security Group scg-${timestamp}-${##} - Click Create.
- Test the name template by deploying templates that include the defined resource types.
Create a project-level custom template with advanced pattern matching
You can create a single custom name template that you can assign to different projects. You use the advanced option to set different numbering starting points for different projects.
This example uses the machine resource.
- Select and click New Custom Name.
- Enter a Name.
This example uses Project Name with Advanced Numbering.
- Select Project as the Scope.
- Click New Naming Template and configure the following options.
Option Sample Value Resource type Machine Template format ${project.name}-${######} Starting counter value 1 Increment step 1 With this configuration, the deployments in the assigned projects will increment from this starting point.
In this example, where the starting counter is 1 and the increment is 1, the first deployment is numbered as 2. I you need the deployment to start at 1, then set the starting counter to zero and the increment step to 1. With 1 as the starting value, ProjectA starts with 2 and ProjectB starts with 2, unless the value is overridden by an advanced matching pattern value.
- To add more refinement to the default organization naming template, click Advanced and click Add Matching Pattern.
You can set different naming patterns to start the counter at different numbers or reset the number to 1 for each pattern. For example, the Sales project numbering starts at 100 and the Marketing project numbering starts at 200.
- Enter the pattern for the sales project.
Option Sample Value Pattern text Sales- Starting counter value 100 - Enter the pattern for the marketing project.
Option Sample Value Pattern text Marketing- Starting counter value 200
- Enter the pattern for the sales project.
- Click Add.
- Continue adding templates for other resource types, as needed.
- Click Assign Projects and add the Sales and Marketing projects.
- Click Create.
- Test the name template by first deploying a cloud template that is in the Sales project, and then one in the Marketing project.

Example of a custom name with custom properties and project-specific values
In addition to the properties provided in the template format autofill options, you can use custom properties. To use custom properties in a custom name, you must define them in a property group.
A custom property value in the cloud template take precedence over the same property value in the custom name.
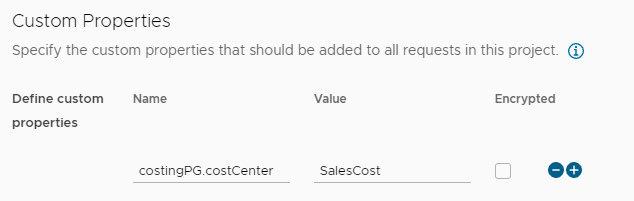
This example uses costCenter as the property and SalesCost as the value for the Sales project and MktCost as the value for the Marketing project.
- Create a property group named costingPG.
- Select and click New Property Group.
- Click Input Values.
- Enter the Name costingPG.
- For the Scope, select Available for any project.
- Click New Property configure the following values and enter the name costCenter.
Options Sample Values Name costCenter Type String Default value research - Click Create.
- Click Create to save the new property group.
- Configure custom properties for the Sales project and the Marketing project.
These steps illustrate the process for the Sales project. You can repeat the steps and use the marketing project values.
- Sales property name: costingPG.costCenter. Value: SalesCost.
- Marketing property name: costingPG.costCenter. Value: MktCost.
- Select and open the Sales project.
- Click the Provisioning tab and locate the Custom Properties section.
- Enter costingPG.costCenter as the property name and SalesCost and the value.
- Click Save.
- Repeat the process in the Marketing project using MktCost and the property value.
- Create a project-level custom name.
This example uses the same projects that the advanced example users. You can assign custom names to only one project at a time. To test the results of this example, you can either apply the custom name to new projects or remove the Sales and Marketing projects from the Project Name with Advanced Numbering example.
This example assumes that you have not yet assigned the Sales and Marketing projects.
- Select and click New Custom Name.
- Enter Project Name and costingPG as the Name.
- Select Project as the Scope.
- Click New Naming Template and configure the following options.
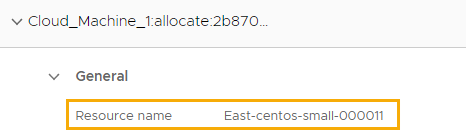
Table 1. Option Value Resource Type Machine Template format ${project.name}-${costingPG.costCenter}-${######} Starting counter value 1 Increment step 1 - Click Add.
- Click Assign Projects and add the Sales and Marketing projects.
- Click Create.
- Test the name template by first deploying a cloud template that is in the Sales project, and then one in the Marketing project.
Figure 1. Sales project resource name

Figure 2. Marketing project resource name

Example of a custom name with property group and cloud template user inputs
This example shows you how to create a custom name based on user inputs in the template. You define two of the user inputs, operating system and size, in the cloud template. One of the user inputs, mktSite, uses a site.siteCode custom property that accepts user inputs and you add it to the cloud template.
- Define the custom property for the marketing project.
- Select and click New Property Group.
- Click Input Values.
- Name and describe the property group.
Option Value Name site Scope Available for any project.
The property group must be generally available so that the property is available to use in the custom name template format.
- Click New Property configure the following values.
Option Value Name siteCode Type String Default value West Enter separate values for East, West, North, and South.
These values represent the possible site codes that your users might select.
- Create the custom naming template.
- Select .
- Enter the Name Site-OS-Size for Marketing Project.
- Select Projects.
Projects is selected and the only option if you already have an organization scoped custom name.
- Click New Naming Template and configure the following options.
Option Value Resource type Machine Template format ${site.siteCode}-${resource.name}-${######}
The site.siteCode property is the one that you defined in the previous step. The resource.name is defined in the cloud template in the next step.
Starting counter value 1 Increment step 1
- Define user inputs in the template.
The user inputs included in this example include operating system and size, and a user input based on the site.siteCode custom property.
The cloud template in this step is simple for demonstration purposes. You can apply the example to one your existing templates.
- Select .
- Enter the Name Marketing Template.
- In Project list, select Marketing.
- Click Create.
- Enter the code for the cloud template or use the following sample code.
Notice that the user inputs are for size and OS. You configure the variables for each input in the flavor (
${input.size}) and image (${input.OS}) machine properties. Finally, the name property is used to construct the resource name (${input.OS}-${input.size}) that can be used in the custom naming template.formatVersion: 1 inputs: size: type: string enum: - small - medium OS: type: string enum: - centos - ubuntu resources: Cloud_vSphere_Network_1: type: Cloud.vSphere.Network properties: networkType: existing Cloud_Machine_1: type: Cloud.Machine properties: image: ${input.OS} flavor: ${input.size} name: ${input.OS}-${input.size} networks: - network: ${resource.Cloud_vSphere_Network_1.id} - To add the site.siteCode custom property as a user input, click the Inputs tab in the right pane and configure the following options.
Option Value Name mktSite Display Name Select a site Type Object Select Object Type Property Groups Select from the existing property groups site - On the Code tab, notice that the added mktSite user input and then update the YAML to include the custom property.
For example, add
site.siteCode: ${input.mktSite.siteCode}to the YAML.formatVersion: 1 inputs: size: type: string title: Select the machine size enum: - small - medium OS: type: string title: Select an operating system enum: - centos - ubuntu mktSite: type: object $ref: /ref/property-groups/site title: Select a site resources: Cloud_vSphere_Network_1: type: Cloud.vSphere.Network properties: networkType: existing Cloud_Machine_1: type: Cloud.Machine properties: image: ${input.OS} flavor: ${input.size} name: ${input.OS}-${input.size} networks: - network: ${resource.Cloud_vSphere_Network_1.id} site.siteCode: ${input.mktSite.siteCode}
- Deploy the template and verify the custom machine name.
Since West is the default value, select a site other than West.
Resource naming precedence at deployment time
Based on how you configure custom naming, the names are applied to the deployed resources based on the following rules.
A common practice is to define a general organization-level naming template and then to create one or more project-level templates, depending one your project management needs.
| Custom Naming Scenario | Precedence |
| No custom names |
|
| Organization-level name |
|
| Project-level names |
|
Working with template formats
When defining your template format, you can use strings and properties. The primary advantage of using properties is that you can use the same properties as the format for multiple projects, but the name is derived from the value properties, which can vary by project, cloud template, platform, and other properties.
The template format properties include the provided properties, discussed here, and any custom properties that you defined in the .
- Valid characters
- Spaces are not allowed.
- For readability, you can use special characters to separate properties. The allowed characters are _ (underscore) and - (dash).
- Provided properties
Table 2. Provided Properties Properties Description endpoint Cloud account information, such as description, enter (AWS), or the name. Endpoint only applies to machines.
Examples
${endpoint.desc}${endpoint.endpointType}${endpoint.name}
project Project information.
Example
${project.desc}${project.name}
resource Includes the resource name from the cloud template, custom properties that are in the cloud template or the project.
Example
${resource.name}
timestamp Date and time of the deployment. The numeric value is yyyy mm dd hh mm ss, but without the spaces. For example, 20210825120345.
Example
${timestamp}
user Example
${user}
username Example
${userName}
###### Number property.
The maximum length is 19 digits.
If you use two digits, ##, the maximum number before the numbering starts over is 99. If you use ###, the numbering restarts after 999.
Example
${####}.
Custom property Custom properties must be part of property group. The property in the custom name includes the property group name and the property.
Example
${propertygroup.property}
Working with the counter
In a single node instance of VMware Aria Automation, the counter increments based on the values that you define in your custom naming templates and as they are applied to the target organization and projects.
In a multi node environment, the counter attempts of increment based on the values in the template. If it encounters a contention, application of the number is attempted three time. It is possible that a request could fail after the third attempt to resolve the contention. In this case, you might see a gap in the numbering.
You might also encounter gaps in the numbering for other reasons. For example, you deploy three virtual machines. The second machine fails during provisioning. The counters for the deployed virtual machines are vm-01 and vm-03, with vm-02 missing.
If you do not use the custom naming, preferring to rely on the default naming strategy, the pools of counter values are reserved to the nodes as follows:
- Node 1: 1-300
- Node 2: 301-600
- Node 3: 601-900
This means that in a multi node environment, the number can appear to be unexpected. The number depends on which node processes the request.
List of resource types to which you can apply custom names
You can create a custom name for only one resource type or for all the resource types. Only the resource types with custom names use the template. All other resources use the default template.
For example, if you create a project-level custom name for only your machines and you have organization-level names for all the other resource types, the machine resource takes the project name and all the other resources use the organization names.
| Custom naming resource types | Deployment resource types |
|---|---|
| Machines |
|
| Networks |
|
| Storage |
|
| Load balancers |
|
| Resource Groups |
|
| Gateways |
|
| NAT |
|
| Security groups |
|
Deleting custom name templates
Deleting a template does not affect currently deployed resource naming. However, you must not delete a custom name template until you verify the impact on all the assigned projects.
You can remove a project from a naming template. The template continues to work for the other projects.
Deleting projects with custom names
If a project has a custom naming template applied, you must first remove the project from the template before you can delete the project.
