During the iterative development of your cloud templates or when you have a final template, you can make the templates available to consumers in the Automation Service Broker self-service catalog. To further enhance the user experience, you can create a custom request form. The customized form is more powerful than the simple template input options.
What to do first
- Verify that you have the infrastructure that supports the your template. If you do not, start with Tutorial: Setting up and testing vSphere infrastructure and deployments in Automation Assembler and continue with the other tutorials.
- Verify that you tagged some resource pools as
env:devandenv:prod. For more information, see Tutorial: Using tags in Automation Assembler to manage vSphere resources. - Ensure that you have a deployable cloud template, similar to the one below. This tutorial starts with the following template.
formatVersion: 1
inputs:
  installedOS:
    type: string
    title: Operating System
    description: Select the operating system.
    enum:
      - centos
      - ubuntu
  placement:
    type: string
    enum:
      - 'env:dev'
      - 'env:prod'
    default: 'env:dev'
    title: Select Placement for Deployment
    description: Target Environment
resources:
  Cloud_vSphere_Disk_1:
    type: Cloud.vSphere.Disk
    properties:
      capacityGb: 1
  Cloud_vSphere_Machine_1:
    type: Cloud.vSphere.Machine
    properties:
      image: '${input.installedOS}'
      installedOS: '${input.installedOS}'
      flavor: small
      constraints:
        - tag: '${input.placement}'
      tags:
        - key: db
          value: mysql
      networks:
        - network: '${resource.Cloud_NSX_Network_1.id}'
          tags:
            - key: db
              value: mysql
      attachedDisks:
        - source: '${resource.Cloud_vSphere_Disk_1.id}'
  Cloud_NSX_Network_1:
    type: Cloud.NSX.Network
    properties:
      networkType: existing
      tags:
        - key: NGINX
          value: web
Step 1: Add inputs to the cloud template
In addition to the existing OS type input, this procedure updates the placement input and adds a size input. When you customize the request form in Automation Service Broker, these are the three fields on the request form that are customized.
- In Automation Assembler, select and create or open the template provided above.
The sample template is used to explain the different options and includes sample values. Adapt it to your environment.
- Add the size variable and define the sizes in the Inputs section.
- In the Cloud_vSphere_Machine_1 section, add a variable to the
flavorproperty.flavor: '${input.size}' - In the Inputs section, add a user input name size so that the user can select the size of the deployment. This is sometimes referred to as the t-shirt size that you defined for the cloud zones.
 size:
    type: string
    title: Deployment size
    description: Select the the deployment t-shirt size.
    enum:
      - small
      - medium
      - large
- In the Cloud_vSphere_Machine_1 section, add a variable to the
- Update placement inputs with a descriptive term rather than the tag strings.
These constraint tags will be matched with the capability tags that you added in Tutorial: Using tags in Automation Assembler to manage vSphere resources.
- In the Inputs section, add a user input named placement so that the user can select development or production as the deployment placement.
This example uses the
oneOfattribute, which allows you to present a natural language label while still submitting strings that the deployment process requires. For example, theenv:devandenv:prodtags.placement: type: string oneOf: - title: Development const: 'env:dev' - title: Production const: 'env:prod' default: 'env:dev' title: Select Deployment Placement description: Target Environment
- In the Inputs section, add a user input named placement so that the user can select development or production as the deployment placement.
- Review the full YAML to ensure that it looks similar to the following example.
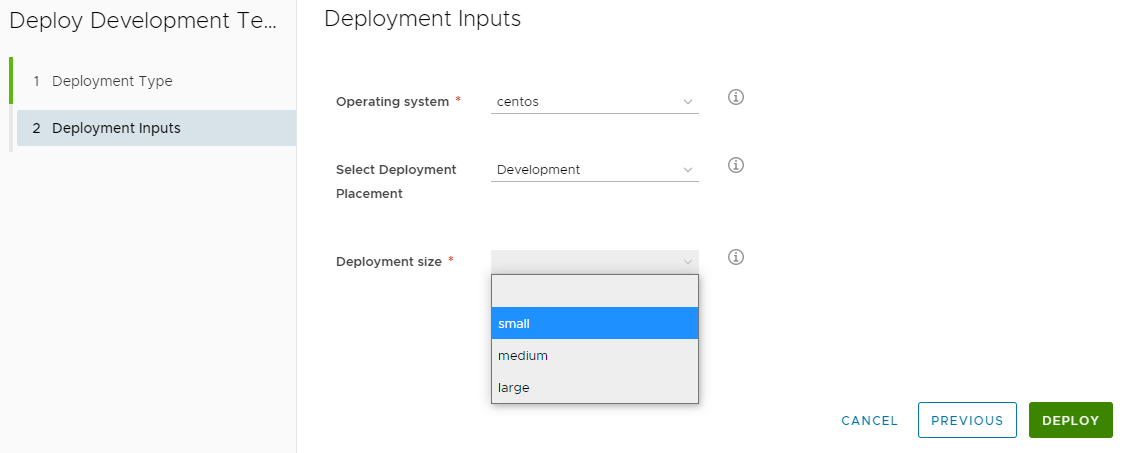
formatVersion: 1 inputs: installedOS: type: string title: Operating system description: Select the operating system. enum: - centos - ubuntu placement: type: string oneOf: - title: Development const: 'env:dev' - title: Production const: 'env:prod' default: 'env:dev' title: Select Deployment Placement description: Target Environment size: type: string title: Deployment size description: Select the the deployment t-shirt size. enum: - small - medium - large resources: Cloud_vSphere_Disk_1: type: Cloud.vSphere.Disk properties: capacityGb: 1 Cloud_vSphere_Machine_1: type: Cloud.vSphere.Machine properties: image: '${input.installedOS}' installedOS: '${input.installedOS}' flavor: '${input.size}' constraints: - tag: '${input.placement}' tags: - key: db value: mysql networks: - network: '${resource.Cloud_NSX_Network_1.id}' tags: - key: db value: mysql attachedDisks: - source: '${resource.Cloud_vSphere_Disk_1.id}' Cloud_NSX_Network_1: type: Cloud.NSX.Network properties: networkType: existing tags: - key: NGINX value: web - Click Deploy, verify that the second page of the request looks similar to the following example, and then you can verify that the deployment is in the selected development of production resource pool after deployment.
Step 2: Version and release the cloud template
When you have a deployable template, you can now make it available in the Automation Service Broker catalog for other uses to deploy. To make the cloud template discoverable so that you can add it to the catalog, you must release it. In this procedure we will version it, to capture a snapshot of the template, and then release the template.
- Select and open the template in the design canvas.
- Click Version and enter a description.
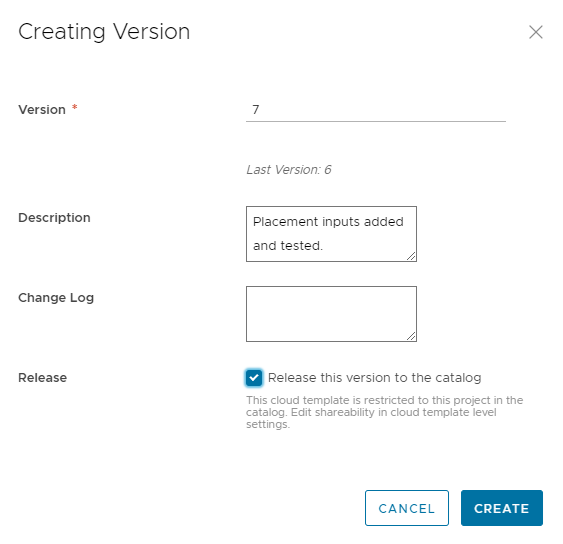
- Select the Release check box and click Create.
Releasing the cloud template does not automatically add it to Automation Service Broker. Releasing it makes is discoverable so the you can add it to the catalog.
Step 3: Add the cloud template to the Automation Service Broker catalog
You can use the Automation Service Broker catalog to provide cloud templates to other consumers in your organization where they don't need to have any awareness of how to create a template. The catalog allows them to deploy the template.
Before you can add the template as a catalog item, you must import it into Automation Service Broker. You can only import released cloud templates.
- To open Automation Service Broker from Automation Assembler, click the service drop-down menu in the upper left corner.

- Click Service Broker.
- Import the cloud template.
- In Automation Service Broker, select .
- Click New and then select Template.
- Enter a Name.
For this tutorial, enter Automation Assembler DevProject.
- For the Project, select the Development Project that you created in Automation Assembler.
- Click Validate.
The system must indicate that it found at least one item.
- When validated, click Create and Import.
Automation Assembler DevProject is added to the list as a content source.
- Make the cloud template available in the catalog.
- Select .
- Click New Policy, and then click Content Sharing Policy.
- Enter a Name.
For this tutorial, enter DevProject Policy.
- In the Scope list, select Development Project.
- In the Content sharing section, click Add Items.
- In the Share Items dialog box, select
Automation Assembler DevProjectand click Save. - In the Users section, select the project users and groups that you want to see the item in the catalog.
- Click Create.
- To verify that the Development Template was added to the catalog, click .
- Click Request on the Development Template card.
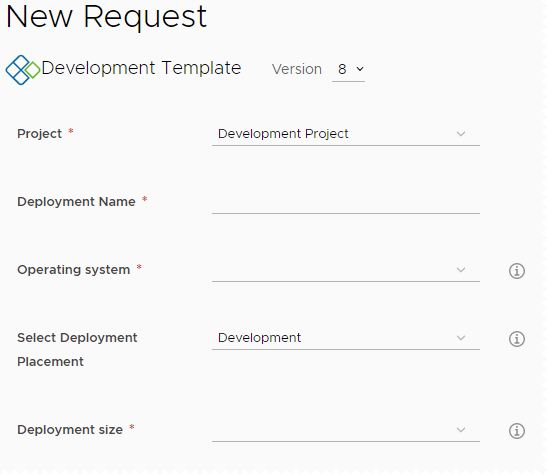
Notice that the inputs that you saw on the cloud template are provided here. The next step is to customize the request form.
Step 4: Create a custom form for the template
The goal for this custom form is to provide a form where the user selects the operating system and placement based on the env:dev or env:prod tags. Then the env:dev option allows the user to select small or medium, large is not an option. However, if the user selects env:prod, there is not option to select large, the size is hidden from the user but is included in the request.
- To create a custom form in Automation Service Broker, select .
- Click the vertical ellipsis to the left of the Development Template entry and click Customize form.
- Customize the input option.
- In the canvas, click fields in the canvas and configure the Properties as specified in the following table.
Canvas field name Appearance Values Constraints Operating system Label and type
- Label = Operating system
Value options
- Value options = Constant
- Value source =
centos|CentOS,ubuntu|Ubuntu
This example uses the value options to customize the all lower case operating system names with the preferred OS name.
Select Deployment Placement Value options
- Value options = Constant
- Value source =
env:dev|Development,env:prod|Production
Deployment Size Visibility
- Value source = Conditional value
- Set value = Yes if Select Deployment Placement Equals env:dev
Default value
- Value source = Conditional value
- Set value = large if Select Deployment Equals env:prod
Value options
- Value options = Constant
- Value source =
small|Small,medium|Medium
Notice that the value source does not include large. Large is excluded because it is only available for Production and is the required value. The large value is included in deployment request without a user-initiated action.
- To turn on the form in the catalog, click Enable.
- Click Save.
- In the canvas, click fields in the canvas and configure the Properties as specified in the following table.
- To ensure the correct results by submitting at least a Development Small and a Production request, test the form in the catalog.
Use following examples to verify the results.
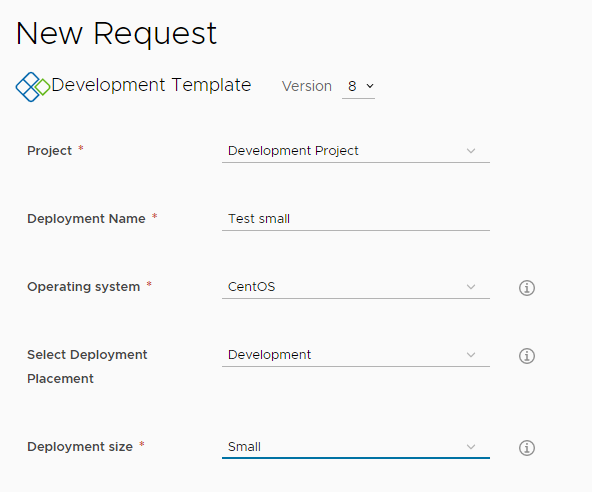
- Test the Development Small request form by providing a name, Test small in this example, and selecting CentOS, Development, and Small for the options.
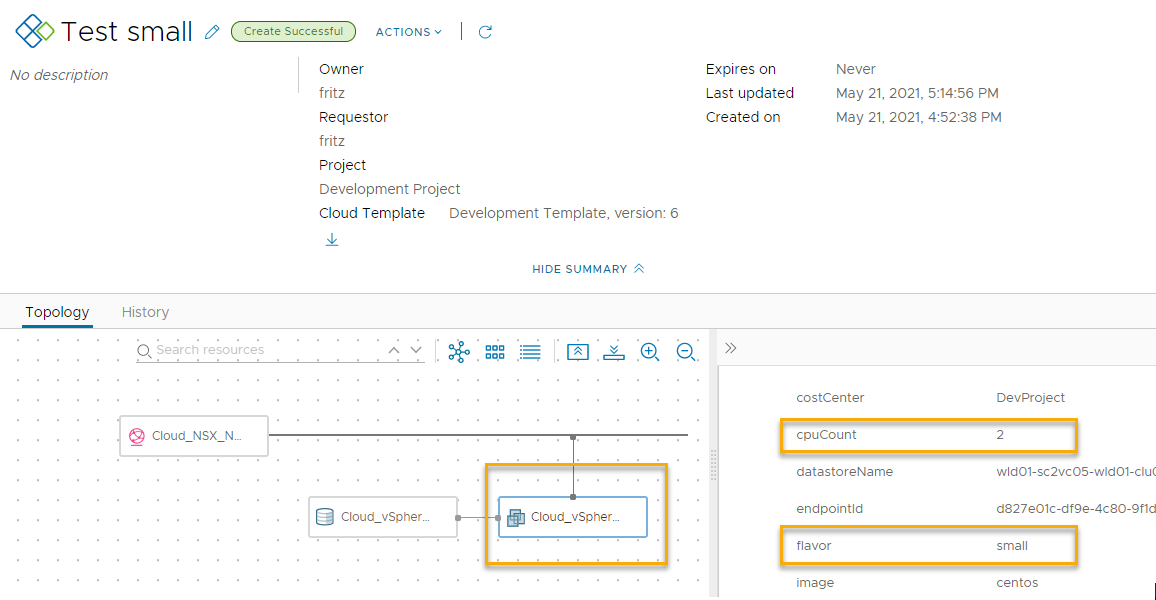
- To verify the Development Small deployment, Select and click the Test small deployment.
- On the Topology tab, click the Cloud_vSphere_Machine, and then locate the Custom Properties section in the right pane.
A few of the values to review include cpuCount = 2 and flavor = small.
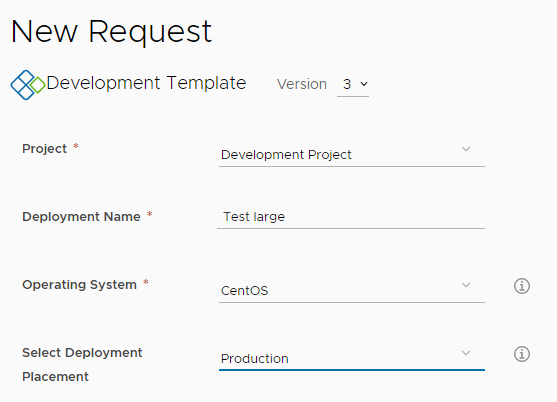
- Test the Production request form by entering a name, Test large in this example, and select CentOS and Production for the options.
Remember, you configured the form to neither display nor require the user to select the size.
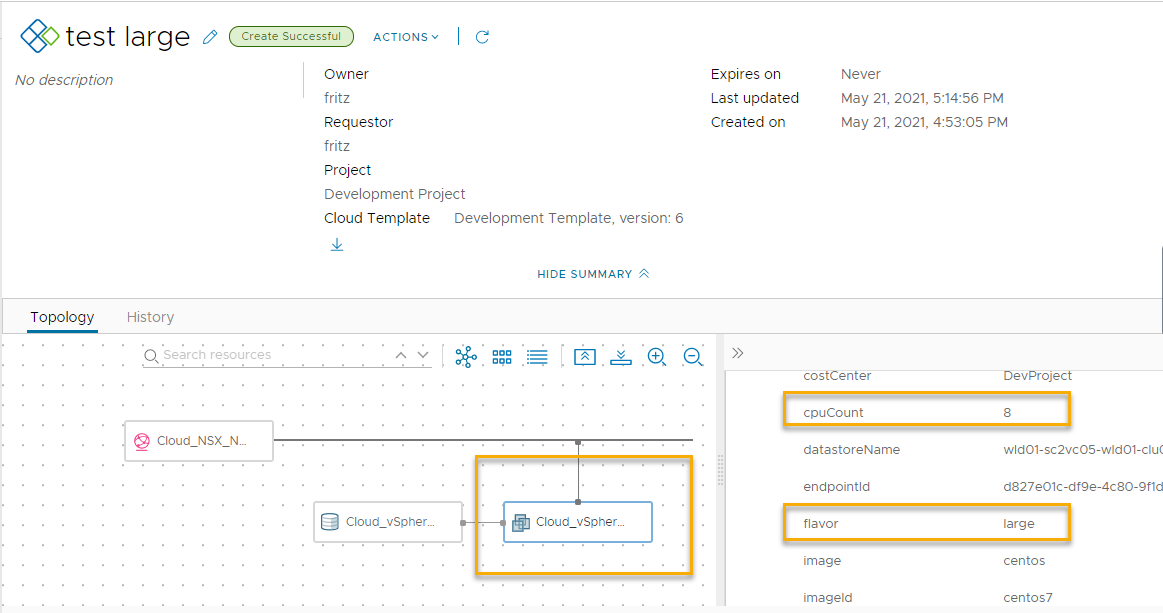
- To verify the Production deployment, select and click the Test large deployment.
- On the Topology tab, click the Cloud_vSphere_Machine, and then locate the Custom Properties section in the right pane.
A few of the values to review include cpuCount = 8 and flavor = large.
- Test the Development Small request form by providing a name, Test small in this example, and selecting CentOS, Development, and Small for the options.
Step 5: Control the cloud template versions in the catalog
In most cases, you want to make only the latest cloud templates available in the Automation Service Broker catalog. The following procedure supports iterative development, where you release a version of template and add it to the catalog, but now you improved the template and want to replace the current version with the newer version.
In step 2, you versioned and released a template, so you are familiar with the process. In step 3, you added it to the catalog. The procedure ties the two steps together as you do iterative development and update the catalog with the latest version.
You do have the option to make multiple versions available in the catalog.
- In Automation Assembler, version the template that you now want to make available in the catalog.
- Select and open the template in the design canvas.
- Click Version History.
- Locate the version that you want to add to the catalog and click Version.
- Enter a Description, select the Release check box, and click Create.
At this point, you have the option to keep the old version in the catalog. If you want multiple versions, ignore the next step where you Unrelease a version.
- To make only one version of the template available in the catalog, review the version history list and click Unrelease on every version that you don't want in the catalog.
- To update the Automation Service Broker catalog with the latest version, and to replace any old version, you must collect the new version.
- In Automation Service Broker, select .
- Click the Automation Assembler DevProject content source that is used in this tutorial.
- Click Validate.
You should see a message that an item is found.
- Click Save and Import.
- Verify that the catalog displays the needed versions or no versions.
- In Automation Service Broker, click .
- Locate the catalog item and click Request.
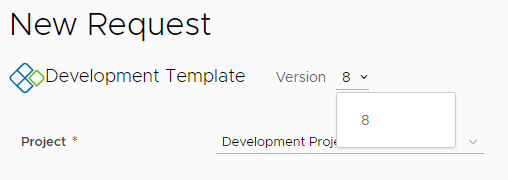
- At the top of the request form, click the Version and verify the version or versions.
The following screenshot shows 8.