


Designs that include Terraform configurations require access to a Terraform runtime environment that you integrate with the Automation Assembler on-premises product.
How to add a Terraform runtime
The runtime environment consists of a Kubernetes cluster that runs Terraform CLI commands to perform requested operations. In addition, the runtime collects logs and returns the results from Terraform CLI commands.
The VMware Aria Automation on-premises product requires users to configure their own Terraform runtime Kubernetes cluster. Only one Terraform runtime per organization is supported. All Terraform deployments for that organization use the same runtime.
To run Terraform commands and states you need a Terraform runtime environment that runs on K8s. When you create your Terraform integration in on-premises VMware Aria Automation, you can choose between a managed k8, (which is a k8s cluster that is already managed by VMware Aria Automation) or an external k8s cluster, (which is a k8s cluster that is not managed by VMware Aria Automation) and the namespace where the Terraform pods will be created. If you are using an external cluster, you must provide Kubeconfig access to the k8s cluster for the Terraform runtime target. Kubeconfig is a k8s standard and the Kubeconfig doesn’t need to be an admin Kubeconfig. You can use a service account with minimum permissions, for example permission to run pods in a namespace and permission generate a Kubeconfig for use with the VMware Aria Automation Terraform runtime integration.
- Verify that you have a Kubernetes cluster on which to run the Terraform CLI.
- All users can supply a kubeconfig file to run the Terraform CLI on an unmanaged Kubernetes cluster.
- Enterprise license users have the option to run the Terraform CLI on a Kubernetes cluster managed by VMware Aria Automation.
In Automation Assembler, go to , and verify that you have a Kubernetes cluster. See How do I work with Kubernetes in Automation Assembler if you need to add one.
- If the Kubernetes cluster is newly added or modified, wait for its data collection to complete.
Data collection retrieves the list of namespaces and other information, and might take up to 5 minutes depending on provider.
- After data collection completes, go to , and select the Terraform Runtime card.
- Enter settings.
Figure 1. Example Terraform runtime integration 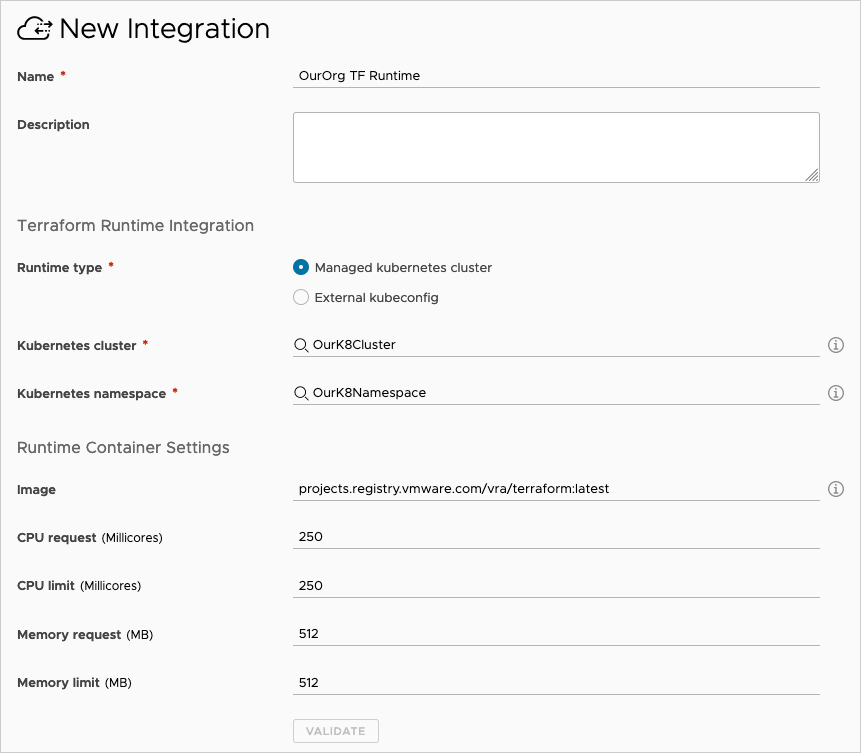
Setting Description Name Give the runtime integration a unique name. Description Explain what the integration is for. Terraform Runtime Integration: Runtime type (Enterprise only) Enterprise license users may select whether to run the Terraform CLI on a Kubernetes cluster managed by VMware Aria Automation or an unmanaged one. Kubernetes kubeconfig (all users) For an unmanaged Kubernetes cluster, paste in the entire contents of the kubeconfig file for the external cluster.
To use an external Kubernetes runtime with a proxy server, see How to add proxy support.
This option is available for all users.
Kubernetes cluster (Enterprise only) For Kubernetes managed by VMware Aria Automation, select the cluster in which to run the Terraform CLI.
The cluster and its kubeconfig file must be reachable. You can validate access to kubeconfig with a GET on
/cmx/api/resources/k8s/clusters/{clusterId}/kube-config.This option is only available for Enterprise licenses.
Kubernetes namespace Select the namespace to use within the cluster, for creating pods that run the Terraform CLI. Runtime Container Settings: Image Enter the path to the container image of the Terraform version that you want to run. Note: The VALIDATE button doesn't check for the container image.CPU request Enter the amount of CPU for running containers. Default is to 250 millicores. CPU limit Enter the maximum allowable CPU for running containers. Default is to 250 millicores. Memory request Enter the amount of memory for running containers. Default is 512 MB. Memory limit Enter the maximum allowable memory for running containers. Default is 512 MB. - Click VALIDATE and adjust settings as needed.
- Click ADD.
Settings are cached. After adding the integration, you can modify settings such as the cluster or namespace, but it might take up to 5 minutes for a change to be detected and for the Terraform CLI to run under the new settings.
Troubleshooting the Terraform runtime
Some Terraform configuration deployment problems might be related to the runtime integration.
| Problem | Cause | Resolution |
|---|---|---|
| Validation fails with an error stating that the namespace is invalid. | You modified the cluster but left the previous namespace in the UI. | Always reselect a namespace after modifying the cluster selection. |
| The namespace drop down is empty or doesn't list newly added namespaces. | Data collection for the cluster has not completed. Data collection takes up to 5 minutes after entering or modifying the cluster and up to 10 minutes when entering or modifying the namespace. | For a new cluster with existing namespaces, wait up to 5 minutes for data collection to complete. For a new namespace in an existing cluster, wait up to 10 minutes for data collection to complete. If the problem continues, remove the cluster and re-add it under . |
| Terraform CLI containers are created in a previous cluster, previous namespace, or with previous runtime settings, even after the integration account was updated. | The Kubernetes API client used by VMware Aria Automation is cached for 5 minutes. | Changes might need up to 5 minutes to take effect. |
| Validation or a Terraform deployment operation fails with an error stating that kubeconfig is not available. | Sometimes these errors occur because the cluster isn't reachable from VMware Aria Automation. In other cases, user credentials, tokens, or certificates are invalid. |
The kubeconfig error can occur for a number of reasons and might require engagement with technical support for troubleshooting. |
How to add proxy support
To have your external Kubernetes runtime cluster connect through a proxy server, follow these steps.
- Log in to your external Kubernetes cluster server.
- Create an empty folder.
- In the new folder, add the following lines to a new file named Dockerfile.
FROM projects.registry.vmware.com/vra/terraform:latest as final
ENV https_proxy=protocol://username:password@proxy_host:proxy_port
ENV http_proxy=protocol://username:password@proxy_host:proxy_port
ENV no_proxy=.local,.localdomain,localhost
- Modify the placeholder values so that the
https_proxyandhttp_proxyenvironment variables include the proxy server settings that you use to access the internet.The protocol will be http or https according to what your proxy server uses, which might not match the environment variable name of
https_proxyorhttp_proxy. - Save and close Dockerfile.
- From the empty folder, run the following command. Depending on your account privileges, you might need to run the command in sudo mode.
docker build --file Dockerfile --tag custom-terraform-runtime:1.0 .The command creates a local custom-terraform-runtime:1.0 Docker image.
- In Automation Assembler, under , go to your Terraform runtime integration.
- Create or edit the runtime container settings to use the custom-terraform-runtime:1.0 image:

