


After creating jobs and defining your targets in Automation Config, you can then run the jobs against the desired targets. You can run a job or one-off command on an as-needed basis (ad-hoc) or you can schedule a job to run at a future date and time. You can also set jobs to run on a repeating schedule.
Before you start
Before you can run jobs, you or your system administrator must first define the targets for your jobs, which determines which node(s) the job will run on. Then, you must create the actual job. For more information, see:
Running an ad-hoc job from the Jobs workspace
To run a job immediately from the Jobs workspace:
- Click Config > Jobs in the side menu to open the Jobs workspace.
- Search for the job you want to run.
- To filter the columns, click the filter button
 for the column you want to search. Start typing the search criteria to filter the rows instantly. For example, you might search for a job by the Salt module involved in a job by filtering the Function column.
 - To sort the columns, click any column name once to sort the rows in descending order. Click again to reverse the order.
- To customize which columns display in the table, click the Show columns button
 in the lower left corner of the table.
Note: Filters, column sorting, and column visibility settings are persistent for a given user, regardless of the device used to log in. This means that when a particular user logs in, that user sees the same filtering, sorting, and visibility settings after logging in until the filters are cleared or the sorting and visibility settings are changed. - To filter the columns, click the filter button
- Click the menu
 next to the job you want to run.
 - Click Run Now.
- In the dialog box, select a target to run the job on.
Note: If the job has been set to run on a specific target or Salt master, the dialog box displays the target for confirmation.
- Select additional options as required, such as setting notification preferences, adding job inputs, or running the job as a test run.
- Click Run Now.
- Check the Activity workspace to confirm the job ran successfully and to review the job returns.
Running an ad-hoc job from the Targets workspace
You can run an ad-hoc job from the Targets workspace. You can run a job on:
- A single minion
- One or more minions
- A Salt master or all Salt masters (using salt-run)
- A target
To run an ad-hoc job from the Targets workspace:
- Click Targets in the side menu to open the Targets workspace.
- Select the minion, target, or list of minions you want to run the job against.
- To select a target group, click the Menu next to the target you want to run the job against and click Run job.
- To select a single minion or list of minions, click the name of the target group and then select the minions you want to run the job against. Then click Run job.
- To select a target group, click the Menu
- In the confirmation dialog, select the job you want to run and confirm the correct target or minions are selected.
- Select additional options as needed and click Run now.
Running ad-hoc commands
Automation Config includes a Run Command control that allows you to run a single command (a Salt execution module) without defining a reusable job. You can use this feature to execute commands quickly or to run one-off commands that are not part of your everyday workflow. For example, you could run a command when troubleshooting or during to test initial configurations.
You can run an ad-hoc job or command on:
- A single minion
- A list of minions
- A Salt master or all Salt masters (using salt-run)
- A target
To run a command:
- Click Targets in the side menu to open the Targets workspace.
- Select which minion, target, or list of minions you want to run the command against.
- In the Run Command dialog, confirm the correct command and target are selected, then select a function. A function is the Salt module you want to execute on the target. Click this field and begin typing the name of the Salt module you want to select or select it from the menu.
See the Salt module index for a complete list of Salt modules. Also see Examples of common jobs for a table describing some of the most commonly used modules.
- Optional: If the Salt module you are using needs certain arguments, add them in the Arguments field. Ensure you have read that Salt module's documention so that you know what arguments are required and in which order the arguments need to be passed.
- Click Run Command to instantly run the command against the specified target.
- Check the Activity workspace to confirm the command ran successfully and to review any job returns.
Scheduling a job
You can use the Schedules workspace in Automation Config to set a single, one-off job to run at a future date and time. You can also create repeating schedules to run jobs on a recurring basis.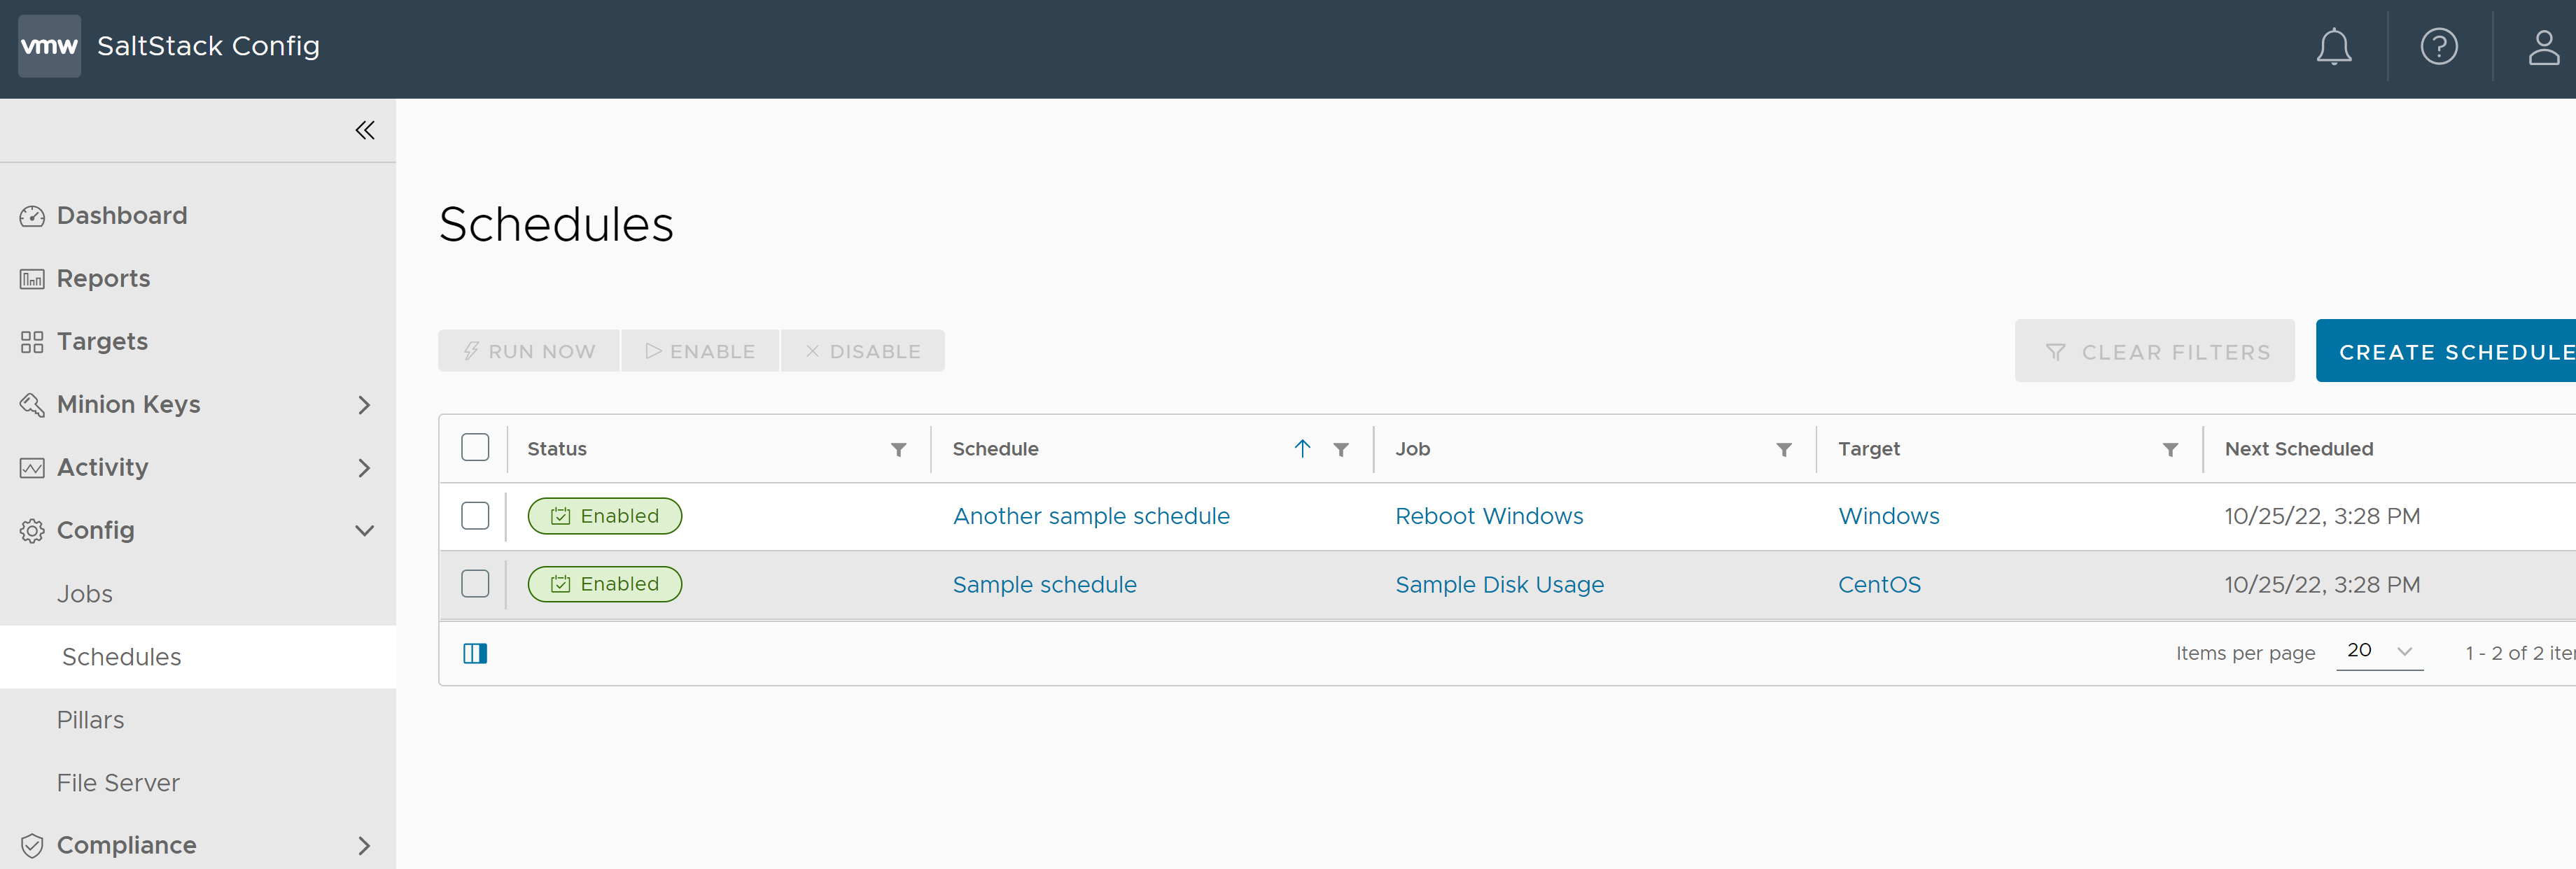
To create a new schedule for a job:
- Click Config > Schedules in the side menu to open the Schedules workspace.
- Click Create Schedule.
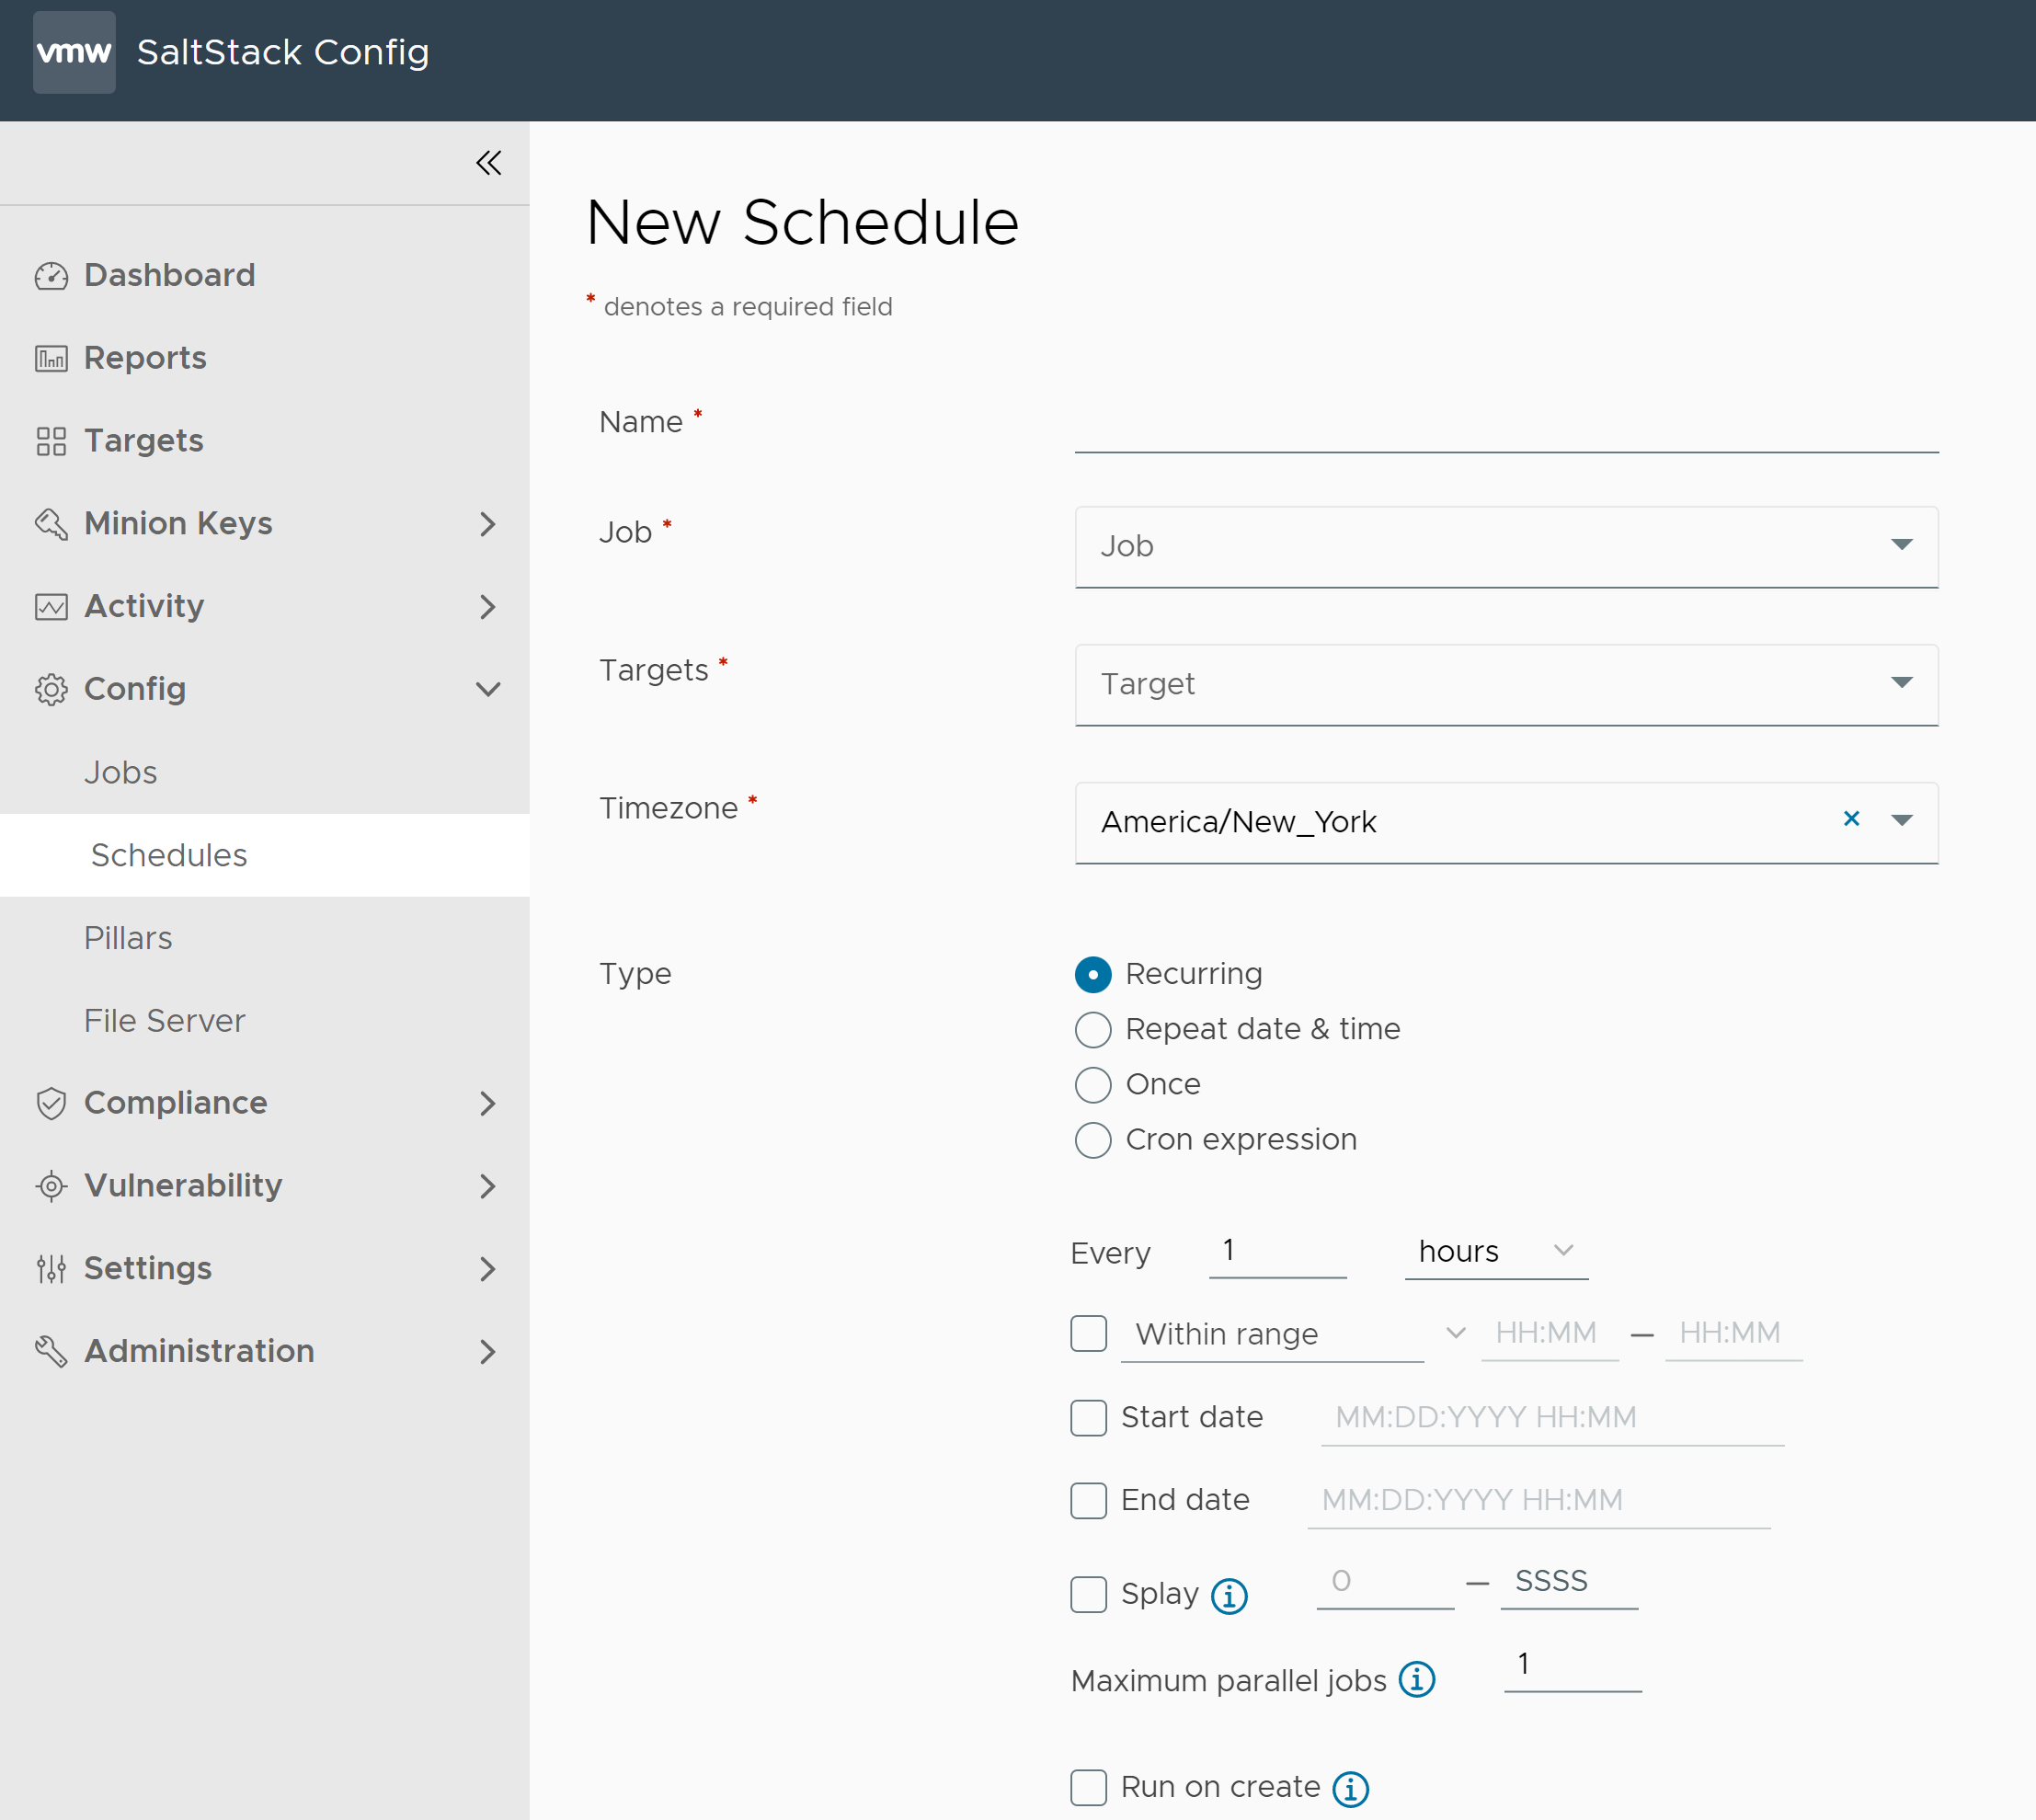
- Enter the details for the new schedule.
Field Value Name
Give the schedule a descriptive name that briefly indicates which job it runs and how frequently it runs. For example, "Daily disk capacity check."
Job
Select the name of the job that will run from the menu.
If you don't see your intended job, check that you have appropriate permissions with your Automation Config administrator.
Targets
Select the targets (minions) that this job should run on. See How do I create targets? for more information.
Timezone
Jobs included in the schedule run based on the timezone indicated in this field. Jobs are saved as UTC, which means jobs will run at the specified UTC time no matter which timezone the RaaS server may be in. The timezone is saved for translation to or from UTC to your local time.
Automation Config automatically detects your local timezone from your web browser and uses this timezone as your default. You cannot change your local timezone.
Type
Choose the schedule frequency from the available options. Depending on your selection and the type of job you are running, other settings become available.
- Recurring - Sets an interval for repeating the schedule. This option enables optional fields for the schedule's start or end date, splay, and maximum number of parallel jobs.
- Repeat Date & Time - Repeats the schedule weekly or daily. This option enables optional fields for the schedule's start or end date, and maximum number of parallel jobs.
- Once - Runs the job once at a specific date and time that you choose.
- Cron - If selecting this option, enter a cron expression to define a custom schedule based on Croniter syntax. See the CronTab editor for syntax guidelines. For best results, avoid scheduling jobs fewer than 60 seconds apart when defining a custom cron expression.
- Click Save and confirm the schedule now appears in the table of upcoming scheduled jobs.
After scheduling your job, you can use the Schedules table to run the job immediately (run now), edit the job, enable or disable the job or check its status.
Next steps
After scheduling your job, you can review job status and job returns in the Activity workspace. See How do I review job status and job returns? for more information.
