


To create a continuous integration and continuous delivery (CICD) pipeline in Automation Pipelines, you can manually add stages and tasks. To plan your CICD native build, you'll gather the information you need, then create a pipeline and manually add stages and tasks to it.
You must plan for both the continuous integration (CI) and continuous delivery (CD) stages of your pipeline. After you create your pipeline and run it, you can monitor trends across the pipeline executions.
When a pipeline includes an image from Docker Hub, you must ensure that the image has cURL or wget embedded before you run the pipeline. When the pipeline runs, Automation Pipelines downloads a binary file that uses cURL or wget to run commands.
The Automation Pipelines pipeline workspace supports Docker and Kubernetes for continuous integration tasks and custom tasks.
For information about configuring the workspace, see Configuring the Pipeline Workspace.
Planning the external and internal requirements
To plan the CI and CD stages of your pipeline, the following requirements indicate what you must do before you create your pipeline.
This example uses a Docker workspace.
To create a pipeline from this example plan, you will use a Docker host, a Git repository, Maven, and several post-process build tools.
Cloud-based or remote on-premises endpoints and repositories that you'll need:
- A Git source code repository where developers check in their code. Automation Pipelines pulls the latest code into the pipeline when developers commit changes.
- A Docker endpoint for the Docker build host that will run the build commands inside a container.
- A Builder image that creates the container on which the continuous integration tests run.
- An Image Registry endpoint so that the Docker build host can pull the builder image from it.
You'll need access to a project. The project groups all your work, including your pipeline, endpoints, and dashboards. Verify that you are a member of a project in Automation Pipelines. If you are not, ask a Automation Pipelines administrator to add you as a member of a project. See How do I add a project in Automation Pipelines.
You'll need a Git webhook that enables Automation Pipelines to use the Git trigger to trigger your pipeline when developers commit code changes. See How do I use the Git trigger in Automation Pipelines to run a pipeline.
How you'll create the CICD pipeline and configure the workspace
You'll need to create the pipeline, then configure the workspace, pipeline input parameters, and tasks.
To create the pipeline, you'll click .

On the Workspace tab, enter the continuous integration information:
- Include your Docker build host.
- Enter the URL for your builder image.
- Select the image registry endpoint so that the pipeline can pull the image from it. The container runs the CI tasks and deploys your image. If the registry needs credentials, you must first create the Image Registry endpoint, then select it here so that the host can pull the image from the registry.
- Add the artifacts that must be cached. For a build to succeed, artifacts such as directories are downloaded as dependencies. The cache is the location where these artifacts reside. For example, dependent artifacts can include the
.m2directory for Maven, and thenode_modulesdirectory for Node.js. These directories are cached across pipeline executions to save time during builds.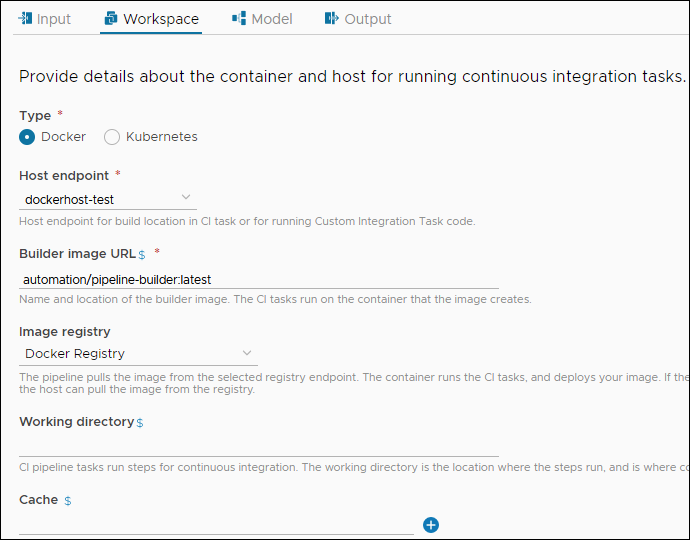
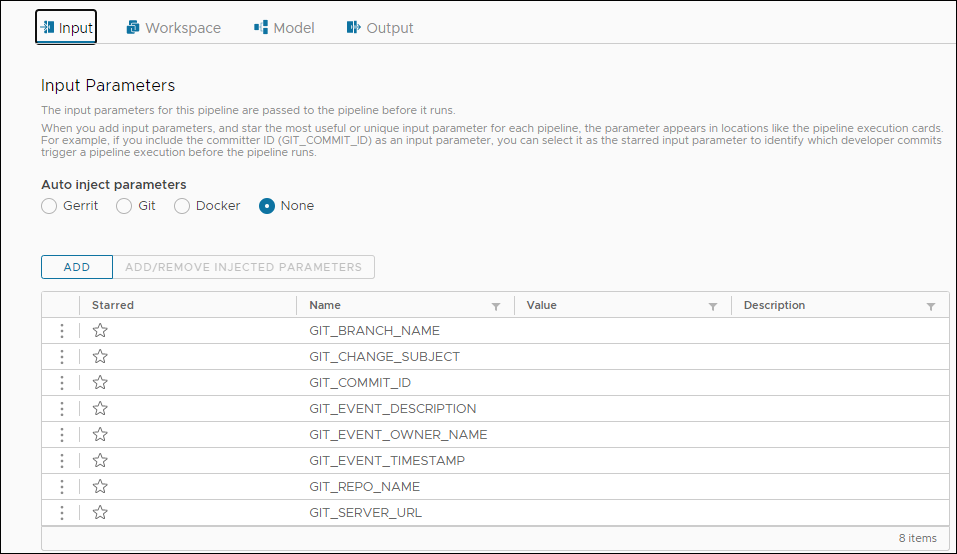
On the Input tab, configure the pipeline input parameters.
- If your pipeline will use input parameters from a Git, Gerrit, or Docker trigger event, select the trigger type for Auto inject parameters. Events can include Change Subject for Gerrit or Git, or Event Owner Name for Docker. If your pipeline will not use any input parameters passed from the event, leave Auto inject parameters set to None.
- To apply a value and description to a pipeline input parameter, click the three vertical dots, and click Edit. The value you enter is used as input to tasks, stages, or notifications.
- To add a pipeline input parameter, click Add. For example, you might add approvers to display a default value for every execution, but which you can override with a different approver at runtime.
- To add or remove an injected parameter, click Add/Remove Injected Parameter. For example, remove an unused parameter to reduce clutter on the results page and only display the input parameters that are used.
Configure the pipeline to test your code:
- Add and configure a CI task.
- Include steps to run
mvn teston your code. - To identify any problems after the task runs, run post-process build tools, such as JUnit and JaCoCo, FindBugs, and Checkstyle.

Configure the pipeline to build your code:
- Add and configure a CI task.
- Include steps that run
mvn clean installon your code. - Include the location and the JAR filename so that it preserves your artifact.

Configure the pipeline to publish your image to your Docker host:
- Add and configure a CI task.
- Add steps that will commit, export, build, and push your image.
- Add the export key of
IMAGEfor the next task to consume.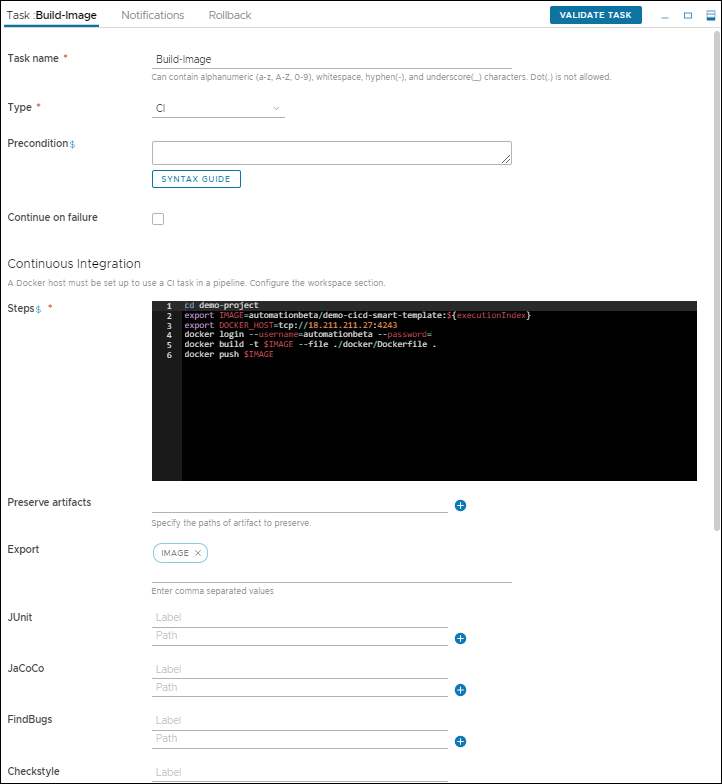
After you configure the workspace, input parameters, test tasks, and build tasks, save your pipeline.
How to enable and run your pipeline
After you configure your pipeline with stages and tasks, you can save and enable the pipeline.
Then, wait for the pipeline to run and finish, then verify that it succeeded. If it failed, correct any errors and run it again.
After the pipeline succeeds, here are some things you might want to confirm:
- Examine the pipeline execution and view the results of the task steps.
- In the workspace of the pipeline execution, locate the details about your container and the cloned Git repository.
- In the workspace, look at the results of your post-process tools and check for errors, code coverage, bugs, and style issues.
- Confirm that your artifact is preserved. Also confirm that the image was exported with the IMAGE name and value.
- Go to your Docker repository and verify that the pipeline published your container.
For a detailed example that shows how Automation Pipelines continuously integrates your code, see How do I continuously integrate code from my GitHub or GitLab repository into my pipeline in Automation Pipelines.
