


Your webhook definition must include a Git endpoint on the branch of the repository that you will monitor. To create the webhook, Automation Pipelines uses the Git endpoint. If the endpoint does not exist, you can create it when you add the webhook. This example assumes that you have a predefined Git endpoint in GitHub.
You can create multiple webhooks for different branches by using the same Git endpoint and providing different values for the branch name in the webhook configuration page. To create another webhook for another branch in the same Git repository, you don't need to clone the Git endpoint multiple times for multiple branches. Instead, you provide the branch name in the webhook, which allows you to reuse the Git endpoint. If the branch in the Git webhook is the same as the branch in the endpoint, you don't need to provide branch name in the Git webhook page.
This example shows you how to use the Git trigger with a GitHub repository, but the prerequisites include preparations required if another Git server type is used.
Prerequisites
- Verify that you are a member of a project in Automation Pipelines. If you are not, ask a Automation Pipelines administrator to add you as a member of a project. See How do I add a project in Automation Pipelines.
- Verify that you have a Git endpoint on the GitHub branch you want to monitor. See How do I integrate Automation Pipelines with Git.
- Verify that you have rights to create a webhook in the Git repository.
- For the pipelines you want to trigger, verify that you have set the input properties to inject Git parameters when the pipeline runs.
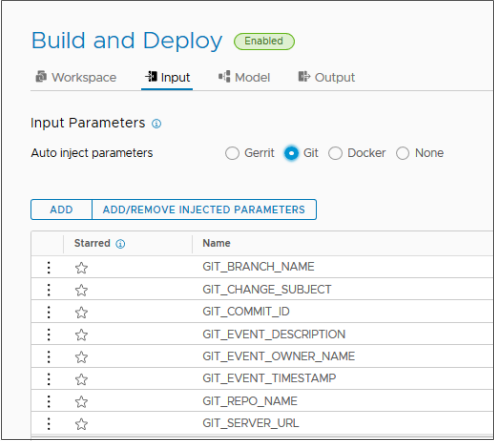
For information about input parameters, see How you'll create the CICD pipeline and configure the workspace.
Procedure
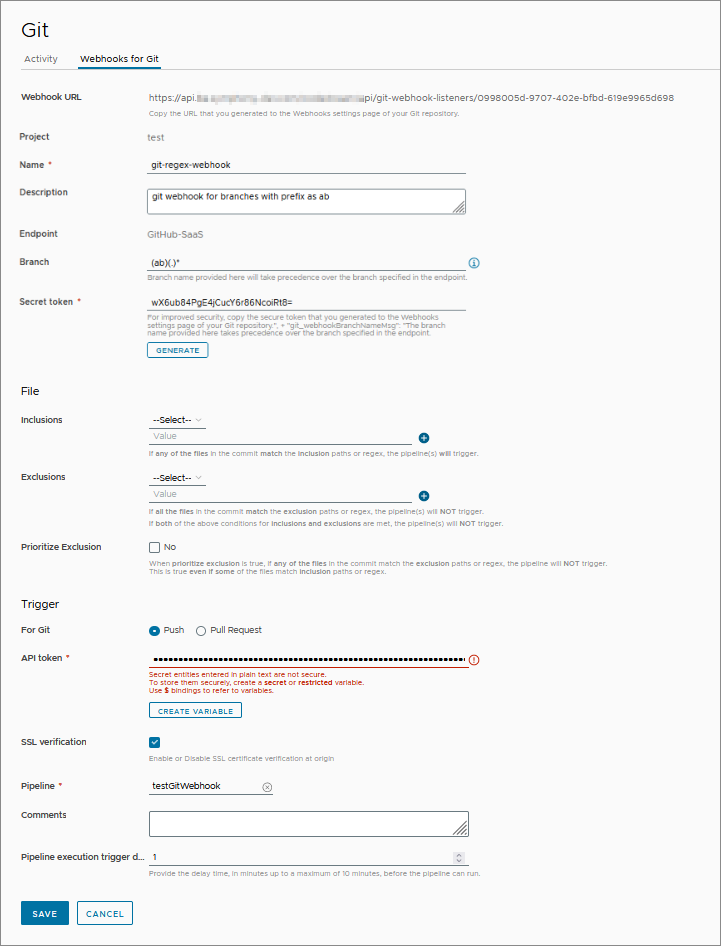
- Click the Webhooks for Git tab, then click New Webhook for Git.
- Select a project.
- Enter a meaningful name and description for the webhook.
- Select a Git endpoint configured for the branch you want to monitor.
When you create your webhook, the webhook definition includes the current endpoint details.
- If you later change the Git type, Git server type, or Git repository URL in the endpoint, the webhook will no longer be able to trigger a pipeline because it will try to access the Git repository using the original endpoint details. You must delete the webhook and create it again with the endpoint.
- If you later change the authentication type, username, or private token in the endpoint, the webhook will continue to work.
- If you are using a BitBucket repository, the URL for the repository must be in one of these formats:
https://api.bitbucket.org/{user}/{repo name}orhttp(s)://{bitbucket-enterprise-server}/rest/api/1.0/users/{username}/repos/{repo name}.
Note: If you previously created a webhook using a Git endpoint that uses a password for basic authentication, you must delete and redefine the webhook with a Git endpoint that uses a private token for authentication.See How do I integrate Automation Pipelines with Git. - (Optional) Enter the branch that you want the webhook to monitor.
If you leave the branch unspecified, the webhook monitors the branch that you configured for the Git endpoint. If you use a regex as a branch name, changes made on any branch matching the regex will trigger the pipeline.
- (Optional) Generate a secret token for the webhook.
If you use a secret token, Automation Pipelines generates a random string token for the webhook. Then, when the webhook receives Git event data, it sends the data with the secret token. Automation Pipelines uses the information to determine if the calls are coming from the expected source such as the configured GitHub instance, repository, and branch. The secret token provides an extra layer of security that is used to verify that the Git event data is coming from the correct source.
- (Optional) Provide file inclusions or exclusions as conditions for the trigger.
- File inclusions. If any of the files in a commit match the files specified in the inclusion paths or regex, the commit triggers the pipelines. With a regex specified, Automation Pipelines only triggers the pipelines when filenames in the changeset match the expression provided. The regex filter is useful when configuring a trigger for multiple pipelines on a single repository.
- File exclusions. When all the files in a commit match the specified files in the exclusion paths or regex, the pipelines do not trigger.
- Prioritize exclusions. When toggled on, Prioritize Exclusion ensures that pipelines do not trigger even if any of the files in a commit match the files specified in the exclusion paths or regex. The default setting is off.
In the following example, both file inclusions and file exclusions are conditions for the trigger.
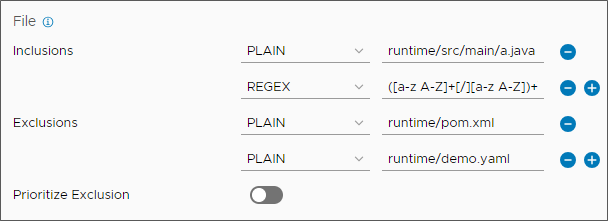
- For file inclusions, a commit with any change to runtime/src/main/a.java or any Java file will trigger pipelines configured in the event configuration.
- For file exclusions, a commit with changes only in both files will not trigger the pipelines configured in the event configurations.
- For the Git event, select a Push or Pull request.
- Enter the API Token.
The VMware Cloud Services API token authenticates you for external API connections with Automation Pipelines. To obtain the API token:
- Sign in to VMware Aria Automation.
- Sign in to
- Click the drop-down arrow by your name.
- Click My Account.
- Click API Tokens.
- Click Generate a New API Token.
- Enter a Token Name.
- Under Organization Roles, click to expand All Organization Roles and select Organization Owner.
- Under Service Roles, click to expand and select Pipelines Administrator.
- Click Generate.
The Token Generated window displays a token with the name that you specified and the name of your organization.
- Click the COPY icon.
Clicking COPY ensures that you capture the exact string and is more reliable than using your pointer to copy the string.
- Select the pipeline for the webhook to trigger.
If the pipeline includes custom added input parameters, the Input Parameters list displays parameters and values. You can enter values for input parameters that pass to the pipeline with the trigger event. Or, you can leave the values blank, or use the default values if defined.
For information about Auto inject input parameters for Git triggers, see the Prerequisites.
- Click Create.
The webhook appears as a new card.
- Click the webhook card.
When the webhook data form reappears, you see a webhook URL added to the top of the form. The Git webhook connects to the GitHub repository through the webhook URL.
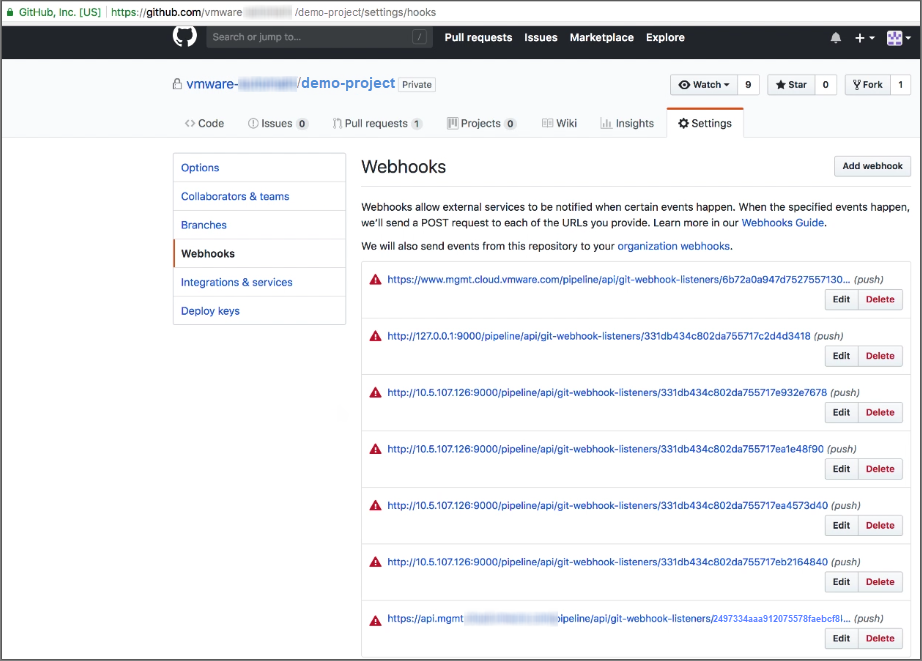
- In a new browser window, open the GitHub repository that connects through the webhook.
- To see the webhook that you added in Automation Pipelines, click the Settings tab and select Webhooks.
At the bottom of the webhooks list, you see the same webhook URL.
- To make a code change, click the Code tab and select a file on the branch. After you edit the file, commit the change.
- To verify that the webhook URL is working, click the Settings tab and select Webhooks again.
At the bottom of the webhooks list, a green checkmark appears next to the webhook URL.

- To see the webhook that you added in Automation Pipelines, click the Settings tab and select Webhooks.
- Return to Automation Pipelines to view the activity on the Git webhook. Click .
Under Execution Status, verify that the pipeline run has started.

- Click Executions and track your pipeline as it runs.
To observe the pipeline run, you can press refresh.

