Notifications from multiple Palo Alto Networks appliances can be integrated with a Carbon Black App Control Server.
Procedure
- Confirm that the Palo Alto Networks firewall and Carbon Black App Control Server system can contact each other.
- On each Palo Alto Networks appliance you plan to integrate with Carbon Black App Control, create a local user account with administrative read-only permissions for the Carbon Black App Control integration.
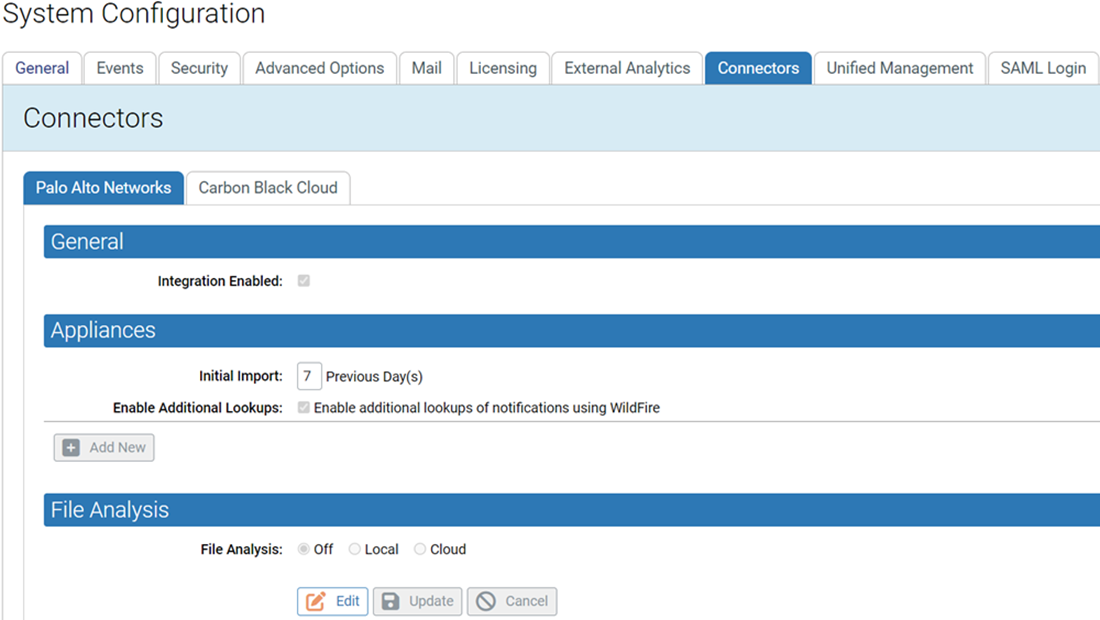
- On the Carbon Black App Control Console menu, click the Settings (gear) icon and click System Configuration.
- Click the Connectors tab and then click the Palo Alto Networks tab.
- Click the Edit button at the bottom of the page.
- Check the Integration Enabled checkbox. This is the primary switch for the Palo Alto Networks integration.
- In the Appliances panel, go to the
Initial Import field and enter the number of days of historical notification data to import to Carbon Black App Control. The default value is 7 days. This value affects only appliances from which no data has been received yet. If Carbon Black App Control already has data from an appliance, data import will resume with the time of the last data received.
- If you want to get a full malware report for each notification that has a file reference, check the Enable Additional Lookups box.
Important: The Initial Import you configured will happen all at one time. If
Enable Additional Lookups is enabled, be sure to choose an Initial Import time period that will not cause the number of WildFire cloud queries to exceed your licensed daily limit.
- The Appliances section of the Palo Alto Networks Integration Settings page lets you add and delete appliances to the Carbon Black App Control integration.
- For each appliance, click Add New and provide the following information:
- Address – The IP address of the appliance.
- Import Threat Log – Checking this box activates import of Threat Log data from this appliance to the External Notifications page on the Carbon Black App Control Server.
- Threat Log Filter – This text field shows the filtering of Threat Log data from the appliance to limit what appears in the External Notifications table. By default, the filter eliminates notifications whose severity level is informational, low, or medium. You can modify the filter to get the notifications you choose; the filter syntax is the same as that used in the Palo Alto Networks Console.
- Import WildFire Log – Checking this box activates import of WildFire Log data from this appliance to the External Notifications page on the Carbon Black App Control Server.
- WildFire Log Filter – This text field shows the filtering of WildFire Log data from the appliance to limit what appears in the External Notifications table. By default, the filter eliminates notifications whose category is benign. You can modify the filter to get only the notifications you choose.
- User Name and Password – In the User Name and Password boxes, enter the user name and password for the unique account you created in Step 2.
Note: Do not use your console login credentials for either Palo Alto Networks or
Carbon Black App Control Console in these fields.
- When you have provided the address and credentials, click the Test button to confirm that this appliance is accessible, the credentials are appropriate, and the filter syntax is valid before saving the appliance specification.
- If you are integrating more appliances, click the Add New button and provide the necessary information for another appliance.
- The settings in the File Analysis panel determines whether files from agents managed by the Carbon Black App Control Server can be sent to the WildFire cloud for analysis. If you plan to enable WildFire file analysis, see Integrating with the WildFire Cloud for Analysis for information on configuring this section.
- When you finish configuring the integration (and if all appliances pass the Test above), click the Update button at the bottom of the page.
Results
When the notifications integration is complete, Palo Alto Networks notifications begin to appear in the Carbon Black App Control Console. To see the notifications, click Reports > External Notifications on the console menu. You might not see notifications immediately because of pre-filtering of appliance notifications. If notifications do not appear at all, check the Events page in the console for Server errors, and also check for possible details of interest.
See External Notifications for a full description of the notification features, including the types of notifications pre-filtered from displaying in the console.