


Create permission, blocking, and path denial rules to control what applications and behaviors the Carbon Black Cloud sensor prevents and allows in your environment.
For Standard and Advanced default policies, many settings are activated out-of-the-box.
- The option for Runs or is running is selected and cannot be modified.
- The option for Scan execute on network drives is selected and cannot be modified.
Using wildcards in paths
When adding a path, you can use wildcards to specify files or directories.
| Wildcard | Description | Example |
|---|---|---|
| * | Matches 0 or more consecutive characters up to a single subdirectory level. | C:\program files*\custom application*.exe Approves any executable files in: C:\program files\custom application\ C:\program files(x86)\custom application\ |
| ** | Matches a partial path across all subdirectory levels and is recursive. | C:\Python27\Lib\site-packages** Approves any files in that directory and all subdirectories. |
| ? | Matches 0 or 1 character in that position. | C:\Program Files\Microsoft Visual Studio 1?.0** Approves any files in the MS Visual Studio version 1 or versions 10-19. |
Set Permission Policy Rules
Use permission rules to allow and log behavior, or to have the Carbon Black Cloud bypass a path entirely. Create permissions rules to set up exclusions for other AV/security products or to remove impediments for software developers' workstations.
Operating system environment variables can be used as part of a policy rule in a path. For example: %WINDIR%.
Procedure
- Select the desired Operation Attempt and Action attributes.
Figure 1. Permissions Rule Attributes 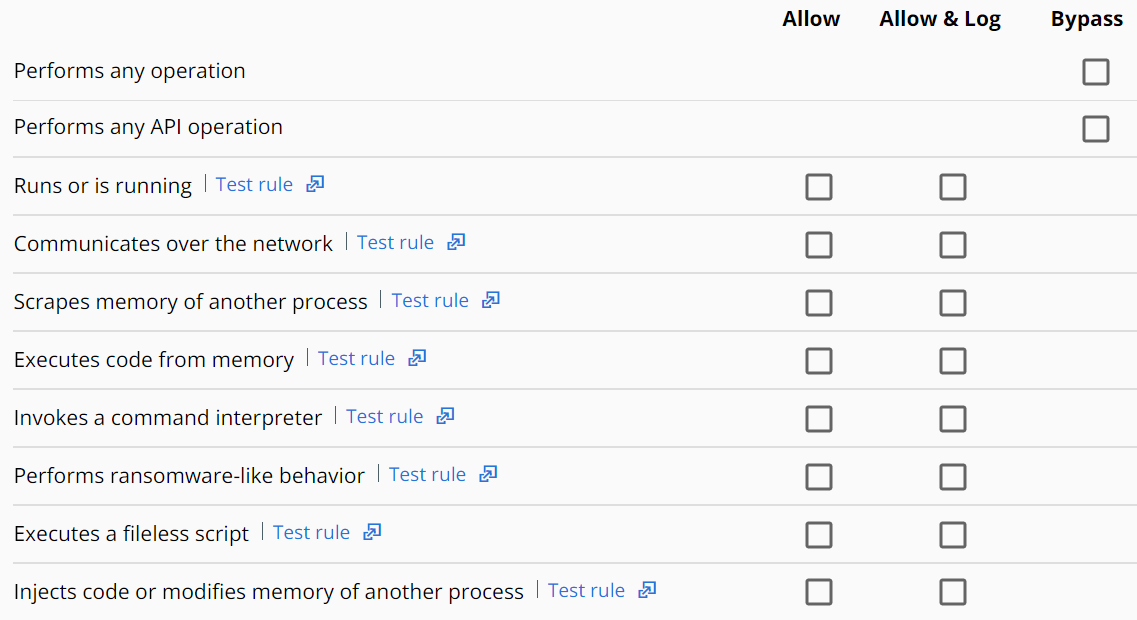
Set Blocking and Isolation Policy Rules
You can create or edit a blocking and isolation rule to deny or terminate processes and applications.
Procedure
- Click Add application path, or click the Edit icon
 next to an existing rule to edit it.
When adding a path, use wildcards to specify files or directories. For an explanation of how wildcards work in policy paths, see Prevention Policy Settings. You can add multiple paths. Each path must start on a new line. Do not separate paths with commas. You can delete a rule by clicking the Trash can icon
next to an existing rule to edit it.
When adding a path, use wildcards to specify files or directories. For an explanation of how wildcards work in policy paths, see Prevention Policy Settings. You can add multiple paths. Each path must start on a new line. Do not separate paths with commas. You can delete a rule by clicking the Trash can icon . You cannot delete built-in rules such as
Known malware or
Suspected malware.
. You cannot delete built-in rules such as
Known malware or
Suspected malware.
- Select the Deny operation or Terminate process attributes.
Figure 2. Blocking and Isolation Attribute Options 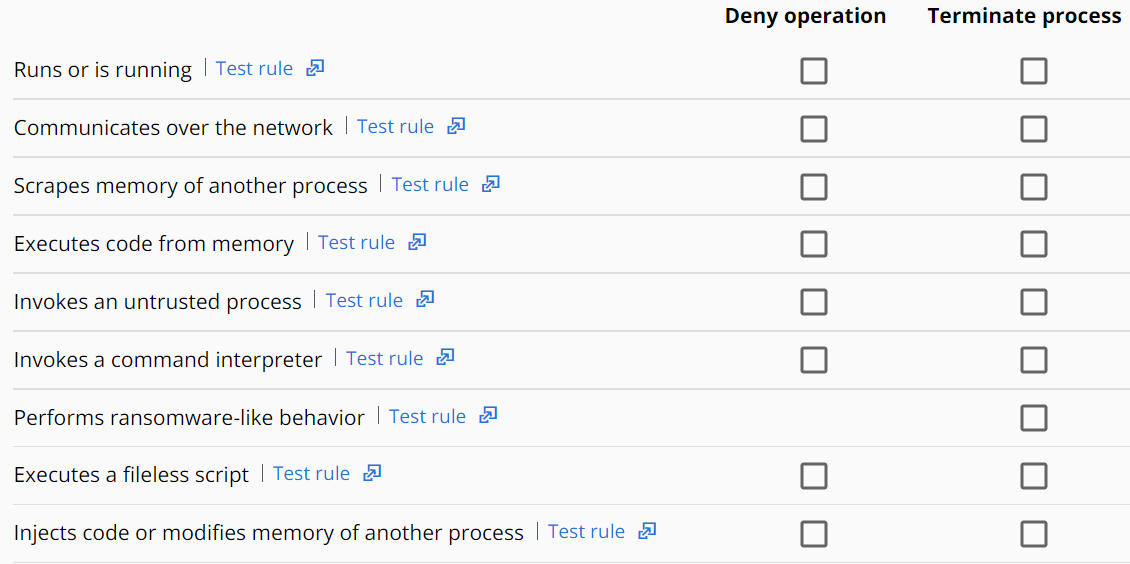 Note: If you set the action to Terminate process, you cannot concurrently deny the operation.
USB Device Blocking
You can control the access to USB storage devices, such as blocking the access to all unapproved USB devices.
Procedure
- On the left navigation pane, click .
- Select the policy.
- Click the Prevention tab and expand USB Device Blocking.
- Turn on blocking by selecting Block access to all unapproved USB devices.
- Optionally copy the same setting to all policies or to a specific policy by clicking Copy setting to other policies. Click Copy.
- To apply the changes, click Save.
Upload Paths
You can deny or allow sensors to send uploads from specific paths.
Procedure
Set Antivirus Exclusion Rules
Use this procedure to create AV exclusion rules, including those specific to various endpoint platforms.
Procedure
- On the left navigation pane, click .
- Select the policy.
- Click the Prevention tab and expand Permissions.
- Click Add application path.
- Enter the AV's recommended file/folder exclusions from the security vendor.
- Set the operation attempt Performs any API operation to Bypass.
- To apply the changes, click Confirm and then click Save.
