If you want to add a vSphere cluster with more than one vSphere Distributed Switch (vDS) or use ESXi hosts with more than two pNICs, you must use the VMware Cloud Foundation API.

For the management domain, all vSphere clusters must use vSAN for principal storage. For VI workload domains, vSphere clusters can use vSAN, NFS, VMFS on FC, or vVols for principal storage. If a VI workload domain has multiple clusters, each cluster can use a different type of principal storage, as long as all hosts within a vSphere cluster use the same type.

You can run multiple add cluster tasks at the same time.

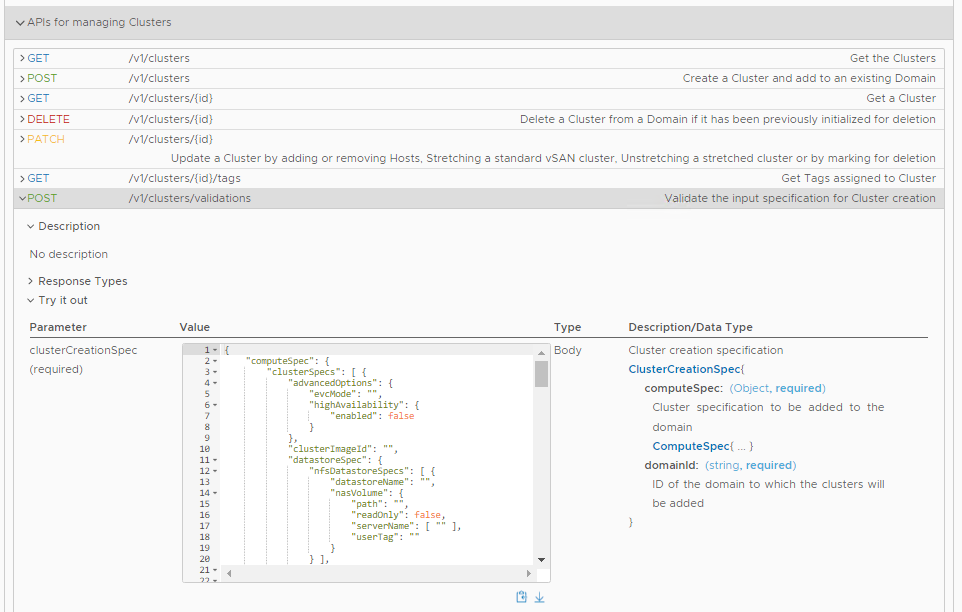
This procedure uses the clusterCreationSpec to add a vSphere cluster to a workload domain using the VMware Cloud Foundation API. It focuses on two specific sections of the clusterCreationSpec that allow you to add a vSphere cluster with more than one vDS or use ESXi hosts with more than two pNICS; hostSpecs and networkSpec.

You will need to modify these sections and complete the other sections of the clusterCreationSpec that are required for your environment. See the VMware Cloud Foundation API Reference Guide for details on all the sections of the clusterCreationSpec. See an example of a complete clusterCreationSpec at the end of this procedure.

The examples in the following procedure are based on the following scenario.
Two vSphere Distributed Switches
  • sfo-w01-cl02-vds01
  • sfo-w01-cl02-vds02
Four pNICs
  • vmnic0
  • vmnic1
  • vmnic2
  • vmnic3
pNIC to vDS mapping
  • vmnic0 and vmnic1 to sfo-w01-cl02-vds01
  • vmnic2 and vmnic3 to sfo-w01-cl02-vds02
vDS to traffic type mapping
  • sfo-w01-cl02-vds01: Management and vMotion
  • sfo-w01-cl02-vds02: vSAN, host overlay, and Edge uplinks
Modify the examples based on your VMware Cloud Foundation environment.

Prerequisites

  • Verify that there are at least three hosts available in the SDDC Manager inventory. For information on commissioning hosts, see Commission Hosts.
    Note: If the vSphere cluster is using NFS, VMFS on FC, or vVols as principal storage, and the VI workload domain is using vSphere Lifecycle Manager images as the update method, then only two hosts are required. Workload Management requires a vSphere cluster with a minimum of three ESXi hosts.
  • Ensure that the hosts you want to add to the vSphere cluster are in an active state.
  • You must have a valid vSphere and vSAN (if using vSAN storage) license specified in the Licensing tab of the SDDC Manager UI with adequate sockets available for the host to be added. For more information, see Add a License Key.
  • If you are using DHCP for the NSX Host Overlay Network, a DHCP server must be configured on the NSX Host Overlay VLAN of the management domain. When NSX creates TEPs for the VI workload domain, they are assigned IP addresses from the DHCP server.

Procedure

  1. Get the IDs for the ESXi hosts that you want to add to the vSphere cluster.
    1. In the SDDC Manager UI, click Developer Center > API Explorer.
    2. Expand the APIs for managing Hosts section, and click GET /v1/hosts.
    3. Enter UNASSIGNED_USEABLE in the status text box and click Execute.
    4. In the response, locate and copy the ID of each host you want to add to the VI workload domain.
  2. In a text editor, create a JSON specification for the hostSpecs. For example:
    "hostSpecs" : [ {
            "id" : "0ac30e66-7f65-4477-8331-80c3777c153c",
            "licenseKey": "XXXXX-XXXXX-XXXXX-XXXXX-XXXXX",
            "username" : "root",
            "hostNetworkSpec" : {
              "vmNics" : [ {
                "id" : "vmnic0",
                "vdsName" : "sfo-w01-cl02-vds01"
              }, {
                "id" : "vmnic1",
                "vdsName" : "sfo-w01-cl02-vds01"
              }, {
                "id" : "vmnic2",
                "vdsName" : "sfo-w01-cl02-vds02"
              }, {
                "id" : "vmnic3",
                "vdsName" : "sfo-w01-cl02-vds02"
              } ]
            }
          },
    For each ESXi host, add a section that includes:
    • id
    • licenseKey
    • userName
    • hostNetworkSpec
    Use the ESXi host IDs from step 1.
  3. Get the ID of the workload domain to which you are adding a vSphere cluster.
    1. In the SDDC Manager UI, click Developer Center > API Explorer.
    2. Expand the APIs for managing Domains section, and click GET /v1/domains.
    3. Click Execute.
    4. In the response, locate and copy the ID of the workload domain to which you want to add a vSphere cluster.
  4. In a text editor, create a JSON specification for the networkSpec. For example:
     "networkSpec" : {
                 "vdsSpecs": [
                   {
                       "name": "sfo-w01-cl02-vds01",
                       "portGroupSpecs": [
                           {
                               "name": "sfo01-w01-cl02-vds01-pg-mgmt",
                               "transportType": "MANAGEMENT"
                           },
                           {
                               "name": "sfo01-w01-cl02-vds01-pg-vmotion",
                               "transportType": "VMOTION"
                           }
                       ]
                   },
                   {
                       "name": "sfo-w01-cl02-vds02",
                       "isUsedByNsxt": true,
                       "portGroupSpecs": [
                           {
                               "name": "sfo01-w01-cl02-vds02-pg-vsan",
                               "transportType": "VSAN"
                           }
                       ]
                    }],
                     "nsxClusterSpec" : 
                        {
                        "nsxTClusterSpec" : 
                           {
                        "geneveVlanId" : 12
                           }
                        }
              }
    Note: Specify "isUsedByNsxt": true for the vDS to use for host overlay traffic. If you have multiple vSphere Distributed Switches, only one of them can specify "isUsedByNsxt": true.
  5. In the SDDC Manager UI, click Developer Center > API Explorer.
  6. Expand the APIs for managing Clusters section, and click POST /v1/clusters/validations.
  7. In the Description/Data Type column, click ClusterCreationSpec.
    clusterCreationSpec in the API Explorer
  8. Replace the hostSpecs section with the information from the hostSpecs JSON file.
  9. Replace the networkSpec section with the information from the networkSpec JSON file.
  10. Replace the domainId with the ID of the workload domain from step 3.
  11. Update or remove the other sections of the clusterCreationSpec as needed, based on the vSphere cluster you are adding.
    See an example of a complete clusterCreationSpec at the end of this procedure.
  12. Click Execute to validate the clusterCreationSpec.
    If validation succeeds, copy the clusterCreationSpec content and proceed to the next step. If validation fails, check the errors in the response, update the clusterCreationSpec, and validate it again.
  13. Expand the APIs for managing Clusters section, and click POST /v1/clusters.
  14. Paste the validated clusterCreationSpec content and click Execute.
    You can use the skipFailedHosts property to determine what happens when one or more of the ESXi hosts you selected for the cluster is unhealthy. If you specify "skipFailedHosts":false and your new cluster includes an unhealthy host, cluster creation will fail. If you specify "skipFailedHosts":true and your new cluster includes an unhealthy host, cluster creation will succeed as long as you selected enough healthy hosts to meet the minimum requirements for a new cluster. If you do not have enough healthy hosts, cluster creation will fail. If you do not specify any value for skipFailedHosts, the system defaults to "skipFailedHosts":true.
    Use the Tasks panel in the SDDC Manager UI to monitor adding the vSphere cluster to the workload domain.

Example

Example of a complete clusterCreationSpec
{
  "domainId": "7d7cf328-5e79-45f5-9b1c-3973f951a910",
  "computeSpec": {
    "clusterSpecs": [
      {
        "name": "sfo-w01-cl02",
        "hostSpecs": [
          {
            "id": "e0579270-7a67-4af6-9f5b-99905160c953",
            "licenseKey": "XXXXX-XXXXX-XXXXX-XXXXX-XXXXX",
            "hostNetworkSpec": {
              "vmNics": [
                {
                  "id": "vmnic0",
                  "vdsName": "sfo-w01-cl02-vds01"
                },
                {
                  "id": "vmnic1",
                  "vdsName": "sfo-w01-cl02-vds01"
                },
                {
                  "id": "vmnic2",
                  "vdsName": "sfo-w01-cl02-vds02"
                },
                {
                  "id": "vmnic3",
                  "vdsName": "sfo-w01-cl02-vds02"
                }
              ]
            }
          },
          {
            "id": "d9db5f30-72a0-4829-8882-17fe5610a03b",
            "licenseKey": "XXXXX-XXXXX-XXXXX-XXXXX-XXXXX",
            "hostNetworkSpec": {
              "vmNics": [
                {
                  "id": "vmnic0",
                  "vdsName": "sfo-w01-cl02-vds01"
                },
                {
                  "id": "vmnic1",
                  "vdsName": "sfo-w01-cl02-vds01"
                },
                {
                  "id": "vmnic2",
                  "vdsName": "sfo-w01-cl02-vds02"
                },
                {
                  "id": "vmnic3",
                  "vdsName": "sfo-w01-cl02-vds02"
                }
              ]
            }
          },
          {
            "id": "13148430-f151-4fdc-b5f3-083590674e12",
            "licenseKey": "XXXXX-XXXXX-XXXXX-XXXXX-XXXXX",
            "hostNetworkSpec": {
              "vmNics": [
                {
                  "id": "vmnic0",
                  "vdsName": "sfo-w01-cl02-vds01"
                },
                {
                  "id": "vmnic1",
                  "vdsName": "sfo-w01-cl02-vds01"
                },
                {
                  "id": "vmnic2",
                  "vdsName": "sfo-w01-cl02-vds02"
                },
                {
                  "id": "vmnic3",
                  "vdsName": "sfo-w01-cl02-vds02"
                }
              ]
            }
          }
        ],
        "datastoreSpec": {
          "vsanDatastoreSpec": {
            "failuresToTolerate": 1,
            "licenseKey": "XXXXX-XXXXX-XXXXX-XXXXX-XXXXX",
            "datastoreName": "sfo-w01-cl02-ds-vsan01"
          }
        },
        "networkSpec": {
          "vdsSpecs": [
            {
              "name": "sfo-w01-cl02-vds01",
              "portGroupSpecs": [
                {
                  "name": "sfo-w01-cl02-vds01-pg-mgmt",
                  "transportType": "MANAGEMENT"
                },
                {
                  "name": "sfo-w01-cl02-vds01-pg-vmotion",
                  "transportType": "VMOTION"
                }
              ]
            },
            {
              "name": "sfo-w01-cl02-vds02",
              "isUsedByNsxt": true,
              "portGroupSpecs": [
                {
                  "name": "sfo-w01-cl02-vds02-pg-vsan",
                  "transportType": "VSAN"
                }
              ]
            }
          ],
          "nsxClusterSpec": {
            "nsxTClusterSpec": {
              "geneveVlanId": ""
            }
          }
        }
      }
    ]
  },
  "advancedOptions": {
    "evcMode": "",
    "highAvailability": {
      "enabled": true
    }
  }
}