This section describes how to configure a Security Policy for VMware Cloud Web Security.
Before you begin:
To configure a Security Policy, a user must have first created, configured, and applied a Security Policy. For specific instructions on how to achieve this, see Creating a Security Policy.
About this Task:
In this section, a user will learn how configure the Security Policy that was created in the section titled, Creating a Security Policy. When creating a Security Policy, there are four rule categories that a user can configure: SSL Inspection, URL Filtering, Content Filtering, and Content Inspection.
Google developed the QUIC (Quick UDP Internet Connections) protocol to increase the performance of HTTPS and HTTP (TCP 443 and TCP 80) connections. Chrome browsers have had experimental support for it since 2014, and it is also used in Chromium (for example, Microsoft Edge, Opera, and Brave) and Android devices.
QUIC connections do not require TCP handshakes. However, SSL inspection requires TCP session information and VMware Cloud Web Security performs SSL Inspection by default (unless a bypass rule is explicitly configured to prevent it) and thus Cloud Web Security cannot examine QUIC sessions where SSL Inspection is being done. In such instances where QUIC is enabled and SSL Inspection is being performed, theis can result in a policy not being applied during a user session.
To ensure that Cloud Web Security policies are consistently applied, it is recommended that the QUIC protocol is either blocked or disabled on the browser.
To block QUIC, configure your browser or firewall to block UDP 443 and UDP 80 as these are the ports the QUIC protocol uses. When the QUIC protocol is blocked, QUIC has a failsafe to fall back to TCP. This enables SSL inspection without negatively impacting the user experience.
To disable QUIC on a Chromium browser, please check the documentation for the respective browser.
To disable QUIC on a Chrome browser:
- Open Chrome
- In the address bar type: chrome://flags
- In the search bar, type "quic".
- Click the drop-down and select Disabled.
- When Default is selected, Chrome will attempt to use QUIC.
- When prompted, click Relaunch Now to restart Chrome and apply your changes.
Procedure:
- In the Security Policies page of the new UI of the VMware SD-WAN Orchestrator, double-click the Security Policy name for the policy to be configured. (See image below).
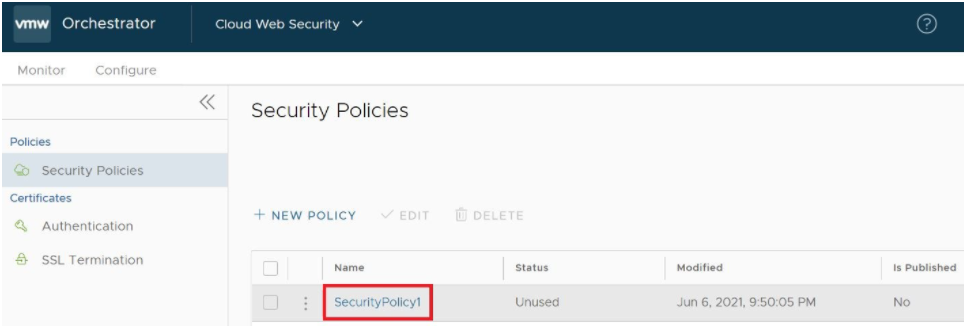
The Security Policies screen for the selected policy appears.
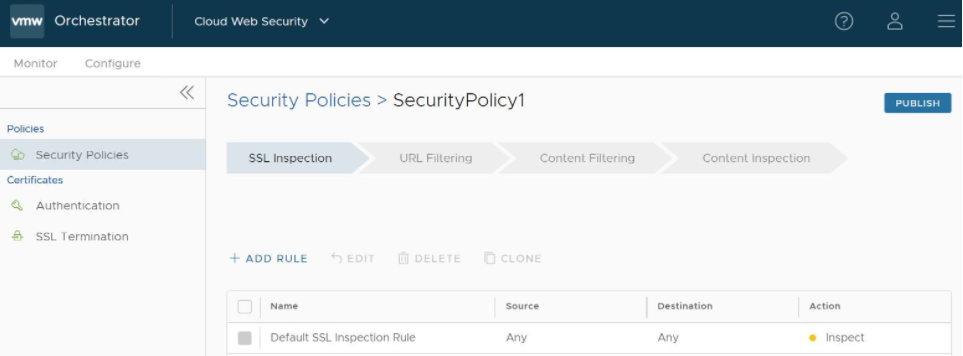
- From the selected Security Policy page, a user can configure rules from the following four rule categories: SSL Inspection, URL Filtering, Content Filtering, and Content Inspection, as shown in the image below. See the Security Policy Categories section for a complete description of how to configure rules for each category (SSL Inspection Category, URL Filtering Category, Content Filtering Category, and Content Inspection Category).
Important: By default, a Security Policy has “allow all” and “decrypt all” rules. By configuring any of the four rule categories listed above, a user is overriding default rules and creating a policy comprised of their own rules.
- After configuring the Security Policy, click the Publish button to publish the Security Policy. See the image below.
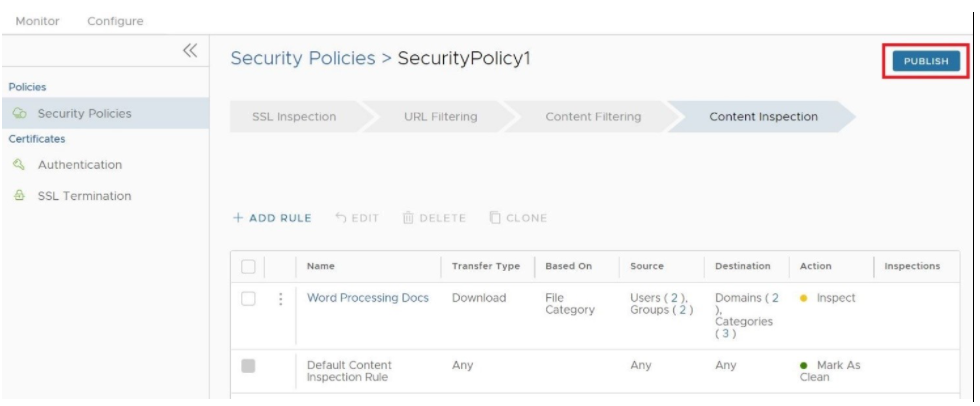
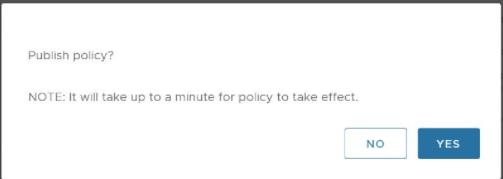
The Publish Policy pop up dialog appears, as shown in the image below.
- Click the Yes button to publish the policy.
A green banner appears on the top of the screen indicating that the Security Policy is being published, as shown in the image below.
 Remember: A Security Policy can be published at any time in the configuration process, and be republished whenever the user revises it.
What to do next:
Security Policy Categories
The sections below describe in detail the four rule categories a user can configure for a selected Security Policy, as mentioned in Step 2 in the 'Procedures' section above. By configuring any of these categories, a user is overriding default rules.
SSL Inspection Category
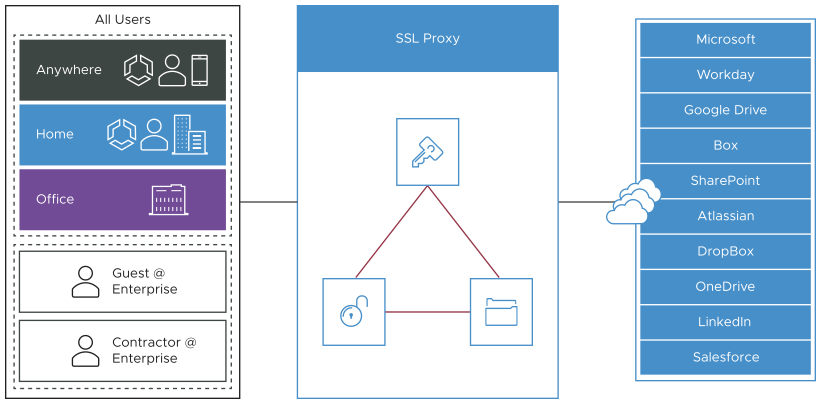
Because 90 percent of Internet traffic is encrypted, there is a need to decrypt the traffic to inspect what is inside. By default, all traffic is SSL decrypted and then inspected, forming the basis for stronger security.
However, some traffic does not like having a “man in the middle” for its traffic in the way that the SSL Inspection works. This includes traffic using certificate pinning, Mutual TLS (mTLS) and some using WebSockets. To ensure Cloud Web Security does not break these kinds of traffic, a user can configure exceptions to this default SSL Inspection rule, which would allow the traffic to bypass SSL Inspection.
The SSL Root CA certificate can be downloaded by clicking on SSL Termination on the left side of the Cloud Web Security > Configuration menu.
- Click the Certificate icon or link to download
- Save file and note location
- Note the Certificate thumbprint, for validation on import
If a user wants to make an exception to the default rule and does not want Cloud Web Security to decrypt SSL encrypted packets, the user would make a rule for that traffic based on either source, destination, or destination categories (image below). Follow the steps below to make an exception to the default rule.
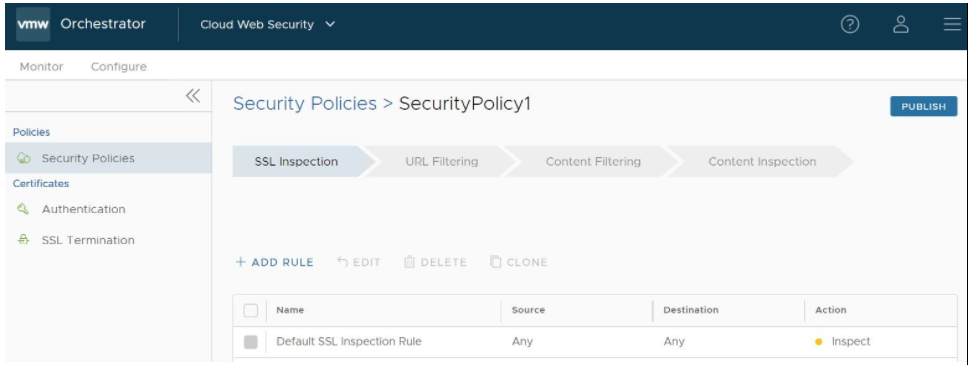
- On the SSL Inspection tab of the Security Policies screen, select + ADD RULE, as shown in the image above to configure the SSL Inspection Exception rule.
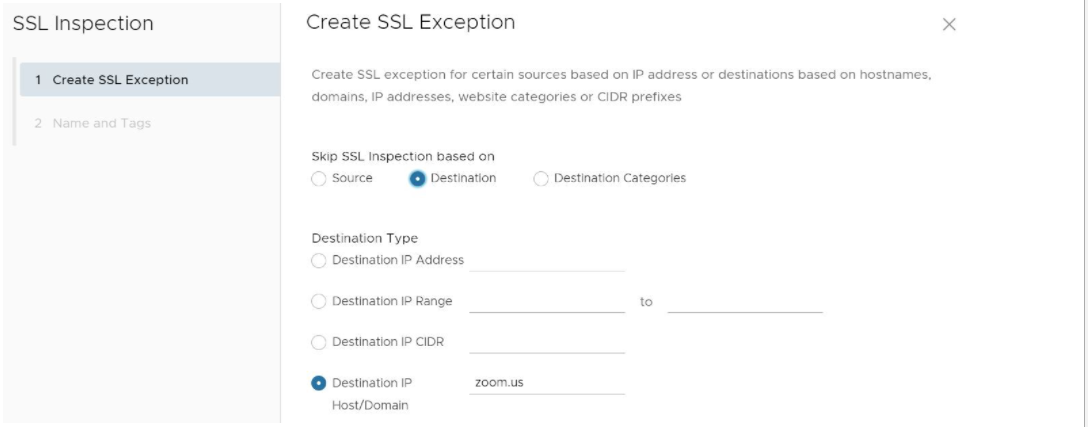
The Create SSL Exception screen appears. See image below.
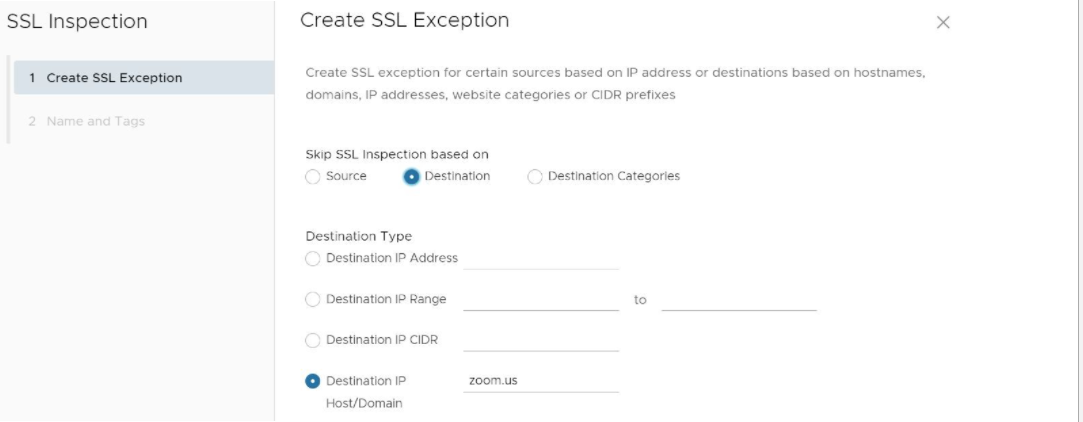
- In the Create SSL Exception screen, the user chooses which type of traffic to bypass SSL Inspection by selecting either Source, Destination, or Destination Categories.
For example, the user could create a rule that bypassed SSL inspection for all traffic destined for zoom.us, by configuring the rule as a destination rule and then choosing the destination type by either destination IP or host/domain. See the image below for an illustration of this example.
- Click the Next button.
- In the Name and Tags screen, indicate the Rule Name, Tags, and if necessary, a Reason for why the bypass rule was created, as shown in the image below.

- Click Finish.
The rule is now added to the Security Policy.
- The user has the following options: configure another SSL Inspection rule, configure a different Security Policy category, or if finished, click the Publish button to publish the Security Policy.
- After publishing the Security Policy, the user is ready to Apply the Security Policy.
URL Filtering Category
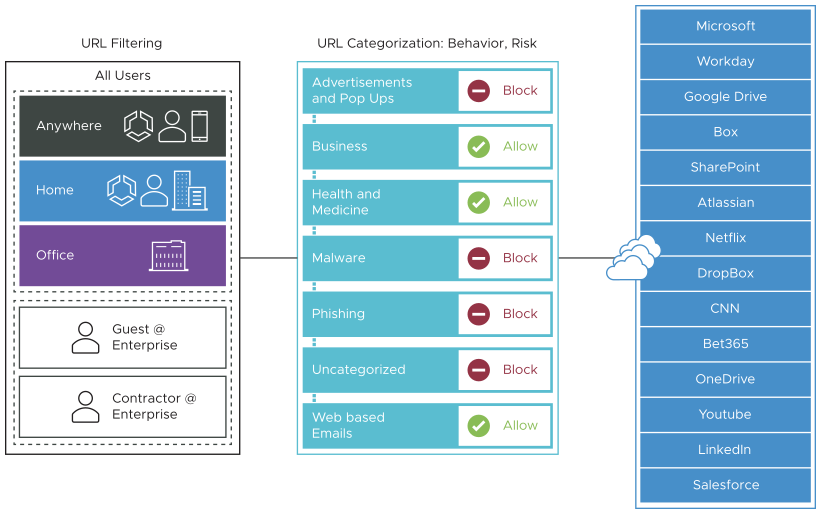
URL Filtering allows the user to configure rules to limit user interaction to specific categories of web sites.
- Control employee web browsing with granular policies.
- Report high risk sites, useful with SaaS applications.
- Allow/Block based on pre-defined categories.
- Block URLs hosting objectionable content with an option to block custom domains.
In contrast to SSL Inspection, where the default rule enforces stringent security by inspecting every SSL encrypted packet, the default rules for URL Filtering are permissive, allowing all traffic by default, regardless of potential danger. It is up to the user to change the default behavior. In order to change the default behavior, the user can choose from three kinds of rules URL Filtering enforces: Category, Threat, and Domain. See the steps below to configure a Security Policy rule for URL Filtering.
- In the selected Security Policies screen, click the URL Filtering tab, located at the top of the screen.
- Select + ADD RULE and click the Next button.
The URL Filtering Applied To screen appears, showing three options to choose from (Web Categories, Threat Categories, and Domain from the Type drop-down menu, as shown in the image below.
- In the Type drop-down menu, choose one of three options (Website Categories, Threat Categories, or Domain), as shown in the image below. See the sub steps below for specific steps to follow for each category option.

- Website Categories Option: The user selects the Website Categories option to configure a rule based on pre-configured categories that comprise a large number of URLs. Follow the sub steps below to configure using this category.
The Select Source and Destination screen appears, as shown in the image below.
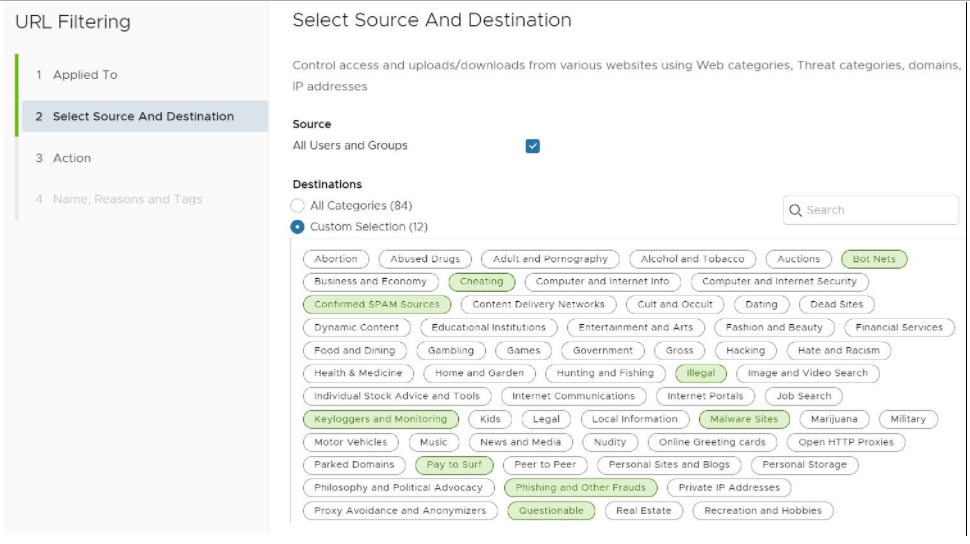
- In the Select Source and Destination screen, under Source, check the All Users and Groups check box to apply the rule to all users and groups, or deselect that check box to specify Users and Groups.
- In the Select Source and Destination screen, under Destinations, select either All Categories or Custom Selection. The All Categories option highlights all available categories and applies them to the rule. The Custom Selection option allows the user to specify which categories to apply to the rule by clicking on each category, as shown in the image above.
- Click the Next button.
- In the URL Filtering Action screen, choose Block or Allow from the drop-down menu to determine if the rule is for blocking URL’s or allowing them. (See image below).
- Click the Next button.

- In the Name, Reasons, and Tags screen, enter information in the following fields: Rule Name, Tags, Reason, and Position. NOTE: The Position field designates the rule's position on the list of URL filtering rules.

- Click the Finish button and the rule will be posted on the URL Filtering list. The main URL Filtering screen appears.
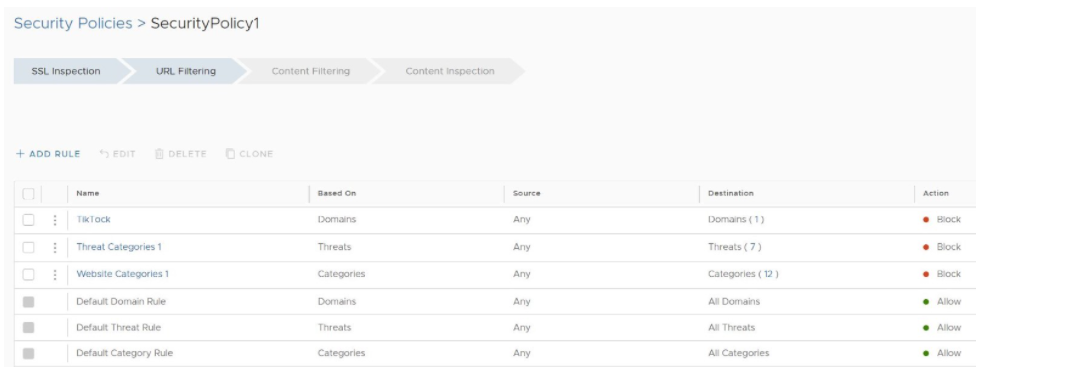
- The user has the following options: configure another SSL Inspection rule, configure a different Security Policy category, or if finished, click the Publish button to publish the Security Policy.
- After publishing the Security Policy, the user is ready to Apply the Security Policy
- Threat Category Option: The user selects the Threat Categories option from the drop-down menu to apply threat types (based on updated information from cybersecurity firms), follow the sub steps below. See image below.
- Click the Next button.

- In the Select Source and Destination screen, under Source, check the All Users and Groups check box to apply the rule to all users and groups, or deselect that check box to specify Users and Groups.

- In the Select Source and Destination screen, under Destinations, select either All Categories or Custom Selection. The All Categories option highlights all available categories and applies them to the rule. The Custom Selection option allows the user to specify which categories to apply to the rule by clicking on each category, as shown in the image above.
- Click the Next button.
- In the URL Filtering Action screen, specify if the specific threats are to be blocked or allowed. See image below.

- In the Name, Reasons and Tags screen, enter information in the following fields: Rule Name, Tags, Reason, and Position. NOTE: The Position field designates the rule's position on the list of URL filtering rules.

- Click the Finish button and the rule will be posted on the URL Filtering list. The main URL Filtering screen appears.

- The user has the following options: configure another SSL Inspection rule, configure a different Security Policy category, or if finished, click the Publish button to publish the Security Policy.
- After publishing the Security Policy, the user is ready to Apply the Security Policy
- In the Select Source and Destination screen, under Source, check the All Users and Groups check box to apply the rule to all users and groups, or deselect that check box to specify Users and Groups.
- Domain Option: The user selects the Domain option from the drop-down menu to configure domain(s), IP addresses, IP ranges, and CIDRs to be filtered per the rule. (See image below).
 Tip: A user can specify multiple domains per rule by separating each domain with a comma.
Click the Next button.
The Select Source and Destination screen appears, as shown in the image below.
Follow the sub steps below to configure the Domain option.
- In the Select Source and Destination screen, under Source, check the All Users and Groups check box to apply the rule to all users and groups, or deselect that check box to specify Users and Groups.
- Click the Next button.
- Under Destinations, enter the domains in the Specify Domains text field (e.g., google.com). A user specifies which domain(s) are to be filtered per the rule. A user can specify multiple domains per rule by separating each domain with a comma.
- Click Next.
- In the URL Filtering Action screen, specify if this rule exception is for blocking the traffic or allowing it, and then click the Next button.

- Click Next.
- In the Name, Reasons and Tags screen, enter information in the following fields: Rule Name, Tags, Reason, and Position. NOTE: The Position field designates the rule's position on the list of URL filtering rules.
- Click Finish.
- After completing all the URL Filtering rules, a user may view the full list.

- Click the Finish button and the rule will be posted on the URL Filtering list. The main URL Filtering screen appears.
- The user has the following options: configure another URL Filtering rule, configure a different Security Policy category, or if finished, click the Publish button to publish the Security Policy.
- After publishing the Security Policy, the user is ready to Apply the Security Policy
- Website Categories Option: The user selects the Website Categories option to configure a rule based on pre-configured categories that comprise a large number of URLs. Follow the sub steps below to configure using this category.
Content Filtering Category
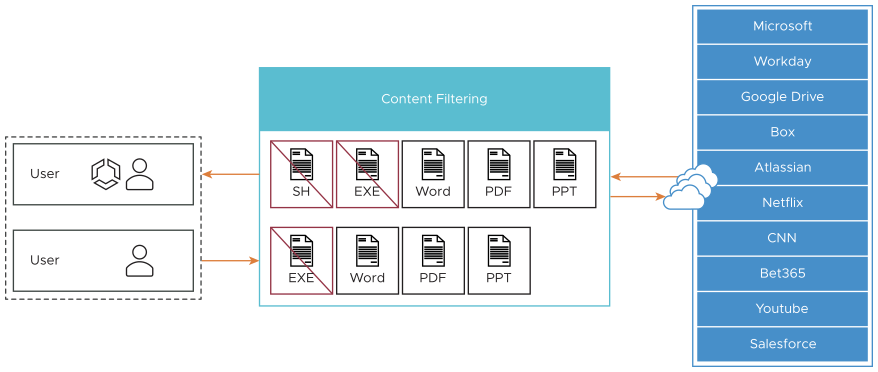
- Reduce attack surface by allowing only required types of content.
- Control content for both uploads and downloads.
The following document and file types are listed are supported.
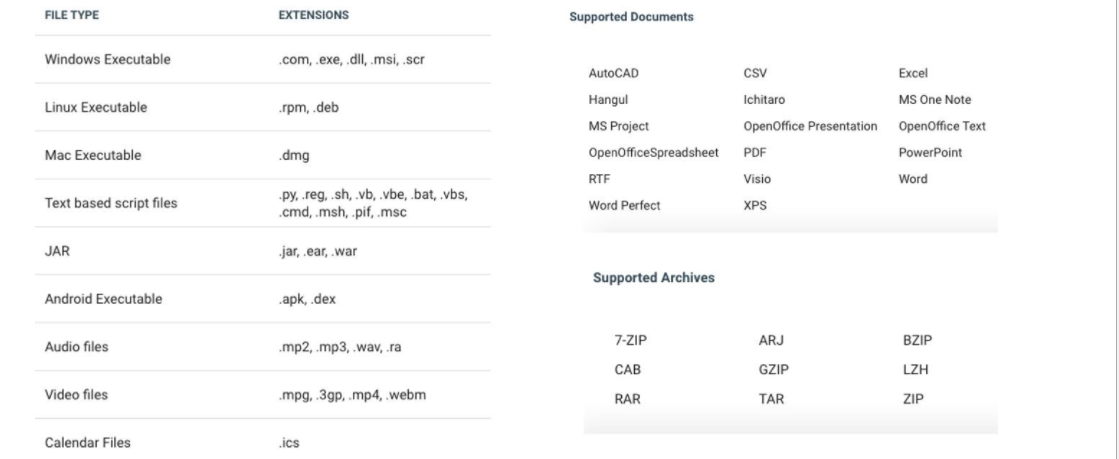 The default rules for Content Filtering are:
- All downloads are allowed, but first undergo a virus scan for harmful content.
- All uploads are allowed without inspection.
- In the selected Security Policy screen, click the Content Filtering tab, located at the top of the screen.
- Select + ADD RULE.
The Content Filtering Applied To screen appears.
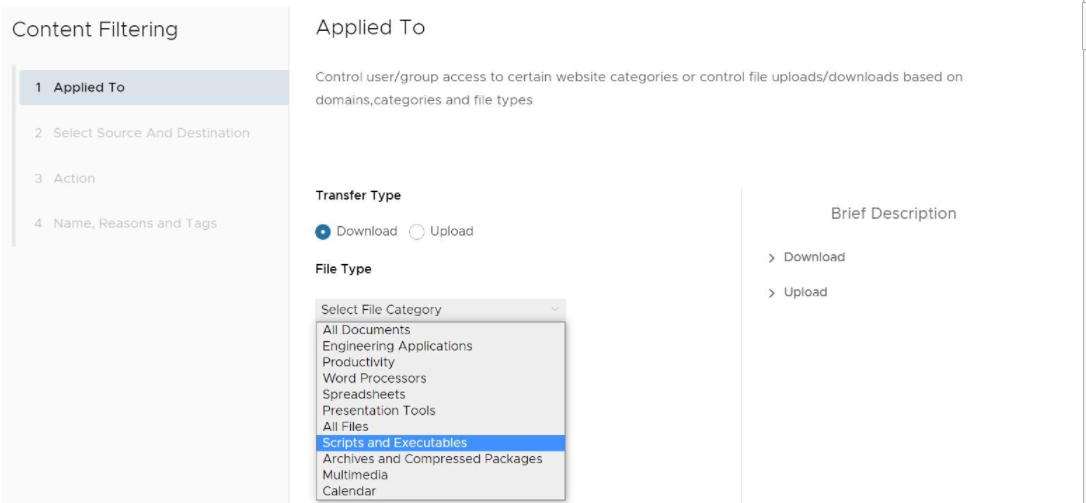
- Under Transfer Type, choose either the Download or Upload radio dial. The user cannot select both options. If the user wants both a download and upload rule, two separate rules are required.
- Under File Type, select a category from the drop-down menu, as shown in the image below.
- Click Next.
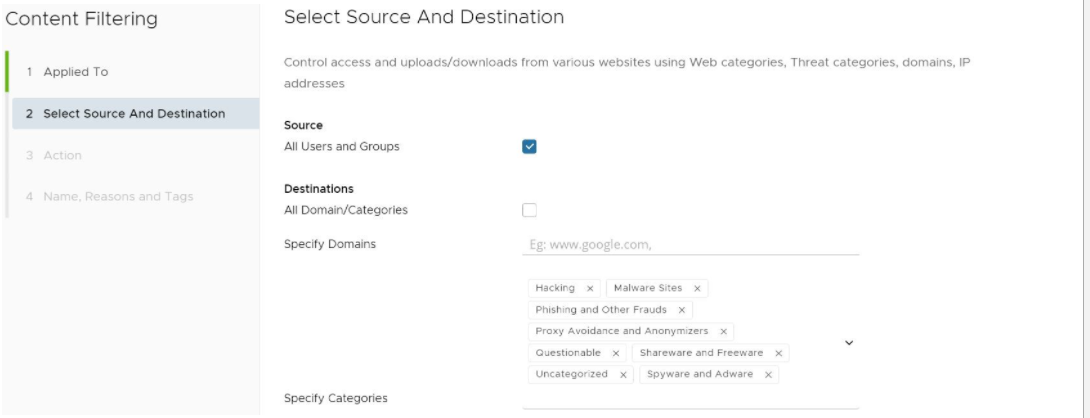
The Select Source and Destination appears, as shown in the image below.
- In the Select Source and Destination screen, under Source, a user can check the All Users and Groups check box to apply the rule to all users and groups, or deselect that check box to specify Users and Groups.
- Under Destinations, a user can check the All Domains/Categories check box to apply the rule to all domains and categories, or deselect the check box to configure individual domains or specify web categories from a drop-down menu.
- Click Next.
- In the Content Filtering Action screen, choose Block or Allow from the drop-down menu to determine if the rule is for blocking URL’s or allowing them, as described in the sub steps below.
- If Block is chosen, then any of the specified file types with matching domain/categories would be blocked for the specified users/groups, as shown in the image below.

- If Allow is chosen, the content is allowed on the network.

- Click the Next button.
- If Block is chosen, then any of the specified file types with matching domain/categories would be blocked for the specified users/groups, as shown in the image below.
- In the Content Filtering Name, Reasons, and Tags screen, enter information for the following text fields: Rule Name, Tags, and Reason. For the Position text field, indicate where the rule should be placed on the Content Filtering rule list.

- Click Finish.
The rule is now added to the Security Policy and the user can continue to the security feature.
- The user has the following options: configure another rule under Content Filtering, configure a different Security Policy category, or if finished, click the Publish button to publish the Security Policy.
- After publishing the Security Policy, the user is ready to Apply the Security Policy
Content Inspection Category
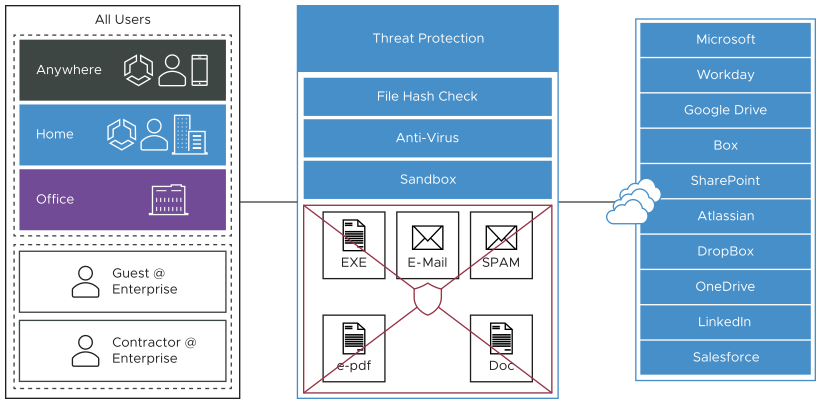
Content Inspection provides protection from active sites with malware content as well as protection against known and “Day 0” threats. Content the user has allowed so far can be inspected to determine if it is harmful.
- File Hash Check: The file is scanned to see if it matches a known file hash stored in the Cloud Web Security database. A file hash is a unique value and is compared against results from more than 50 AV engines. The result of a hash check can be clean, malicious, or unknown. If clean, the file is allowed onto the network. If malicious, the file is dropped. If unknown, the file will be either dropped or sent to the Anti-Virus Scan, depending on which options were selected.
- Anti-Virus Scan: The file is scanned by the Cloud Web Security anti-virus application checking for known viruses and malware signatures. If the file matches a known virus or malware, the file is dropped. If the file does not match a known virus/malware, it is either dropped or sent to the Sandbox, depending on which options were selected.
- Sandbox: The Sandbox is a contained environment where a file can be securely analyzed in two ways:
- Static Analysis: inspects the file for libraries, functions imported, scans the code for strings, linking methods used, etc.
- Dynamic Analysis: runs the file in a contained environment and determines if the file is infected based on the behavior. Dynamic takes much more time to process.
- In the selected Security Policies screen, click the Content Inspection tab, located at the top of the screen, as shown in the image below.

- Select + ADD RULE.
The Applied To Content Inspection screen appears.
- Under Transfer Type, choose either the Download or Upload radio dial, or choose both types.
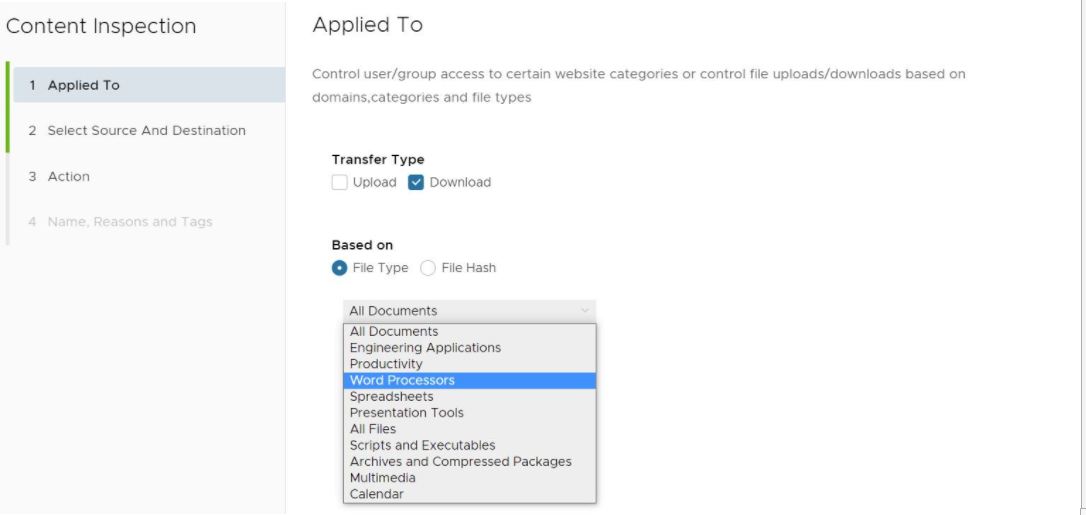
- Under Based on, select either File Type or File Hash, which indicates if the inspection will look for files based on File Type or File Hash. (A user cannot choose both).
- If the user selects File Type, choose a category from the drop-down menu, as shown in the image above. For example, as shown in the image below, a user can configure a rule to inspect downloaded files that match the listed Word Processor file types: Word, XPS, OpenOffice Text, and Word Perfect.
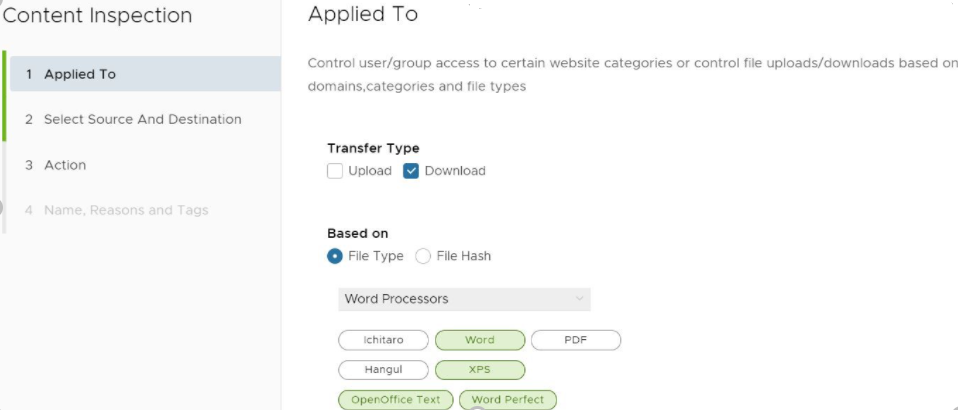
- If a user selects File Hash, enter a SHA-256 hash in the appropriate text box.
- If the user selects File Type, choose a category from the drop-down menu, as shown in the image above. For example, as shown in the image below, a user can configure a rule to inspect downloaded files that match the listed Word Processor file types: Word, XPS, OpenOffice Text, and Word Perfect.
- Click the Next button.
The Content Inspection Source and Destination screen appears, as shown in the image below.
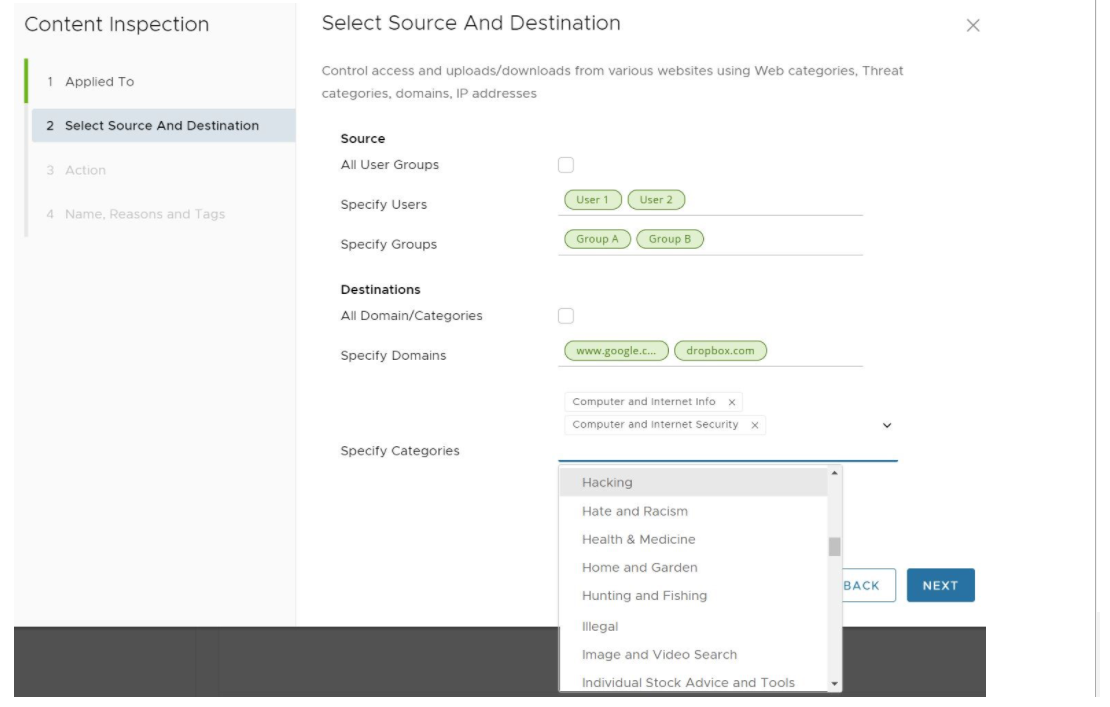
- In the Select Source and Destination screen, under Source, a user can check the All Users and Groups check box to apply the rule to all users and groups, or deselect that check box to specify Users and Groups.
- Under Destinations, enter the domains in the Specify Domains text field (e.g., google.com). A user specifies which domain(s) are to be filtered per the rule. A user can specify multiple domains per rule by separating each domain with a comma.
- Click the Next button.
- In the Content Inspection Action screen, choose an action from the Policy Action drop-down menu (Mark as Clean, Mark as Infected, or Inspect). See the table below for a description of these policy actions, and see the sub steps below for a description of each Policy Action.
- If the user chooses either the Mark As Clean or Mark As Infected policies, the Inspection Options (All Checks, File Hash Check, File Full Scan, Sandbox Inspection) are not available.

- If the user chooses the Inspect Policy Action, he or she can select up to three Inspection Options (All Checks, File Hash Check, File Full Scan, Sandbox Inspection). NOTE: The All Checks options means all three options are selected.

Table 1. Policy Action Description Policy Action Description Mark as Clean The files will automatically be permitted onto the network without inspection. Mark as Infected The files will automatically be treated as dangerous and will be dropped and not permitted onto the network. Inspect The matching files will be subject up to three different inspection options, and if the file fails the inspection, it will be dropped.
- If the user chooses either the Mark As Clean or Mark As Infected policies, the Inspection Options (All Checks, File Hash Check, File Full Scan, Sandbox Inspection) are not available.
- Click Next.
- In the Content Inspection Name, Reasons and Tags screen, enter information for the following text fields: Rule Name, Tags, and Reason. For the Position text field, indicate where the rule should be placed on the Content Filtering rule list.
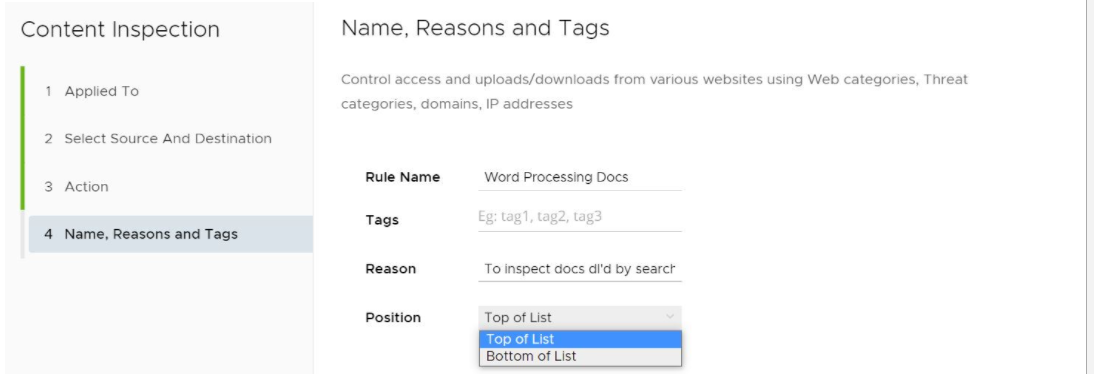
- Click Finish.
The rule is now added to the Security Policy and the user can continue to the security feature.
- The user has the following options: configure another rule under Content Inspection, configure a different Security Policy category, or if finished, click the Publish button to publish the Security Policy.
- After publishing the Security Policy, the user is ready to Apply the Security Policy
