


Describes in detail how to configure a Web Security rule for a selected Security Policy.
Before you begin
To configure a Security Policy, users must have first created a Security Policy. For specific instructions on how to create a Security Policy, see Creating a Security Policy.
Web Security Categories
URL Filtering

URL Filtering allows users to configure rules to limit user interaction to specific categories of web sites.
- Control employee web browsing with granular policies.
- Report high risk sites, useful with SaaS applications.
- Allow/Block based on pre-defined categories.
- Block URLs hosting objectionable content with an option to block custom domains.
In contrast to SSL Inspection, where the default rule enforces stringent security by inspecting every SSL encrypted packet, the default rules for URL Filtering are permissive, allowing all traffic by default, regardless of potential danger. It is up to users to change the default behavior. In order to change the default behavior, users can choose from three kinds of rules URL Filtering enforces: Category, Threat, and Domain.
- Navigate to .
- Select a security policy to configure a URL Filtering rule.
- In the selected Security Policies screen, click the Web Security tab.
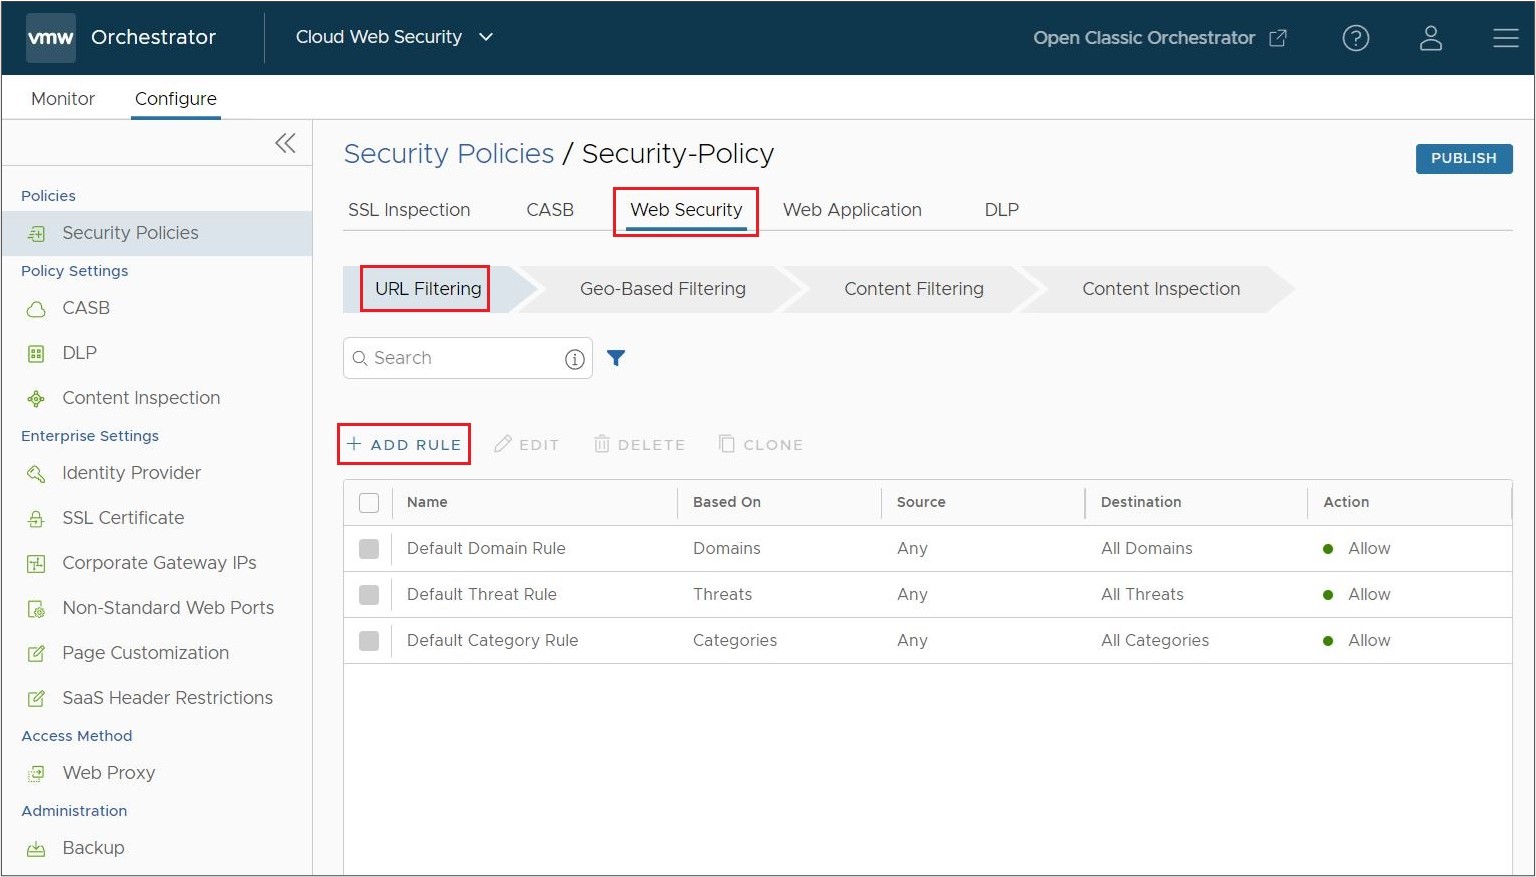
- Under the URL Filtering tab, click + ADD RULE.
The Based On screen appears.
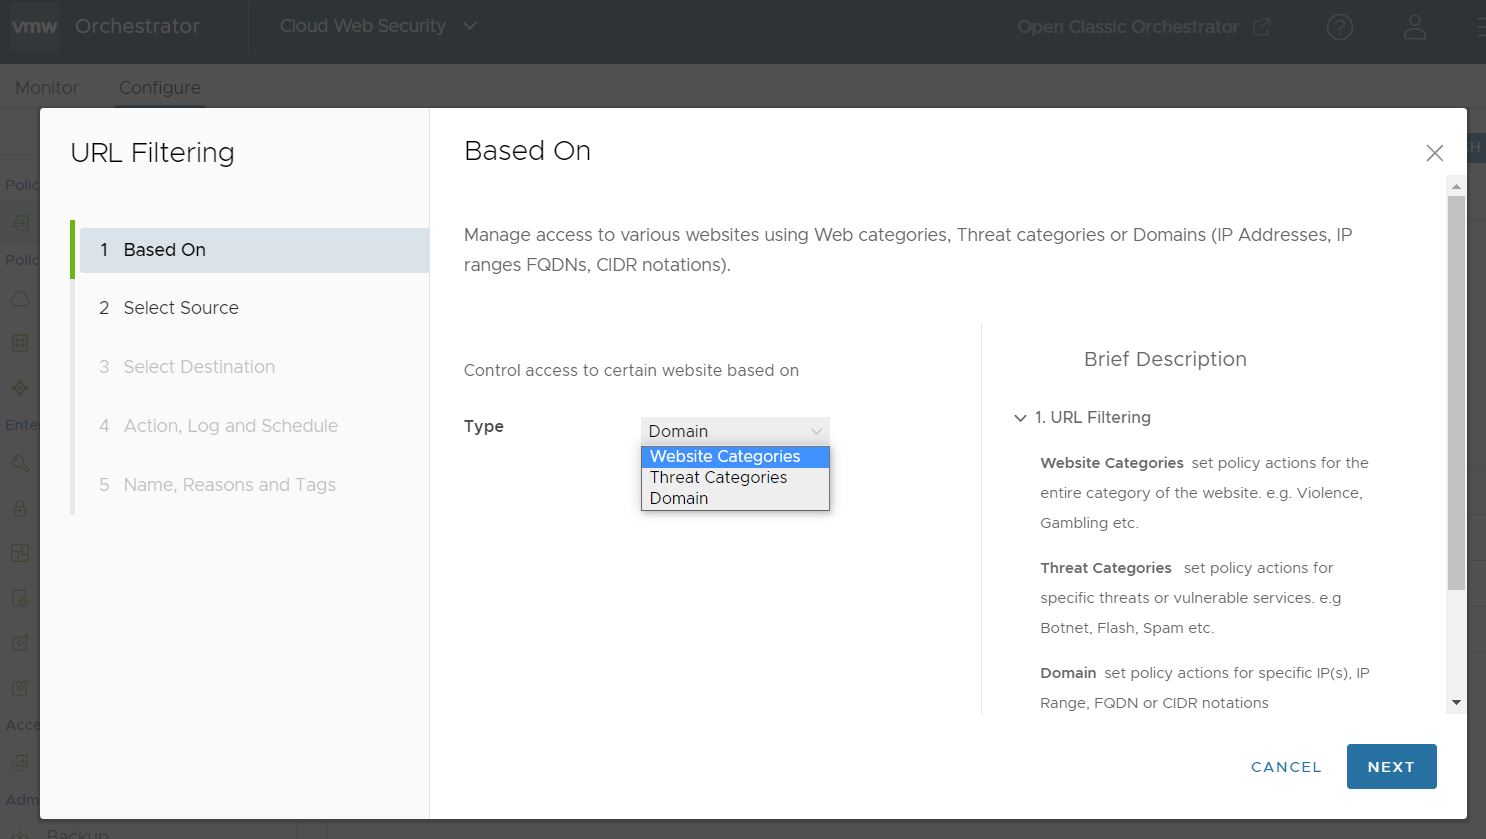
- In the Based On screen, from the Type drop-down menu, select one of the three options to control access to certain websites:
- Website Categories - Set policy actions for the entire category of the website. For example, Violence, Gambling, and others of the same kind.
- Threat Categories - Set policy actions for specific threats or vulnerable services. For example, Botnet, Flash, Spam, and others of the same kind.
- Domain - Set policy actions for specific IPs, IP Range, FQDN, or CIDR notations. This can be done manually with a static list configured in the rule or through the use of a domain list stored remotely that you can dynamically edit and update.
Click Next, the Select Source screen appears.
- In the Select Source screen, select the source to apply the rule or exception.
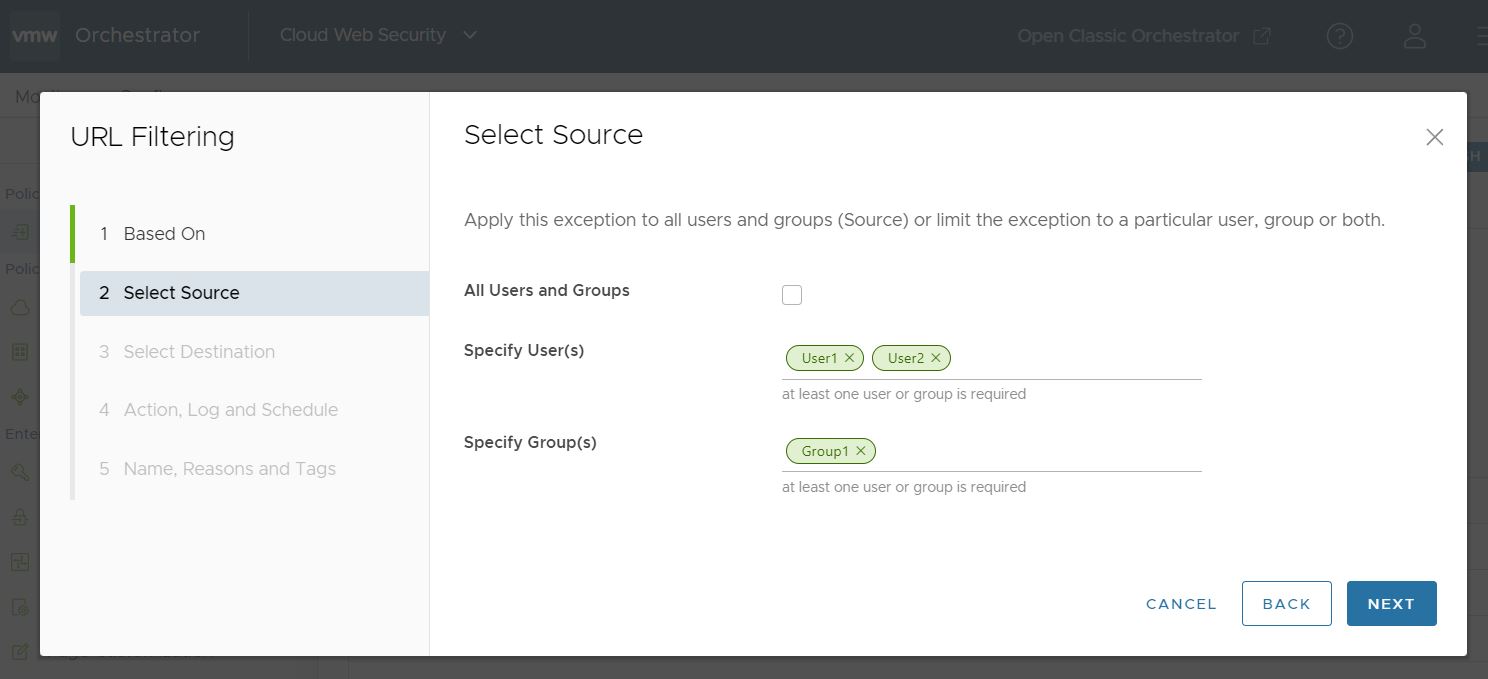
Under Source, select the All Users and Groups check box to apply the rule to all users and groups, or deselect that check box to specify Users and Groups.
Click Next, the Select Destination screen appears.Note: A resource request may occasionally lack the authentication cookie necessary for user identification. Should this occur, a rule based on specific users or groups is not implemented for that resource request. Only rules matching All Users and Groups are applied in this scenario. For example, if you have a rule in place to block website 'A' for All Users and Groups, but a higher priority rule exists to allow website 'A' for certain users or groups, those specific users or groups may observe that while website 'A' loads, some resources or components, such as images or CSS, are missing. -
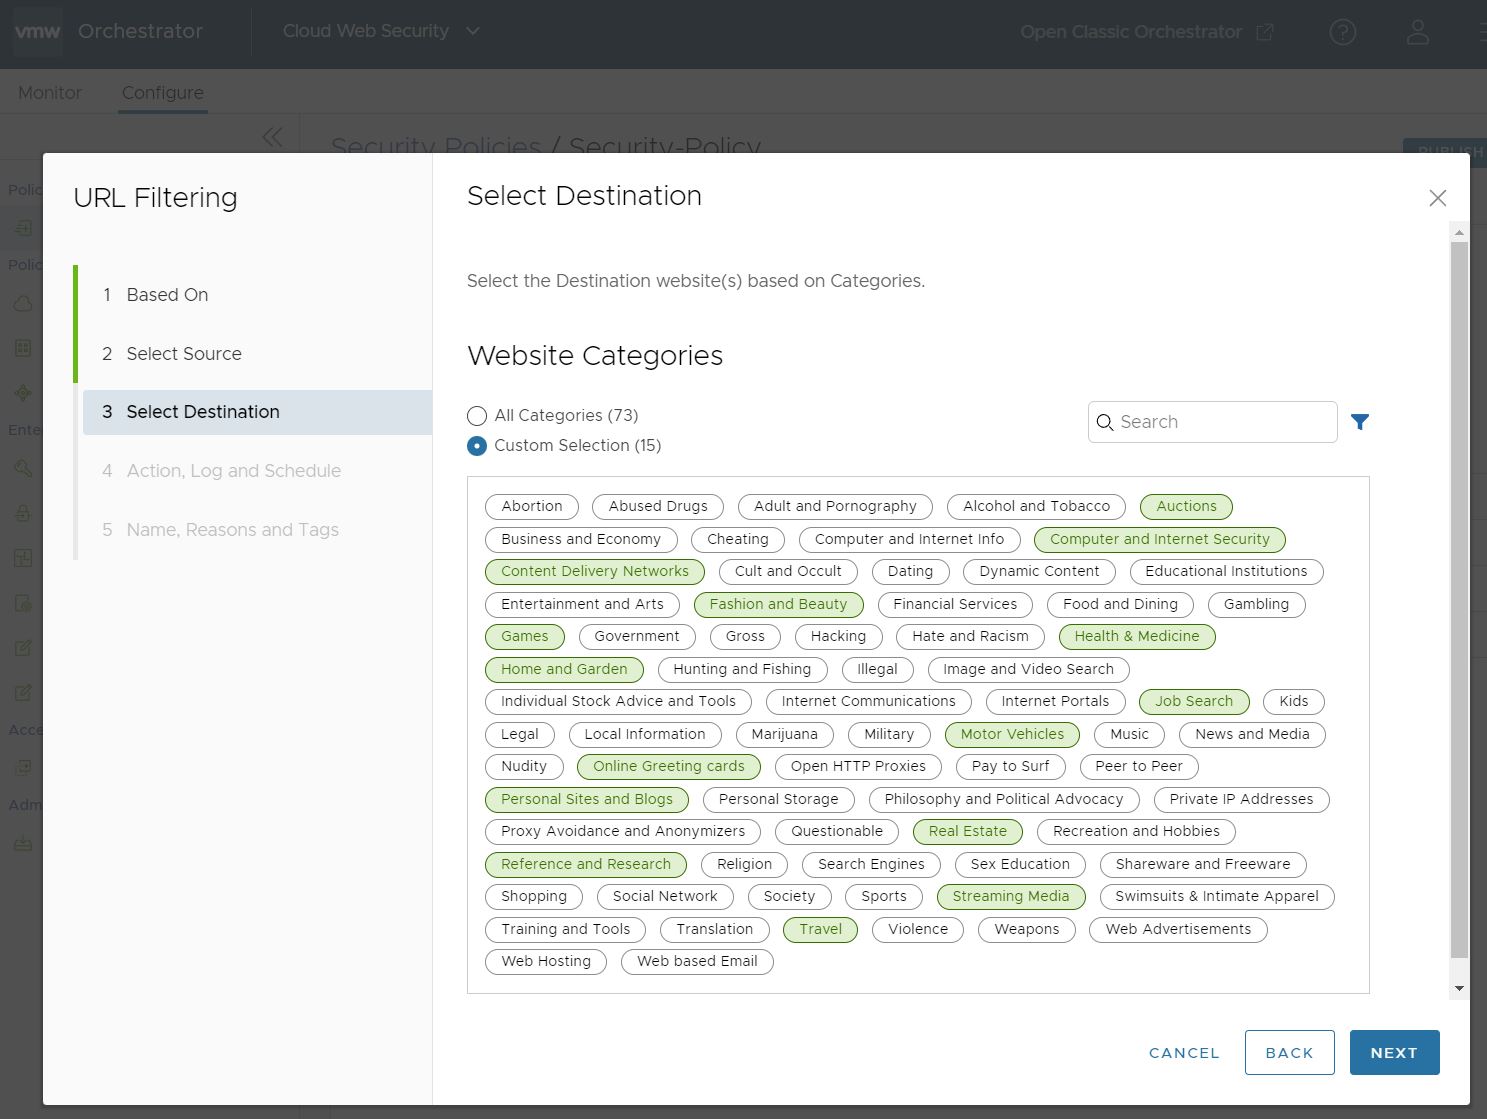
Under Select Destination, you will see a screen based on the choice made in the Based On section: Website Categories, Threat Categories, or Domains.
- Website Categories: Choose either All Categories or Custom Selection. The All Categories option highlights all available categories and applies them to the rule. The Custom Selection option allows users to specify which categories to apply to the rule by clicking on each category. You can also use the Search box to find a category.
- Threat Categories: Choose either All Categories or Custom Selection. The All Categories option highlights all available categories and applies them to the rule. The Custom Selection option allows users to specify which categories to apply to the rule by clicking on each category. You can also use the Search box to find a category.

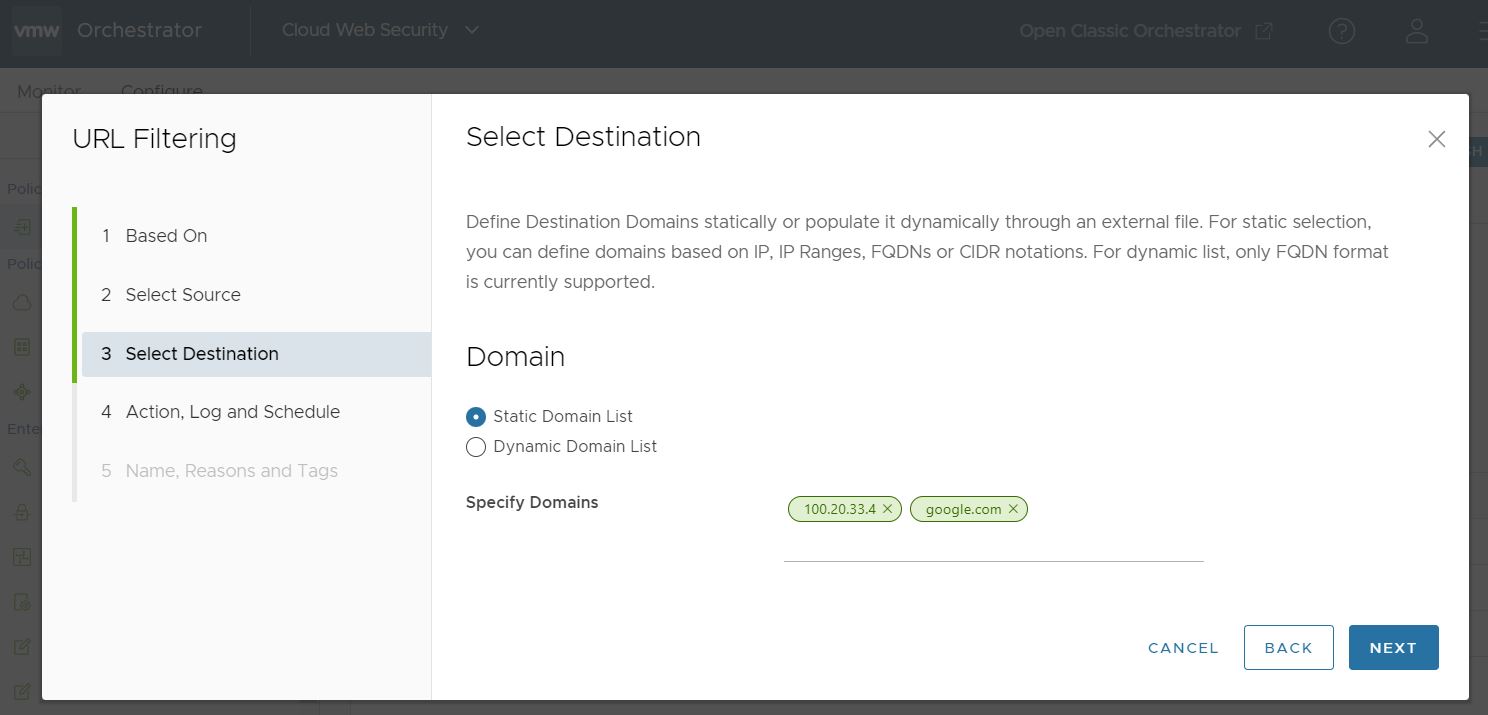
- Domain: The Domain Destination can be configured in one of two ways: Static Domain List or Dynamic Domain List.
- Static Domain List: For the Static Domain List, enter domains formatted as either IP Address, IP Address Ranges, FQDNs, or CIDR notations. The domain formats can be mixed as needed. The list is static in the sense that you must update the rule manually each time you want to change the list.
- Dynamic Domain List: For this option Cloud Web Security references a text list of FQDN formatted domains which is stored remotely at a location of your choosing. The location must be publicly accessible to the service. The advantage of this option is that you can make a domain list with a large number of domains and that can be edited and updated easily.
Note: While the Static Domain List allows domains in a variety formats (IP Address, IP Address Ranges, FQDNs, or CIDR notations), the Dynamic Domain List you create and maintain can only use FQDN formatted domains.
The Dynamic Domain List screen has three configuration fields:
- List Name: Specify a unique name for the domain list being referenced.
- Source URL: The location of the text file list. This URL must be publicly available so that Cloud Web Security can access it. For example, a user could create a text file and store it on Dropbox where you configure the file so that it is available to anyone with the link.
In the below example, we have used https://raw.githubusercontent.com/opendns/public-domain-lists/master/opendns-top-domains.txt as our remote URL. This is a simple list of the top public domains per OpenDNS.
Once the Source URL is entered, click on Validate URL. Cloud Web Security will then check the URL to confirm that URL reachable and then check the text file and determine the validity of the domains on the list. If all the domains are valid you will see all green text and can then configure the Update Frequency as seen in the below image.
Figure 1. Dynamic Domain List With All Valid Domains  If there are invalid domains in the Dynamic Domain List, the test output appears as red text and lists both the number of valid domains and the number of invalid domains as seen in the image below. You can either troubleshoot your domain list and retest it, or can optionally continue with the domain list as is by clicking on Ignore and Continue. The invalid domains on the list will be ignored by Cloud Web Security when applying the URL Filtering Rule.Note: While the Validate URL test outputs the number the invalid domains, it does not specify which domains on your list are invalid. You will need to troubleshoot your domain list separately to ensure all listed domains are valid.
Figure 2. Dynamic Domain List With Invalid Domains 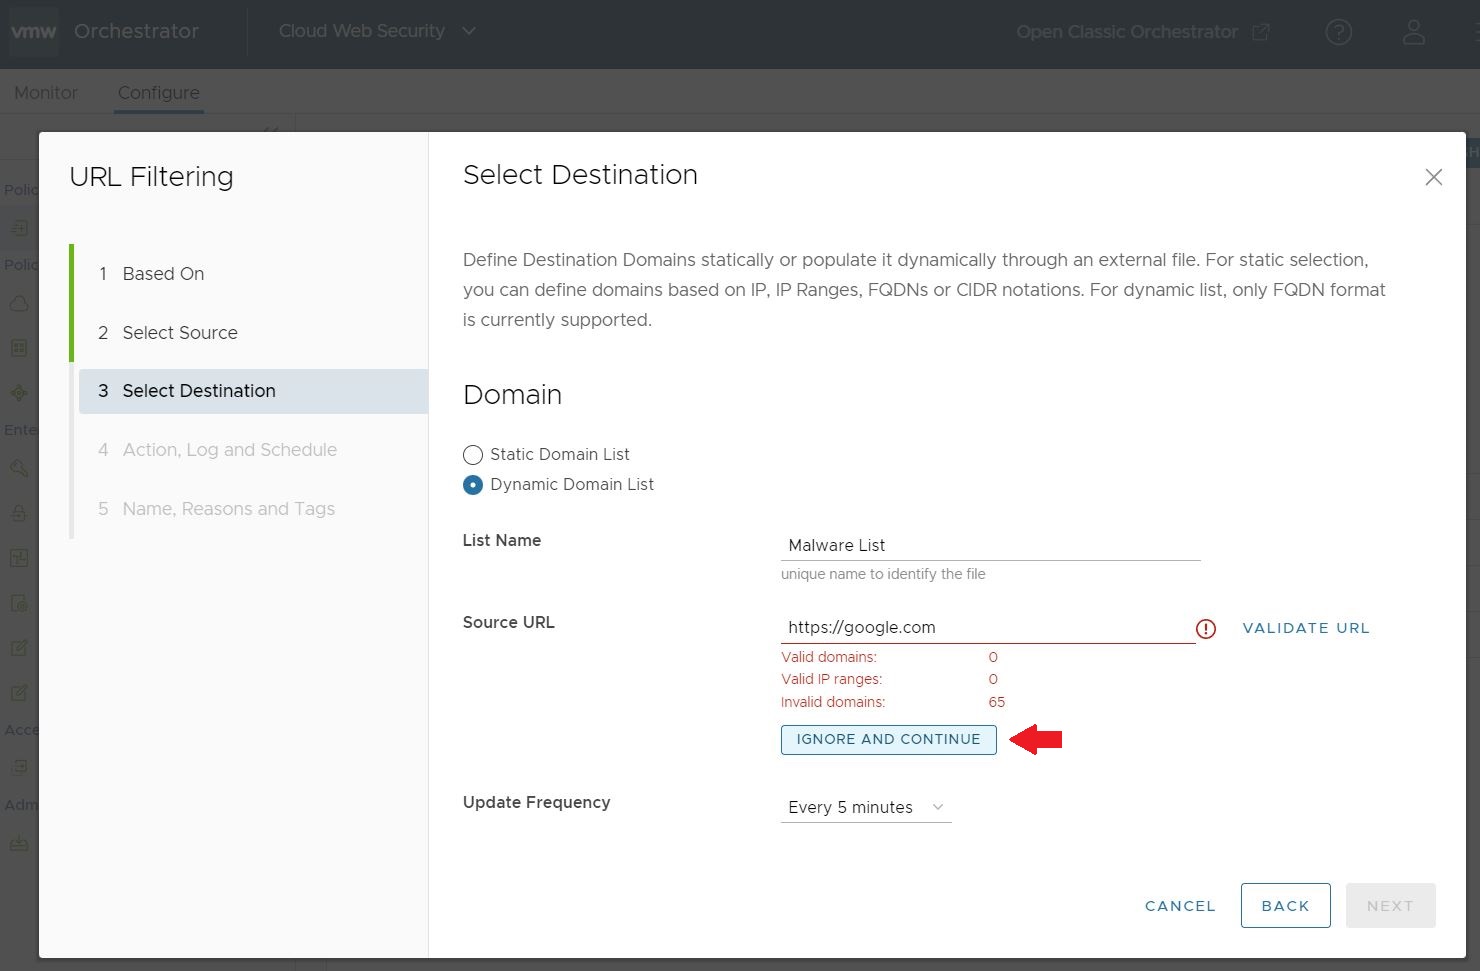
- Update Frequency: Configure how often you want Cloud Web Security to check your Dynamic Domain List to update this URL Filtering rule. The options are every: 5 minutes, 30 minutes, Hourly (60 minutes), Daily (24 hours).
Click Next, the Action, Log and Schedule screen appears.
- Static Domain List: For the Static Domain List, enter domains formatted as either IP Address, IP Address Ranges, FQDNs, or CIDR notations. The domain formats can be mixed as needed. The list is static in the sense that you must update the rule manually each time you want to change the list.
- Website Categories: Choose either All Categories or Custom Selection. The All Categories option highlights all available categories and applies them to the rule. The Custom Selection option allows users to specify which categories to apply to the rule by clicking on each category. You can also use the Search box to find a category.
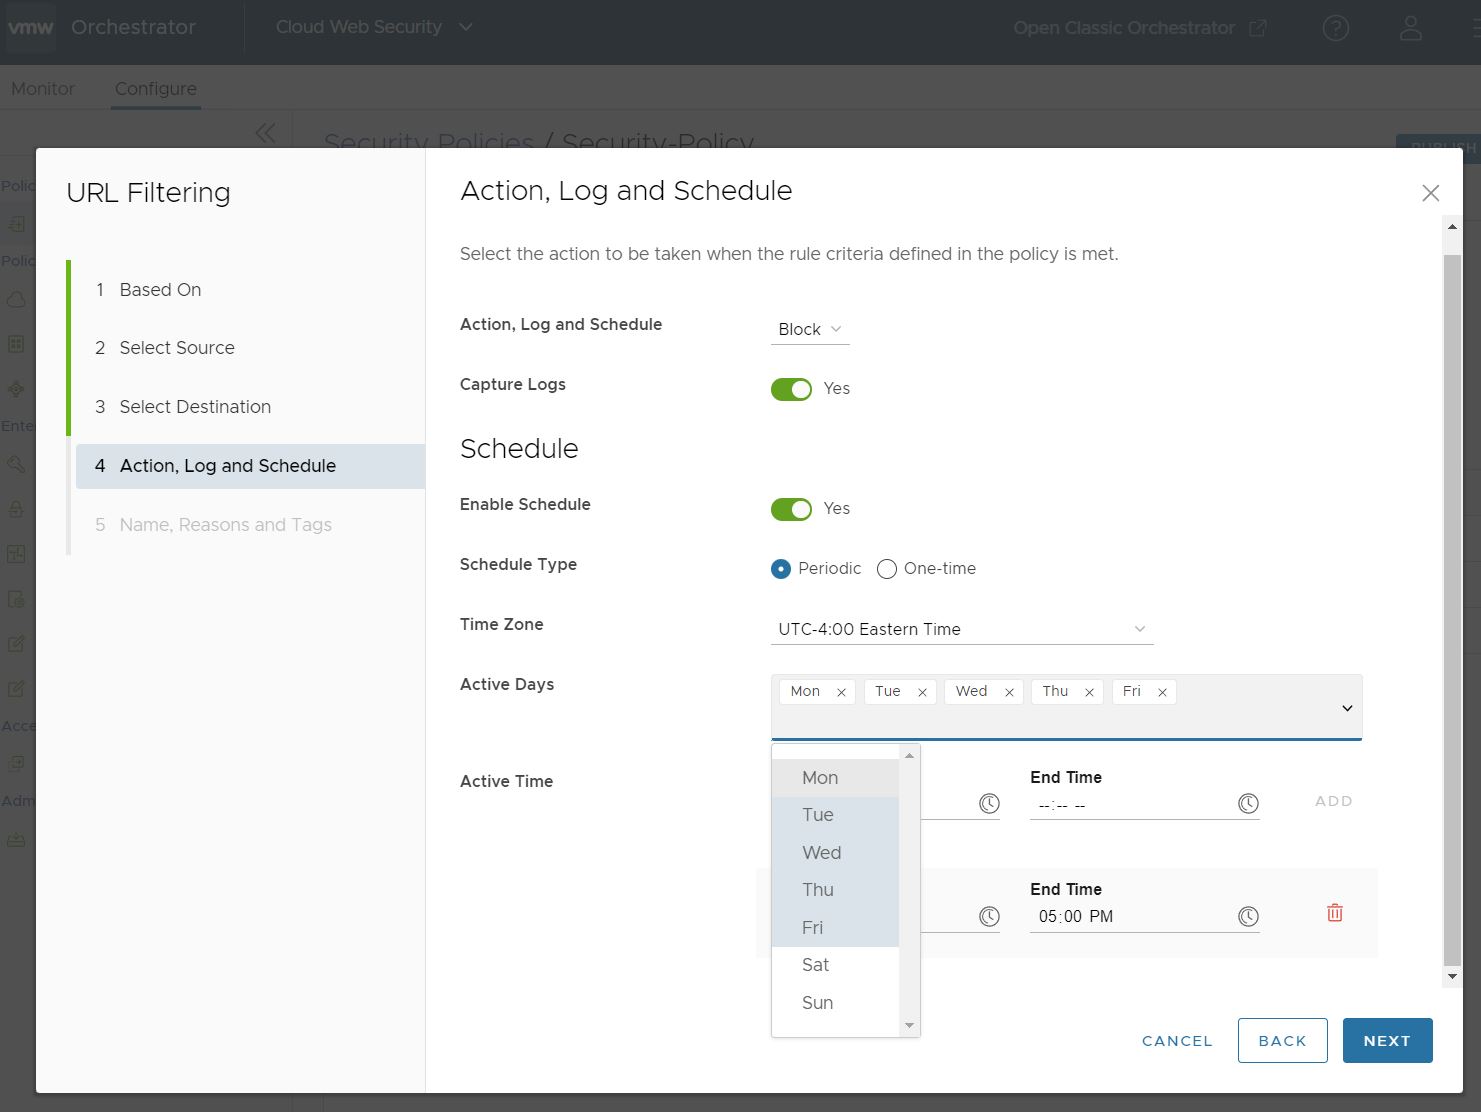
- In the Action, Log and Schedule screen, you have the option of deciding what action should be taken when a URL Filtering Rule is matched, whether those incidents should be logged, and whether this rule applies at all times or during specified time periods.
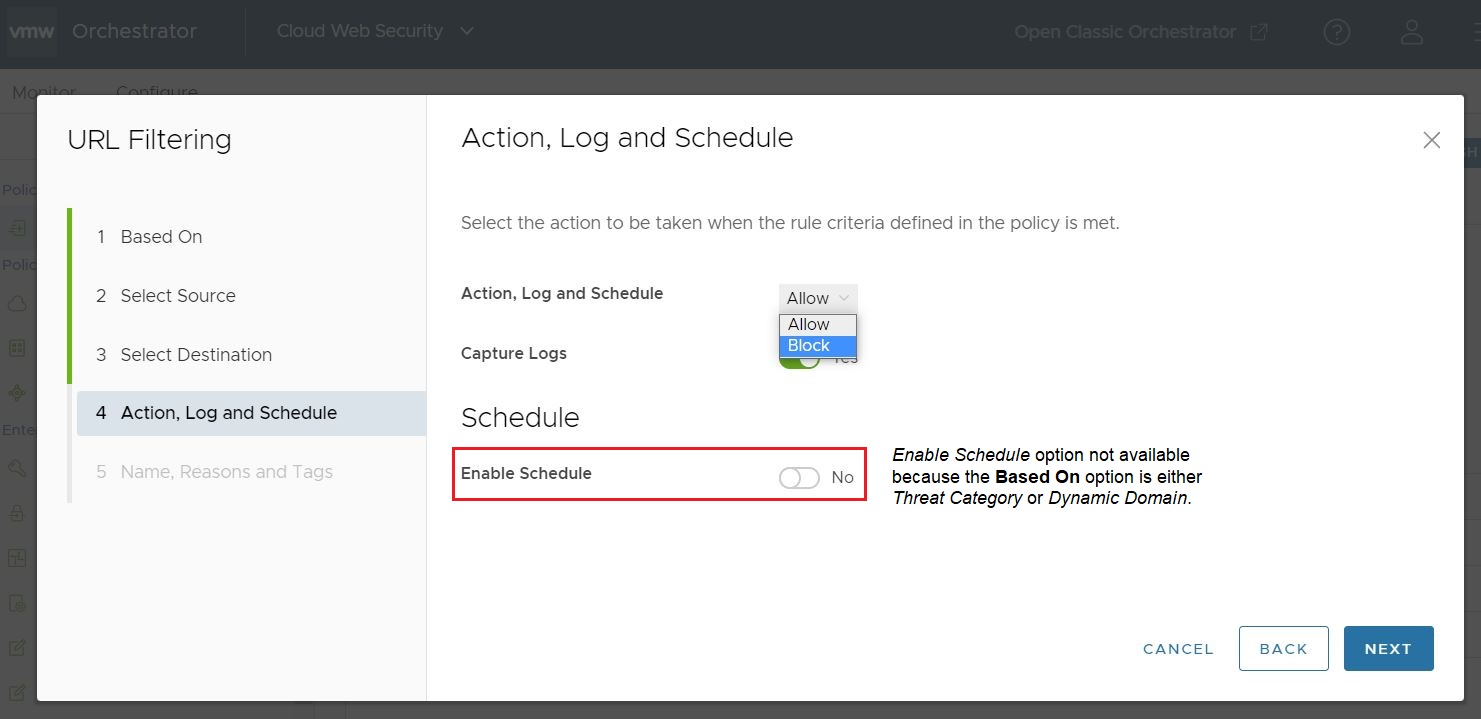
- The Action option determines whether traffic matching the rule criteria defined in the policy is allowed or blocked. Select the action Block or Allow from the Action drop-down menu.
- When the Capture Logs option is configured as Yes, Cloud Web Security logs every instance that the URL Filtering rule is applied and these logged events can be observed in the or compiled and downloaded as a report under .
- Finally, toggle Enable Schedule to optionally configure the days and time periods the rule is applied.
Note: The Schedule feature is available for rules where the Based On type is either Website Categories or Domain > Static Domain List. Schedule is not available for Based On type Threat Categories or Domain > Dynamic Domain List, and in those instances the toggle button will be inaccessible.
Schedule offers two Schedule Type options for a URL Filtering Rule: Periodic and One Time.
-
The Periodic option allows you to configure a weekly, rotating schedule for when your URL Filtering Rule is applied. Selecting Periodic opens up three configurable options: Time Zone, Active Days, and Active Time. When initially selecting this option, the screen would include a default time period with preselected Active Days and Active Time. Your Time Zone is auto-detected and populated in the Time Zone parameter. You can edit each of these values and the initial values are provided as a useful starting point.
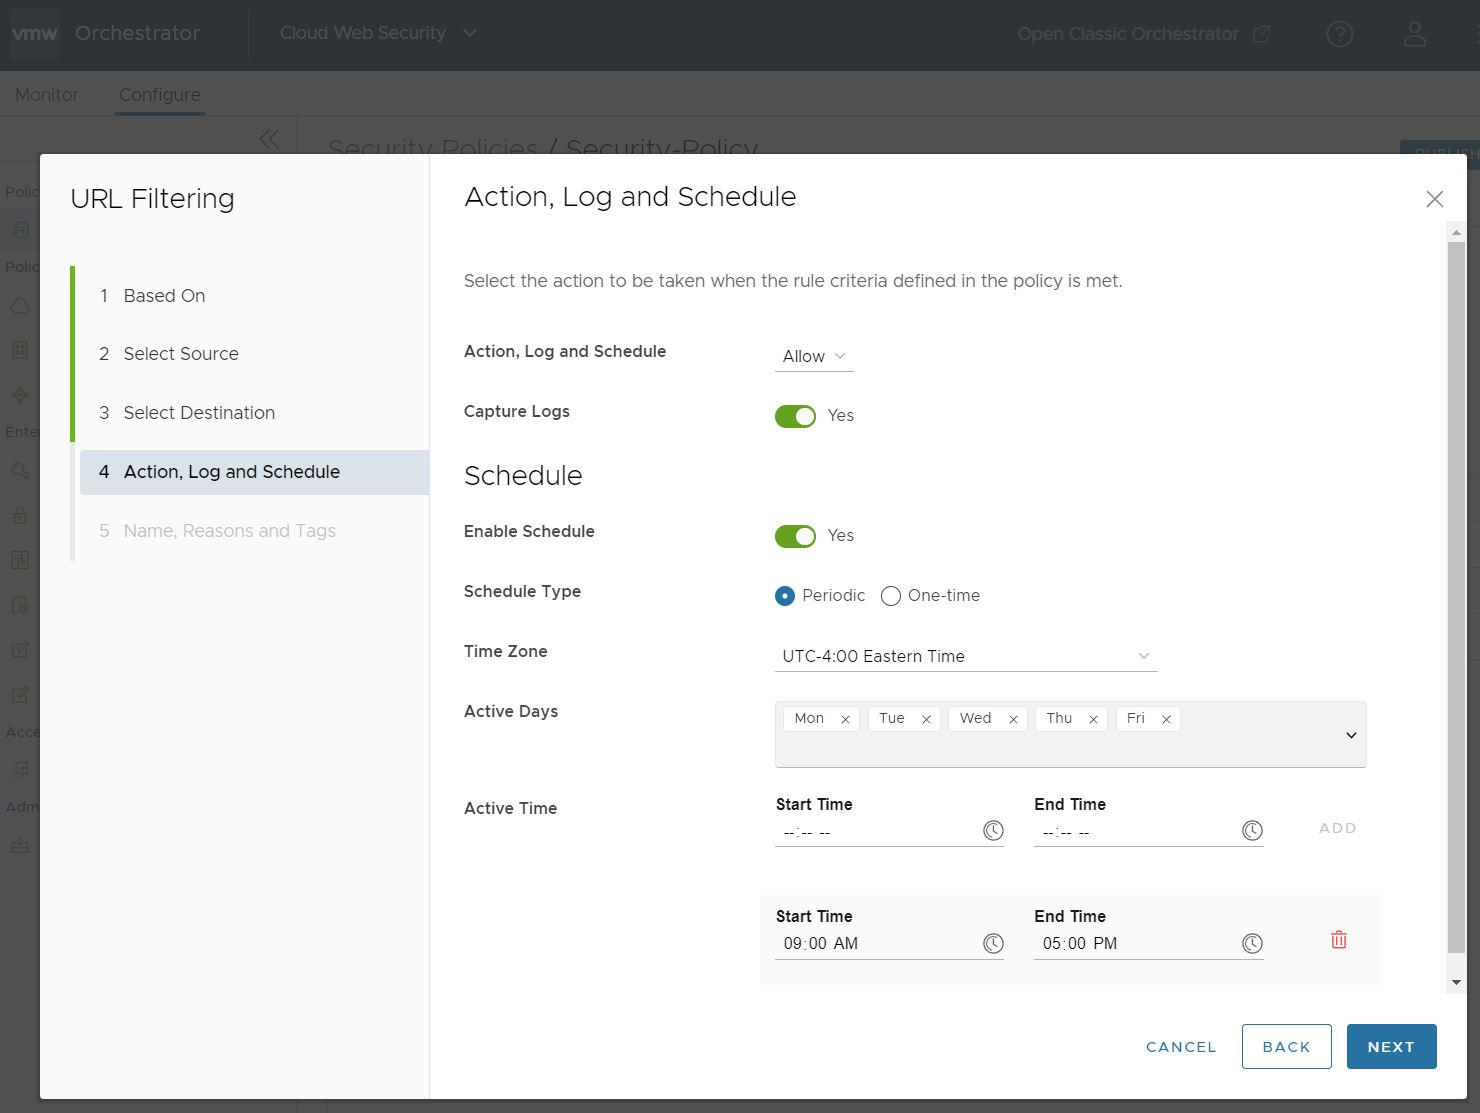
Time Zone specifies the time zone the rule will refer to when implementing the Active Time and is expressed in the UTC offset that reflects that time zone's current status relative to Daylight Savings/Summer Time versus Standard Time. For example, in the below screenshot the United States time zones are all expressed in the Daylight Savings UTC offset value and would adjust to the Standard Time offsets when applicable.
 Attention: The Time Zone parameter is static and implements the Active Time only with reference to the configured Time Zone. The Scheduling feature does not auto-detect a user's time zone and dynamically adjust so that the rule applies the same Active Time for each user based on their location.
For example, if a user sets the Time Zone as UTC-4:00 Eastern Time with a Start Time of 09:00 AM and an End Time of 05:00 PM, for a user in the Eastern Time, this is when the rule would be implemented. However, if a user is in the UTC-7:00 Pacific Time Zone, the rules are implemented 3 hours earlier, from 6:00 AM to 2:00 PM. For a user in UTC +1:00 UK and Ireland, the rules are implemented 5 hours later.
Active Times are automatically adjusted for Daylights Savings/Summer Time as applicable for the selected time zone and this is reflected in the UTC offset value.
The Active Days Schedule Type specifies the days of the week the rule is applied. You can add and remove days by clicking the arrow to open the drop down menu.
Active Time specifies the time period or periods when the rule is applied relative to the configured Time Zone. You can specify multiple Active Time periods by clicking ADD, and remove a time period by clicking the trash can icon.
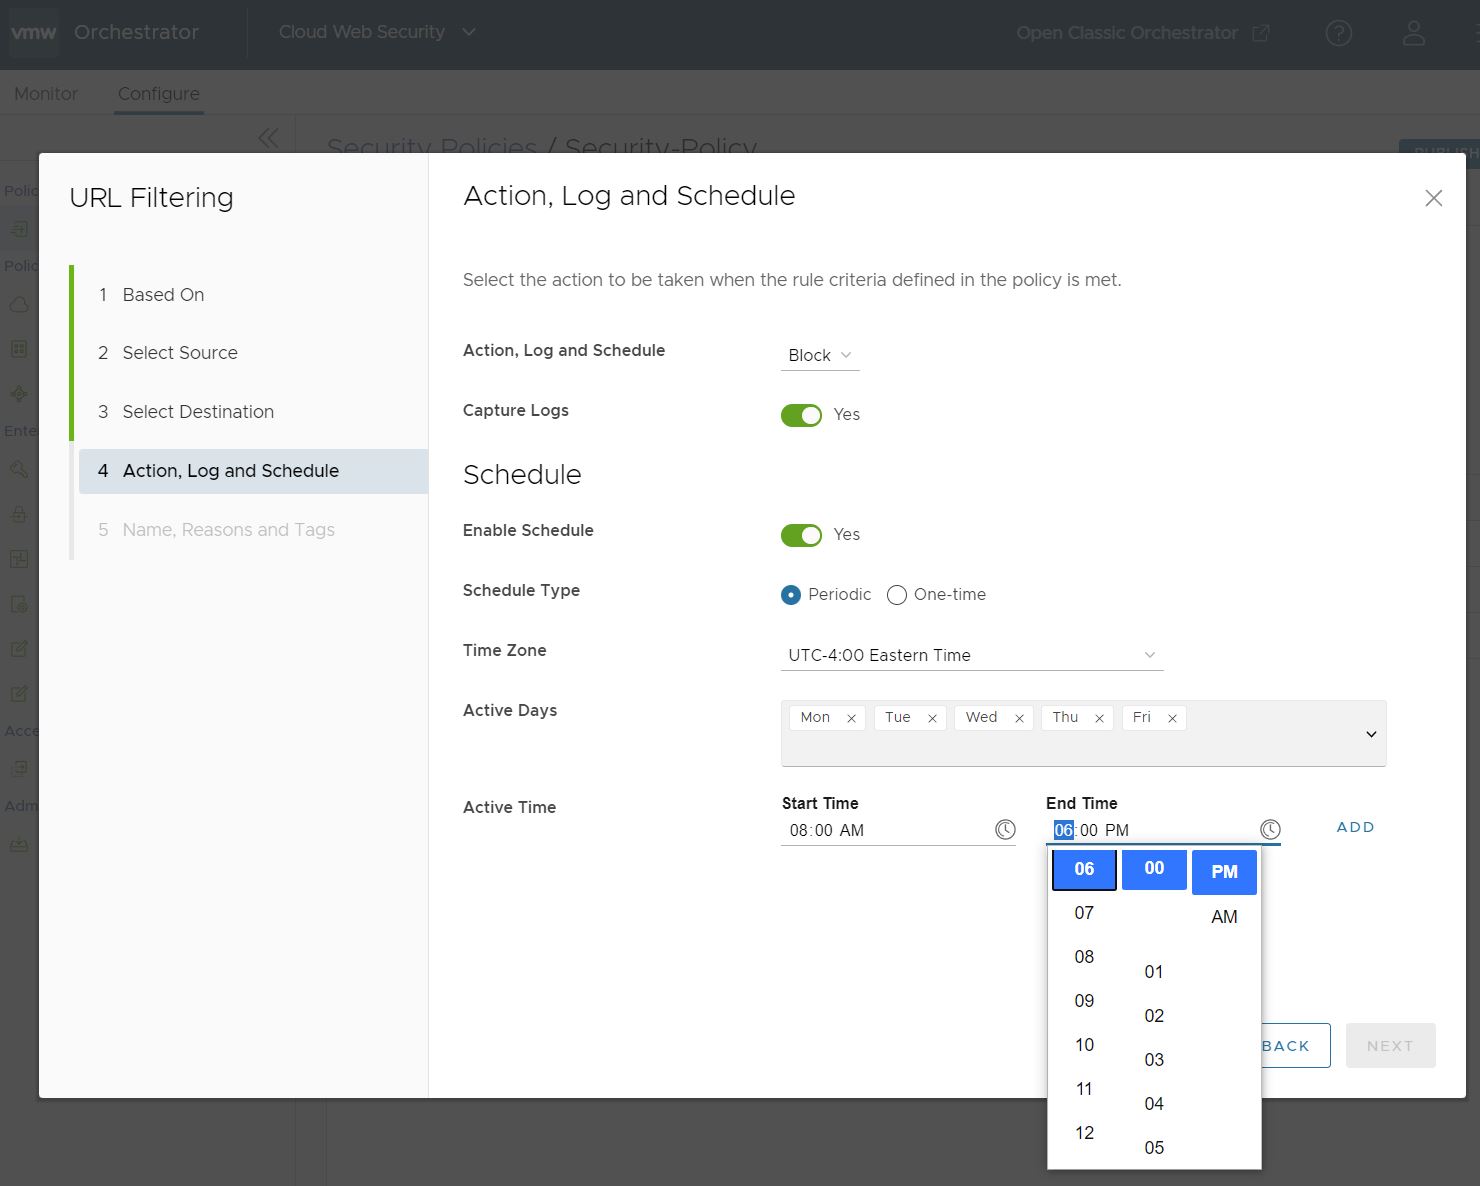 Note: Make certain that your Start Time is a value prior to your End Time or you will observe an error.
Also, the Start Time and End Time must exist within the same calendar day. For example, you cannot configure a Start Time of 11:00 PM and an End Time of 01:00 AM because while you may understand that 01:00 AM as two hours after 11 PM, Cloud Web Security understands that 01:00 AM as that particular calendar day's time and 22 hours earlier, and thus invalid.
- The One-time Schedule Type option specifies either one single block of time with a start and expiration date and time when the rule is applied, or a starting date and time from which the rule is indefinitely applied.
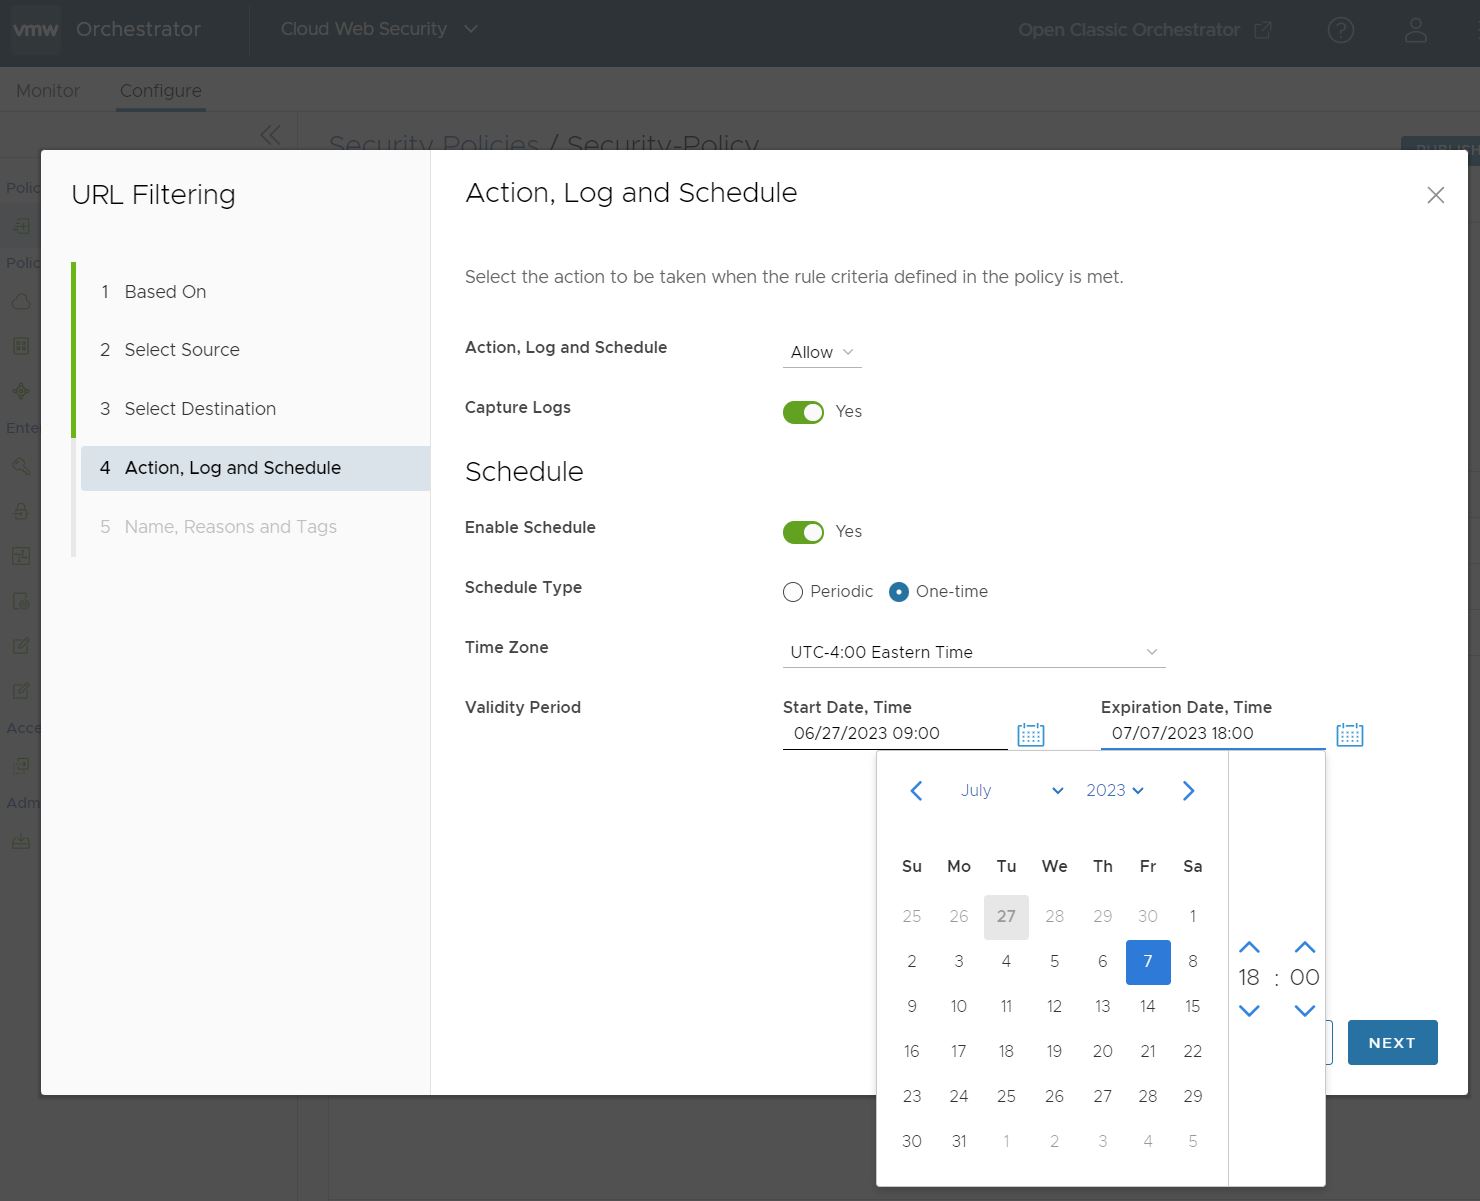
For either option a user configures a Time Zone, which specifies the time zone the rule will refer to when implementing the Validity Period and is expressed in the UTC offset that reflects that time zone's current status relative to Daylight Savings/Summer Time versus Standard Time. For example, in the above screenshot the Eastern Time zone is selected with a Daylight Savings UTC offset value and would adjust to the Standard Time UTC offset when applicable. For additional information, see the section on the Time Zone option in the Periodic section seen earlier.
For a Validity Period with both a Start and Expiration Date and Time, configure those time periods either by manually entering the values in each section, or clicking on the calendar icon to open the date and time configuration window.
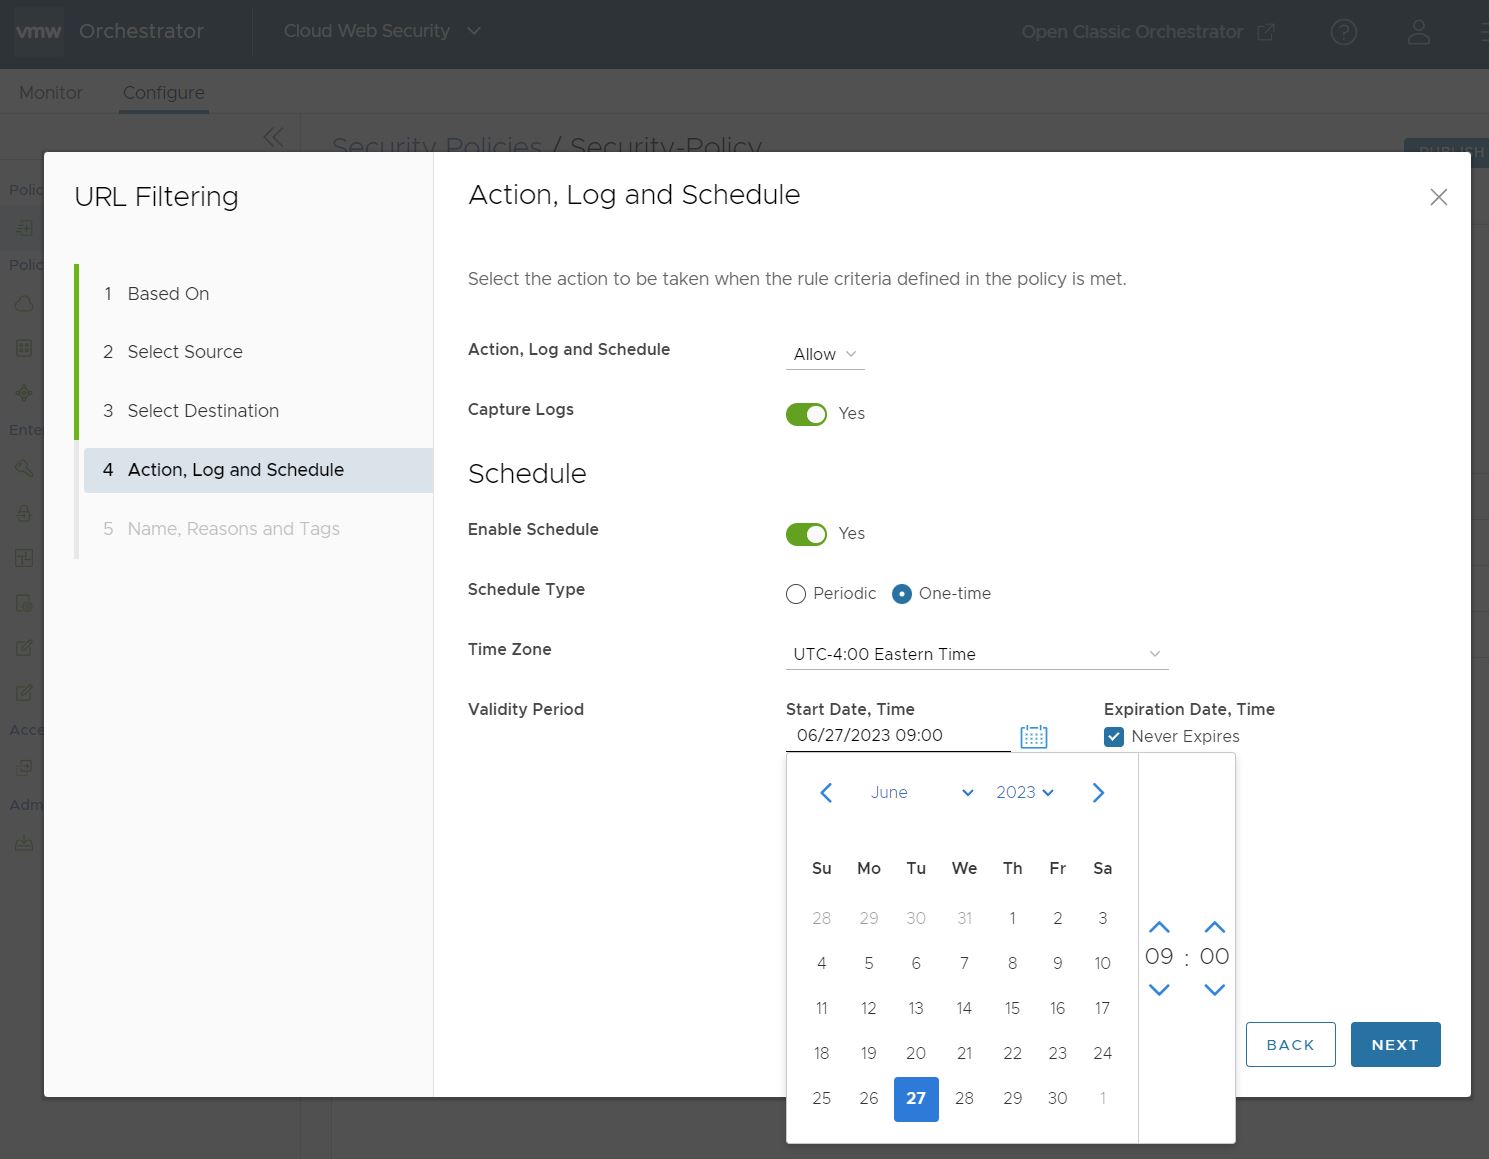
The second option is to configure a rule with a Validity Period that has a Start Date and Time, but no Expiration Date. This is done by configuring the Start Date, Time as before, but this time checking the box for Never Expires. This rule is applied indefinitely from the Start Date and Time until the user edits or removes the Schedule option for it.
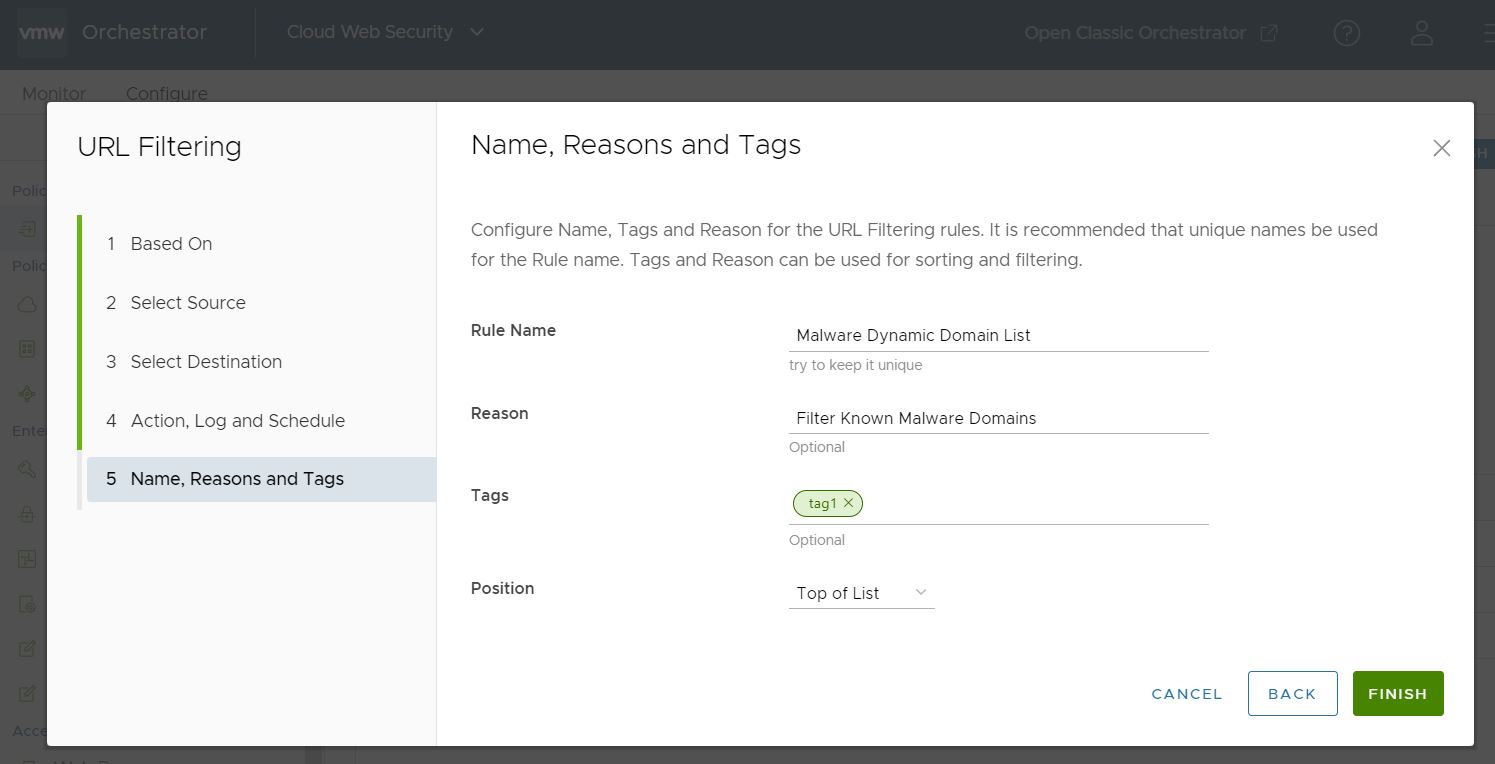
Once you have configured all desired parameters for Action, Log, and Schedule, click Next, and the Name, Reasons, and Tags screen appears.
-
- In the Name, Reasons, and Tags screen, configure a unique Rule Name (required), Tags (if used), Reason (if needed), and a Position for the rule on the list of URL Filtering rules (the options are either 'Top of List' or 'Bottom of List').
Note: The Position field designates the rule's position on the list of URL Filtering rules.
- Click Finish and the newly created URL Filtering rule appears in the URL Filtering list.
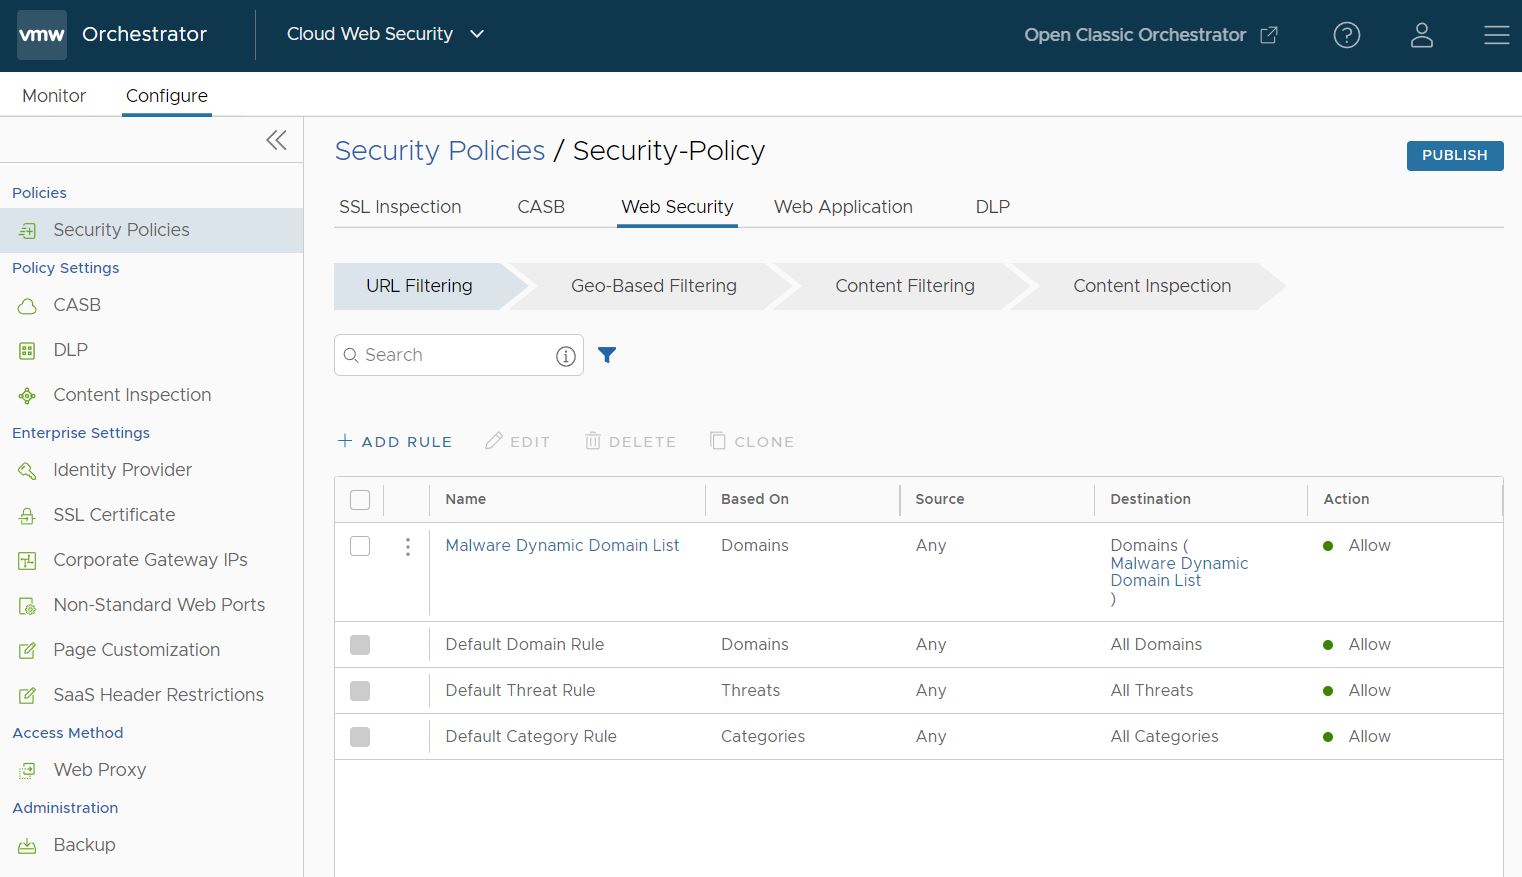
- For the new Security Policy rule to take effect, select the rule and click the Publish button on the upper right-hand corner of the screen.
- After publishing the Security Policy, users can Apply the Security Policy.
- For an existing security policy, user can perform the following actions by selecting the check box of the policy:
- Edit - Allows to modify an existing policy rule.
- Clone - Allows to clone a policy from an existing one.
- Delete - Allows to delete a policy.
Geo-Based Filtering
Geo-Based Filtering allows users to configure a rule to either block or allow internet traffic based on the geographic region of the content. Cloud Web Security uses MaxMind to resolve the destination IP address and determine the traffic's destination country.
- Control employee web browsing based on the geographic source and destination of the traffic.
- Allow/Block based on a list of 251 countries.
- All downloads and uploads are allowed regardless of their geographic region.
- Navigate to .
- Select a security policy to configure a Geo-Based Filtering rule.
- In the selected Security Policies screen, click the Web Security tab.

- Under the Geo-Based Filtering tab, click + ADD RULE.
The Source screen appears.

- In the Source screen, choose All Users and Groups to have the Geo-Based rule apply to everyone in the enterprise. Choose Specify User(s) and Specify Group(s) fields to specify one or more users and/or groups to which the rule would apply.
Click Next, the Destination Countries screen appears.
- In the Destination Countries screen, select the countries to apply the rule or exception.
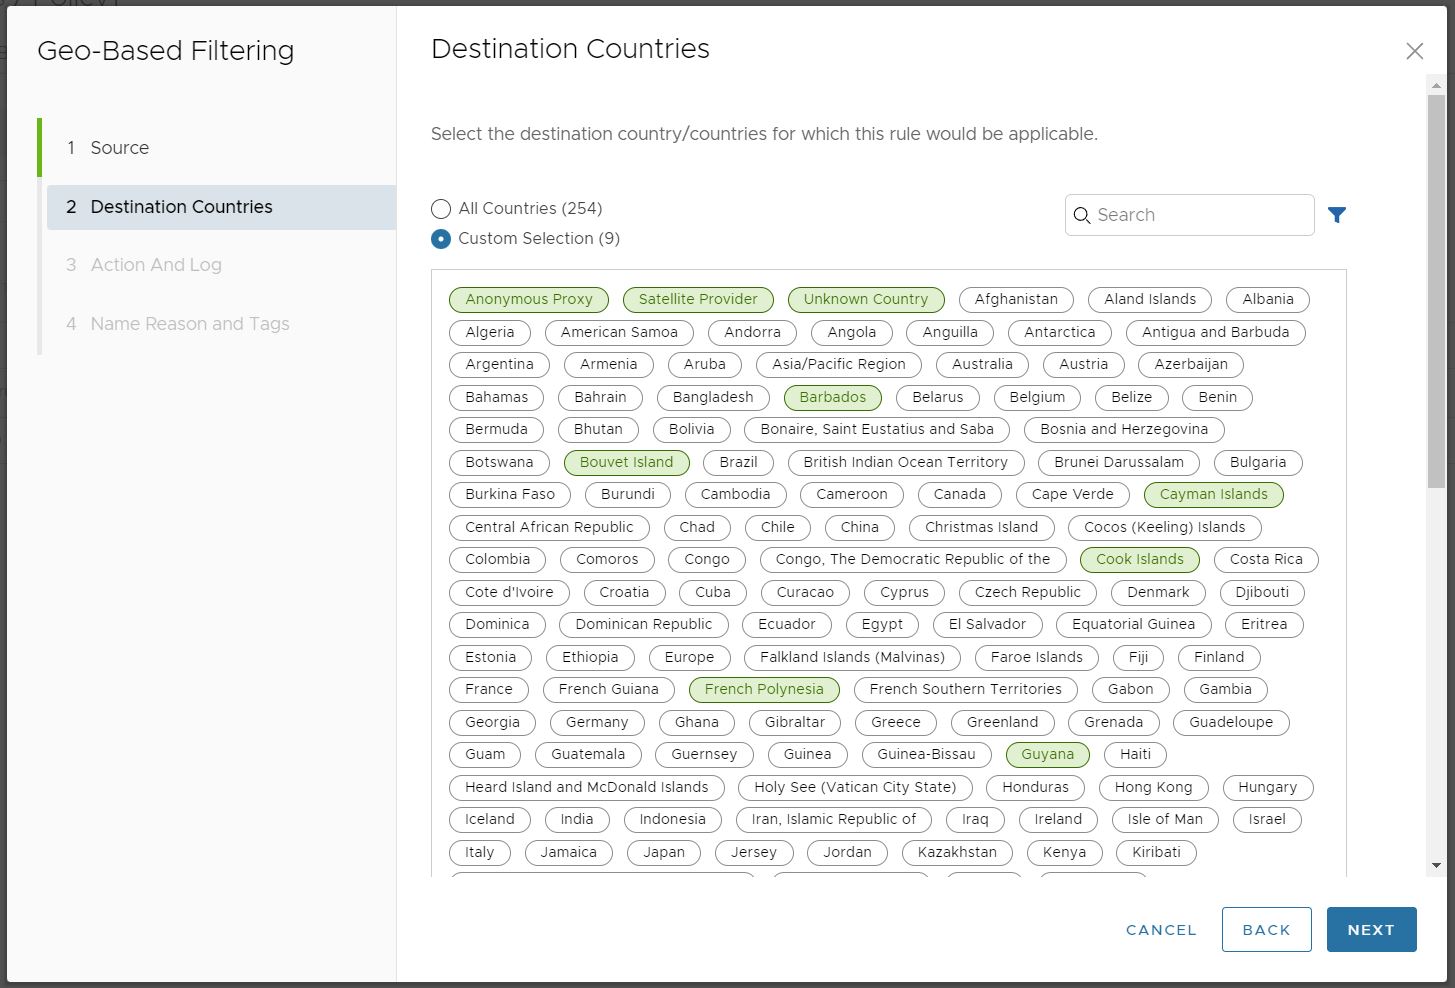 Click All Countries and all 251 countries plus Anonymous Proxy, Satellite Provider, and Unknown Country would be part of the rule. Otherwise, use the Custom Selection to individually select every country to which you want the rule to apply.Note: The categories Anonymous Proxy and Satellite Provider are used to help ensure the rule is not circumvented. A client can use an anonymous proxy or a satellite provider link to make traffic going to a selected country appear to be going to one not selected. Adding these two Destinations to a Geo-Based Rule helps mitigate the success of that approach.Note: Unknown Country category ensures traffic that MaxMind does not successfully resolve and identifies as "Unknown" is nonetheless subject to a Geo-Based Rule. For more information about MaxMind's geolocation accuracy for a particular country, see their GeoIP2 City Accuracy page. If a country has a low level of geolocation accuracy, select Unknown Country to ensure complete coverage under the rule.
Click Next, the Action and Log screen appears.
- In the Action and Log screen, select the action Block or Allow from the Action drop-down menu to be taken when the rule criteria defined in the policy are met.
Next specify whether Capture Logs should be used when the rule is applies to traffic.

Click Next, the Name, Reasons, and Tags screen appears.
- In the Name, Reasons, and Tags screen, configure a unique Rule Name (required), Tags (if used), Reason (if needed), and a Position for the rule on the list of URL Filtering rules (the options are either 'Top of List' or 'Bottom of List').
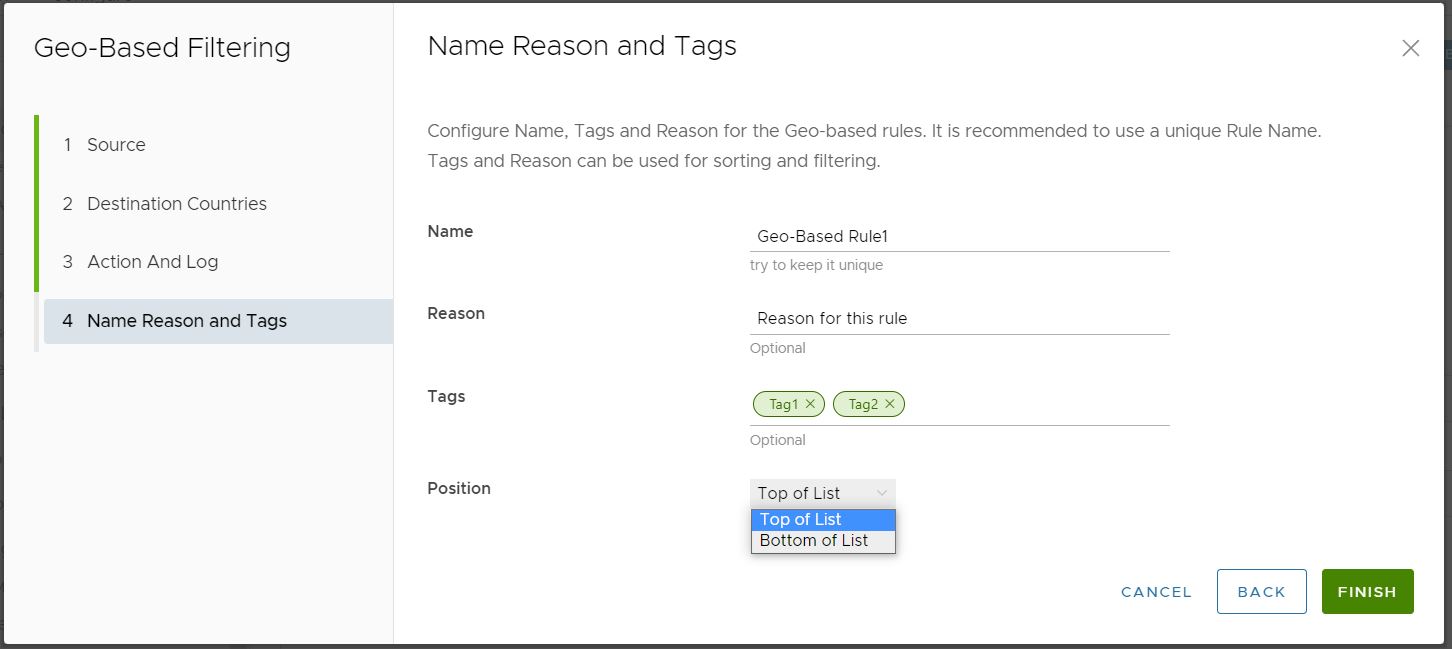
- Click Finish and the newly created Geo-Based Filtering rule appears in the Geo-Based Filtering list.

- For the new Security Policy rule to take effect, select the rule and click the Publish button on the upper right-hand corner of the screen.
- After publishing the Security Policy, users can Apply the Security Policy.
- For an existing security policy, user can perform the following actions by selecting the check box of the policy:
- Edit - Allows to modify an existing policy rule.
- Clone - Allows to clone a policy from an existing one.
- Delete - Allows to delete a policy.
Content Filtering
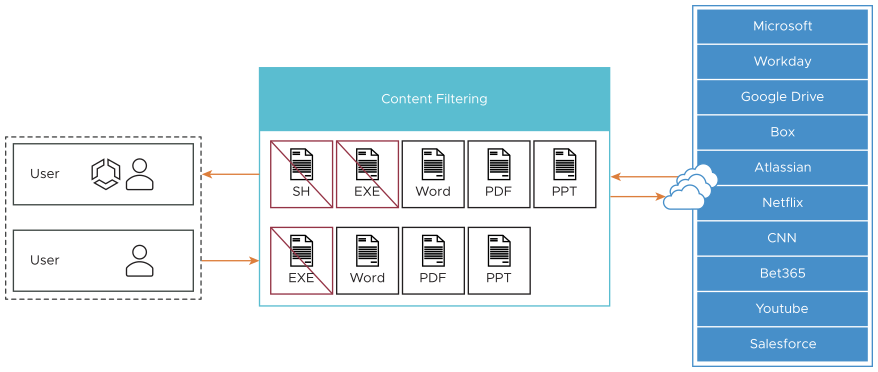
- Reduce attack surface by allowing only required types of content.
- Control content for both uploads and downloads.
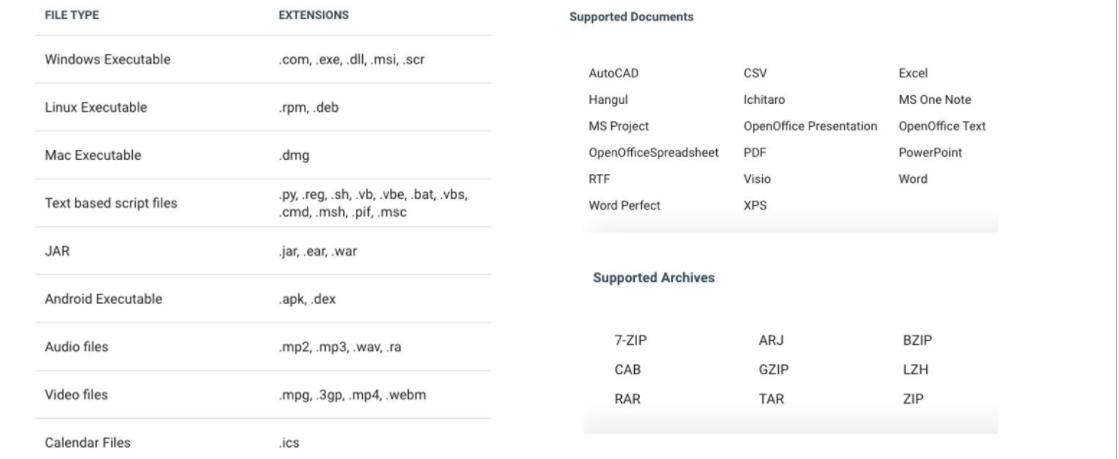
The following document and file types are listed are supported.
 The default rule for Content Filtering are:
- All downloads are allowed, but first undergo a virus scan for harmful content.
- All uploads are allowed without inspection.
Note: Should the virus scan detect harmful content in a download, that download is blocked and logged in Events.
- Navigate to .
- Select a security policy to configure a Content Filtering rule.
- In the selected Security Policies screen, click the Web Security tab.
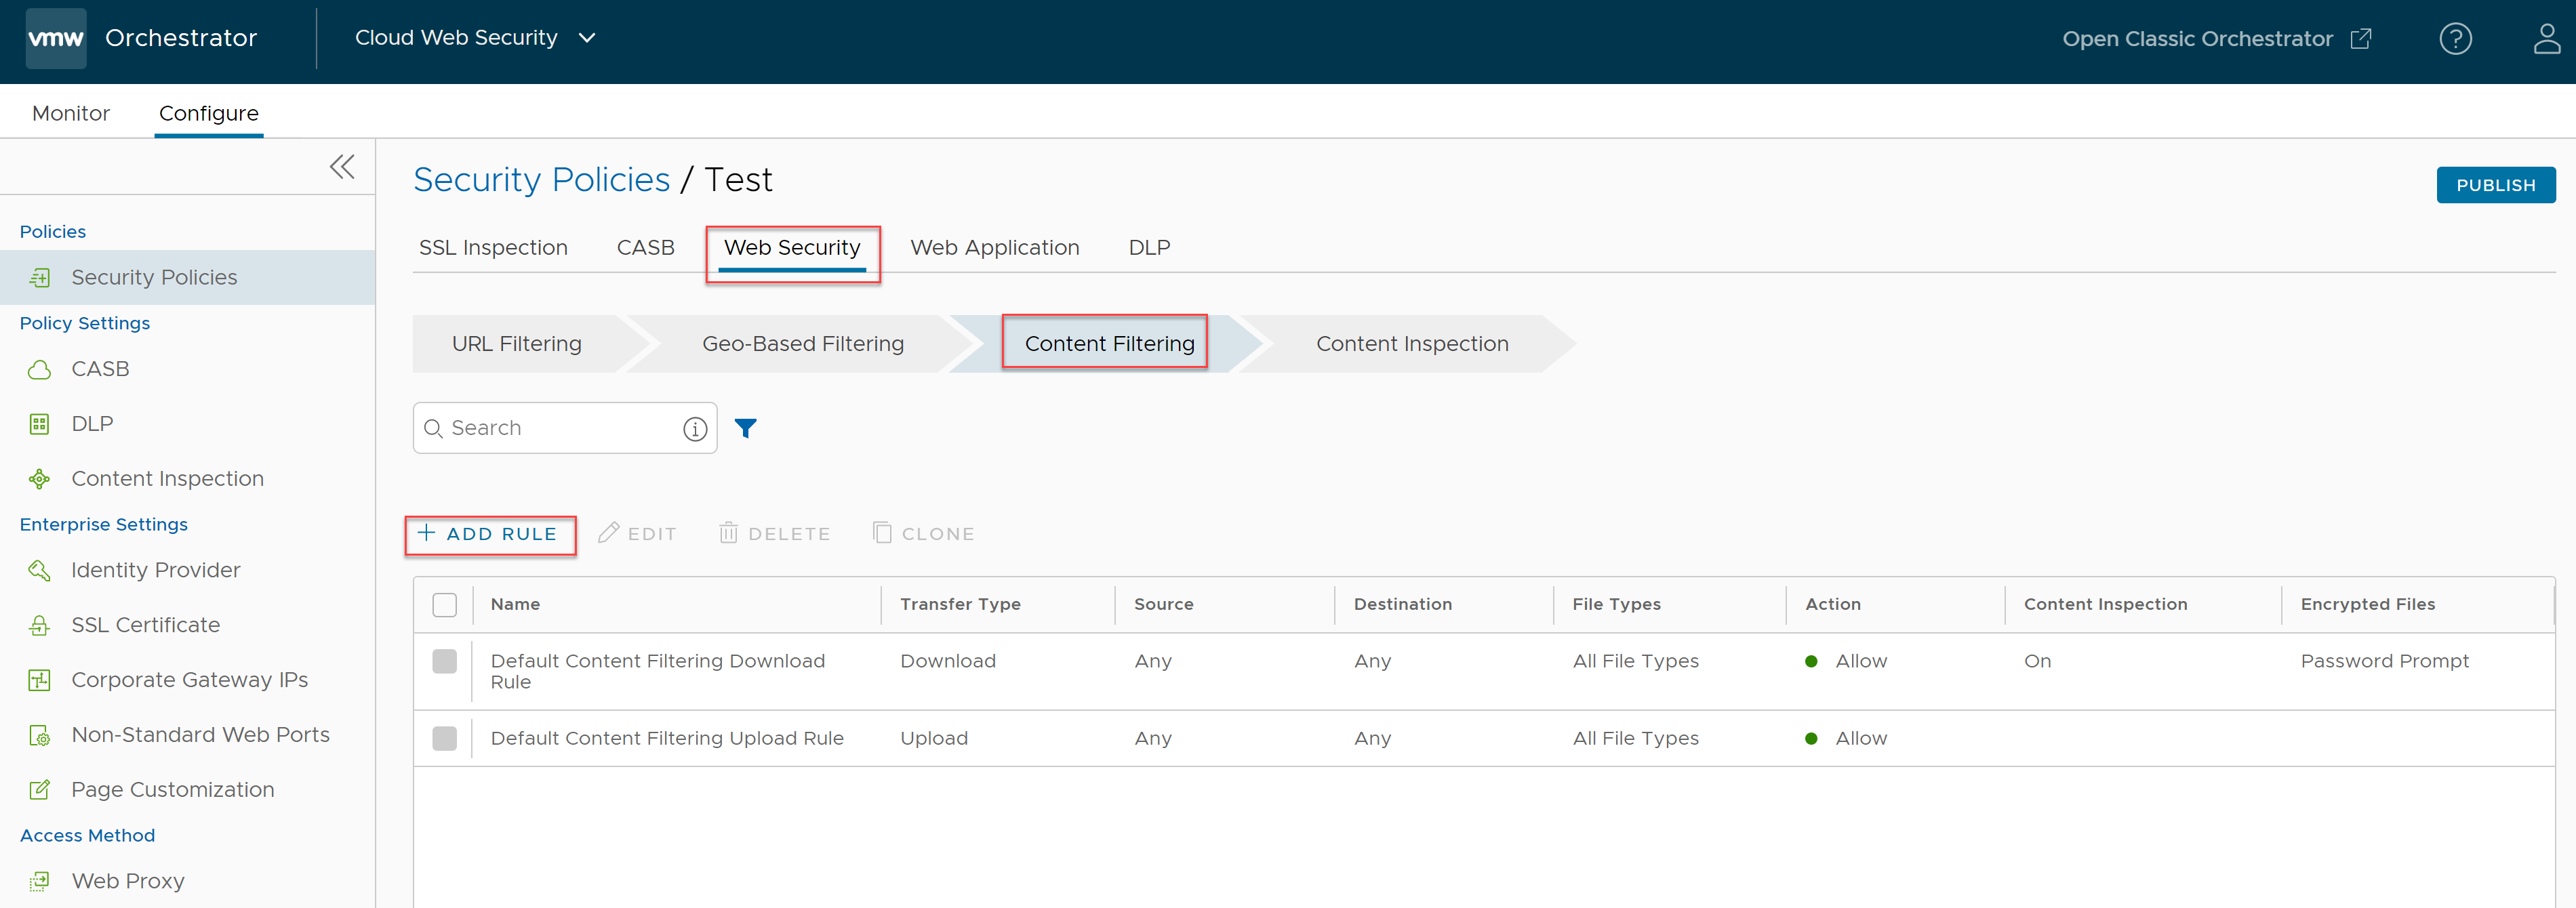
- Under the Content Filtering tab, click + ADD RULE.
The Based On screen appears.

- In the Based On screen, configure the following settings to manage access to file Downloads and Uploads based on file types to/from various websites:
- For the Transfer Type, choose either the Download or Upload radio button. Users cannot select both options. If users want both a download and upload rule, two separate rules are required.
- From the File Type drop-down menu, select a file type.
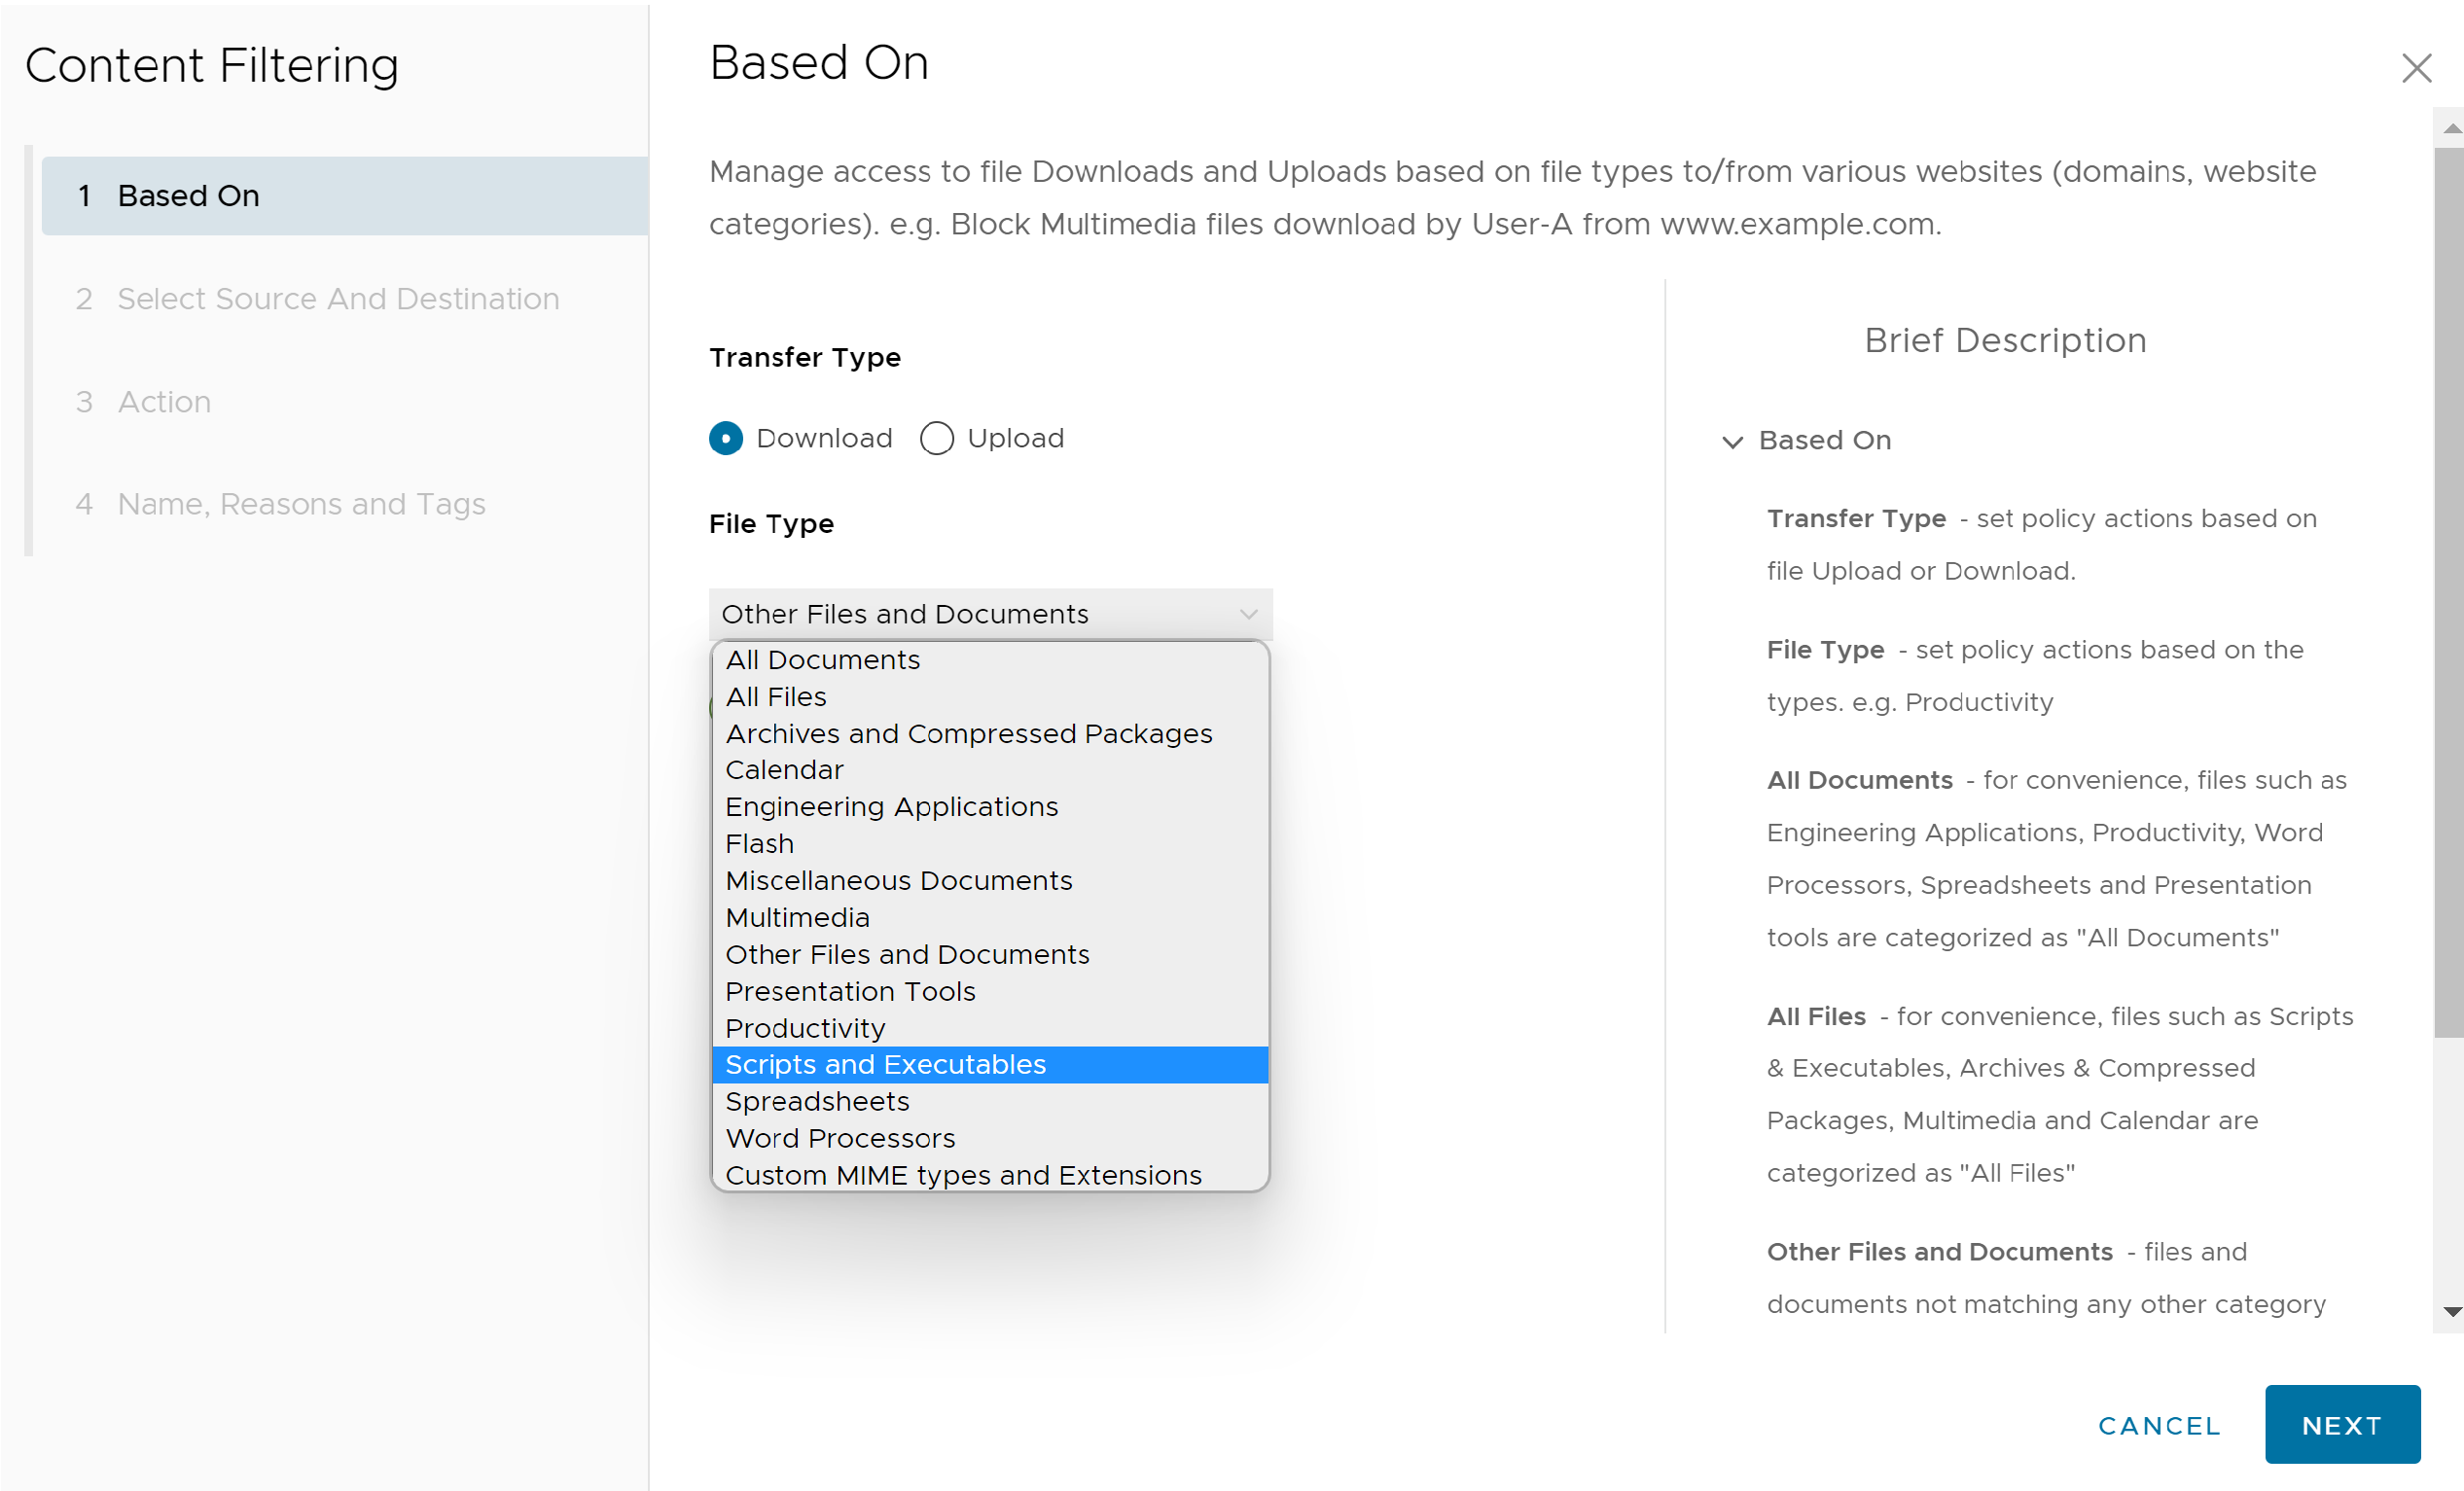
- Click Next, the Select Source and Destination screen appears.
- In the Select Source and Destination screen, select the source and destination to apply the rule or exception.

- Under Source, select the All Users and Groups check box to apply the rule to all users and groups, or deselect that check box to specify Users and Groups.
- Under Destinations, select either All Domain/Categories check box to apply the rule to all available domains and categories, or deselect the check box to specify which Domains and Categories to apply to the rule.
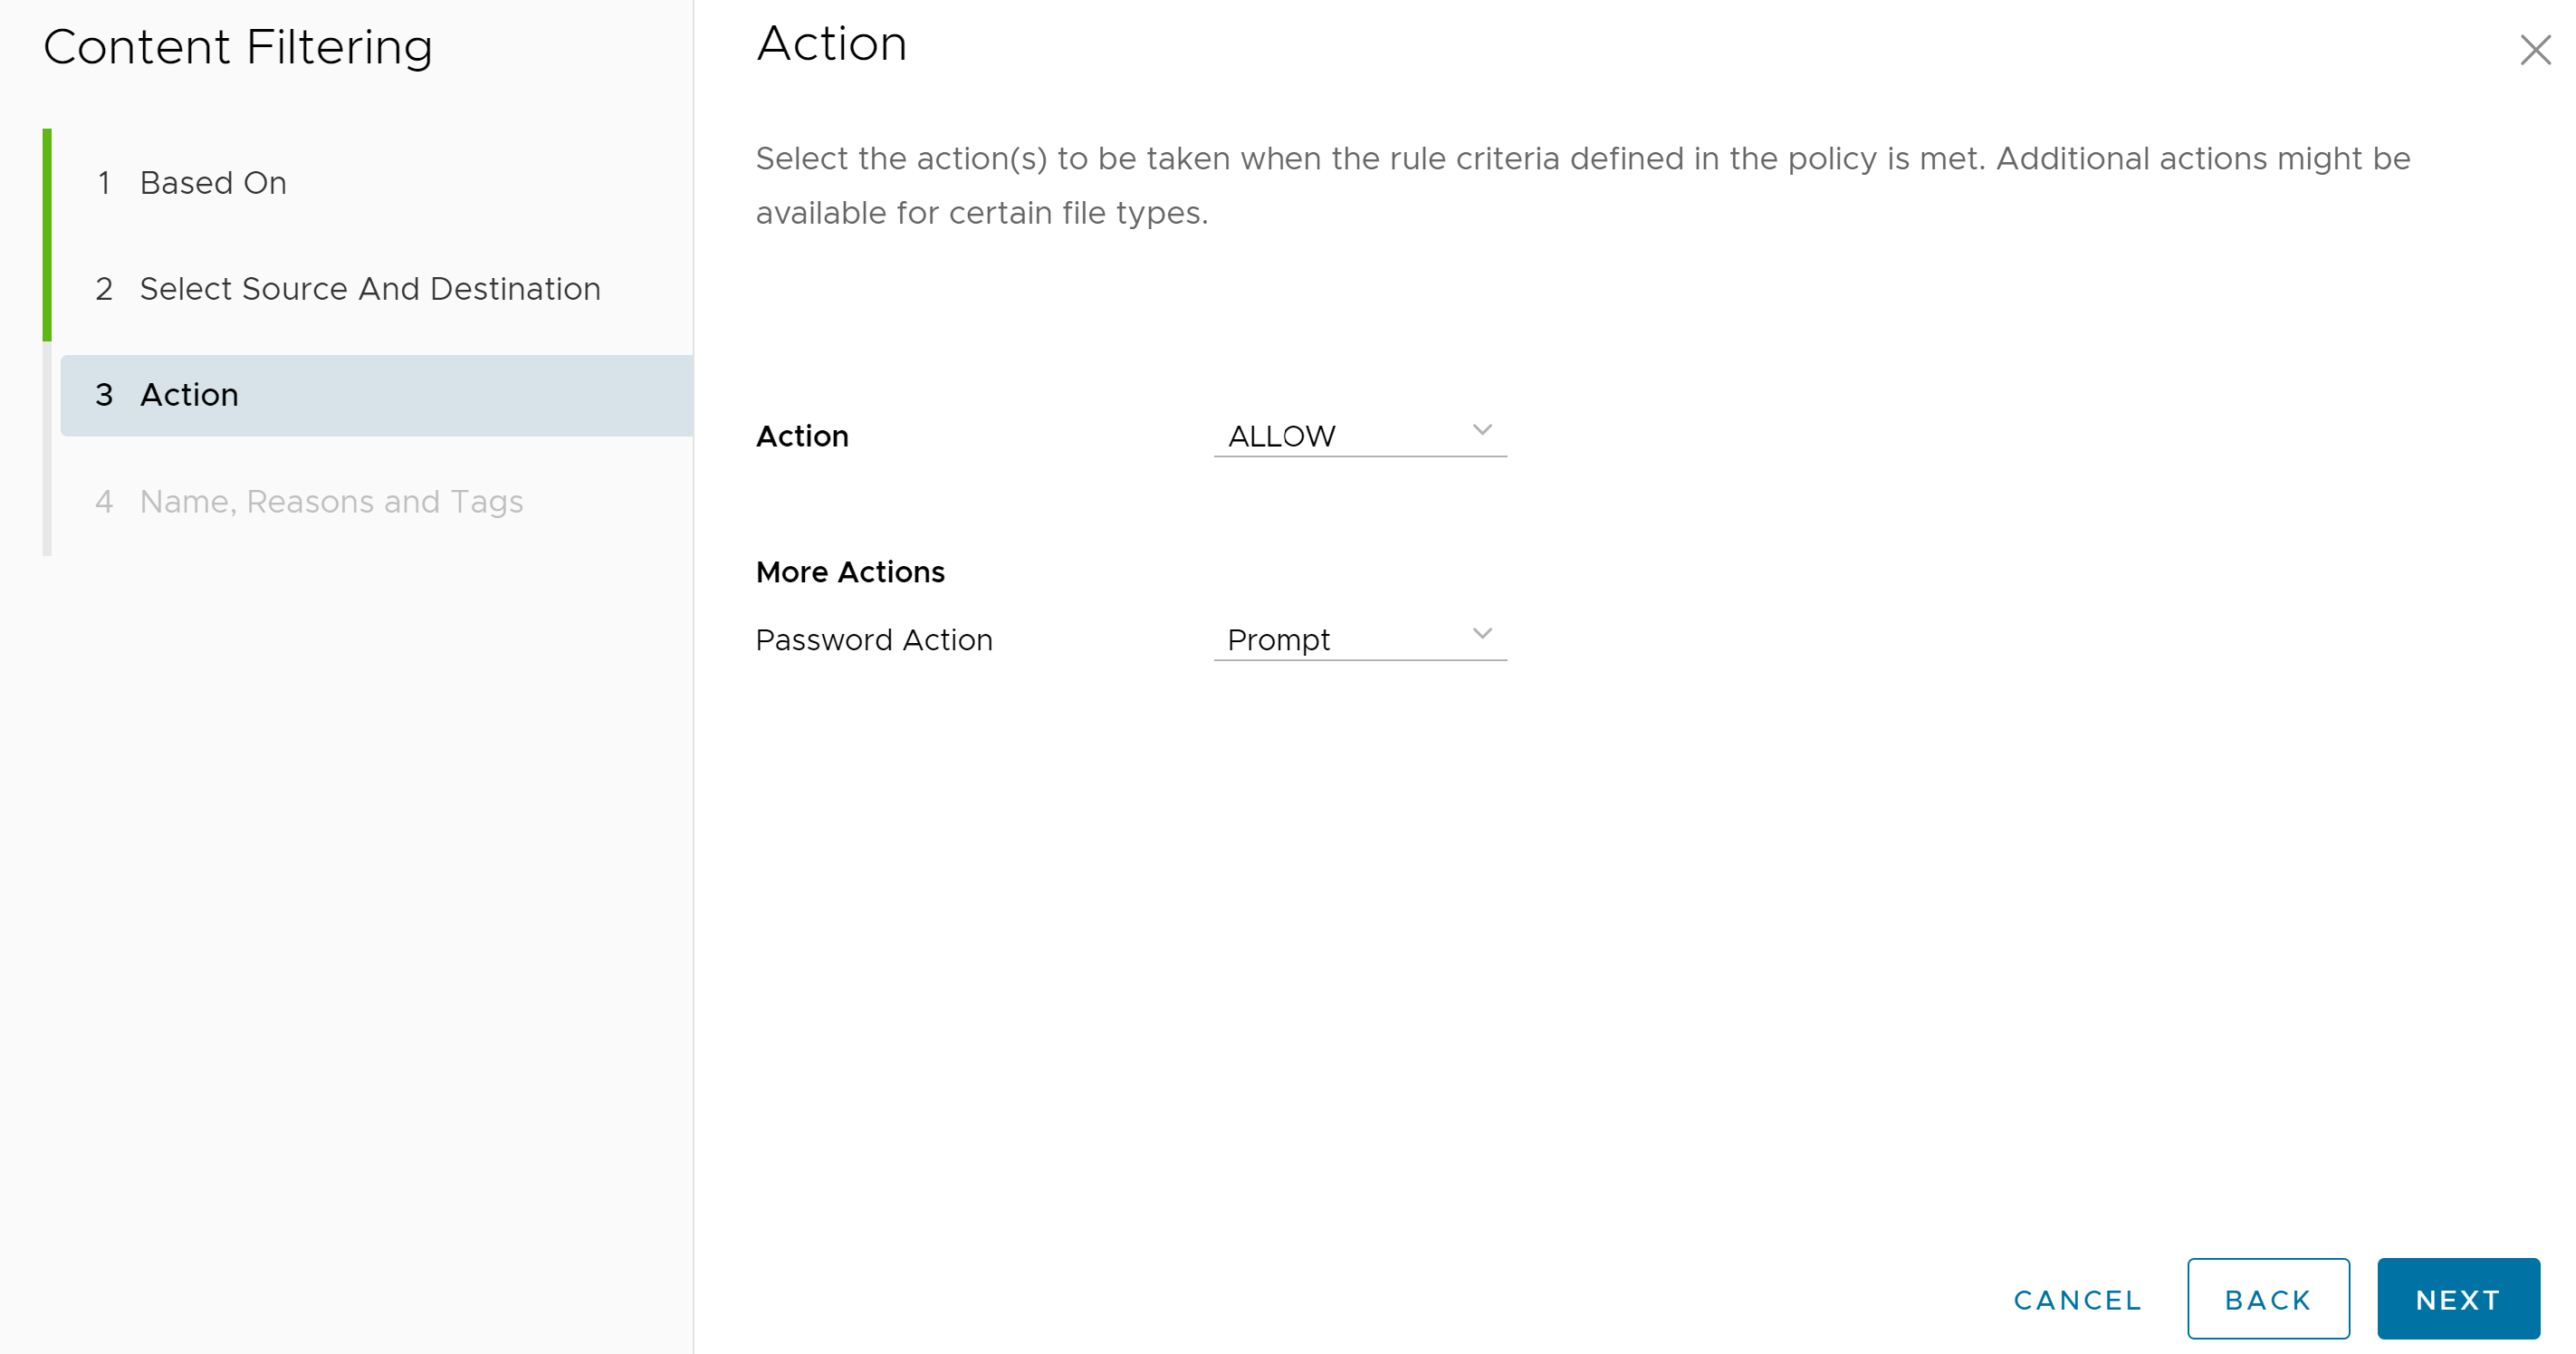
- Click Next, the Action screen appears.
- In the Action screen, select the action Block or Allow from the Action drop-down menu to be taken when the rule criteria defined in the policy are met. Additionally, users can set Password Action (Prompt, Allow, or Block) for certain file types.
Click Next, the Name, Reasons, and Tags screen appears.
- In the Name, Reasons, and Tags screen, configure a unique Rule Name (required), Tags (if used), Reason (if needed), and a Position for the rule on the list of Content Filtering rules (the options are either 'Top of List' or 'Bottom of List').
Note: The Position field designates the rule's position on the list of Content Filtering rules.

- Click Finish and the newly created Content Filtering rule appears in the Content Filtering list.
- Users have the following options: configure another rule under Content Filtering, configure a different Security Policy category, or if finished, click the Publish button to publish the Security Policy.
- After publishing the Security Policy, users can Apply the Security Policy.
Content Inspection
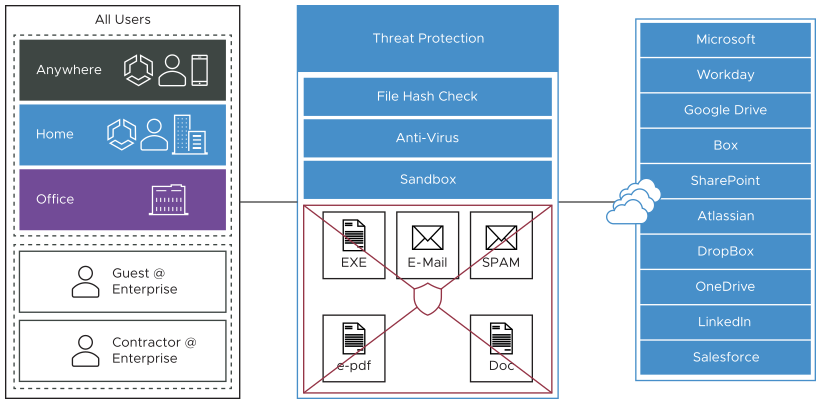
Content Inspection provides protection from active sites with malware content as well as protection against known and “Day 0” threats. Content allowed so far can be inspected to determine if it is harmful.
- File Hash Check: The file is scanned to see if it matches a known file hash stored in the Cloud Web Security database. A file hash is a unique value and is compared against results from more than 50 AV engines. The result of a hash check can be clean, malicious, or unknown. If clean, the file is allowed onto the network. If malicious, the file is dropped. If unknown, the file will be either dropped or sent to the Anti-Virus Scan, depending on which options were selected. By default, this option is activated for your policy.
- Anti-Virus Scan: The file is scanned by the Cloud Web Security anti-virus application checking for known viruses and malware signatures. If the file matches a known virus or malware, the file is dropped. If the file does not match a known virus/malware, it is either dropped or sent to the Sandbox, depending on which options were selected. By default, this option is activated for your policy.
- Sandbox: The Sandbox is a contained environment where a file can be securely analyzed in two ways:
- Static Analysis: inspects the file for libraries, functions imported, scans the code for strings, linking methods used, etc.
- Dynamic Analysis: runs the file in a contained environment and determines if the file is infected based on the behavior. Dynamic takes much more time to process.
By default, Sandbox Inspection is deactivated for your policy. You can activate Sandbox Inspection from page.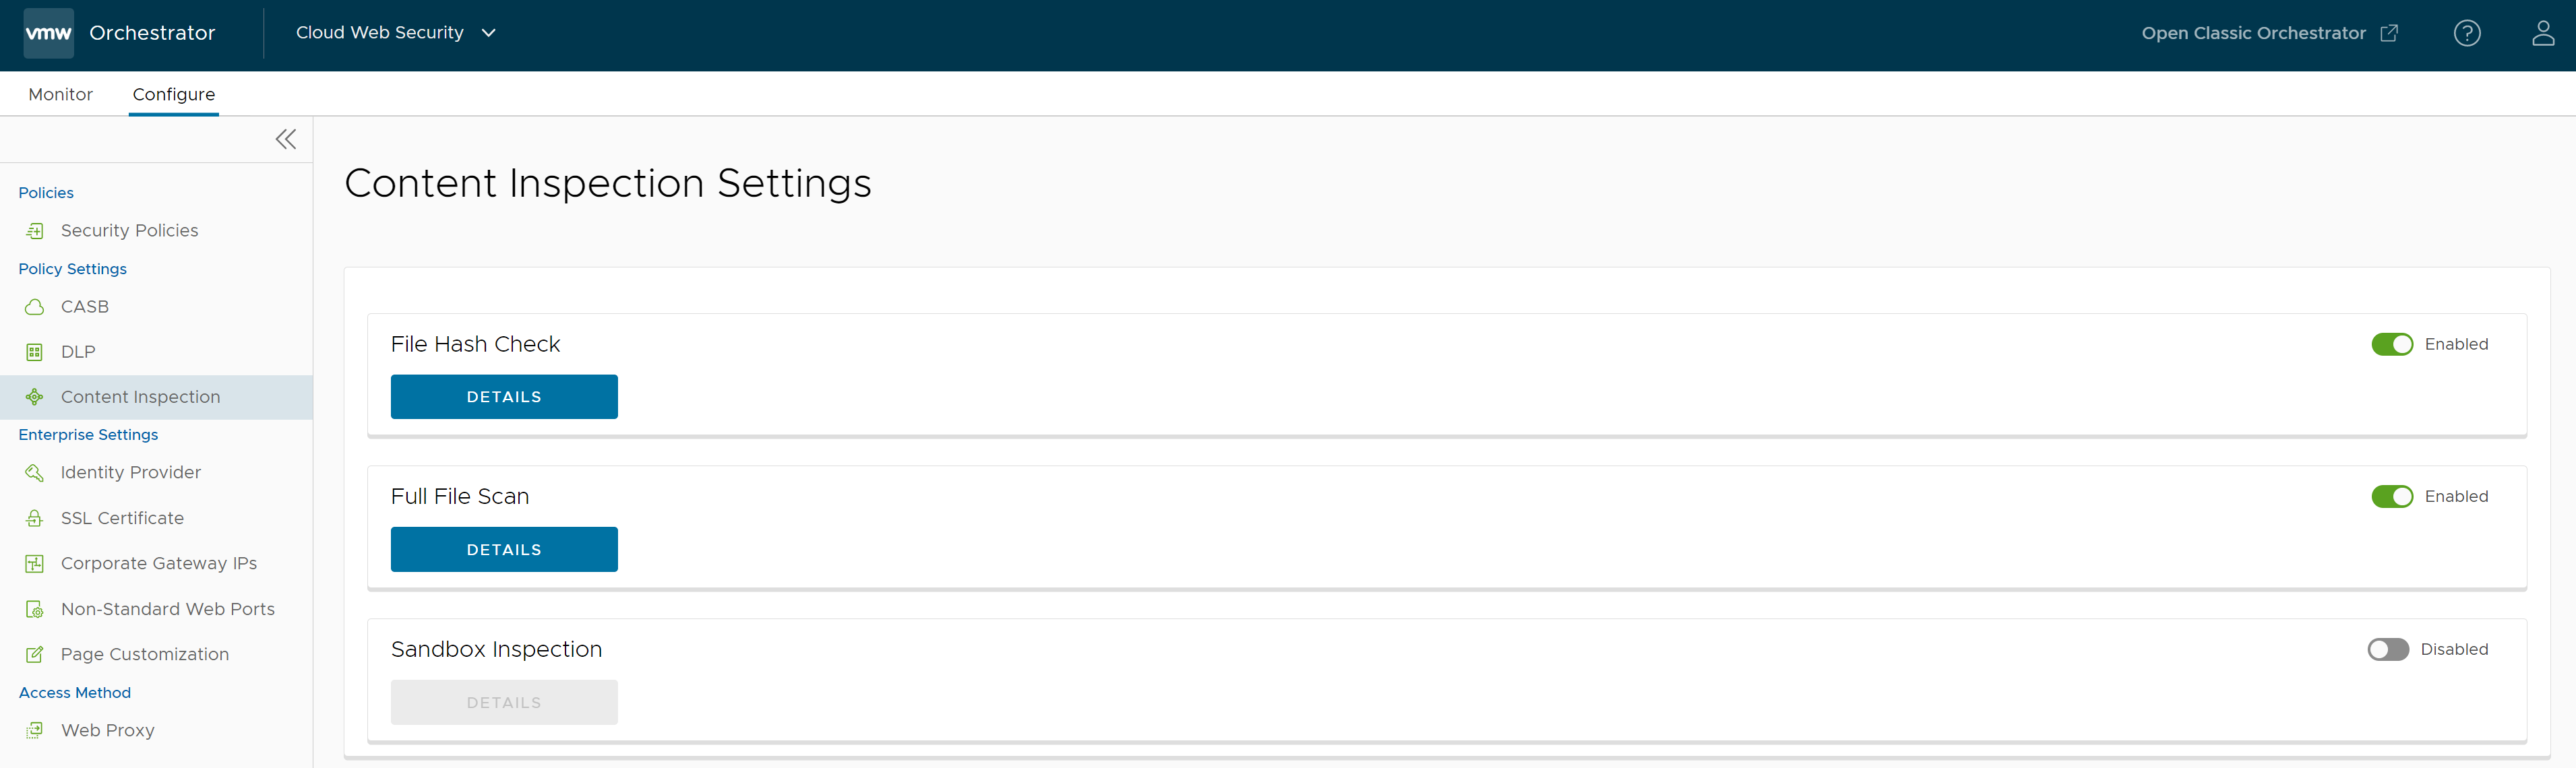
- Navigate to .
- Select a security policy to configure a Content Inspection rule.
- In the selected Security Policies screen, click the Web Security tab.
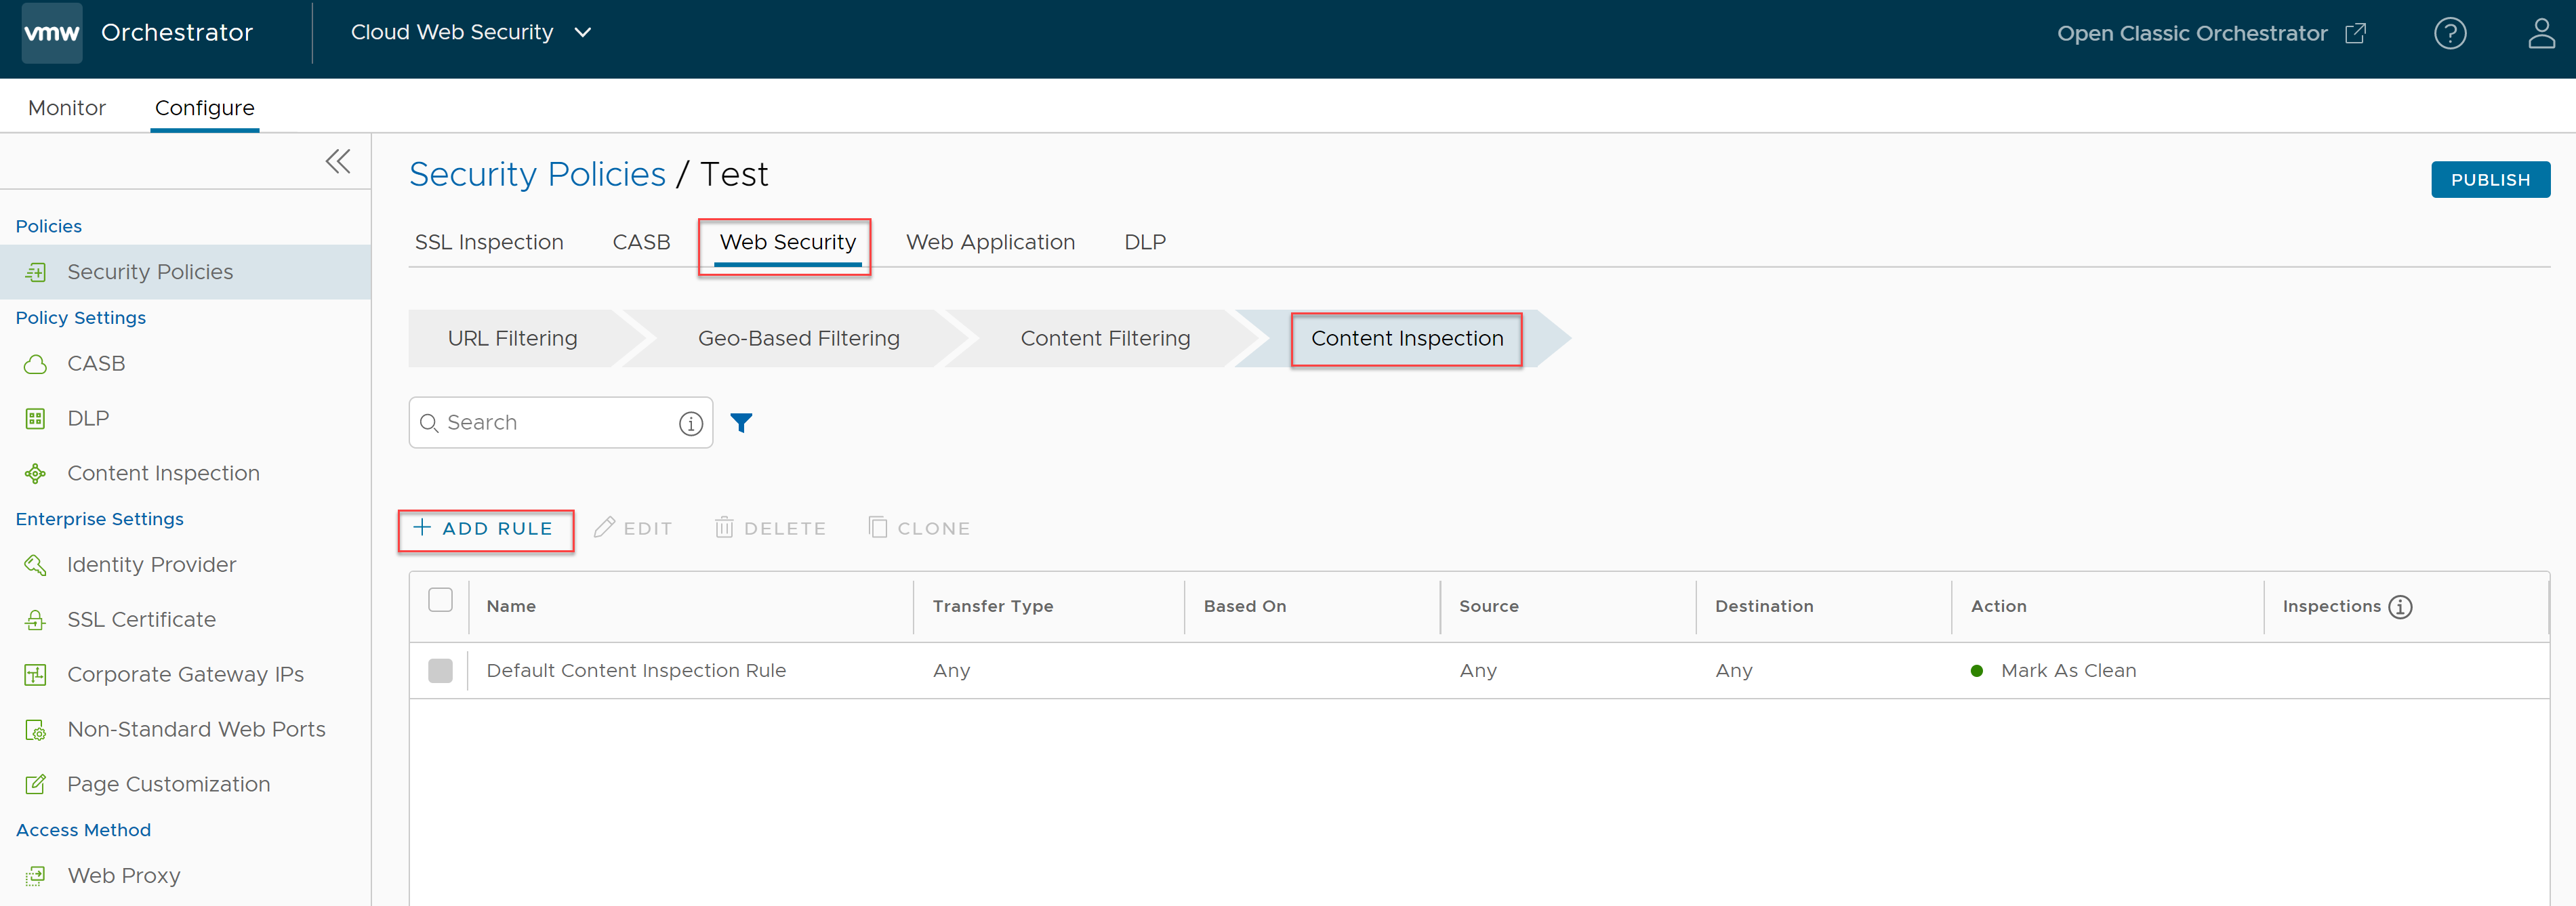
- Under the Content Inspection tab, click + ADD RULE.
The Based On screen appears.
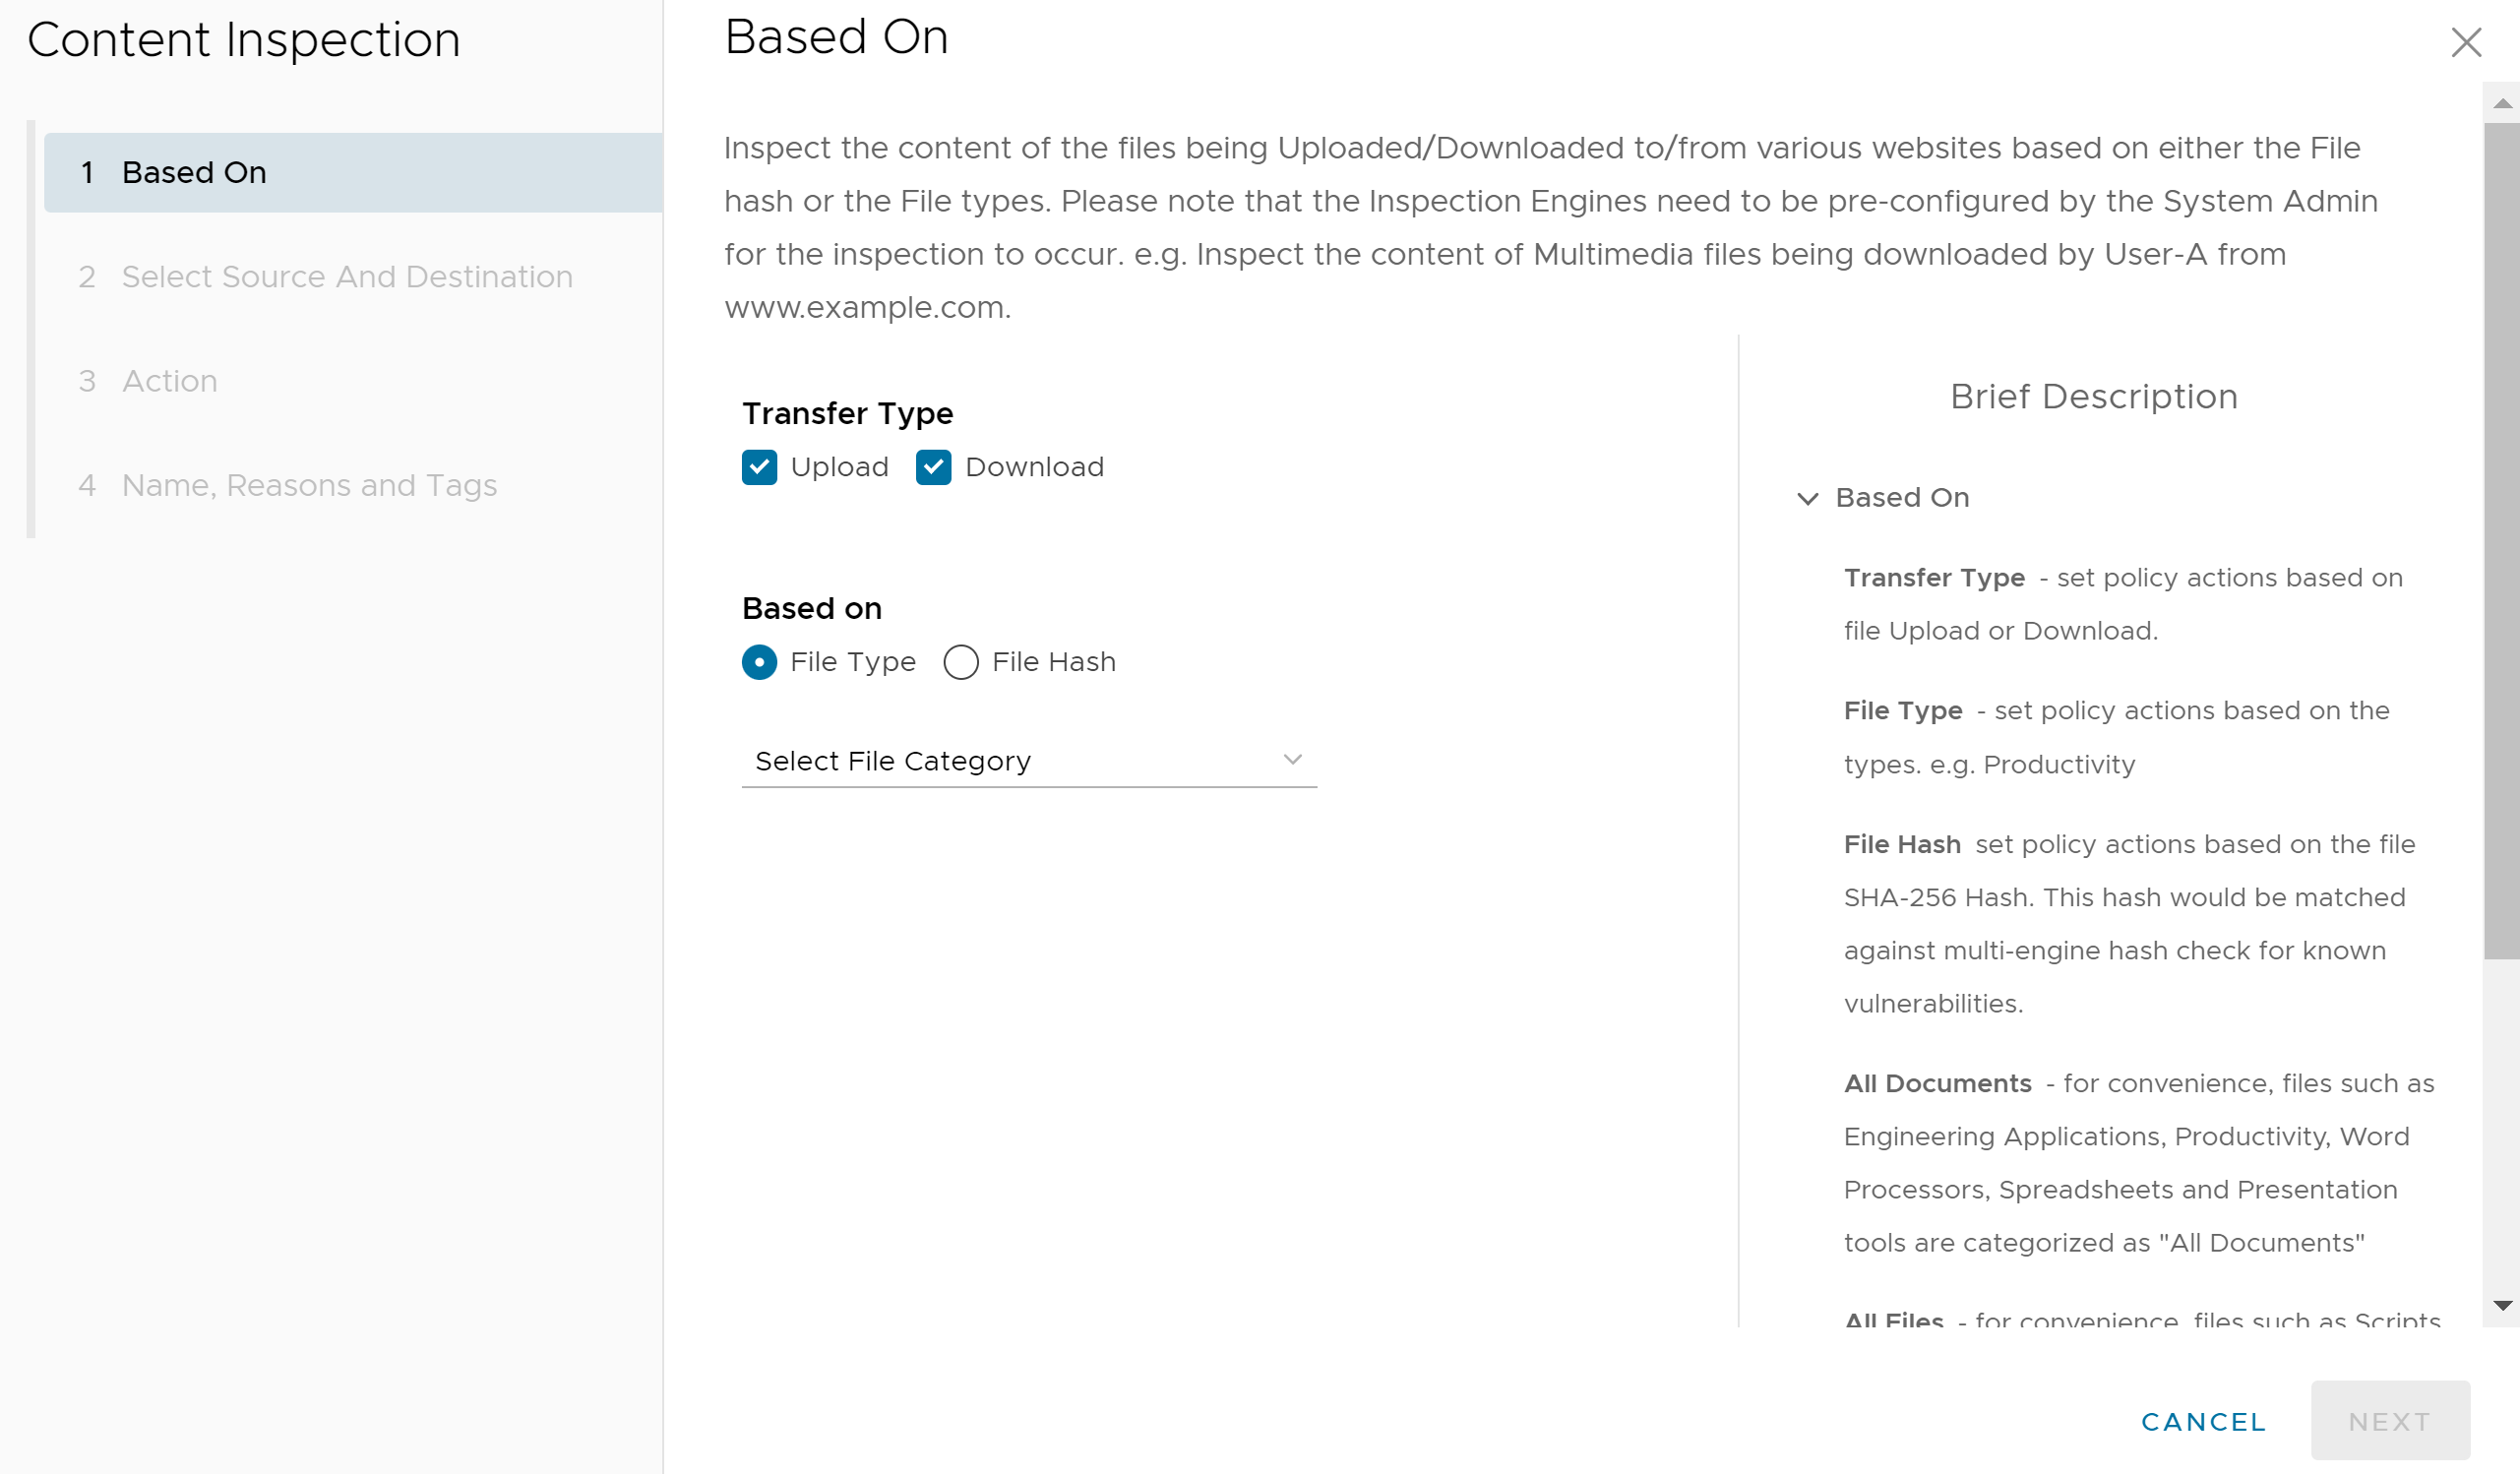
- In the Based On screen, configure the following settings to inspect the content of the files being Uploaded/Downloaded to/from various websites based on either the File hash or the File types.:
- For the Transfer Type, choose either the Download or Upload radio button, or choose both types.
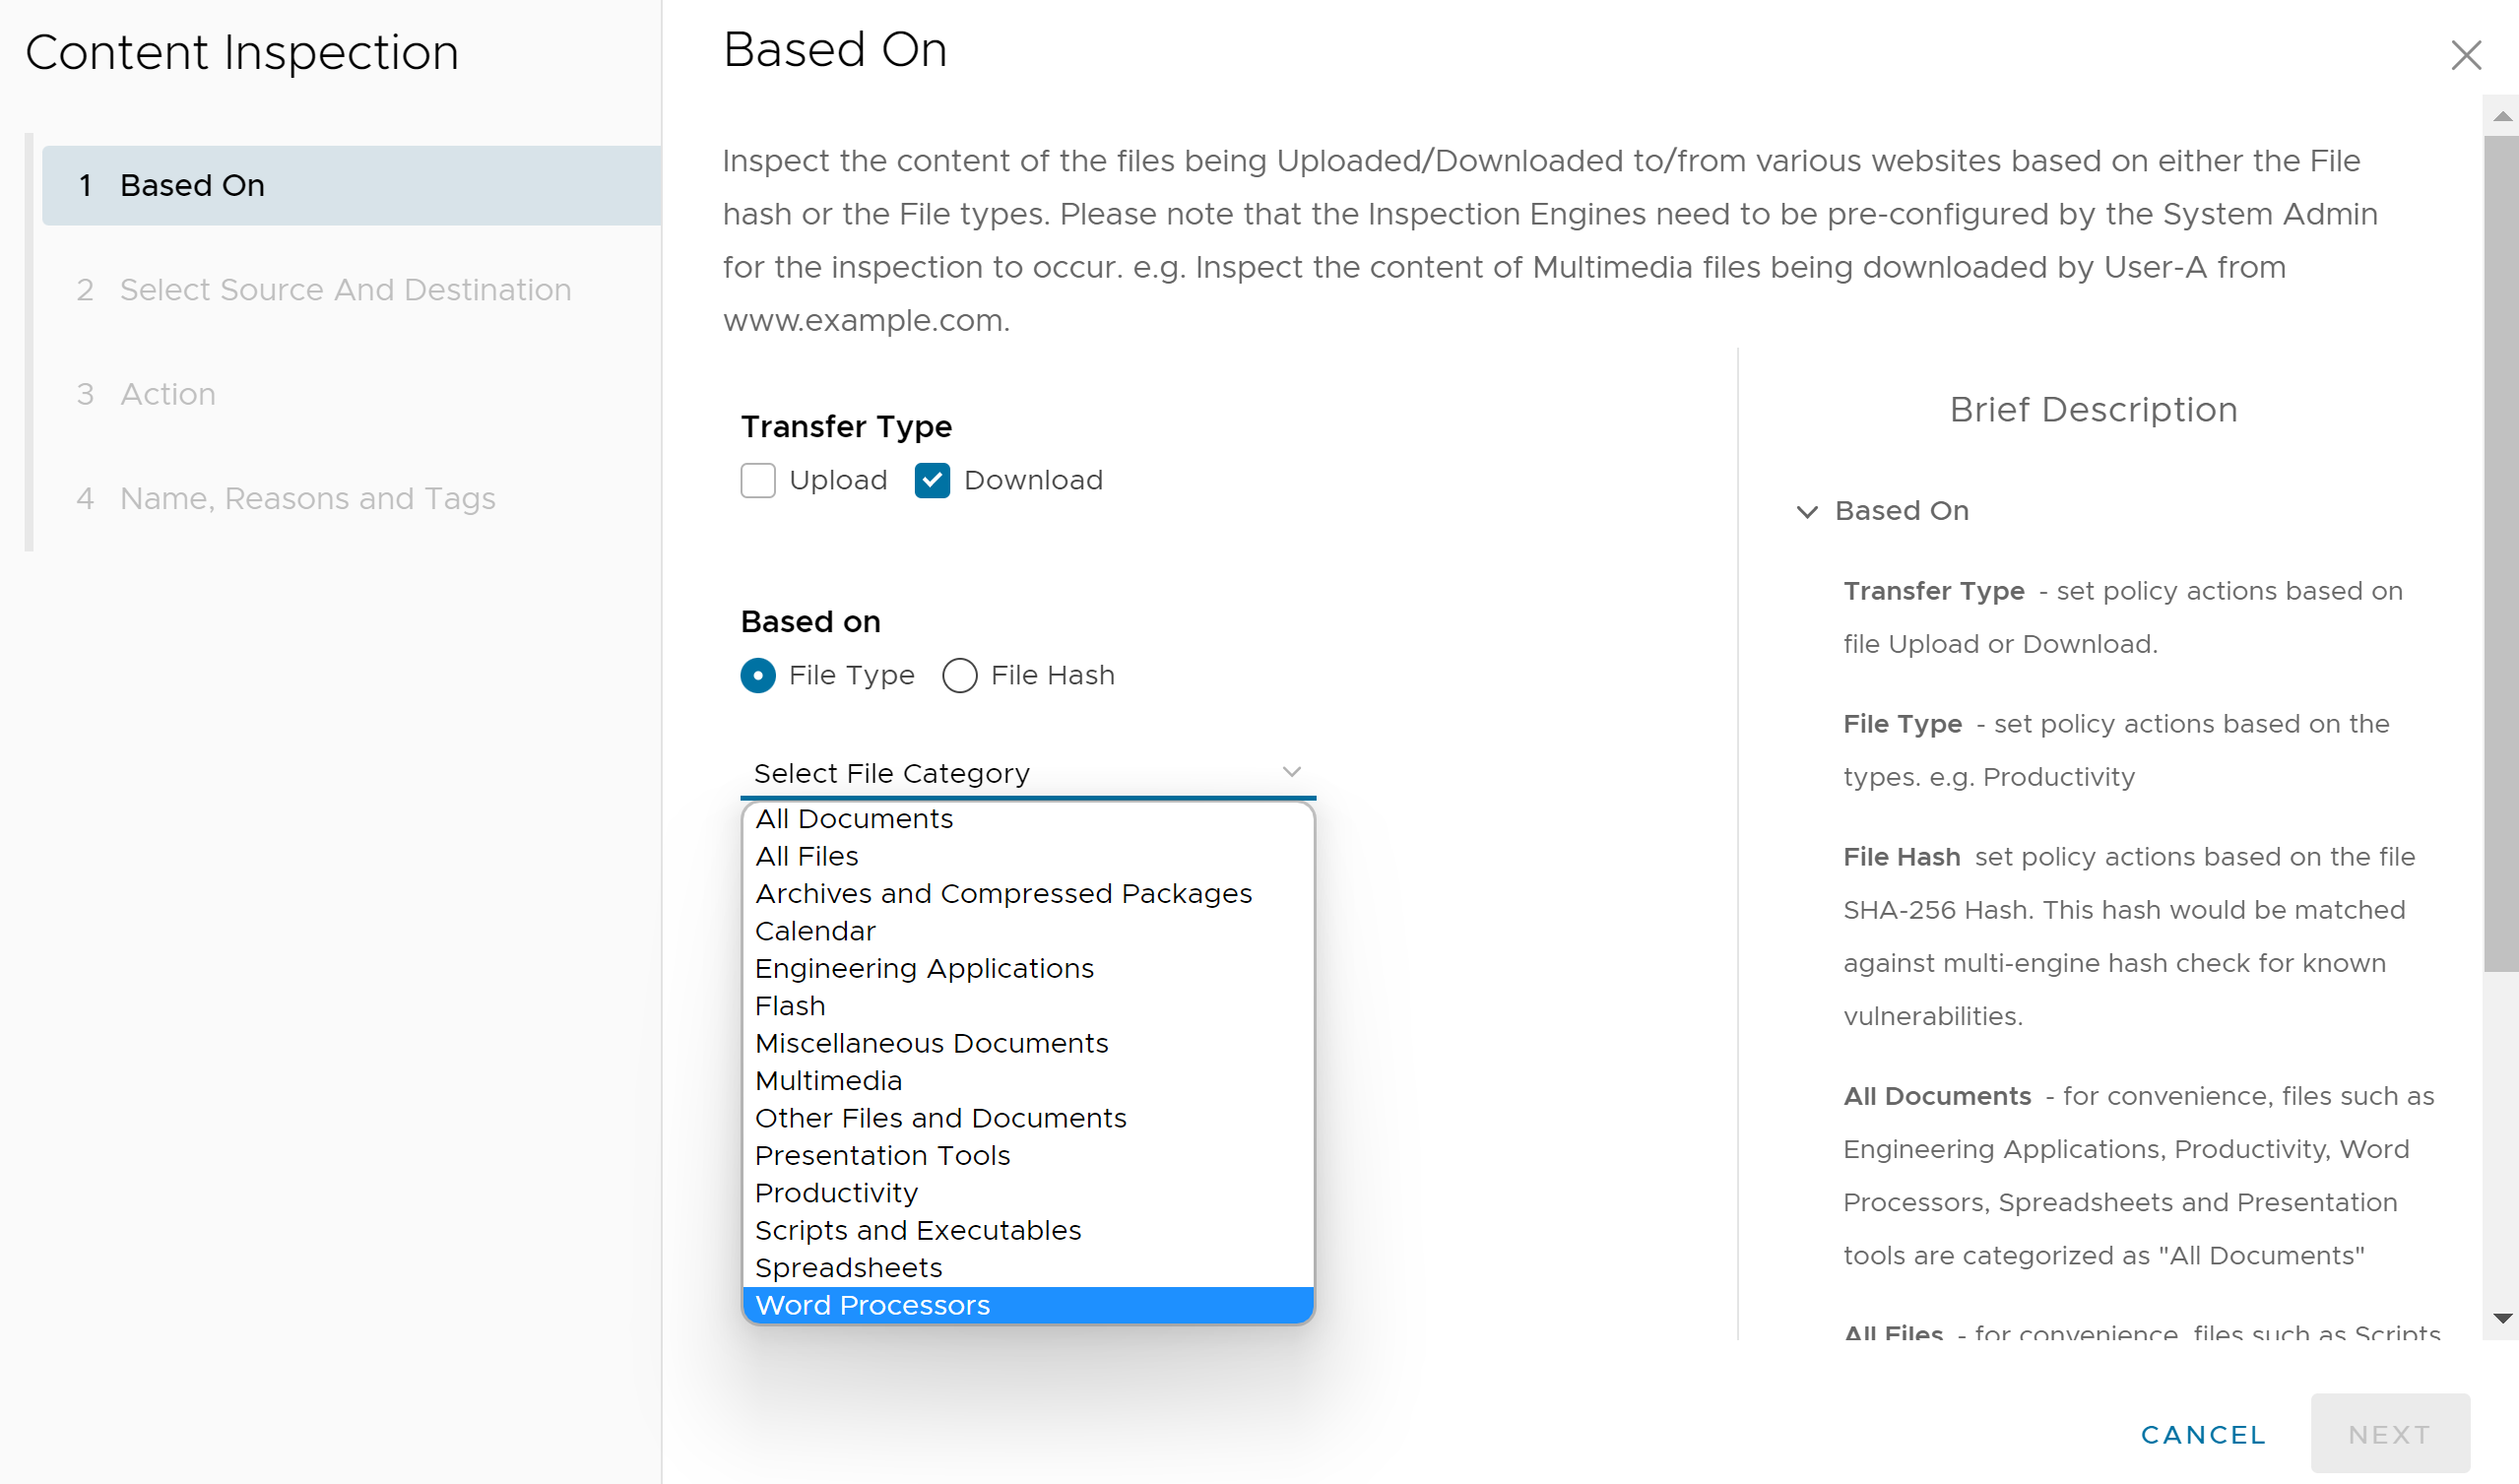
- Under Based on, select either File Type or File Hash, which indicates if the inspection will look for files based on File Type or File Hash. (Users cannot choose both).
- If users select File Type, choose a category from the drop-down menu. For example, users can configure a rule to inspect downloaded files that match the listed Word Processor file types: Word, XPS, OpenOffice Text, and Word Perfect.
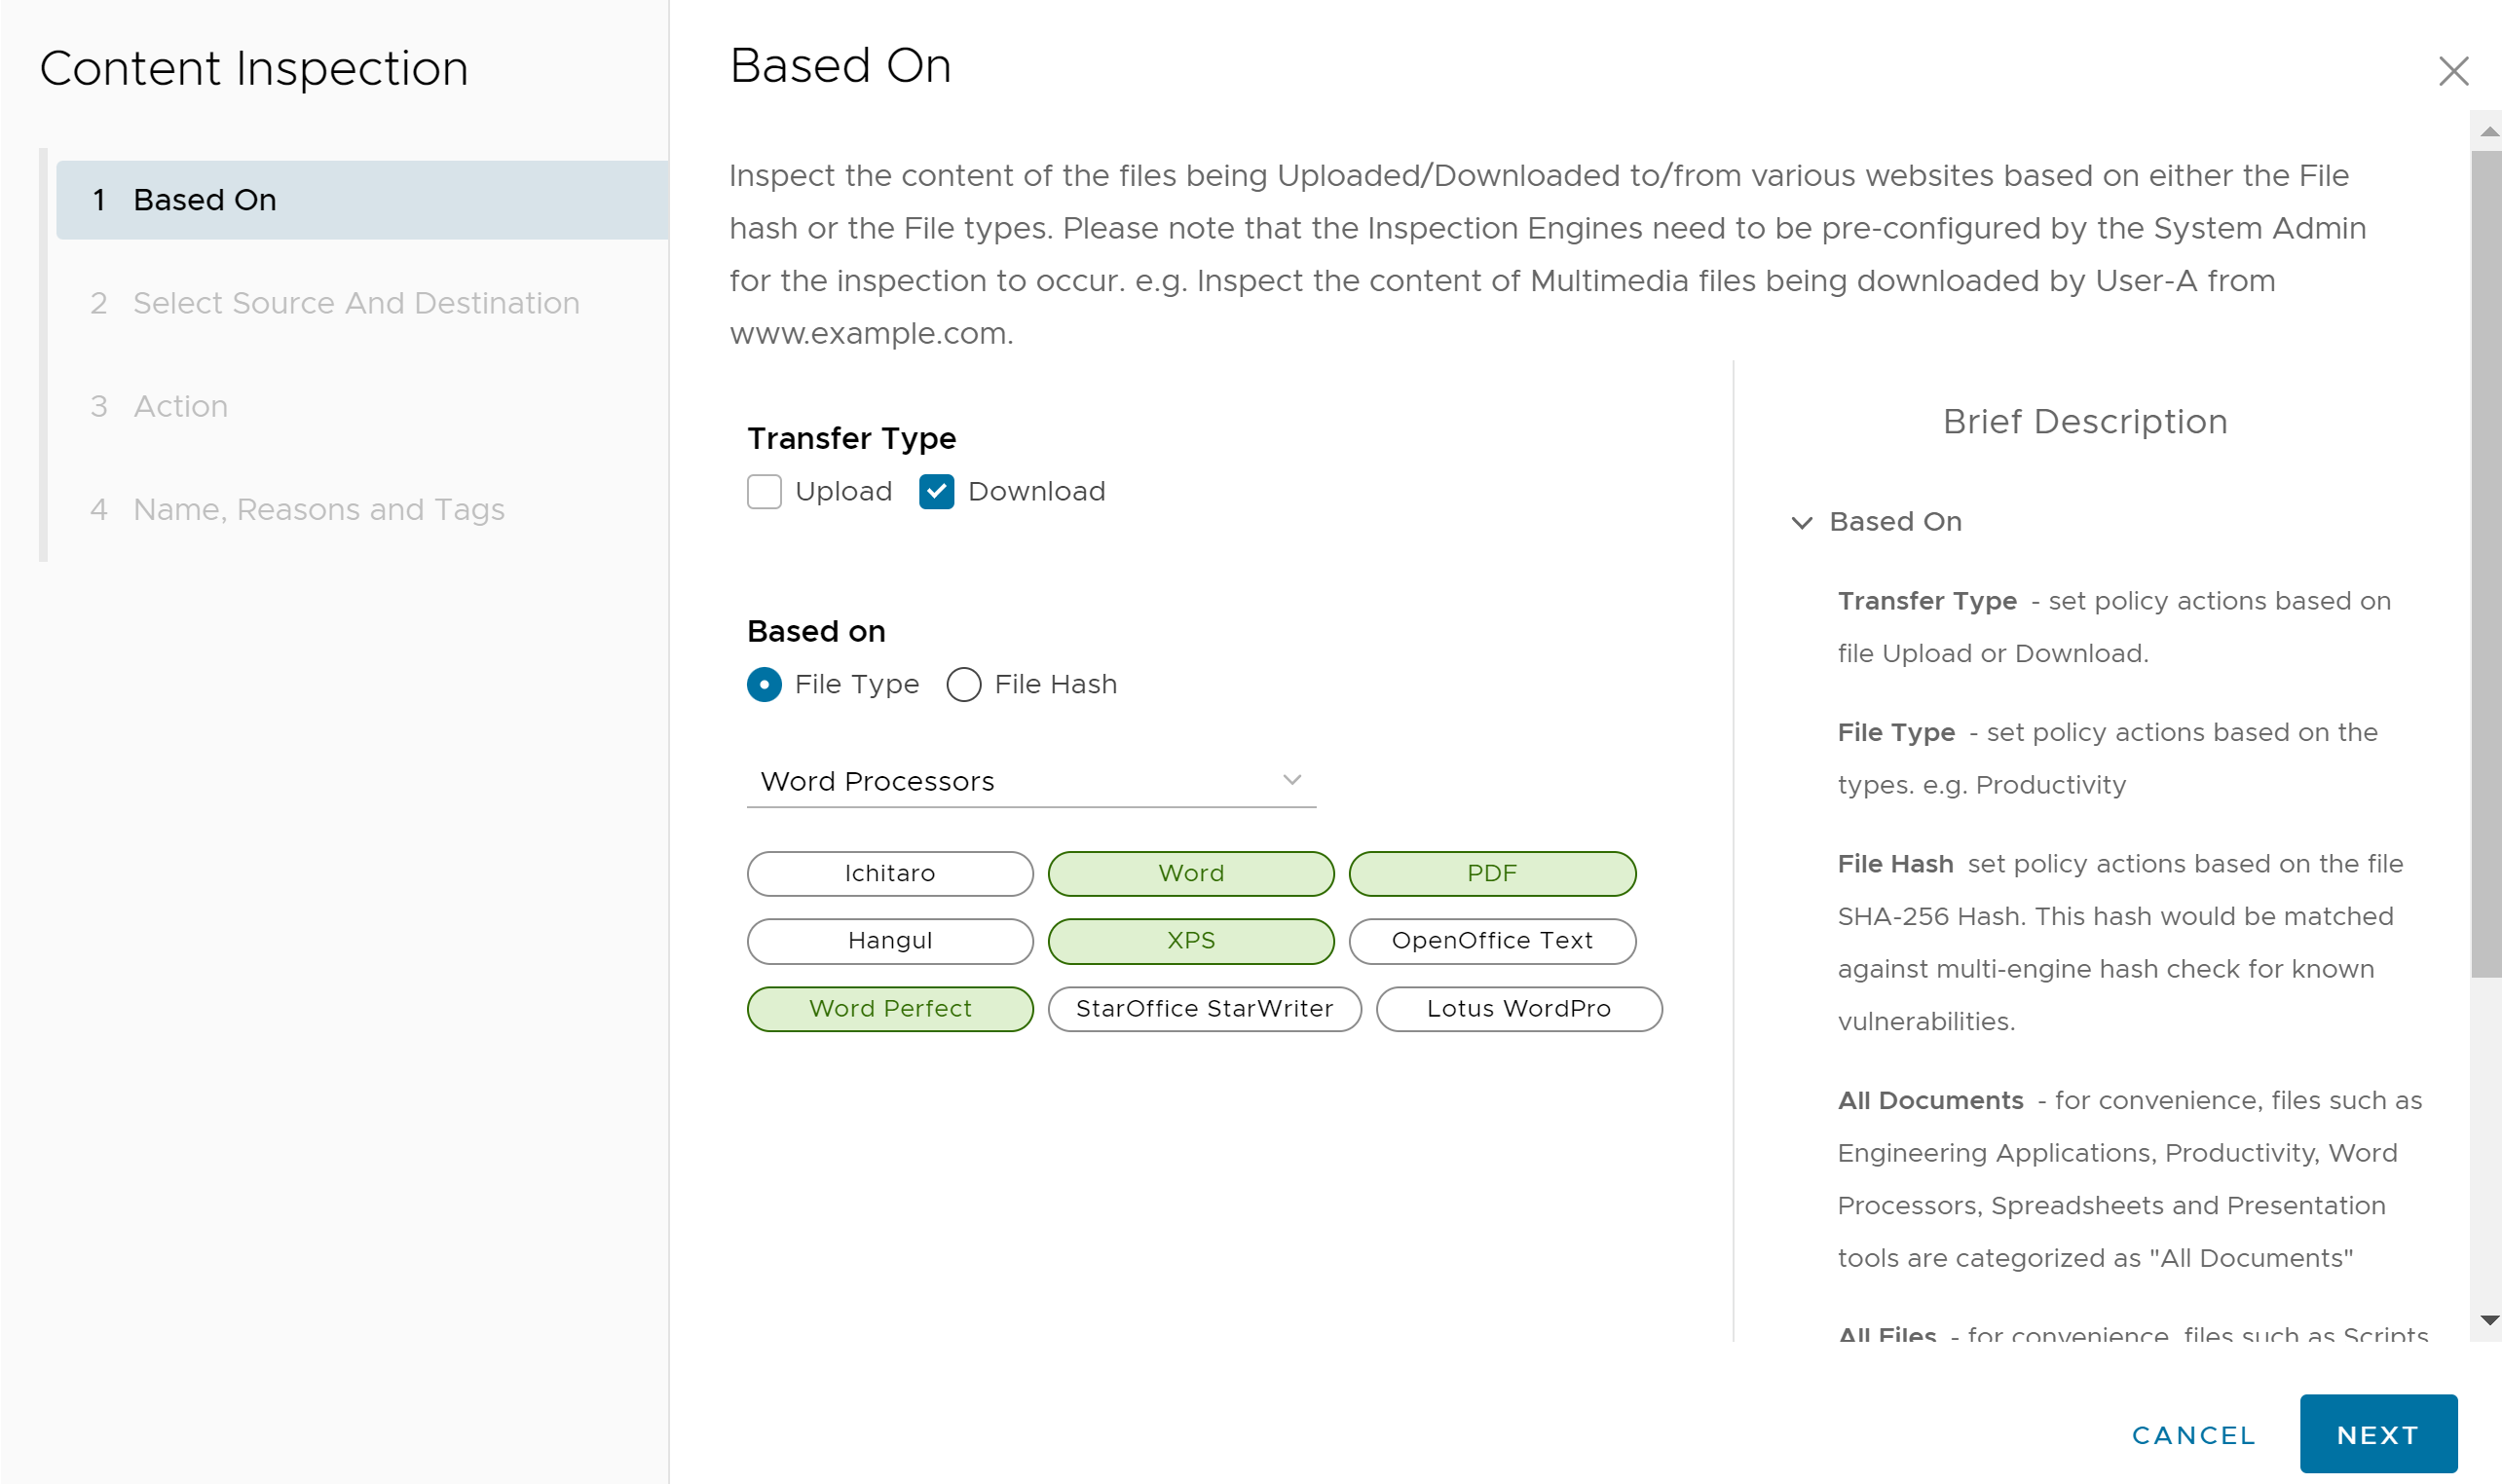
- If users select File Hash, enter a SHA-256 Hash in the appropriate text box.
- If users select File Type, choose a category from the drop-down menu. For example, users can configure a rule to inspect downloaded files that match the listed Word Processor file types: Word, XPS, OpenOffice Text, and Word Perfect.
- Click Next, the Select Source and Destination screen appears.
- For the Transfer Type, choose either the Download or Upload radio button, or choose both types.
- In the Source and Destination screen appears, select the source and destination to apply the rule.
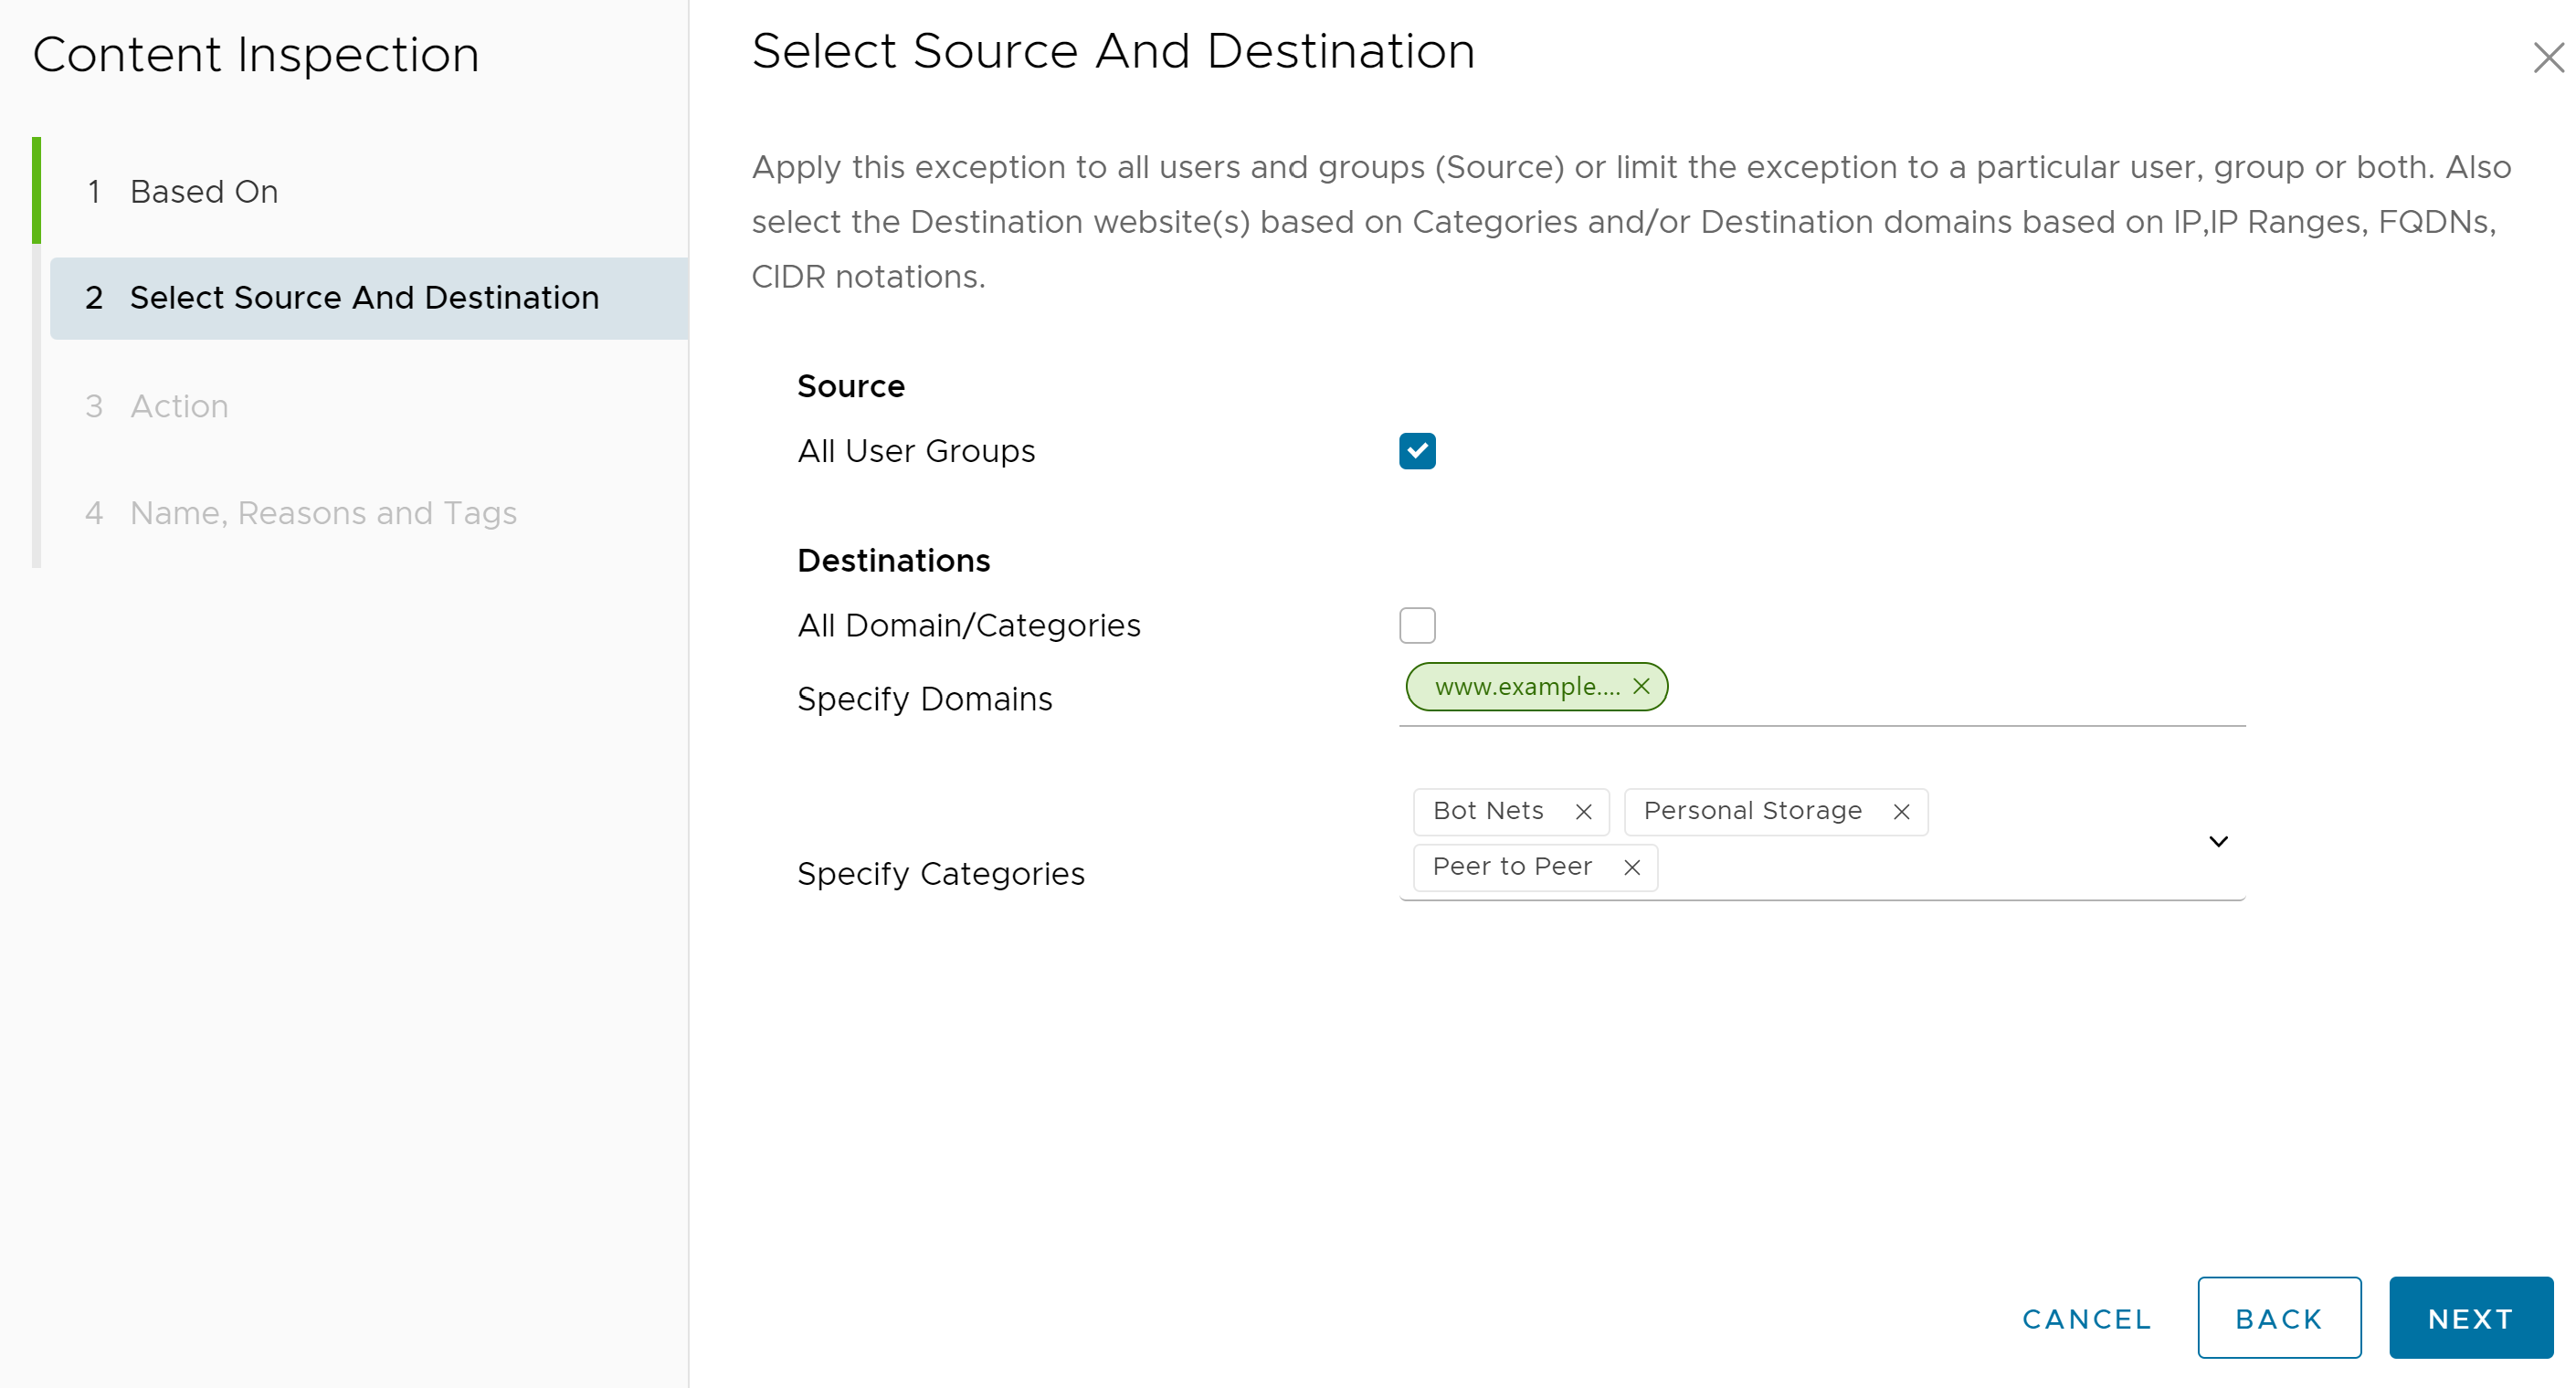
- Under Source, select the All Users and Groups check box to apply the rule to all users and groups, or deselect that check box to specify Users and Groups.
- Under Destinations, select either All Domain/Categories check box to apply the rule to all available domains and categories, or deselect the check box to specify which Domains and Categories to apply to the rule.
- Click Next, the Action screen appears.
- In the Action screen, from the Policy Action drop-down menu choose any one of the following actions: Mark As Clean, Mark As Infected, or Inspect.
Table 1. Policy Action Description Policy Action Description Mark As Clean The files will automatically be permitted onto the network without inspection. Mark As Infected The files will automatically be treated as dangerous and will be dropped and not permitted onto the network. Inspect The matching files will be subject up to three different inspection options, and if the file fails the inspection, it will be dropped. - If users choose either the Mark As Clean or Mark As Infected policy actions, the Inspection Options (All Checks, File Hash Check, File Full Scan, Sandbox Inspection) are not available.

- If users choose the Inspect Policy Action, user can select up to three Inspection Options (File Hash Check, File Full Scan, Sandbox Inspection).
Note: The All Checks option mean all three options (File Hash Check, File Full Scan, Sandbox Inspection) are selected.

Click Next, the Name, Reasons, and Tags screen appears.
- If users choose either the Mark As Clean or Mark As Infected policy actions, the Inspection Options (All Checks, File Hash Check, File Full Scan, Sandbox Inspection) are not available.
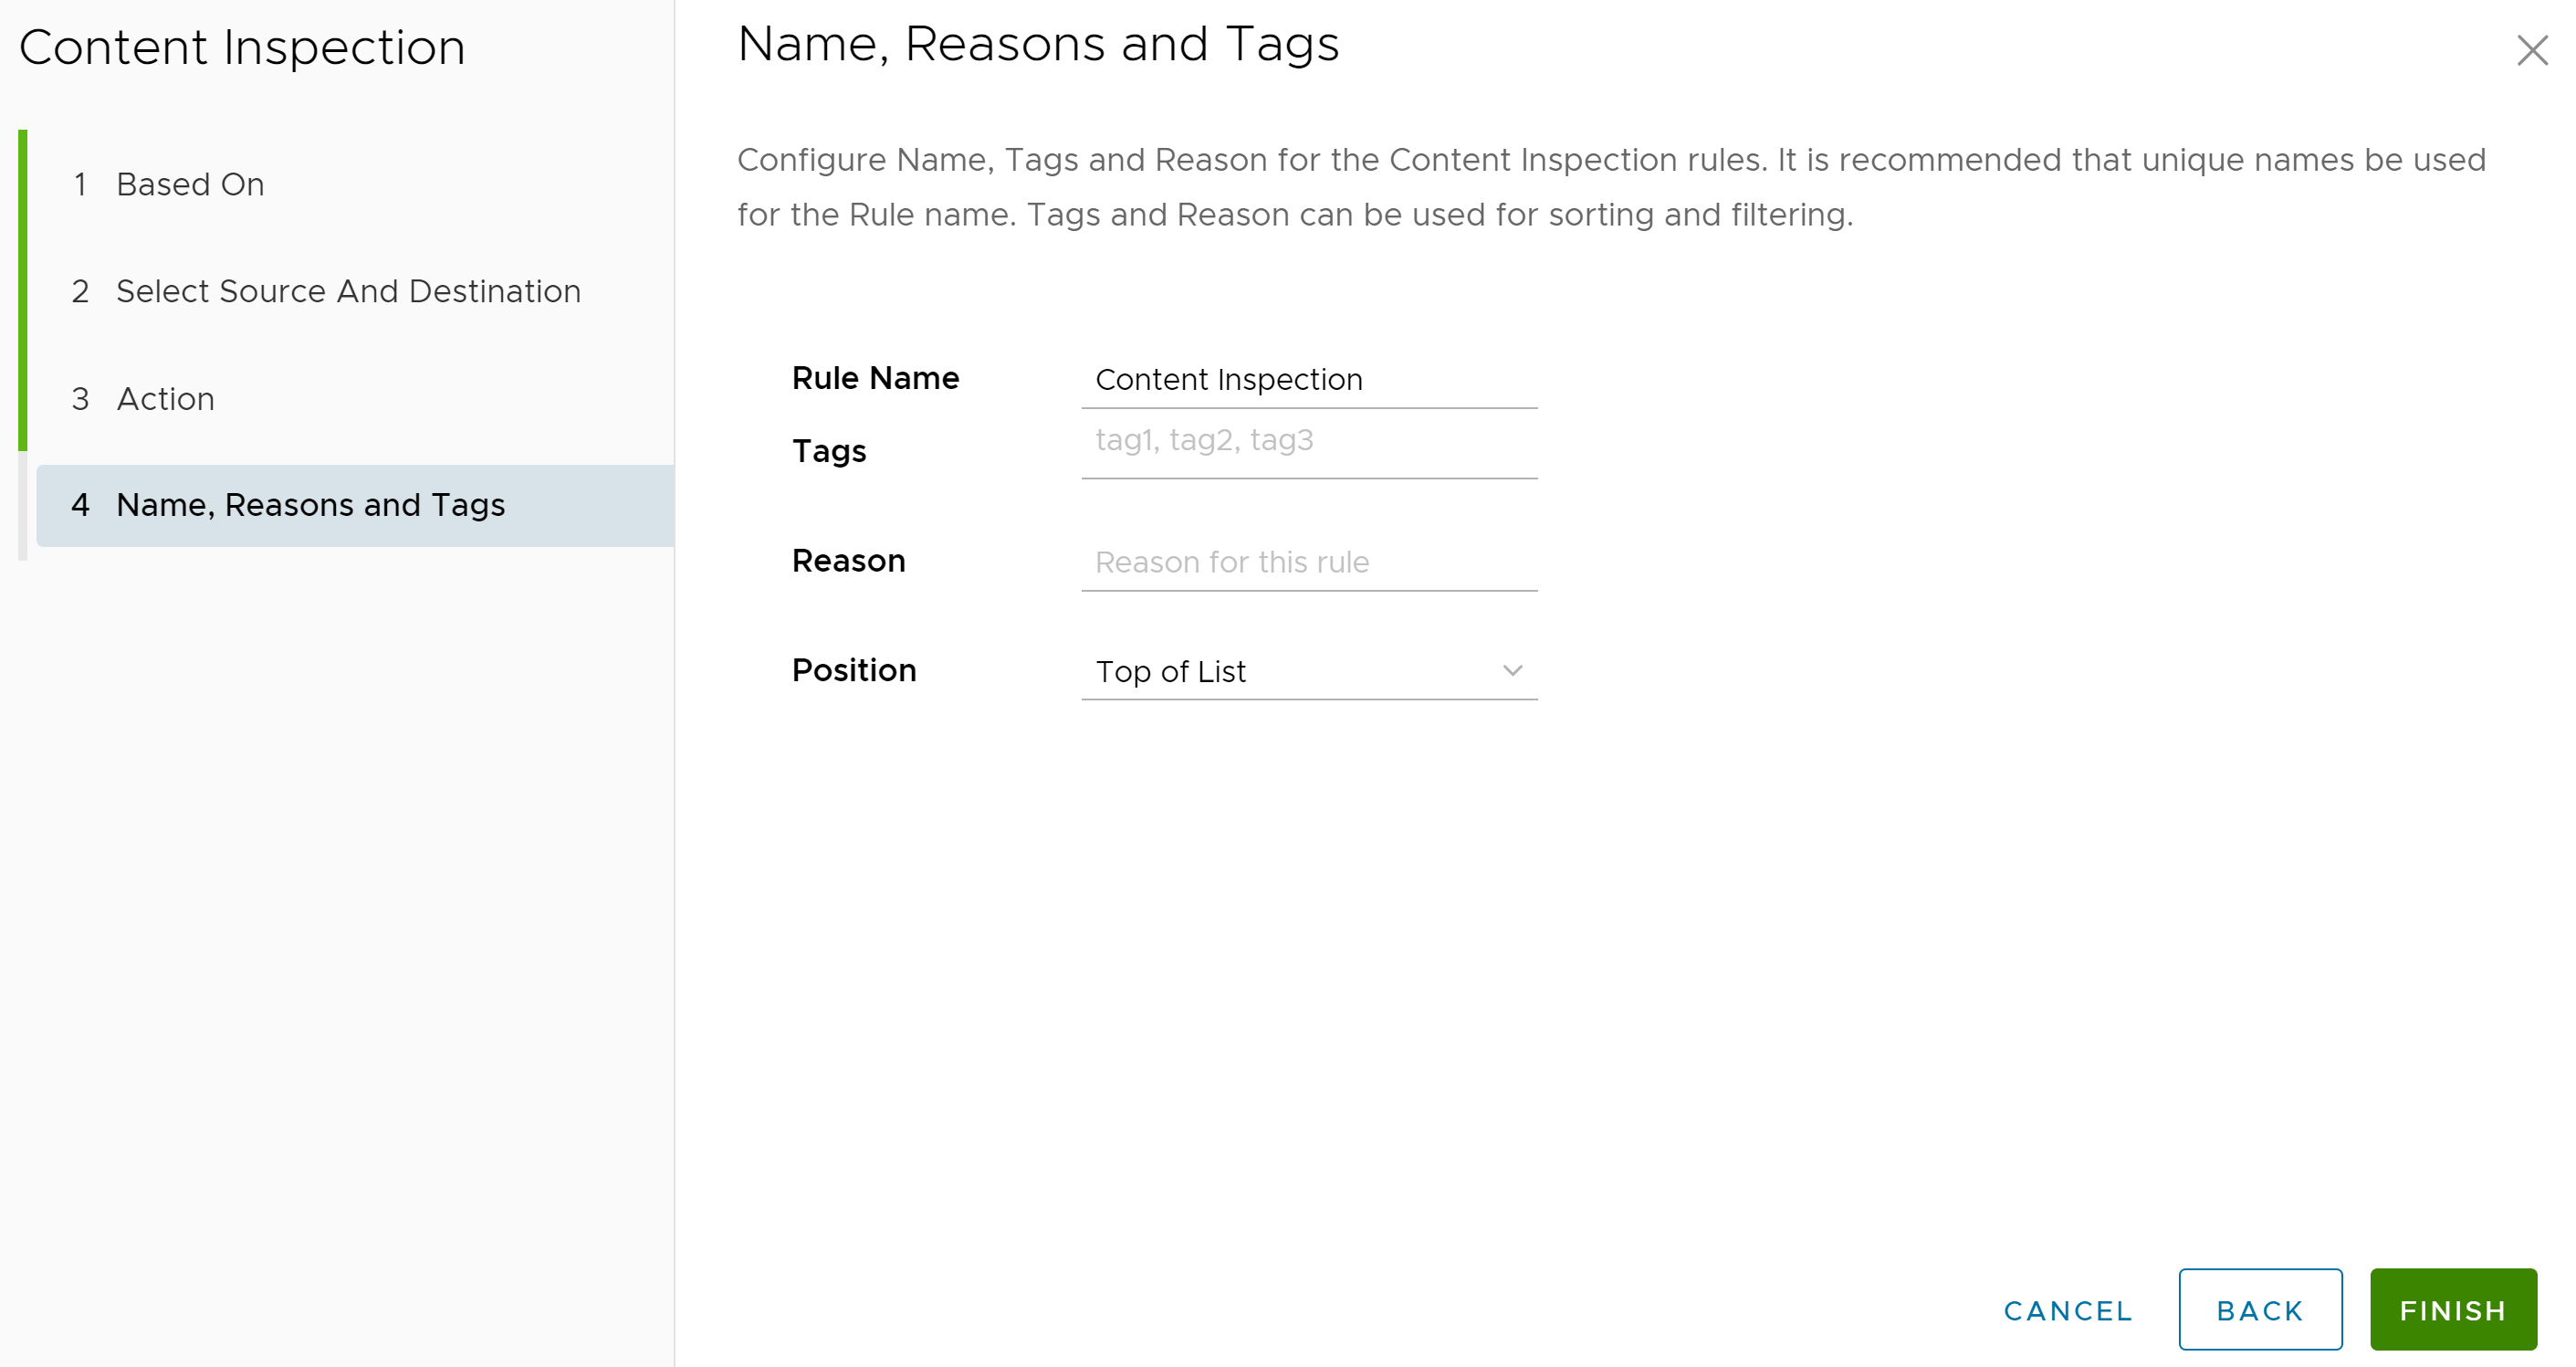
- In the Name, Reasons and Tags screen, configure a unique Rule Name (required), Tags (if used), Reason (if needed), and a Position for the rule on the list of Content Inspection rules (the options are either 'Top of List' or 'Bottom of List').
Note: The Position field designates the rule's position on the list of Content Inspection rules.
- Click Finish and the newly created Content Inspection rule appears in the Content Inspection list.
- Users have the following options: configure another rule under Content Filtering, configure a different Security Policy category, or if finished, click the Publish button to publish the Security Policy.
- After publishing the Security Policy, users can Apply the Security Policy.
