When you deploy the VMware Data Services Manager plugin, you install and configure the service control plane in a vSphere cluster.

Note: As part of VMware integration with Broadcom, Tanzu Network is no longer available for the software downloads and updates. Use the Broadcom’s Customer Support Portal at https://support.broadcom.com/ as a software distribution channel. See a knowledge base article (ID#: 367105) .

You perform the following procedure to install and deploy the DSM plugin.

Audience

The procedures in this topic are performed by a vSphere administrator.

Prerequisites

Before you begin deploying the VMware Data Services Manager plugin, your vCenter Server must be configured. Ensure that you have on hand and can identify:

  • The IP address or fully-qualified domain name of your vCenter Server instance.
  • Your vCenter Server administrator credentials. Alternatively, you can be a user with limited permissions, appropriate for installing and operating the DSM plugin in vCenter Server. For information, see Creating a User with Limited Permissions for VMware Data Services Manager.
  • The ESXi host cluster or ESXi host on which you plan to install and deploy the VM.
  • The default gateway for the Management Network (eth0).

Any external endpoint that the plugin VM connects to (LDAP, S3 local/cloud storage) must be resolvable by the DNS server that you specify during deployment.

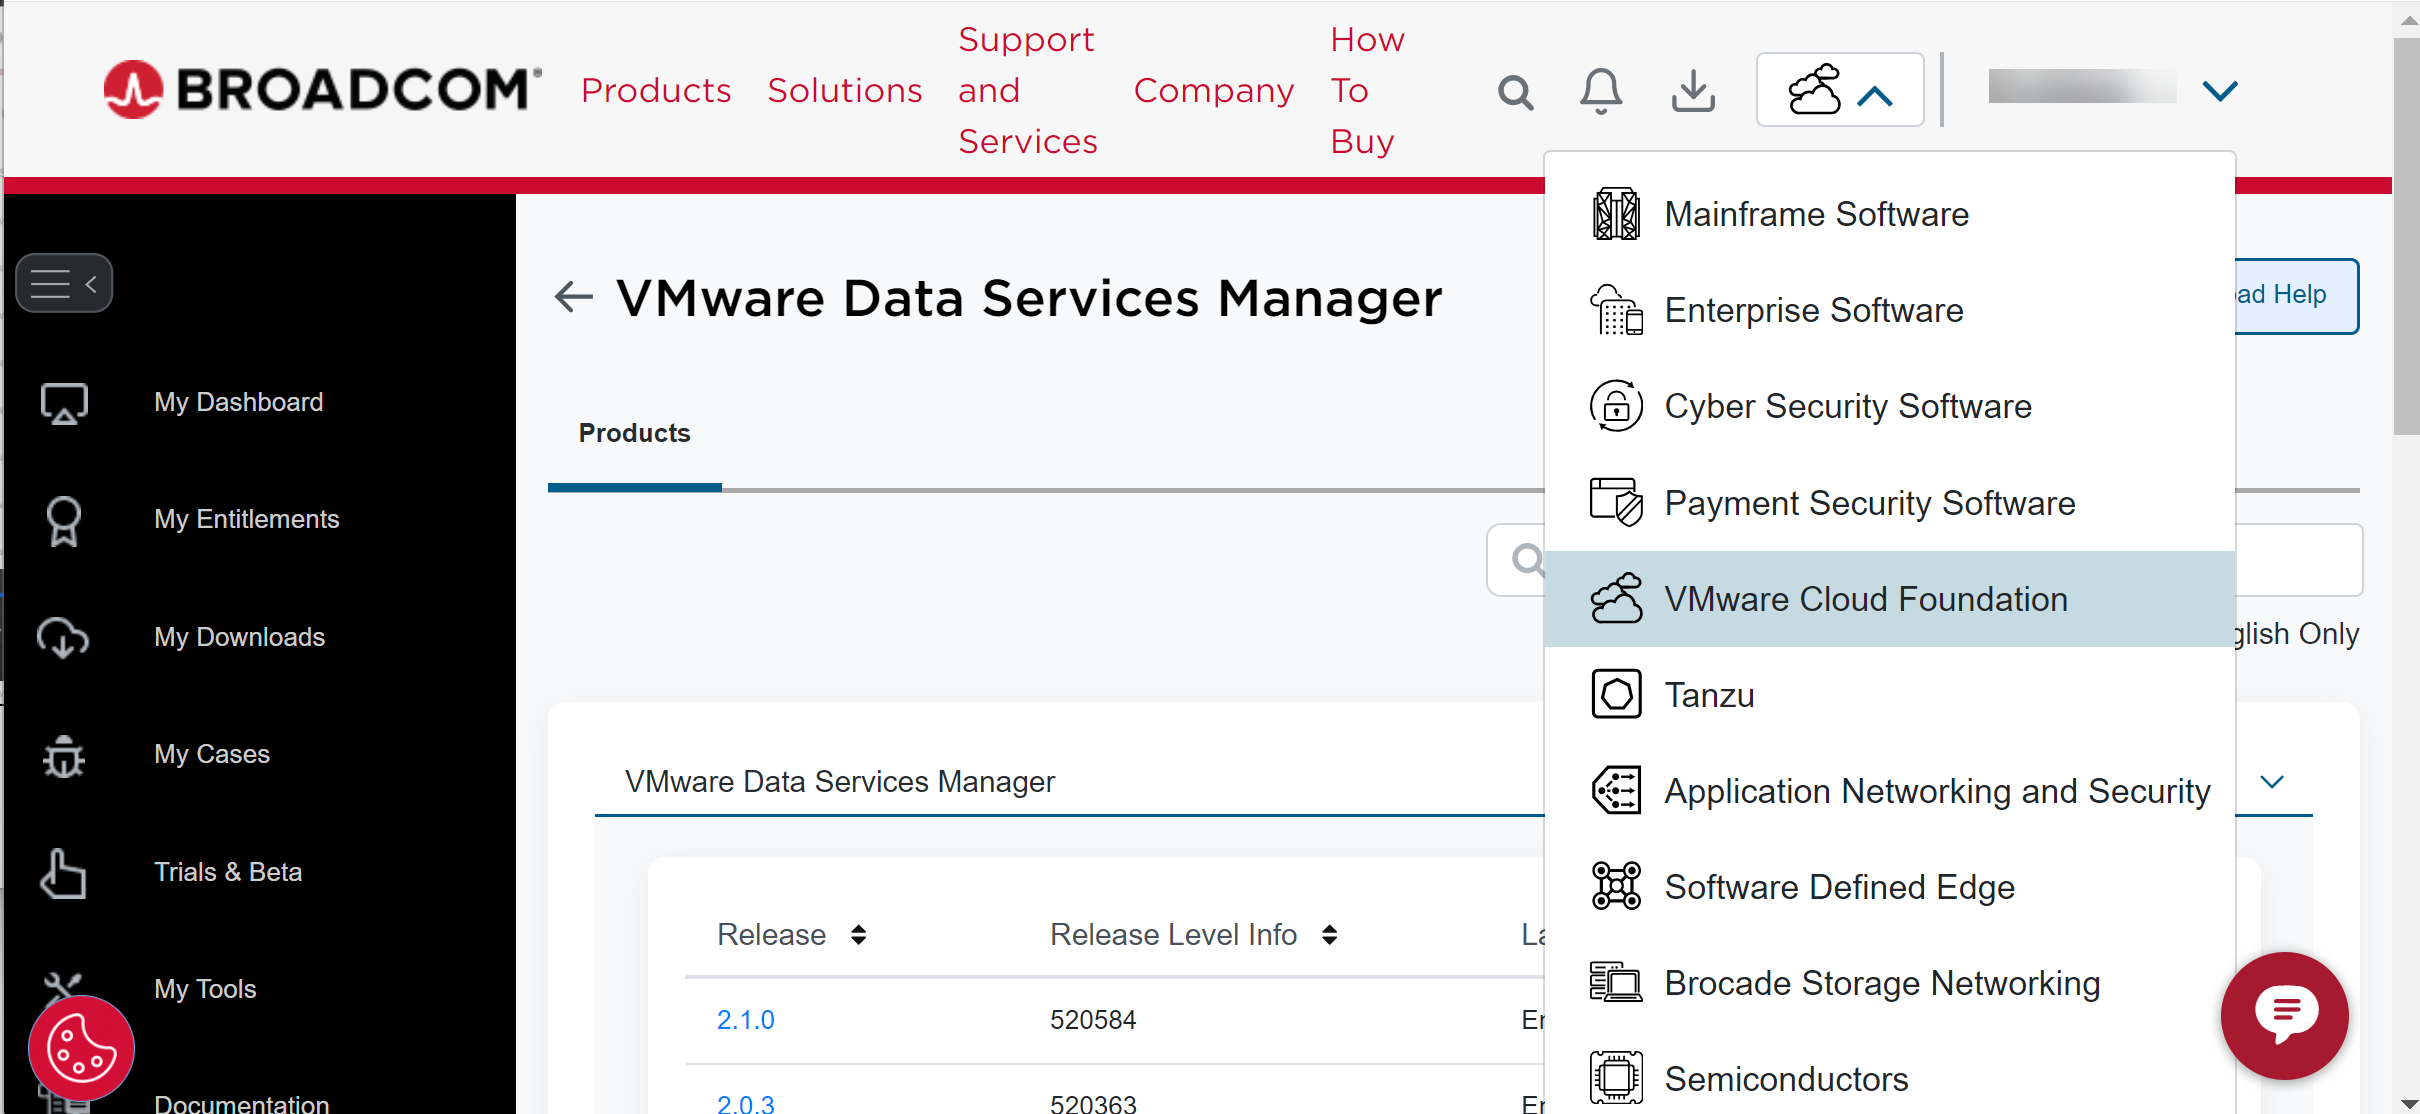
Step 1: Download the VMware Data Services Manager Plugin .ova

The VMware Data Services Manager plugin .ova is available as a separate download from the Broadcom software download page.

Perform these steps to download the plugin .ova from the Broadcom software download page.
Note: In VMware Data Services Manager 2.1.0, the size of the .ova file has increased. Installing and deploying the VMware Data Services Manager plugin 2.1.0 might take longer.
  1. Navigate to the appropriate release of VMware Data Services Manager on the My Downloads page of https://support.broadcom.com/, locate and select Provider Virtual Appliance, and download the file.

    Broadcom software download page

    The format of the plugin virtual appliance download file name is:

    dms-va-version-build.ova
    
    For example:
    dsm-va-2.1.0.3775-XXXXXXX.ova
    
  2. Make note of the directory to which the file was downloaded.

Step 2: Install the DSM Plugin

Perform these steps to install the DSM plugin .ova.

Procedure

  1. Open a web browser window, and log in to your vCenter Server instance:
    https://vcenter_server_ip_or_fqdn
    
  2. In the vSphere Client, select Menu > Administration > Client Plugins.
  3. In the Client Plugins page, click ADD.

    The Select an OVF template form in the Install new solution wizard appears.

  4. In the Select an OVF template form, either select URL and enter the URL of the location to download the .ova file, or select Local file and browse your local directory to download the .ova file.
    Note: If you want to provide the location to download the `.ova` file through the **URL** field, you must provide an HTTPS URL.
  5. Click NEXT.
  6. If the Source Verification dialog box appears, click YES to validate the SSL certificate, and then, click NEXT. The Source Verification dialog box appears only if the SSL certificate is not trusted.
    The Select a name and folder form appears.
  7. On the Select a name and folder form, select a location for the DSM plugin VM, and then click NEXT.
  8. On the Select a compute resource form, select the cluster or ESXi host on which to install the plugin VM.
    Note: Do not select option to Automatically power on deployed VM.
  9. Click NEXT after vCenter Server successfully completes compatibility checks on the selected object.

    After resource validation on the selected deployment target completes, the Review details form appears.

  10. Examine the template details for the plugin VM, taking note of the Size on disk values. This information may help you in your selection of storage configuration for the plugin VM in an upcoming step.
  11. Click NEXT.

    The Select storage form appears.

  12. In the Select storage form, specify the disk format and the datastore for the virtual machine configuration files and virtual disks:
    Property Name Value
    Encrypt this virtual machine This option is currently deactivated.
    Select virtual disk format Select the format of the virtual disk from the drop-down menu. Choices are Thick Provision Lazy Zeroed (recommended for production environments), Thin Provision, or Thick Provision Eager Zeroed. Note that thick formats improve performance, while thin formats save storage space. Storage Provisioning and Space Reclamation in the VMware vSphere documentation provides more information about these settings.
    VM Storage Policy Retain the Datastore Default policy or select a preconfigured policy from the dropdown list.
  13. Wait for the compatibility checks for your selections to complete successfully, and then click NEXT.
    The Select networks form appears.
  14. In the Select networks form, use the Management Network drop-down list to select the network for the VMware Data Services Manager traffic (eth0).
  15. In the Select networks form, review the IP Allocation Settings as well, and then click NEXT to complete the network configuration.
    The Customize template form appears.
  16. Use the Customize template form to configure the plugin VM Application deployment properties:
    Property Name Value
    Appliance Root Password

    Enter the Password of the plugin VM and then re-enter it in the Confirm Password field. Note this password because it will be used to ssh login to DSM VM.

    Password rules: Minimum 8 and maximum 32 characters, at least one uppercase letter, one lowercase letter, one number and one special character ?!@#$%A&*_+. Avoid dictionary words while setting the password.

    vCenter Hostname/IP Address

    Enter the IP address or hostname of the target vCenter Server system where the database clusters will be deployed. If SAN entries in the corresponding vCenter Server certificate have FQDN, use FQDN. Otherwise, use the IP.

    Note the hostName/IP of vCenter Server because you will need to select it as the vCenter Server instance to be associated with the solution plugin when you configure the Associate vCenter Servers form, which is the next step.

    vCenter SHA-256 Thumbprint

    Enter the vCenter Server SHA-256 thumbprint. Enter the value in uppercase letters and colon delimitation. Do not use space delimitation.

    For information on obtaining the thumbprint, see the knowledge base article 312777.

    vCenter Administrator Username

    Enter the vCenter Server administrator username.

    The vCenter Server administrator credentials will not be stored and will be discarded after creating a dedicated vCenter Server service account.

    vCenter Administrator Password

    Enter the password of the vCenter Server administrator.

    Note:

    The SSO admin credentials that you provide are not stored and they are discarded after creating a dedicated vCenter Server service account for VMware Data Services Manager

  17. Configure the Networking Properties of the plugin VM in the Customize template form. You may assign a static IP address to the plugin VM for certain functionality like backup and recovery to work. Specify values for the following properties:
    Property Name Value
    Management Network IP Address The IP address for the plugin VM on the Management Network.
    Management Network Netmask The netmask or prefix for the plugin VM on the Management Network.
    Management Network Default Gateway The IP address of the default gateway for the plugin VM.
    Domain Name Servers The IP address of the domain name server for the plugin VM.

    If there are multiple Domain Name Server entries, separate them by a space and not a comma.

    NTP Servers The NTP server can be list of IP addresses or FQDNs. The plugin VM and databases must use the same NTP server.
  18. By default, the checkbox to confirm your approval for VMware's Customer Experience Improvement Program (CEIP) in the Customize template form is selected. Your approval allows VMware to ingest telemetry data from VMware Data Services Manager interface and provide better customer experience for you. You can deselect the checkbox if you want to opt out of this program.

    You can invoke the /appliance_ip/ceip/consent endpoint, to approve CEIP.

    appliance_ip is the IP of the VMware Data Services Manager interface.

    PUT https://appliance_ip/ceip/consent

    Request parameters:

    {
     "consent": "true"
    }
    

    You can invoke the /appliance/ceip/consent endpoint, to disapprove CEIP:

    PUT https://appliance/ceip/consent

    Request parameters:

    {
     "consent": "false"
    }
    
    Note:

    If you install VMware Data Services Manager in an air-gapped environment, telemetry data is not collected for CEIP.

  19. Click NEXT.
  20. Use the Associate vCenter server to select the vCenter Server instance to be associated with the solution plugin.

    Make sure to select the vCenter Server instance you indicated on the Customize template form.

  21. Click NEXT.
  22. Examine the plugin VM configuration displayed on the Ready to complete form, and click FINISH.

    Note: It may take some time to deploy the plugin VM. Monitor the Recent Tasks pane at the bottom of the vSphere Client to follow the progress of the operation.

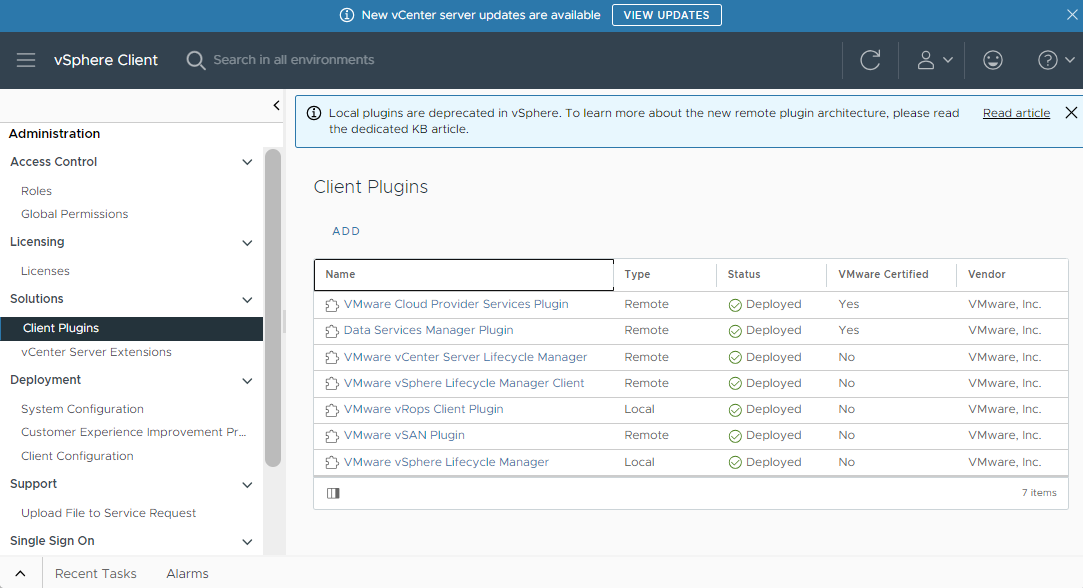
  23. After the installation process of the DSM plugin is completed, validate that the VMware Data Services Manager plugin is listed in the Client Plugins page with the status as Deployed.
    Data Services Manager Plugin on the Client Plugins page

What to do next

You successfully installed and deployed the VMware Data Services Manager plugin. You can see the version of the plugin in the Version column of the Client Plugins page. When a new version becomes available, the plugin updates automatically, and the version number changes to the new one.

For more details on vSphere plugins, see How to Manage Your vCenter Server Client Plug-Ins in the VMware vSphere documentation

Your next step is to complete the VMware Data Services Manager configuration. See Configuring VMware Data Services Manager in the vSphere Client.

Step 3: Confirm Successful Installation of the DSM plugin

Perform these steps to verify that the DSM plugin has installed successfully.

Procedure

  1. In the vCenter Server Recent Tasks pane, monitor the deployment status of the DSM plugin.
    Option Description
    Deploy OVF task is successful You see that vCenter Server initiates the following tasks:
    • Install Solution
    • Download Plugin
    • Deploy Plugin
    Deploy OVF task is unsuccessful Review the task details in vCenter Server, take corrective actions, and redeploy.
    After vCenter Server completes the deployment tasks, the system registers the plugin in vCenter Server.
  2. Verify the deployment of the DSM plugin.
    • Once the plugin is registered in vCenter Server, a message prompting you to refresh the browser appears. Click the refresh button. If the browser does not refresh, manually refresh it to see the plugin UI in the vSphere Client.
    • If the plugin is deployed and the plugin UI is visible in the vSphere Client, check the Global Alerts page of the DSM console for any non-catastrophic alerts and address them as needed.
    • If the plugin UI is not visible, log in to the DSM console with root credentials and review the Global Alerts page. See Troubleshoot Installation of VMware Data Services Manager.
    If you don't see alerts, the DSM installation is considered successful.

What to do next

Note: If you are an API user, verify the status of dsmsystemconfigs.system.dataservices.vmware.com and vcenterbindings.system.dataservices.vmware.com resources. If the resource status for both is Ready, the DSM installation is successful.