Follow these steps to install the VMware Greenplum Connector for Informatica components on both the Informatica PowerCenter Repository Service node and on the PowerCenter Client machine.
After installing the Informatica components, you must also install and start the Greenplum Streaming Server (GPSS) service in the Greenplum Database cluster.
Prerequisites
See the Release Notes to understand the requirements and limitations for this release of the Connector.
Process
Follow these steps to install all Connector Components:
- Step 1: Install the Informatica PowerCenter Repository Service Connector Component
- Step 2: Install the PowerCenter Client Connector Component
- Step 3: Install and Configure GPSS in Greenplum Database
Step 1: Install the Informatica PowerCenter Repository Service Connector Component
-
Download and uncompress the Connector distribution from Tanzu Network on the PowerCenter Repository Service server.
-
Open a terminal on the Informatica server machine, and navigate to the location of the Greenplum Informatica Connector installation files for PowerCenter. For example:
cd c:\Downloads\gpic_1.0.2\Informatica_PowerCenterNote: Use files from the
Informatica_PowerCentersubdirectory for all PowerCenter server and client installations. -
Run the
installServer.batscript and provide the Informatica installation directory. For example:installServer.bat c:\Informatica\10.2.0Note: If you need to reinstall the adapter or install a newer version of the adapter, include the
trueoption to overwrite the existing files. For example:installServer.bat c:\Informatica\10.2.0 trueThe Connector software installs to the specified directory.
-
Before you register the server plug-in component, you must change the Informatica PowerCenter Repository Service domain’s Operating Mode to
Exclusivemode. You change it back toNormalmode after registration is complete. Follow these steps:-
Access the Informatica Administrator console using your Web browser. For example, access http://<informatica-server-address>:6008/administrator and log in with administrator credentials.
-
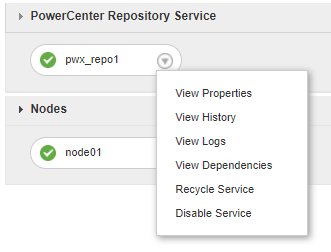
Under PowerCenter Repository Service, click the menu icon for the name of your service and select View Properties.

-
Click the edit icon next to Repository Properties.
-
Change the Operating Mode value to Exclusive prior to installing the Connector software. Return the mode to Normal after installing the Connector.
-
Click OK. The console prompts you to restart the Repository Service to apply the change.
-
Click OK a second time to restart the Repository Service.
-
-
Follow these steps to register the Connector plug-in to Informatica:
-
In the Informatica Administrator console, click the Plug-Ins button for the service that you modified in Step 4.
-
If you installed a previous version of the plug-in, the name “Greenplum5 Plugin-
(Informatica)” will already appear in the list. Select any existing Greenplum5 plug-in and click the Unregister plug-in (trash can) icon. Enter your Repository credentials to authorize unregistering the plug-in, and then click OK. -
Click the Register Plug-in icon.
-
Click Choose Files and navigate to the directory where you uncompressed the Connector software. Choose the
Informatica_PowerCenter\server\server\bin\Plugin\Greenplum5Plugin.xmlfile (For example,c:\Downloads\gpic_1.0.2\Informatica_PowerCenter\server\server\bin\Plugin\Greenplum5Plugin.xml) and click Open. -
Click the check box next to Update existing plug-in registration and enter your repository credentials. Click OK to register the plug-in.
-
-
Repeat the instructions in Step 4 to return the repository Operating Mode to Normal.
Step 2: Install the PowerCenter Client Connector Component
-
Stop the PowerCenter Client application if it is currently running.
-
On the PowerCenter client machine, download and uncompress the Connector distribution from Tanzu Network.
-
Open a terminal on the Informatica server machine, and navigate to the location of the Greenplum Informatica Connector installation files for PowerCenter. For example:
cd c:\Downloads\gpic_1.0.2\Informatica_PowerCenterNote: Use files from the
Informatica_PowerCentersubdirectory for all PowerCenter server and client installations. -
Run the
installClient.batfile and provide the Informatica installation directory. For example:installClient.bat C:\Informatica\10.2.0\clients trueNote: If you need to reinstall the adapter or install a newer version of the adapter, include the
trueoption to overwrite the existing files.The installer copies the Connector client files to the PowerCenter client installation.
-
Use File Explorer to navigate to the directory where you uncompressed the Connector software. Locate the
Informatica_PowerCenter\client\PowerCenterClientdirectory (for example,c:\Downloads\gpic_1.0.2\Informatica_PowerCenter\client\PowerCenterClient). This directory contains two registry files:Greenplum5.reg(registers the 32-bit version of the Greenplum Informatica plug-in)Greenplum5_64.reg(registers the 64-bit plug-in)
-
Open either
Greenplum5.regorGreenplum5_64.regfor 32-bit or 64-bit installations, respectively, in a text editor of your choice. Look for the string “10.0.0” in the registry key, and edit it to match your PowerCenter Client software version. For example, if you are using PowerCenter version 10.2.0, change the version portion of the string "10.0.0\Plugins\Informatica" to read "10.2.0\Plugins\Informatica". Save your changes. -
Double-click your modified
Greenplum5.regorGreenplum5_64.regfile to open it with Registry Editor. -
Click Yes to allow Registry Editor to make the required changes, and click Yes a second time to verify. Click OK to acknowledge that the new registry entry was added.
After you install the client Connector component and register the plug-in, the Application Connection type named Greenplum5 becomes available in the PowerCenter client tool. You will use this connection type to access the Greenplum Streaming Server for selecting Greenplum Database tables as load targets. See Using the Connector.
Step 3: Install and Configure GPSS
The Greenplum Streaming Server (GPSS) manages communication and data transfer between the Connector and Greenplum Database. In addition to installing the Connector components in your Informatica cluster, you must install, configure and start GPSS in the Greenplum Database cluster. See Installing and Configuring GPSS in Greenplum Database for information.