The Network Profile is an abstraction of a Distributed Port group, Standard Port group, or NSX Logical Switch, and the Layer 3 properties of that network. A Network Profile is a sub-component of a complete Compute Profile.

Create a Network Profile for each network you intend to use with the HCX services. The extension selects these network profiles when creating a Compute Profile and assigned one or more of Network Profile functions.

Note:

Although a Network Profile can be assigned any of the functions during the Compute Profile configuration, consider creating a separate profile for each function as a best practice.

Note: In Federated NSX environments, the NSX Global Manager populates local NSX managers with all global network segments known to the Global Manager. These networks are flagged in HCX as Global Networks in the HCX inventory, and become available for use for Bulk, RAV, and vMotion migrations. These global segments, however, are not supported for HCX Interconnect configuration, meaning Network Profile and Compute Profile creation with Global Segments or Global transport Zones.
  • Management Network:

    The HCX Interconnect appliances use this network to communicate with management systems like the HCX Manager, vCenter Server, ESXi Management, NSX Manager, DNS, NTP.

  • Uplink Network:

    The HCX Interconnect appliances use this network for WAN communications, like TX/RX of transport packets.

  • vMotion Network:

    The HCX Interconnect appliances use this network for the traffic exclusive to vMotion protocol operations.
    Important: The HCX Interconnect uses a Network Profile configuration dedicated to vMotion traffic. This configuration does not include the vMotion NFC traffic. HCX always uses its Management interface for vMotion NFC traffic.
  • vSphere Replication Network:

    The HCX Interconnect appliances use this network for the traffic exclusive to vSphere Replication.
    Important: In deployments where ESXi servers use a dedicated VMkernel configuration for vSphere Replication services, the HCX Interconnect uses a Network Profile configuration dedicated to the vSphere Replication traffic. This configuration does not include the vSphere Replication NFC traffic. HCX always uses its Management interface for vSphere Replication NFC traffic.
  • Guest Network for OS Assisted Migration

    The Sentinel Gateway appliances use this vSphere network to connect with non-vSphere virtual machines.

Important:

When creating a separate Network Profile for vMotion or vSphere Replication services, although the option is available to configure a GW as a standard Network Profile, traffic for those services will only use the default GW in the Management Network Profile to attempt to access resources in a different subnet. If ESXi resources are not L2 adjacent to the IX appliance on those networks, there is a requirement to configure “Static Routes” as part of the “Advance Configurations” option in the Compute Profile to ensure traffic is directed to the default GW on those networks.

Prerequisites

  • The HCX Manager must be installed and configured.

  • Use the planned network configurations prepared using the checklist described in Getting Started with VMware HCX.

Procedure

  1. Navigate to the Network Profiles interface:
    1. In the vSphere Client, navigate To HCX > Interconnect > Multi-Site Service Mesh > Network Profiles.
    2. At the destination site, navigate to https://hcx-cloud-ip-or-fqdn > Multi-Site Service Mesh > Network Profiles.
  2. Click Create Network Profile.
    Shows the Create Network Profile button highlighted in the HCX Manager Interconnect > Network Profiles screen.
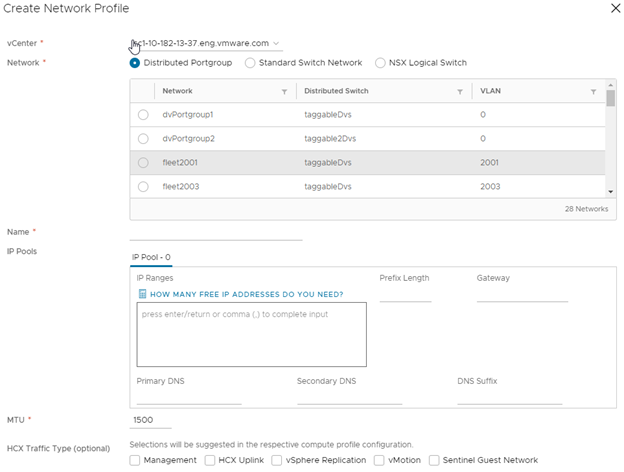
  3. Select a vCenter Server and existing Network.
    1. Select a vCenter Server from the drop-down menu.
    2. Select Distributed Port Group, Standard Switch Port Group, NSX Logical Switch, or External Network to filter the available networks by type.
      Note: Additional options to create a Network Profile backed by a VMware Cloud Director External Network display only in VMware Cloud Director deployments.
    3. Select one of the available networks.
      Create Network Profile screen with fields for vCenter, Network, Name, IP Pools, MTU, and HCX traffic type. An asterisk marks mandatory items.
  4. Name the Network Profile.
  5. Provide the IP address pool details for the network profile.
    1. Provide an IP address range available for the HCX appliances. Use a comma to separate multiple discontiguous ranges within the same subnet.
    2. Enter the Prefix Length for the network containing the IP ranges provided.
    3. Enter the Default Gateway Address for the network.
    4. Specify the DNS server information.
  6. Enter the MTU value.
  7. (Optional) Using the check boxes, associate one or more suggested traffic types with the network selection: Management, HCX Uplink, vSphere Replication, vMotion, Sentinel Guest Network.
    The traffic type selection appears as a suggestion of which networks to use when creating the Compute Profile. It does not prevent the network from being used for other types of network traffic.
  8. To complete the Network Profile configuration, click Create.

What to do next

Created Network Profiles are designated to one or more specific functions during a Compute Profile configuration, or when to override default Network Profiles when creating a Service Mesh.
Note: To edit an existing Network Profile, navigate to the specific Network Profile and click Edit.