After you have deployed the OVA file in the vSphere Client, activate the HCX Cloud Manager and perform the initial configuration immediately when you next open the appliance management interface.

Note:

This procedure is for deploying HCX Cloud Manager in private clouds. For public cloud deployments, the HCX Cloud Manager deployment and activation is automated.

Prerequisites

  • Deploy the HCX OVA in the vSphere Client. Allow up to five minutes after the OVA deployment for the services to initialize.

  • Configure firewall rules at source and destination sites to allow inbound and outbound connectivity based on the HCX services or features used. See https://ports.vmware.com/home/VMware-HCX.

  • Obtain the license key. See Activating New HCX Systems.

Procedure

  1. Browse to the appliance management interface and log in using the admin user credentials.

    Browse to https://hcx-ip-or-fqdn:9443.

  2. (Optional) If there is a proxy server in the environment in the path for outbound HTTPS connections, configure it now:
    1. Navigate to the Administration tab, and click Proxy.
    2. Click Edit.
    3. Enter the proxy server information, including any exclusions.
      Important: Add the local vCenter, ESXi, NSX, SSO, and HCX-IX systems as exceptions not to be sent to the proxy server.
    4. If you have other changes to make based on the system settings entered when deploying HCX, you can make them now. This includes NTP and DNS settings. For more information see, Deploy the HCX Manager OVA in the vSphere Client.
    5. Navigate back to the Configuration tab to continue the activation procedure.
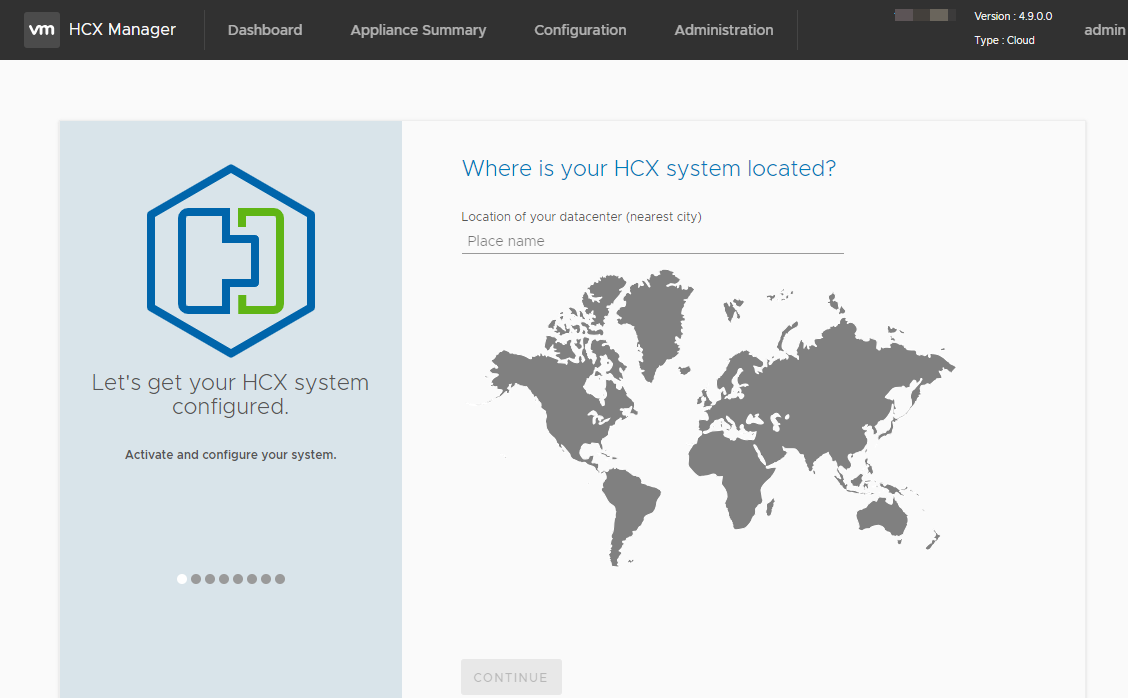
  3. Enter the location where you are deploying the system.

    Select the nearest major city to where the HCX system is geographically located. HCX sites are represented visually in the Dashboard.

    ""

  4. Click Continue.

    A screen appears prompting you for a system name.

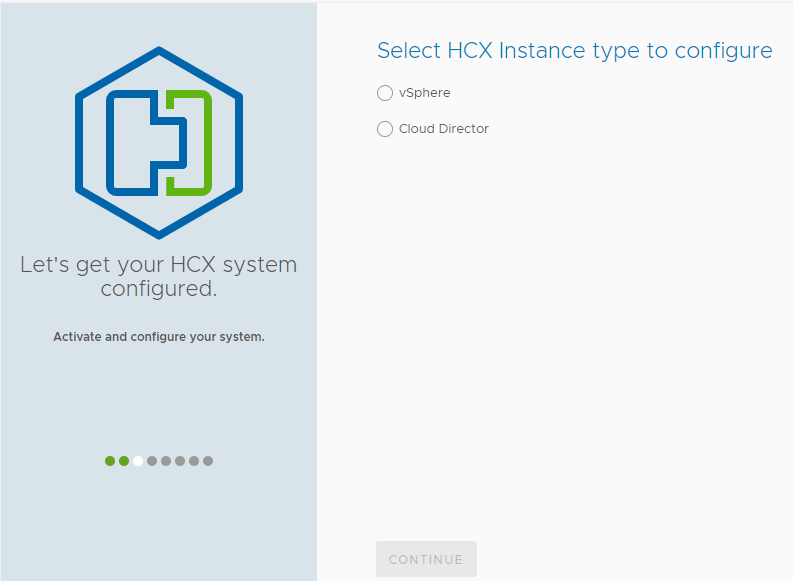
  5. Enter the system name, and click Continue.

    A screen appears prompting you to select the cloud instance type.

    ""

  6. Select the cloud instance to which VMware HCX will be connected.

    HCX can connect to only one cloud instance per deployment.

  7. Click Continue.

    A series of screens appear, prompting you for the selection details.

  8. Enter the configuration details for the selected VMware cloud instance.

    After entering the information, click Continue to proceed to the next screen

    Cloud Instance

    Configuration Parameters

    vSphere

    1. vCenter Server and NSX details

      1. vCenter Server

        • vCenter URL

        • User name

        • Password

      2. NSX

        • NSX URL

        • User name

        • Password

    2. SSO details

      • vCenter Server or Platform Services Controller URL

    3. Public Access URL details

      • URL through which the HCX Manager is accessed.

        Note:

        This is typically the HCX Manager services UI: https//<hcx-mgr-fqdn-or-ip>.

    Cloud Director

    1. Cloud Director details

      • Cloud Director URL

      • System Administrator user name

      • System Administrator password

    2. vCenter Server and NSX details

      Note:

      The HCX Manager automatically fetches the vCenter Server and NSX URLs.

      1. vCenter Server

        • User name

        • Password

      2. NSX

        • User name

        • Password

    3. AMQP details

      Note:

      The HCX Manager automatically fetches the AMQP parameters. Edit the parameters as appropriate.

      • AMQP Host name

      • Port

      • vHost

      • User name

      • Password

      • Use SSL

  9. When done entering the configuration details, click Continue.
    The activation screen appears.
    Important: If the vSphere vCenter is licensed with VMware Cloud Foundation (VCF) Solution Licensing, HCX automatically detects and inherits the VCF license and uses it to activate the system. If the system detects a VCF license, the activation screen displays the VCF information. Skip to Step Step 12.

    Activation screen displaying the line for entering the HCX License Key and the option to activate later.

  10. Enter one of the following keys::
    • Enter the NSX Data Center Enterprise Plus license for the HCX License Key value and click Activate.
    • If you are activating using an activation key, enter that key for the HCX License Key value and click Activate.
    • If you are planning to activate HCX in Evaluation Mode, do not enter a license and click Activate Later.
    Note: Do not change the HCX Activation Server URL. This URL is preset for specific public cloud environments and is not applicable to activation in private clouds.
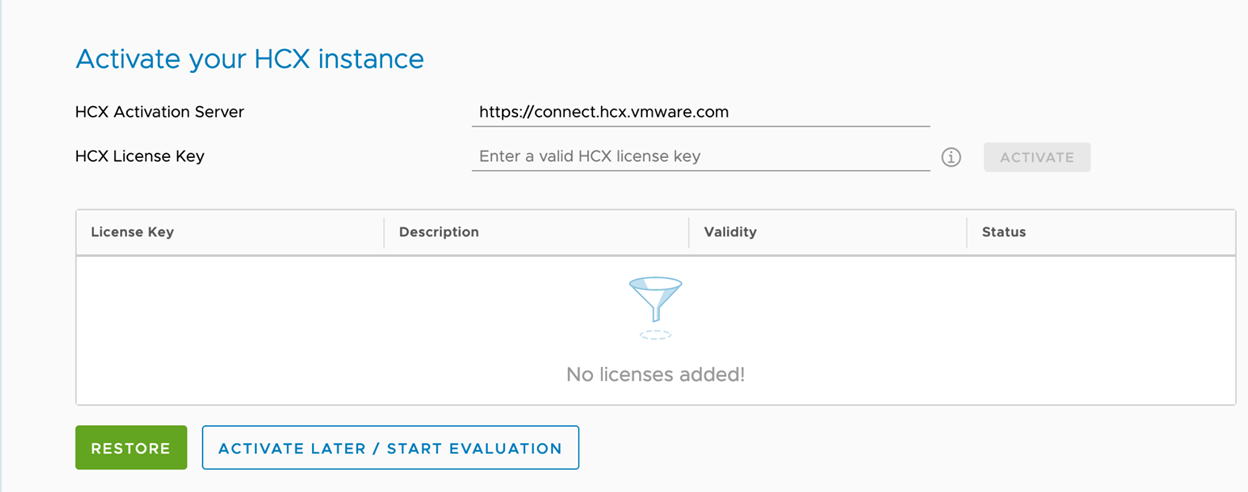
  11. (Optional) If you have an HCX Enterprise License (upgrade), enter it in the HCX License Key field, and click Add.

    The upgrade license key is added to the license key table. The table includes information about each license key.
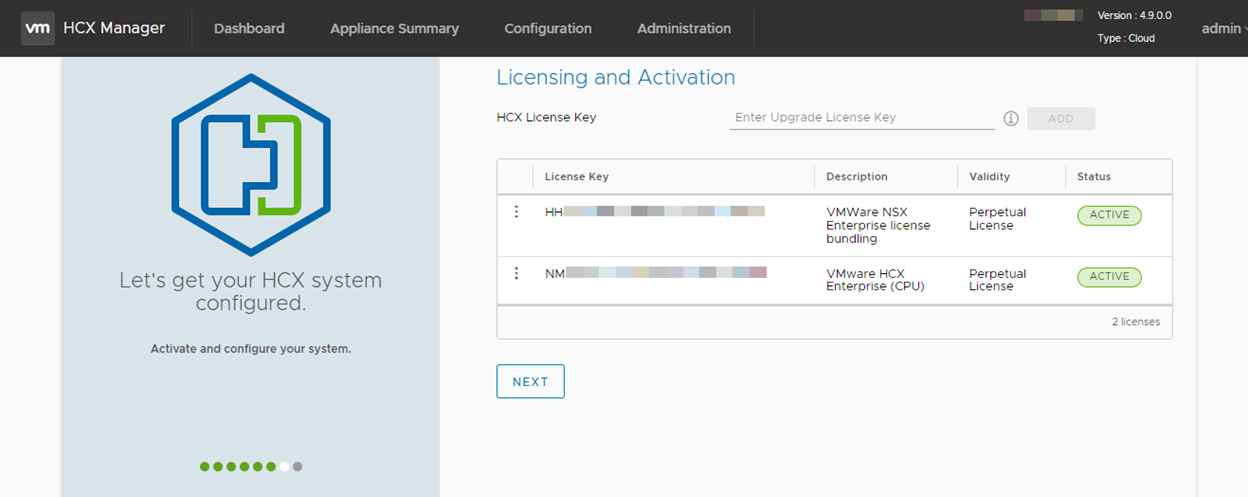
    ""
  12. Click Next.

    The system verifies the configuration and then displays a configuration summary screen. The summary screen lists the applicable configuration information: Location, System Name, vCenter Server, NSX Manager, SSO information, Public Access URL, and license type. The summary includes instructions to restart the HCX Application Service and Web service for the changes to take effect, and to configure vSphere Roles after restarting the services.

    ""

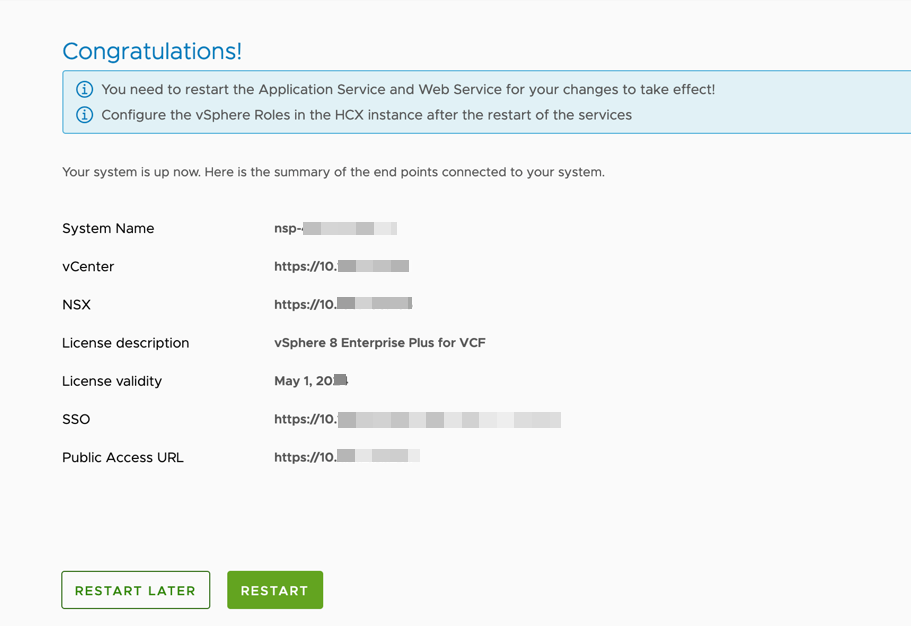
  13. To reload the system, click Restart.

    It can take several minutes to reinitialize the system completely. During this process, the appliance management interface is not available.

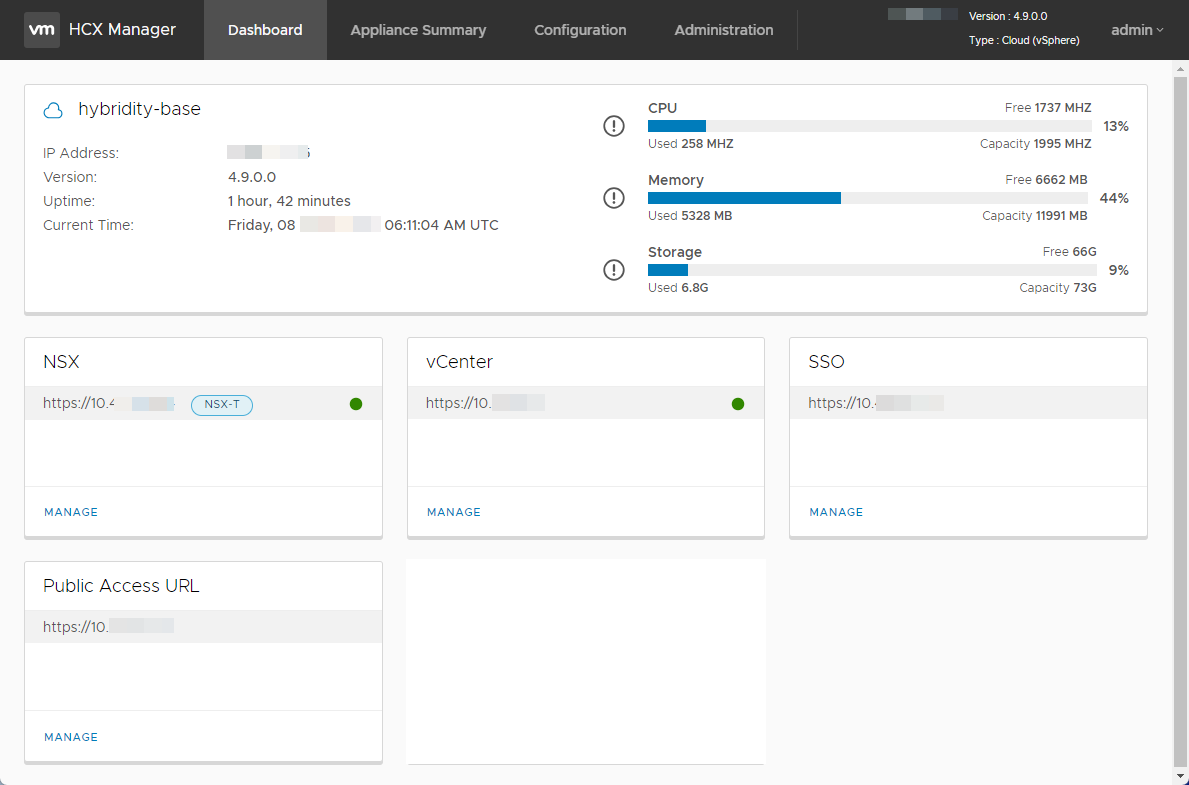
    Note: In cases where the HCX activation workflow detects the VCF license key automatically, a message banner can appear indicating that the system is in Evaluation Mode till HCX services are restarted after configuration. This is a benign message. To clear the message, log out and log back in to the HCX management interface: https://<hcx-ip-or-fqdn>:9443.

    After the system reloads, it displays the HCX Manager appliance dashboard. For more information about the dashboard, see Understanding the Appliance Management Dashboard.

    Management dashboard tabs: Dashboard, Appliance Summary, Configuration, and Administration.
  14. Configure HCX roles:
    1. In the appliance management dashboard, navigate to Configuration > HCX Role Mapping.
    2. Assign the HCX Roles to the vCenter User Groups that are allowed to perform HCX operations.
      By default, the HCX Administrator role is mapped to the local vSphere administrator group. For HCX Cloud Manager deployments, the system displays the optional HCX Tenant role, which is intended for use by HCX Service Providers.
    3. Click Save.

Results

The HCX Cloud Manager system configuration is complete.

What to do next

Configure and activate any other HCX Connector or HCX Cloud Manager sites, and then go to Configuring and Managing the HCX Interconnect.