


As a VMware Marketplace publisher, you can create solution offers so that the potential customers can buy your solution. This section explains the process to publish a solution on VMware Marketplace.
To publish a solution, partners must have a VMware Marketplace Account via VMware Cloud Services Portal (CSP), as well as an active Technology Alliance Partner (TAP) membership.
- If you already have a CSP account for which you are the organization owner, log into the CSP portal and add the VMware Marketplace service to your existing organization.
- If you are not the organization owner, you will need to request access to VMware Marketplace from your organization owner.
Register on VMware Marketplace
- Go to the VMware Marketplace website.
- Click CREATE MARKETPLACE ACCOUNT at the top of the VMware Marketplace page.
- Click CREATE YOUR VMWARE ACCOUNT.
The Create VMware Account page appears.
- Fill in the required information and click CONTINUE.
The Identity Verification page appears.
- VMware Cloud Services sends a verification code to the email address that you have entered in the previous step. Check if the email address is correct and then click SEND VERIFICATION CODE. You will receive a verification code to your email address. In the Email Verification section, enter the code that you have received, and then click VERIFY CODE. After successful code verification, click CREATE VMWARE ACCOUNT.
A message appears confirming the creation of your VMware account.
- Click CONTINUE TO COMPLETE SIGN UP.
The VMware Cloud Services sign in page appears.
- Sign in using the account that you have just created.
The Organization Setup page appears. A Cloud Services organization is an account management service that enables you to consolidate and centrally manage multiple VMware Cloud Services. The Cloud Services organization construct includes account management and consolidated billing capabilities that enable you to better meet the budgetary, security, and compliance needs of your business. As an administrator of an organization, you can also add users to specific VMware Cloud Services, such as the VMware Marketplace service.
- Enter a name for the organization that you want to create. Read and agree to the VMware Cloud Services terms and conditions, and then click CREATE ORGANIZATION AND COMPLETE SIGN-UP.
This completes the registration process, and you will be signed into the VMware Marketplace portal.
Complete Technology Alliance Program (TAP) Registration
Before publishing a solution on VMware Marketplace, you must successfully complete the Technology Alliance Program (TAP) Registration process. For more information, see Technology Alliance Partner (TAP) Program.
- When you sign into VMware Marketplace, if your organization is not an active member of the TAP program, you will be prompted to apply for TAP registration.
- When you publish your solution for the first time on VMware Marketplace, the first step in publishing workflow is to register and complete TAP.
Publishing Options
You can choose either the Listing Solution option or Distributable Solution option to publish your solution on the VMware Marketplace. For more information, refer Publishing Options.

Publish a Solution
Prerequisite: Refer to the VMware Marketplace Listing Style Guide for detailed recommendations and requirements prior to publishing your solutions to the VMware Marketplace.
The following instructions will walk you through the process of publishing both a listing-only and a distributable solution.
The publishing workflow is divided into multiple sections. Fill in the appropriate information in each section. You can complete the sections in any order. You don’t have to complete the sections all at once. You can enter some information, preview the listing, and then return to that section to edit or add details. You don’t have to fill and submit the form at once. You can fill in some information, and save the form in SAVE AS DRAFT option, and then complete the form at a later point of time using the EDIT DRAFT option.
Publish Listing-only Solution
- Log into the VMware Marketplace portal.
- Click Partners.
- Under Publish, click Solutions.
- On top right, click CREATE SOLUTION > Listing Solution.
The Create Solution form appears.
- In the Create Solution form, fill the following sections:
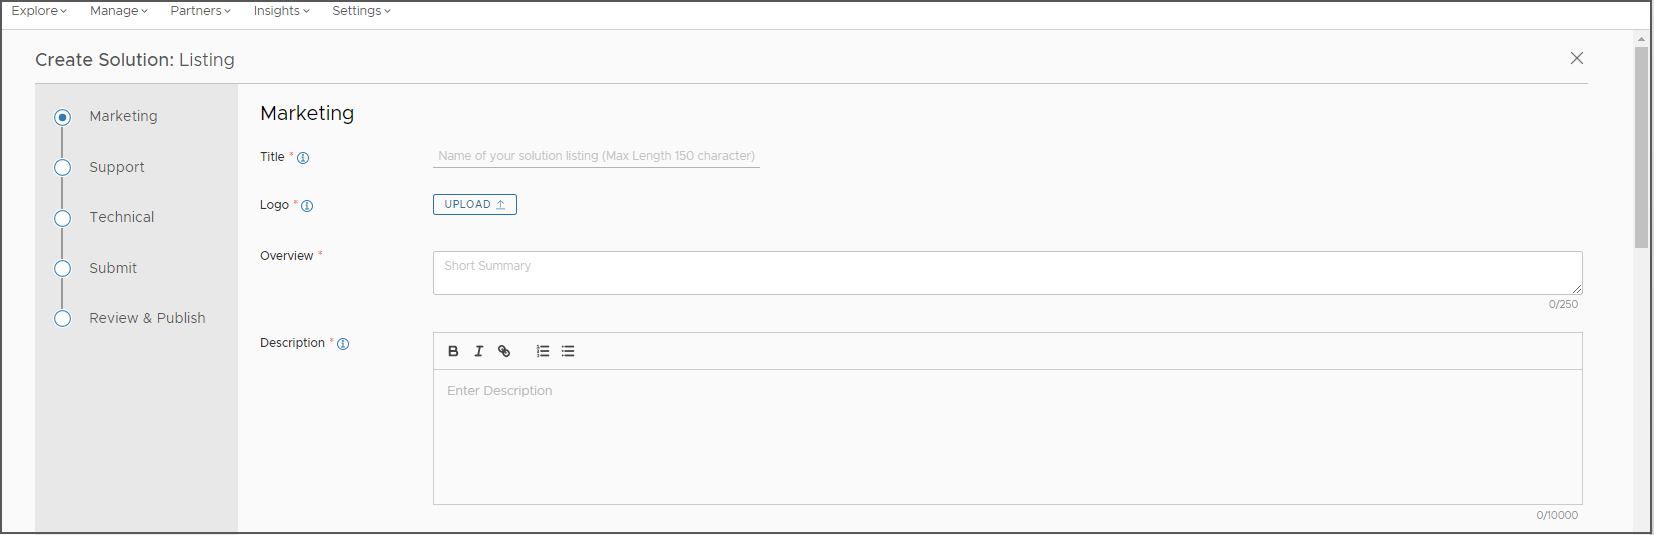
- Marketing
- Title: English name for your solution. This should be the name of your application. Your solution name can contain maximum of 150 characters. Capitalize the first letter of each word in the Title. Use numerals (4 instead of four). Use normal text. Special characters do not appear in the title. Use the English name of the solution.
- Logo: The icon displays on the listing pages for your app or service. The logo should be 200 pixels width by 200 pixels height. Use an image with white background for logo. Use the logo that ships along with your solution.
- Overview: Enter a brief description that will show up at the top of your listing. This should indicate the application’s purpose.
- Description: Enter a description that tells the potential customers what your solution does. You can include detailed information about solution's features, attributes, use cases, and warranty. You can also add a summary of the key elements of your solution to showcase the unique selling proposition to potential customers.
- Redirect URL: This link will appear as the Try Now button on your solution. Ensure that this is the URL to access your solution.
- Features: Add key features of your solution.
- Media: Include at least one image file of the solution which not the company logo (required). Images can be diagrams, solution images, and so on. If you upload multiple images, they will be displayed in carousel format. You can also include a link to the solution video hosted on YouTube or upload the video file itself.
- Support
Enter the email id and phone number to help potential customers to contact your organization. Enter your organization website URL so that they can find more information about your solution and the product. Add resources such as white papers, case studies, installation guides, user guides, or webinars. Use the Summary field to provide additional support information such as support hours, support links, documentation links, and so on.
- Technical
The information you enter here makes the solution easily discoverable on VMware Marketplace. It helps VMware customers to easily filter, search, and quickly discover your solution on VMware Marketplace. Provide as much technical details as you can to make your solution stand out.
You should provide the following technical information:- Choose a form factor for your solution.
- Select the category and sub-category that best suits your solution. These categories are derived from industry standard groupings of software solutions.
Note: You can choose only one category and sub-category per solution.
- Optionally, you can enter the OS details and the VMware Technology Alliance Program (TAP) Franchise information.
- Choose your solution’s technical compatibility with VMware products.
- Add compatibility details for all the VMware products that are relevant to your solution.
- Add VMware Ready / Partner Ready details if your solution has gone through the compatibility programs.
- Marketing
- After filling information in all the sections, go to Submit section to review and submit the form. You can preview your listing before submitting it by clicking the Preview button.
Your solution goes through validation and compliance approval. You will receive regular notifications from the VMware Marketplace team on the status. During the review process, you may receive feedback and change requests from the VMware Marketplace team on your submission before it gets published.
Once your solution is approved, it gets published on VMware Marketplace.
Publish Distributable Solution
- Log into the VMware Marketplace portal.
- Click Partners.
- Under Publish, click Solutions.
- On top right, click CREATE SOLUTION > Distributable Solution.
Note:
If you see a message indicating that the VMware Marketplace Addendum is not accepted and the Distributable Solution option appears greyed out, request your Org Owner to read and accept the VMware Marketplace Addendum. You will not be able to publish a Distributable Solution until the VMware Marketplace Addendum is accepted by your Org Owner.
The VMware Marketplace Addendum appears.
- Read and accept the VMware Marketplace Addendum.
The Create Solution form appears.
You can also download the VMware Marketplace Addendum for your future reference
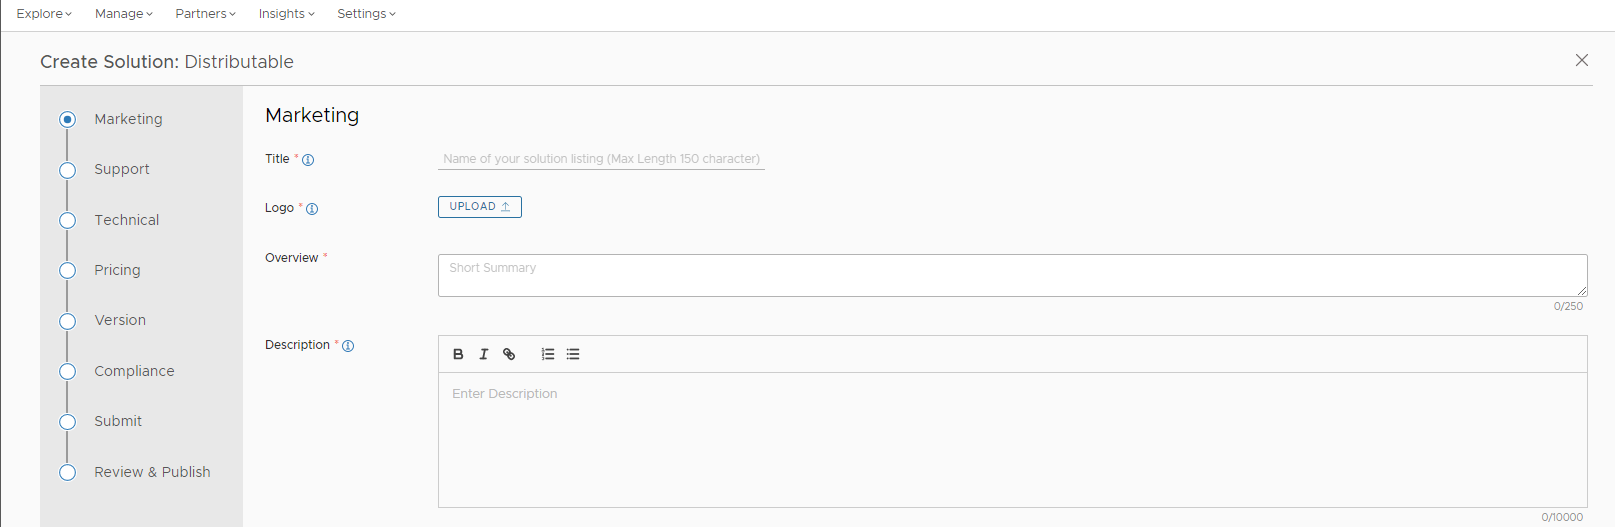
- In the Create Solution form, fill the following sections:
- Marketing
- Title: English name for your solution. Title should be the name of your application. Your solution name can contain maximum of 150 characters. Capitalize the first letter of each word in the Title. Use numerals (4 instead of four). Use normal text. Special characters do not appear in the title. Use the English name of the solution.
- Logo: The icon displays on the listing pages for your application or service. The logo should be 200 pixels width by 200 pixels height. Use an image with white background for logo. Use the logo that ships along with your solution.
- Overview: Enter a brief description. The description shows up at the top of your listing. Overview should indicate the application’s purpose.
- Description: Enter a description that tells the potential customers what your solution does. You can include detailed information about solution's features, attributes, use cases, and warranty. To showcase the unique selling proposition to potential customers, you can also add a summary of the key elements of your solution.
- Redirect URL: This link appears as the Try Now button on your solution. Ensure that this is the URL to access your solution.
- Features: Add key features of your solution.
- Media: Include at least one image file of the solution which not the company logo (required). Images can be diagrams, solution images, and so on. If you upload multiple images, they will be displayed in carousel format. You can also include a link to the solution video hosted on YouTube or upload the video file itself.
- Support
Enter the email id and the phone number to help potential customers to contact your organization. Enter your organization website URL so that they can find more information about your solution and the product. Add resources such as white papers, case studies, installation guides, user guides, or webinars. Use the Summary field to provide additional support information such as support hours, support links, documentation links, and so on.
- Technical
The information you enter here makes the solution easily discoverable on VMware Marketplace. It helps prospective customers easily filter, search, and quickly discover your solution on VMware Marketplace. Provide as much technical details as you can to make your solution stand out.
You should provide the following technical information:- Select a form factor for your solution.
- Select the category and subcategory that best suits your solution. These categories are derived from industry standard groupings of software solutions.
- Optionally, you can enter the OS details and the VMware Technology Alliance Partner (TAP) franchise information.
- Add compatibility details for all the VMware products that are relevant to your solution.
- Add VMware Ready / Partner Ready details if your solution has gone through the compatibility programs.
- Optionally, you can write a technical summary to provide additional technical information about your solution.
Form Factor Additional Technical Information Blueprints - Select a deployment platform type on which your solution can be deployed. Available options are VMware Cloud, VMware Cloud Director, and On-Prem.
Containers - Docker is set as the default artefact type.
- Select a deployment platform. Available option is VMware Tanzu.
Kubernetes - Choose a package type. Available option is Helm Chart.
- Select a deployment platform. Available option is VMware Tanzu.
SaaS - Login URL.
- Subscribe URL.
- Homepage URL.
Virtual Machines - Select an artifact type. Available options are OVA and ISO.
- Choose a deployment platform. Available options are VMware Cloud, VMware Cloud Director, and On-Prem.
- Pricing
Select one of the following subscription models for your solution:
-
BYOL: Bring Your Own License (BYOL) option enables direct deployment of your solution through previously purchase paid or trial solution license key. The BYOL allows prospective customers directly download or deploy your solution to VMware endpoints.
To publish a solution using the BYOL option you must have validated your solution either through the Partner Ready or VMware Ready validation programs or through VMware Marketplace’s platform validation functionality.
Note: Platform validation functionality is currently available only for container-based solutions. - Free: Enables free download and deployment of your solution.
-
Trial: This option enables direct deployment of your solution through trial solution license key. The Trial option allows prospective customers directly download or deploy your solution to VMware endpoints.
To publish a solution using the Trial option, you must have validated your solution either through the Partner Ready or VMware Ready validation programs or through VMware Marketplace’s platform validation functionality.
Note: Platform validation functionality is currently available only for container-based solutions. - Paid: Enables discovery and deployment of a solution through a license key purchased through VMware Marketplace. To publish a solution using the Paid option, you must have validated your solution either through the Partner Ready or VMware Ready validation programs or through VMware Marketplace’s platform validation functionality.
You must specify the pricing information for your solution. To enter the pricing information:
- Click the ADD PRICING button.
The Pricing Dimension dialog box appears.
- Enter the following information and then click ADD:
- Prepaid SKU: SKU of your solution.
- Prepaid Price: Enter the subscriptions price in Unite States Dollars (USD). You must also enter the unit of measurement. For example, per hour, per seat, and so on.
- Term Length: Duration for which the user has access to the product. The available options are 1 year and 3 years.
- Enable Monthly Billing: Select this option to allow the prospective customer to pay the subscription charges monthly. For example, if you set the Prepaid Price as USD 1200, Term Length as 1 year, and select the Enable Monthly Billing option, then the prospective customer can either pay the subscription fee for $1200 in lump sum or a subscription fee of USD120 per month for 12 months.
The information you entered appears in the Pricing Dimension section. You can add multiple Pricing dimensions by clicking the ADD PRICING button.
You can change the pricing dimension by clicking the edit icon (
 ). You can also delete a pricing dimension by clicking the delete icon (
 ).
).
- Click the ADD PRICING button.
-
- Version
Enter your solution’s version number.
Click the ADD VERSION AND COMPATIBILITY button to add compatibility details for all the VMware products that are relevant to your solution and the VMware validation program that your solution might have completed.
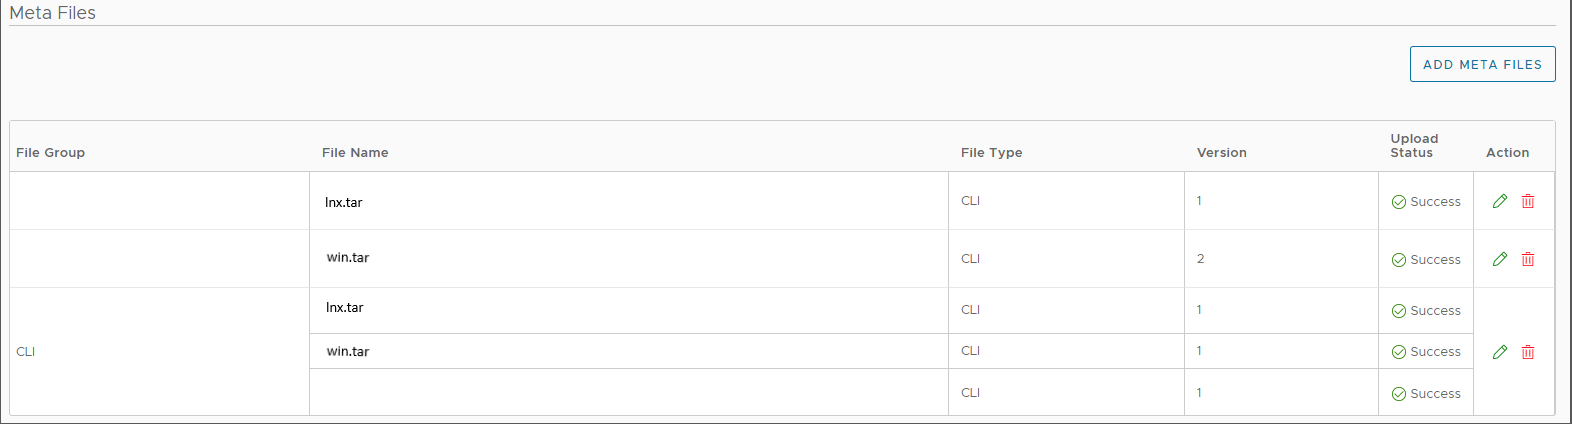
Note: VMware Marketplace does not run any testing on your solution but just confirms that your solution has previously been certified or validated through the selected program.Click the ADD META FILES button to upload the files that are required for deploying your solution. In the Add Meta Files dialog that appears, you can upload meta files either individually or as part of a file group.
A file group is a logical group of components. All the files that you upload as part of a file group are listed under that file group. For example, you can create a file group called CLI and upload multiple CLI tar balls for each supported operating system.
 Depending on the form factor that you have selected in the Technical section, you may need to enter the following additional information:
Form Factor Information Blueprints Blueprint Details: Click the ADD BLUEPRINT DETAILS button to add information such as blueprint name, URL to download the blueprint, blueprint type, and instructions to deploy the blueprint. Containers Docker Image: Click the ADD DOCKER IMAGE button to add a docker image. You can either add a docker registry or upload a docker image. Content Packs Content Pack: Click the ADD CONTENT PACK button to add a content pack. Kubernetes Helm Chart: Click the ADD HELM CHART button add a helm chart. You can add information such as chart name, version, upload the chart or provide the URL to download the chart, and deployment instructions. Management Packs Management Pack: Click the ADD MANAGEMENT PACK button to upload the management pack. Others Others: Click the ADD OTHERS button to add your file. Plug-In Plug-In: Click the ADD PLUG-IN button to upload your plug-in. Professional Services Professional Services: Click the ADD PROFESSIONAL SERVICES button to add your file. Virtual Machine Virtual Machine: Click the ADD VIRTUAL MACHINE button to upload your files. - Compliance
Based on the information that you have entered in the previous sections, you might be asked to enter compliance details such as Cryptography and U.S. Export Compliance, encryption details, Export Control Classification Number (ECCN), open-source license disclosure, and End User License Agreement (EULA).
Note: VMware does not advise on the compliance and export control details of your solution. If you have questions about the compliance information required, consult your legal team.
- Marketing
- After filling information in all the sections, go to Submit section to review and submit the form. You can preview your listing before submitting it by clicking the Preview button.
Your solution goes through validation and compliance approval. You will receive regular notifications from the VMware Marketplace team on the status. During the review process, you might receive feedback and change requests from the VMware Marketplace team before it gets published.
Once your solution is approved, it gets published on VMware Marketplace.
