


You can create a pool group by navigating to to open the pool group page. This page displays a high-level overview of configured pools.
You can create a new pool group by clicking CREATE POOL GROUP, or edit the pool group by clicking the pencil icon.

Considering a pool group consisting of three pools (pool-1, pool-2, pool-3) , following are the steps to configure the feature:
Navigate to .
Create individual pools pool-1, pool-2, pool-3 to be attached to the pool group. Alternatively, you can create the pools during Pool Group creation.
For more information on configuring pool settings, see Server Pools.
Specify the name and set cloud and VRF context details.
Pool Group Deployment Policy: Select pool group deployment policy from the drop-down menu or you can create a new policy by clicking Create button. Once you setup, autoscale manager will automatically promote new pools into production when deployment goals are met.
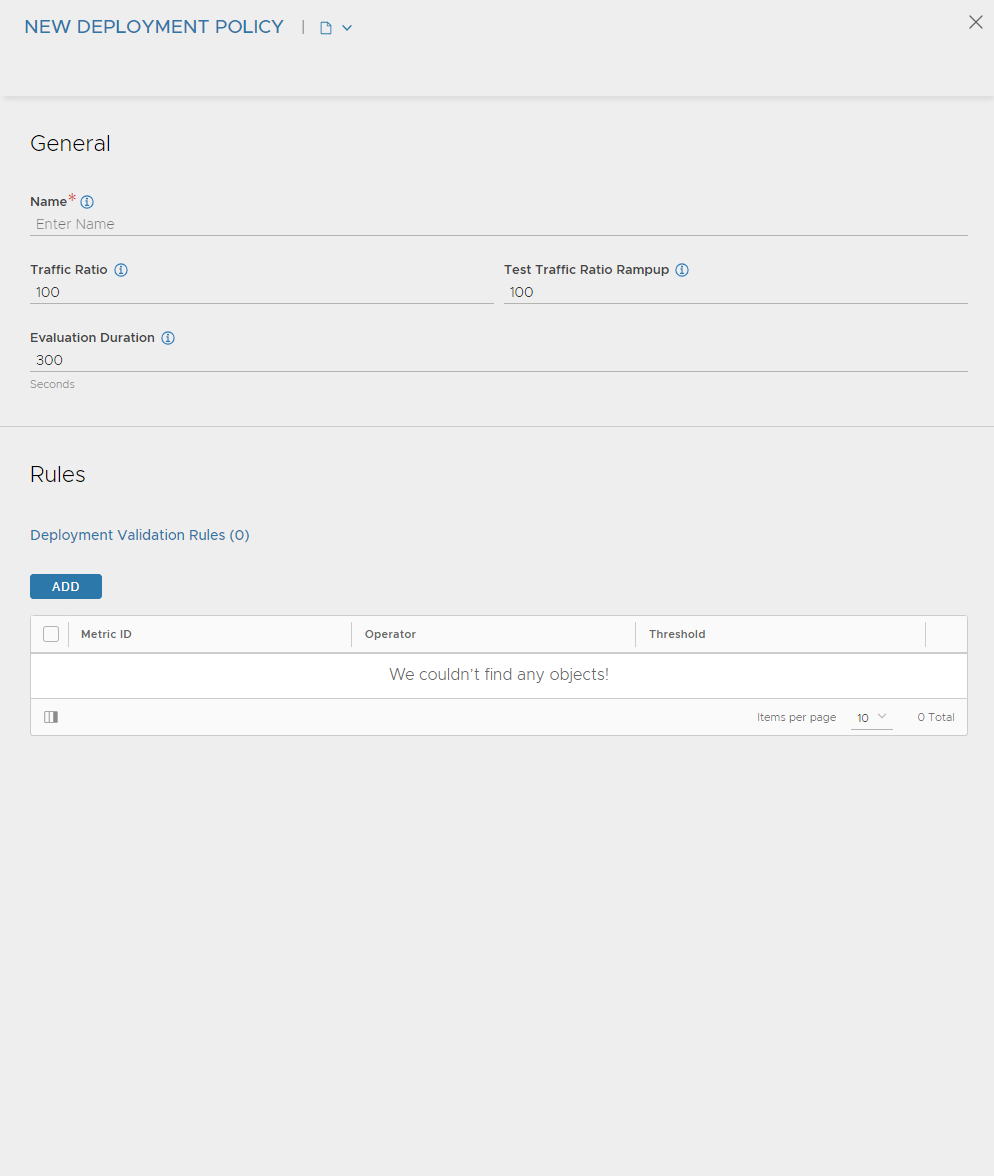
Name: Specify the name of the pool group deployment policy.
Traffic Ratio: Specify the target traffic ratio before the pool is made production.
Test Traffic Ratio Rampup: Specify the ratio of the traffic that is sent to the pool under test. The test ratio of 100 means blue, green.
Evaluation Duration: Specify the duration of evaluation period for automatic deployment.
Deployment Validation Rules: Click ADD button to add Metric ID, Operator name, and Threshold value.
In the Members tab, add the previously created pools as member pools or create new member pools. Note that each pool has been assigned a priority here.
Enable HTTP2: Check this box to enable HTTP/2 for traffic from virtual service to all the backend servers in all the pools configured under this pool group.
Number of 'Up' Servers: Specify the minimum number of servers to distribute traffic to. The range is from 1-65535.
Group Members: Click Add.
Pool: Select the name of pool from the drop-down menu. You can also create a pool by clicking Create button.
Priority: Specify the priority of a pool. All pools with same priority are treated similarly in a pool group. The pool with higher priority is selected, if the pool is eligible or an explicit policy chooses a different pool.
Ratio: Specify the ratio of selecting eligible pools in the pool group. The range is from 1-1000.
Deployment State: Select the pool deployment state used with the PG deployment policy from the drop-down menu. The following are the deployment state options:
Evaluation Failed: Selecting this option indicates the pool's traffic ratio is set to zero, if the pool has failed its evaluation.
Evaluation In Progress: Selecting this option indicatesthe pool will be under evaluation. Once the evaluation is over, it will be transitioned to either ACTIVE, DISABLED or EVALUATION FAILED state.
In Service: Selecting this option indicates the pool has passed the evaluation. It is actively placed in service with ratio 100.
Out of Service: Selecting this option indicates the pool had previously passed the evaluation, but it is out of service as its traffic ratio is zero.
In the Fail Action tab, select the action to be executed from the drop-down menu when the pool group experiences failure. There are three options available as fail actions:
Close Connection: If all servers in a pool are down, the default behavior of the virtual service is to close new client connection attempts by issuing TCP resets or dropping UDP packets. Existing connections are not terminated, even though their server is marked down. The assumption is the server may be slow but may still be able to continue processing the existing client connection.
HTTP Local Response: Returns a simple web page. Specify a status code of 200 or 503. If a custom HTML file has not been uploaded to NSX Advanced Load Balancer, it will return a basic page with the error code.
Status Code: Select 200 or 503 from the drop-down menu.
Upload File
HTTP Redirect - Returns a redirect HTTP response code, including a specified URL.
Status Code - Choose 301, 302, or 307 from the drop-down menu.
Protocol - By default NSX Advanced Load Balancer will redirect using HTTPS unless HTTP is clicked instead.
Host - The host to which the redirect request is sent.
Path - Specify the path configuration for the redirect request. If it is not set, then the path from the original request's URI is preserved in the redirect on pool failure.
Query - Specify the query configuration for the redirect request URI. If it is not set, the query from the original request's URI is preserved in the redirect on pool failure.
In the Role-Based Access Control (RBAC) tab, click ADD.
Specify the Key and the corresponding Value(s).
To know more about configuring labels, see Granular Role Based Access Controls.
After specifying all the necessary details, click SAVE.
