


To configure eBGP-multihop Peer using NSX Advanced Load Balancer Controller UI and CLI.
Using NSX Advanced Load Balancer UI
Login to NSX Advanced Load Balancer UI and navigate to and click CREATE.
Under BGP Peering tab select the Enable BGP Peering check box. Select eBGP for Type.
If you select eBGP, then ASnumber is configurable inside peers.
If you select iBGP, then ASnumber is not configurable inside peers.
Provide the following values to BGP, IPv4 Prefix, IPv4 Peer, Remote AS, and Multihop:

Using NSX Advanced Load Balancer CLI
Peer Configuration — Enable BGP, set the following attributes:
AS – 65000
Type – eBGP
Remote AS – 1
BFD – Yes
Advertise VIP – Yes
Advertise SNAT – Yes
Use vrfcontext sub-mode to configure the required attributes:
[admin-controller]: > configure vrfcontext global
[admin:controller]: vrfcontext:bgp_profile> peers index 1
[admin:controller]: vrfcontext:bgp_profile> peers ebgp_multihop 2
[admin-controller]: vrfcontext:bgp_profile > peers peer_ip 10.116.0.1 subnet 10.115.0.0/16 md5_secret abcd
[admin:controller]: vrfcontext:bgp_profile:peers> save
[admin:controller]: vrfcontext:bgp_profile> save
[admin:controller]: vrfcontext> save
[admin:controller]: >
For more information on configuring BGP on NSX Advanced Load Balancer, see BGP Support for Scaling Virtual Services.
The following diagram explains all the required configurations for configuring multihop eBGP peers:
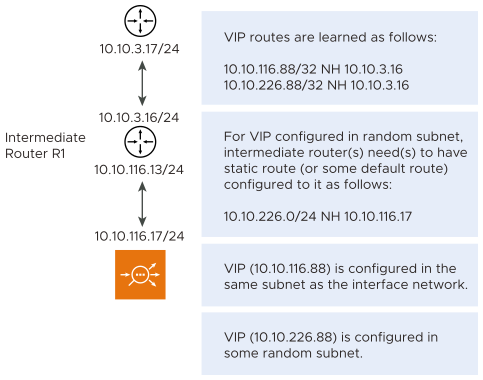
Configure static route or default route to reach peer network (10.10.3.0/24) using router R1 (10.10.116.12). 10.10.3.0/24 next hop 10.10.116.12
Configure two virtual service IP addresses as follows:
VIP (10.10.116.88) is configured in the same subnet as the interface network (10.10.116.0/24).
VIP (10.10.226.88) is configured in some random subnet.
