Azure VMware Solution provides you with private clouds that contain vSphere clusters built from dedicated bare-metal Azure infrastructure. The minimum initial deployment is three hosts, but additional hosts can be added up to a maximum of 16 hosts per cluster.
All provisioned private clouds have vCenter Server, vSAN, vSphere, and NSX-T. You can migrate workloads from your on-premises environments, deploy new virtual machines (VMs), and consume Azure services from your private clouds. Azure VMware management tools (vCenter Server and NSX Manager) will be available at least 99.9% of the time.
For more information, see the Azure VMware Solution page.
Azure VMware Solution is a VMware-validated solution with ongoing validation and testing of enhancements and upgrades. Microsoft manages and maintains private cloud infrastructure and software. It allows you to focus on developing and running workloads in your private clouds.
Network Services in AVS
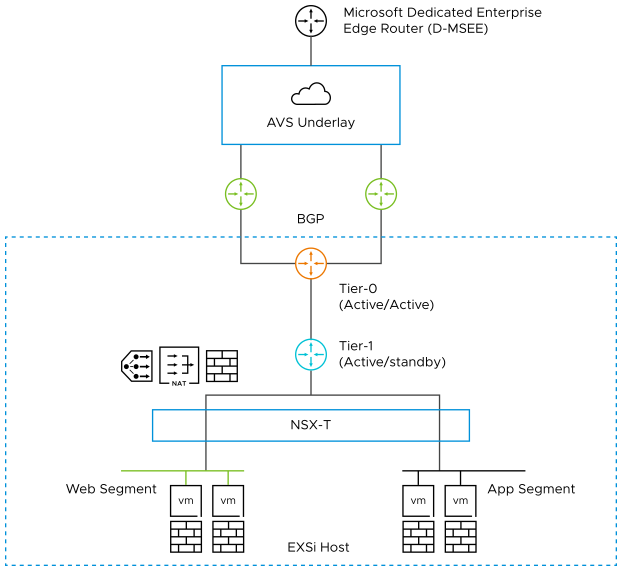
The following diagram demonstrates high-level network architecture of AVS Private Cloud VMware Network services:

From the diagram,
AVS is pre-provisioned with the following NSX-T network configurations:
Tier-0 Gateway configured in Active/Active mode for ECMP
Northbound connectivity through BGP on Tier-0 Gateway
Pre-provisioned Tier-1Gateway for workload segment connectivity
Route advertisement enabled on pre-provisioned Tier-1 Gateway
Route redistribution enabled on Tier-0 Gateway
Default Internet Access for SDDC workloads with an option to enable/disable
AVS allows customers to add the following NSX-T network configurations:
Create overlay segments and connect workloads
Deploy additional Tier-1 Gateways
Deploy distributed services such as Distributed Fire Wall (DFW)
Deploy stateful services such as Load Balancer, Gateway Firewall (GFW), DNS and DHCP on Tier-1 Gateway
NSX Advanced Load Balancer for AVS
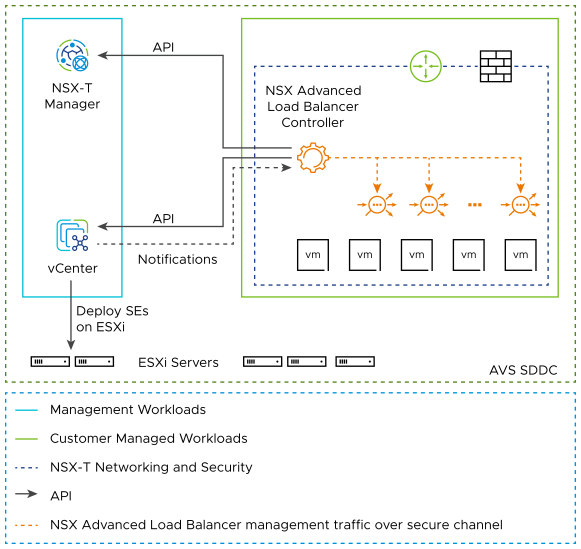
NSX Advanced Load Balancer provides load balancing for applications running in AVS SDDC. NSX Advanced Load Balancer integrates as a second party load balancing solution, with communication between the NSX Advanced Load Balancer Controller, NSX Manager and VMware vCenter within AVS. This integration enables NSX Advanced Load Balancer to deploy and manage Service Engines automatically based on demand, providing for an elastic, automated approach to load balancing.
NSX Advanced Load Balancer leverages the NSX-T Cloud Connector mode of operation in AVS as well. This is facilitated by the similarity in the VMware infrastructure between an on-premises NSX-T deployment as well as AVS deployment, as far as objects of interest for NSX Advanced Load Balancer are concerned.

Key Points from the Deployment shown above:
The NSX Advanced Load Balancer Controller is a cluster of three control plane VMs. The NSX Advanced Load Balancer Controller can run within the AVS SDDC, or outside it in your on-premises datacenter / Azure native VNet. The Controllers need IP reachability from the Service Engines.
The Controller connects with the NSX-Manager and VMware vSphere vCenter within AVS and discovers the VMware objects such as Port groups, clusters, NSX T1, Segments etc.
The Controller automatically deploys an NSX Advanced Load Balancer Service Engine, which is the data path instance. The NSX Advanced Load Balancer SE is a virtual machine running within the AVS SDDC.
The Controller ensures that the NSX-T DFW is programmed correctly to allow traffic.
NSX Advanced Load Balancer allows for various deployment configurations of the underlying NSX system, such as shared segment for the Virtual Service front-end IP (VS IP) and pool members, as well as dedicated segments for each.
NSX Advanced Load Balancer also supports the default Tier 1 gateway as well as additional Tier 1 gateways created within AVS by the customer.
While NSX Advanced Load Balancer supports various VLAN backed segment topologies, these are not applicable in the context of AVS as AVS supports overlay segments created by customers.
Installing NSX Advanced Load Balancer in AVS
- Licensing
-
NSX Advanced Load Balancer only supports Enterprise Edition license for Google Cloud VMware Engine integration. To know more about the Enterprise Edition license, see License Management on NSX Advanced Load Balancer in VMware NSX Advanced Load BalancerAdministration guide.
NSX Advanced Load Balancer Licenses can be added to the Controller at any time as per the requirement. The licenses are available at my.vmware.com. Login to your account at my.vmware.com to access the VMware serial key(DLF).
NSX Advanced Load Balancer Controllers manage licenses and central capacity pool for NSX ALB Service Engines.
NSX Advanced Load Balancer allows for a 10% overage of the total license capacity.
- Role Requirements
-
The NSX Advanced Load Balancer Controller requires:
The NSX Network Engineer role or higher if you are running NSX-T Data Center 3.0.x, or the NSX Network Admin role or higher if you are running NSX-T Data Center 3.1.x or later.
VMware vCenter permissions as defined in Configuring Roles and Permissions for vCenter and NSX-T Users.
You can use the cloudadmin user and credential provided for AVS. This user has a role which is a superset of the required permissions and is sufficient for the integration.
For information on setting the content library, see the the Creating a Content Library section of the Installing NSX Advanced Load Balancer in VMware NSX-T Environments.
For information on deploying the Controller OVA, see Deploying the NSX Advanced Load Balancer Controller OVA.
For information on setting up the Controller, see Setting up the Controller.
Creating an NSX-T Cloud
To create an NSX-T cloud, log in in to the NSX Advanced Load Balancer Controller and follow the steps given below:
From the NSX Advanced Load Balancer UI, navigate to . Click Create.
Provide a Name.
Select NSX-T as the Credentials Type.
Enter the Username and Password.
Click Save. Similarly, create vCenter Credentials.
For information on configuring the NSX-T Cloud, see Creating an NSX-T Cloud.
Creating a Virtual Service
From the NSX Advanced Load Balancer UI,
Go to Applications.
Click .
Select the NSX-T cloud which was created.
Enter the details related to the virtual service IP, Pool members, Tier 1 Logical Router, and more as required.
Click Save to create the virtual service.
On successful creation of a Service Engine, the Virtual Service comes up and becomes ready to process traffic.