


OpenStack integration with NSX Advanced Load Balancer is IPv6 capable. The integration discussed in this section has been tested for OpenStack Ocata, which focuses on resolving scalability and performance issues.
Software-Defined Networking (SDN) supports Contrail.
Setup Information
In a general setup, the NSX Advanced Load Balancer Controller is spun up in the management network (avimgmt in this case). The Controller is used for testing against OpenStack no-access cloud and a generic OpenStack cloud. Server and client instances are spun up in Stateless address auto configuration (SLAAC) based on client and server networks, respectively. These instances are in either Dynamic Host Configuration Protocol version 6 (DHCPv6) stateful-based client or server networks.
Network Topology
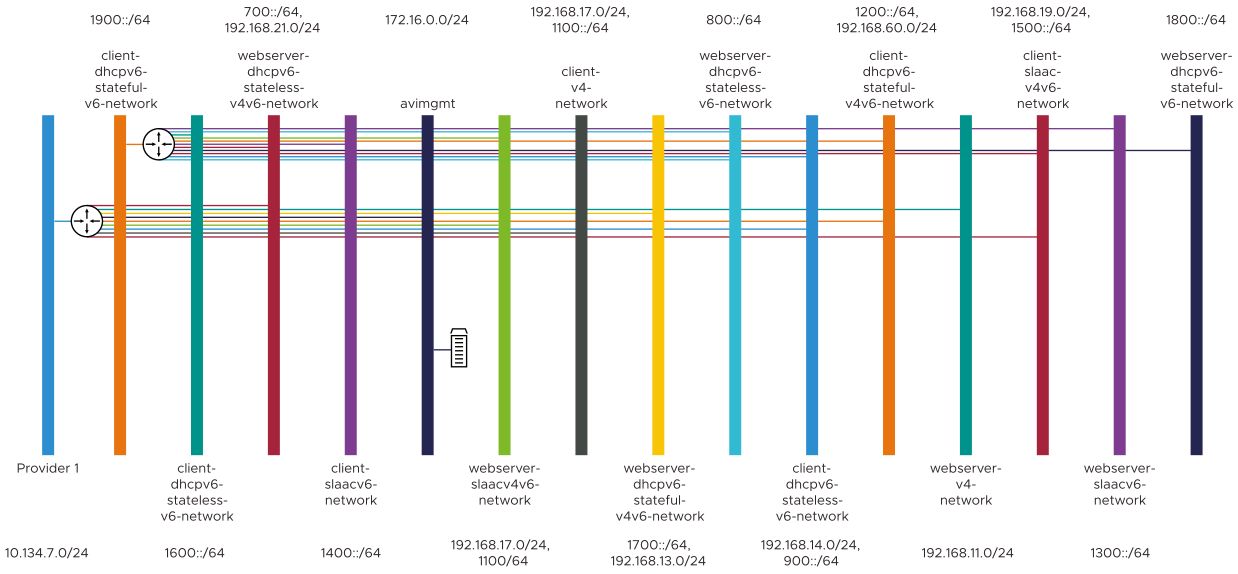
The following network combinations are considered:
IPv4 networks.
IPv6 networks, which are further broken down into SLAAC, DHCPv6 stateless, and DHCPv6 stateful. These are chosen from the Horizon UI or OpenStack CLI during the network creation.
Networks starting with client prefix are chosen for virtual services, and networks starting with server prefix are chosen for backend servers.
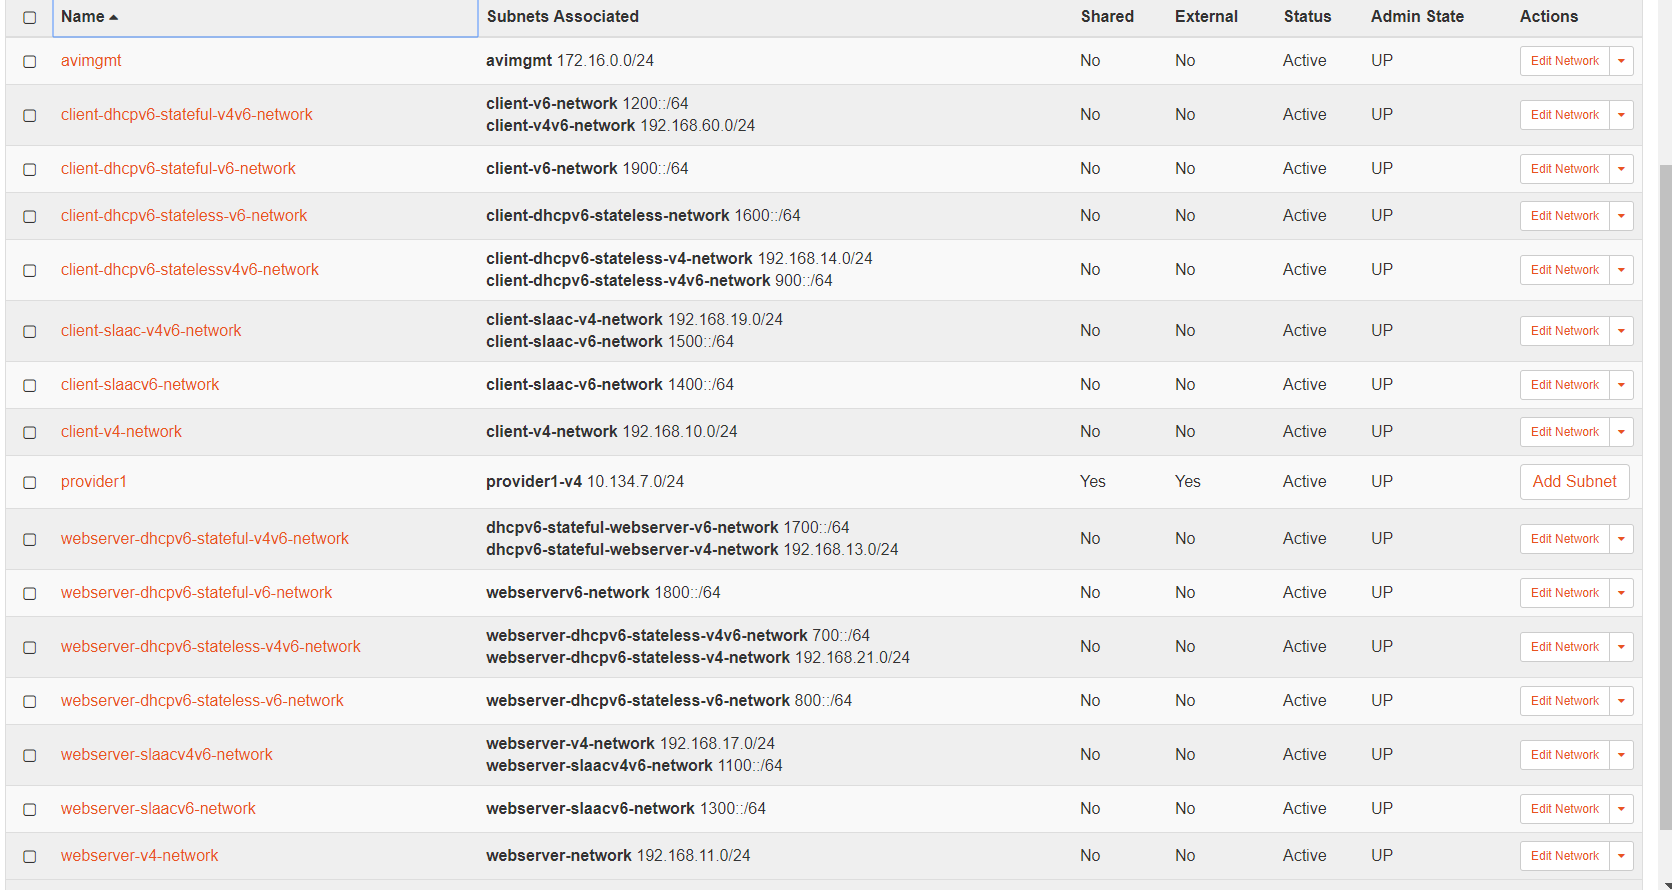
As a result, 16 networks are considered, as displayed in the screenshot below:
This is done to cover all possible scenarios and is not an exact requirement.
The setup thus comprises one-arm and two-arm setups where everything can be contained in one network or different networks, respectively. In this section, the two-arm setups are used for virtual service creation (separate network), and then the traffic is sent to the server on a different network. In two-arm setups, the virtual service is in one network, and its back-end servers are in another.
IP Addressing Schema used
Virtual services are created using stateful DHCPv6, SLAAC, or static IPv6 addressing. In this case, the IP address is chosen from a SLAAC v6 or DHCPv6 stateful network, and IPv4 is used at instances too.
OpenStack does not support floating IPv6. Hence,
For dual-stack virtual service, floating IP will always get translated (NAT) to a private v4 VIP address.
For an IPv6 Virtual IP (VIP), as in the case of a dual-stack virtual service, the IPv6 VIP, irrespective of being private or public, must be on the same interface as the private IPv4 VIP network for the placement to get through.
The following combinations of IPv4, IPv6, and dual-stack networks covers all addressing types:
Static or manual configuration.
Stateless address auto configuration (SLAAC): IPv6 prefix (/64) is assigned to the end node using router advertisement (RA), and the node self-constructs the interface ID (IID) portion of the address (the last /64 bits).
Stateful DHCPv6: Similar to IPv4 DHCP, a DHCPv6 server handles the entire IPv6 addressing and configuration options.
SE starts the DHCPv6 client only upon receiving route advertisement (RA) from the designated router.
Stateless DHCPv6: A combination of SLAAC for address assignment and DHCPv6 for option assignment, such as, Domain Name System (DNS)DNS, domain name, is used.
Networking
This is setup-agnostic and you can alter this as per your requirements.
As noticed in the network topology above, all networks must be routed within the respective Virtual LAN (VLAN) 207 network. Here, VLAN 207 is the provider network VLAN. This routing requires a router in the network.
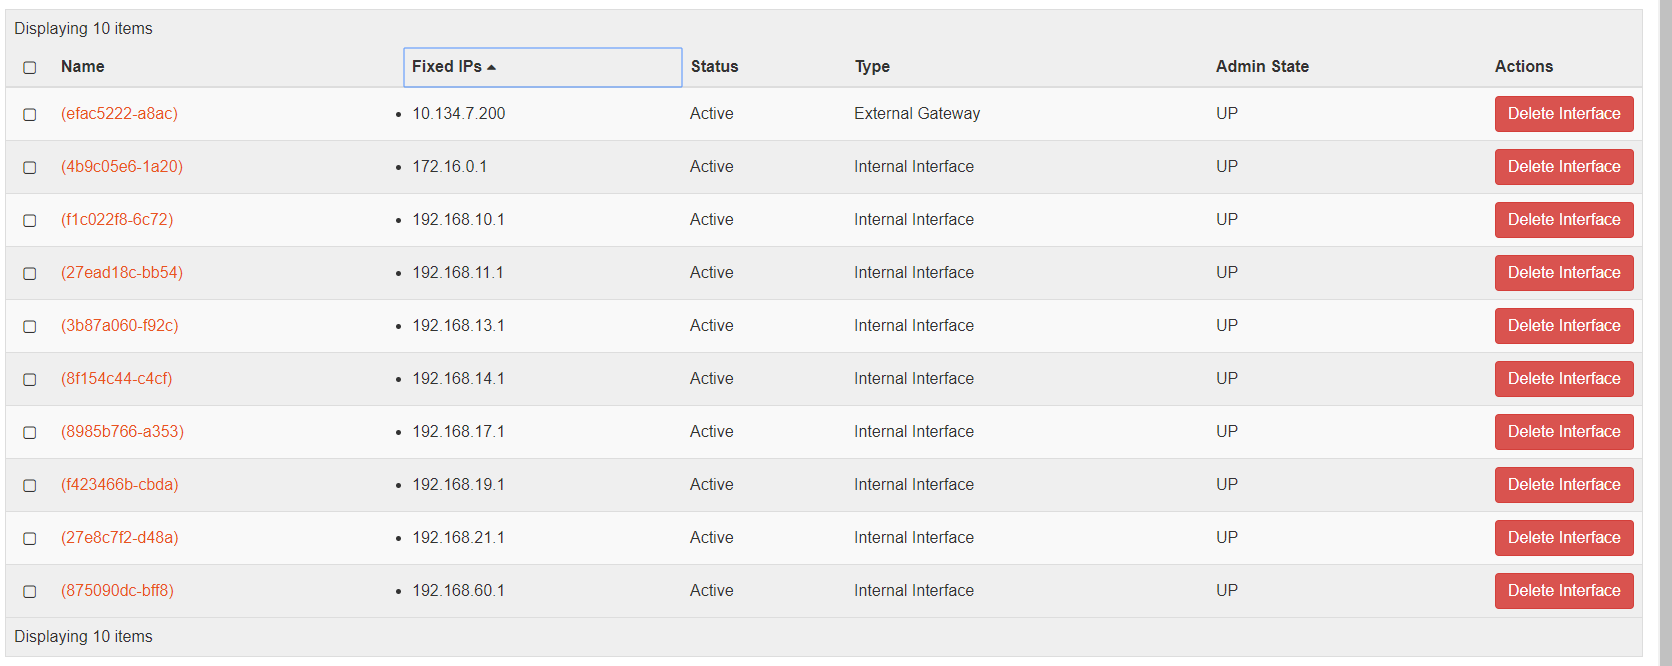
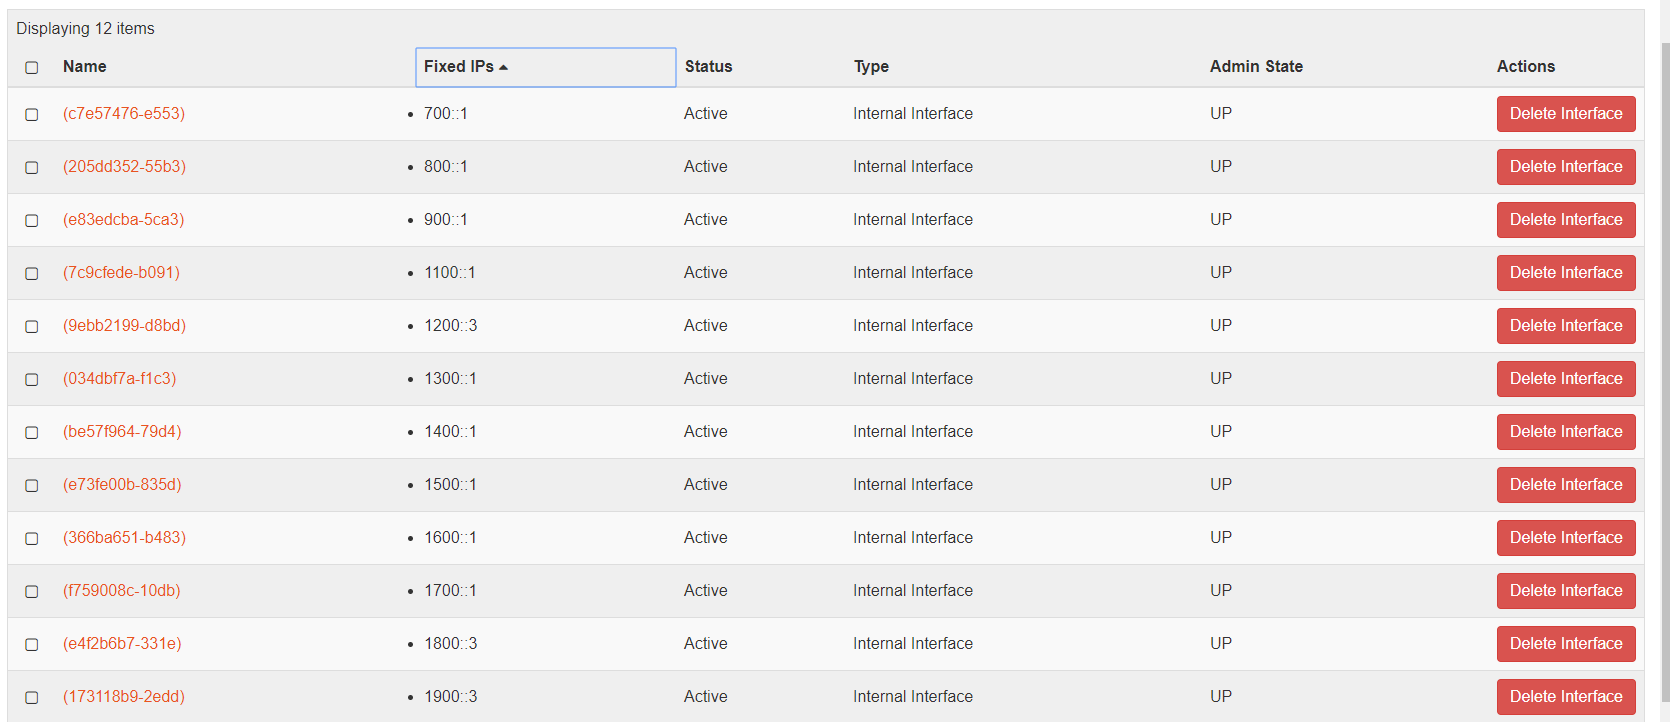
Interfaces Connected to the Router

Each network must have an interface connected to the router (IPv4 or IPv6 router), as displayed in the screenshots below:
IPv6 Route Advertisement
A router is configured to handle IPv6 route advertisement (RAs). If DHCPv6 is the chosen IP addressing schema, RAs must be sent across the OpenStack for their work on the SEs. Similarly, after the IPv6 networks are created, pick the link-local address (LLA) for each IPv6 network and update that as the default gateway for each IPv6 network. The configuration is as shown below:
root@openstack-ocata:~# ip netns | grep qrouter
qrouter-3eeb3d41-8955-431c-b2bd-1934c97900a9
qrouter-017709bf-5ab1-43b5-a372-75c554c1b961
root@openstack-ocata:~# ip netns exec qrouter-017709bf-5ab1-43b5-a372-75c554c1b961 bash
ip a
As seen in the output below, the value inet6 fe80::f816:3eff:fe88:18ff is the LLA that is updated under the IPv6 network settings.
13: qr-c7e57476-e5@if109:
mtu 1450 qdisc noqueue state UP group default qlen 1000
link/ether fa:16:3e:88:18:ff brd ff:ff:ff:ff:ff:ff link-netnsid 0
inet6 700::1/64 scope global
valid_lft forever preferred_lft forever
inet6 fe80::f816:3eff:fe88:18ff/64 scope link
valid_lft forever preferred_lft forever
Security Groups
For a generic OpenStack cloud, the security group rules are automatically created for the SEs.
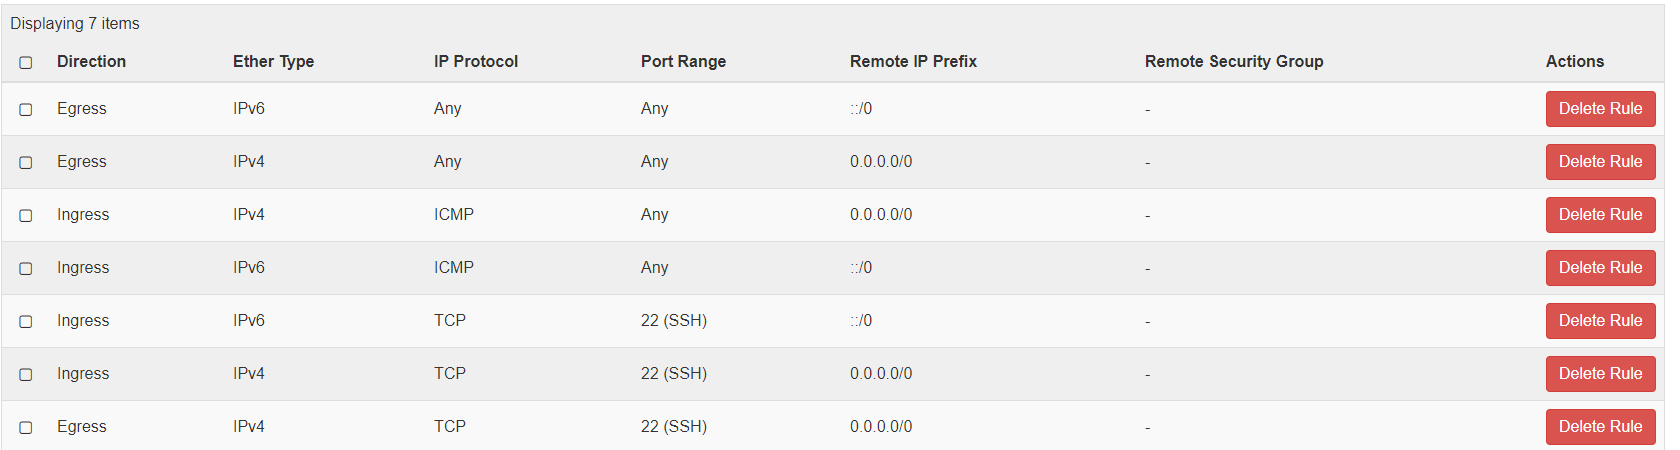
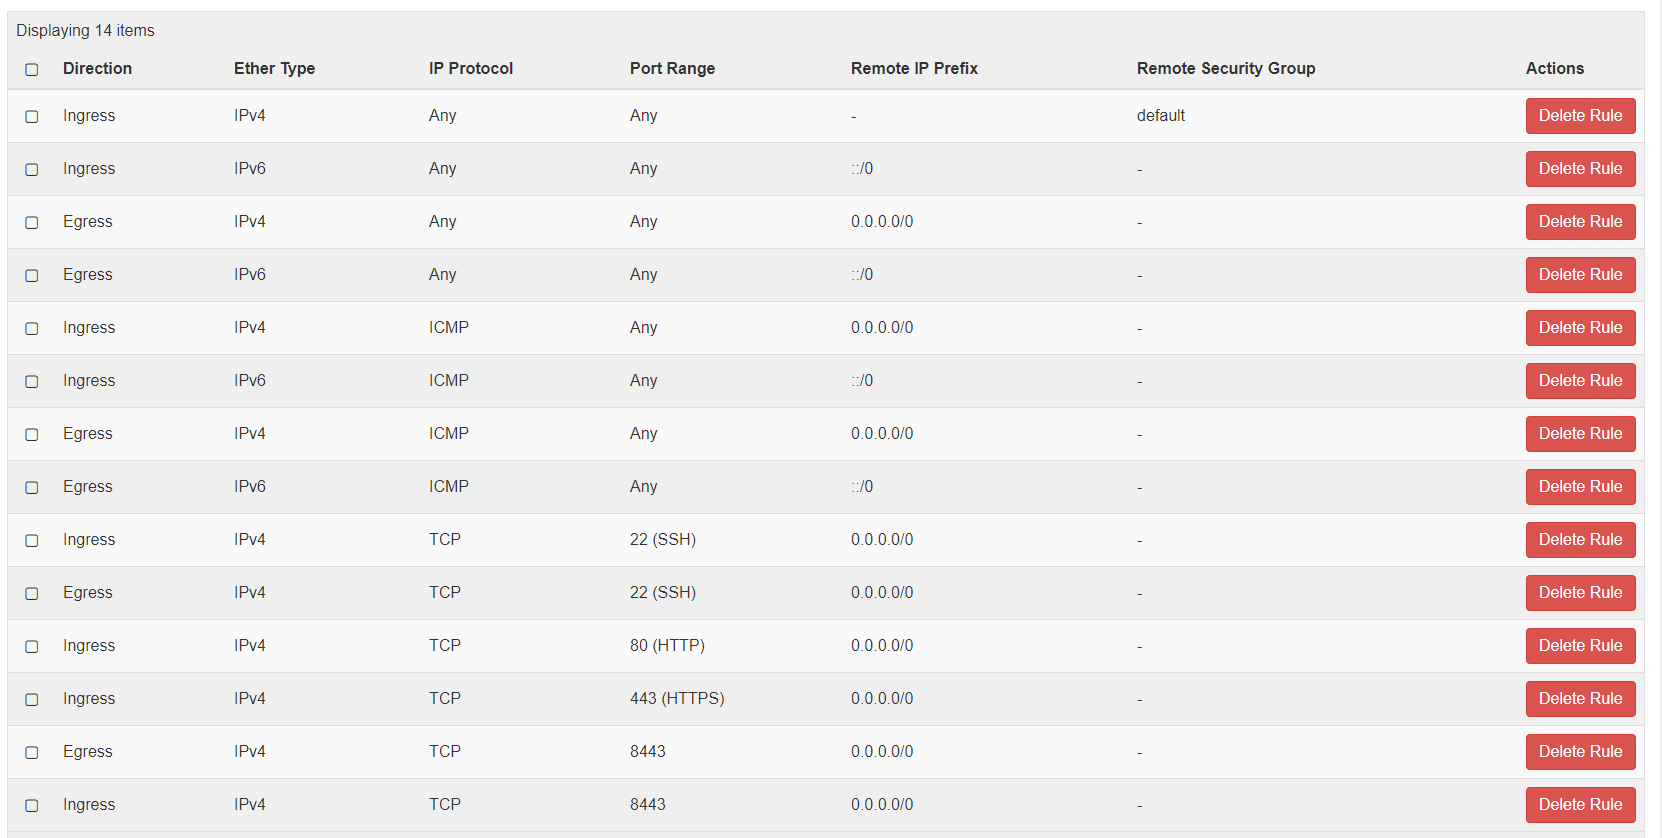
For a No-Orchestrator cloud, when the SE is spun up manually using the steps mentioned at Creating Service Engine using Creating Service Engine using Heat-Templates in No-Access OpenStack Cloud, certain rules for IPv4 and IPv6 must be allowed for the traffic (The Internet Control Message Protocol (ICMP), Secure Shell (SSH) to work. Open up ports such as 22, 80, 443, and 8443. If 8443 is not configured as an exception, then the SE will not be able to SSH into the Controller and vice-versa.
Allowed-Address-Pairs
The allowed address pair extension extends the port attribute that enables you to specify arbitrary mac_address/ ip_address ((Classless Inter-Domain Routing, (CIDR)) pairs that are allowed to pass through a port regardless of the subnet associated with the network.
In the case of a generic OpenStack cloud, this is enabled by default in the cloud settings, so no further changes are required.

In the case of a No-Orchestrator cloud, this can be done using OpenStack CLI or via Horizon.
The allowed-address-pairs neutron extension allows traffic with specific CIDRs to exit from a port. NSX Advanced Load Balancer uses this extension to place VIPs on Service Engine (SE) data. Thereby, VIPs on SE data ports allow VIP traffic to exit through these data ports.
Add allowed-address-pairs on the SE ports so that the security groups do not drop the packets. For the MLS/ OVS plug-in, you can add the allowed-address-pairs with 0.0.0.0/0 and with (if required for IPv6 or dual-stack)::/0 once for each of the SE ports or specific VIP address.
In the case of Contrail used as SDN type with NSX Advanced Load Balancer, the VIP addresses are added to the fixed address list as explained here. For differentiating interface IP, you must add the same to AAP with /24 or /120 prefix based on whether it is IPv4 or IPv6.
neutron port-update da0e1e9a-312d-41c2-b15f-f10ac344ef03 --allowed-address-pairs type=dict list=true ip_address=192.168.1.222/32

neutron port-update da0e1e9a-312d-41c2-b15f-f10ac344ef03 --allowed-address-pairs type=dict list=true ip_address=2001::6/128
If True, then the allowed-address-pairs extension will be used. If the underlying network plugin does not support this feature, then the VIP traffic will not work.
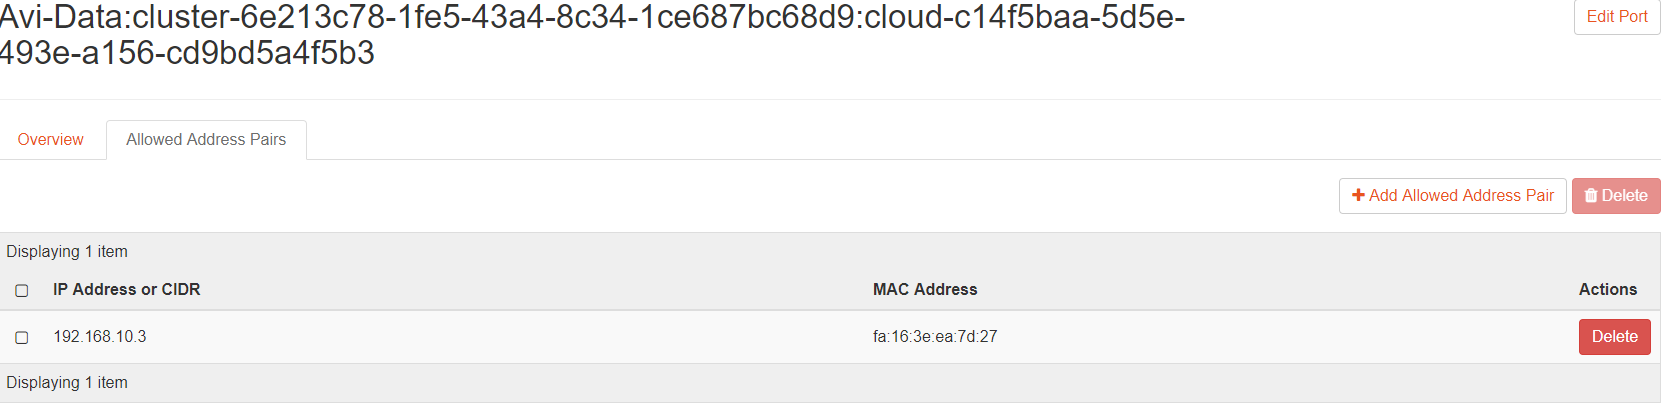
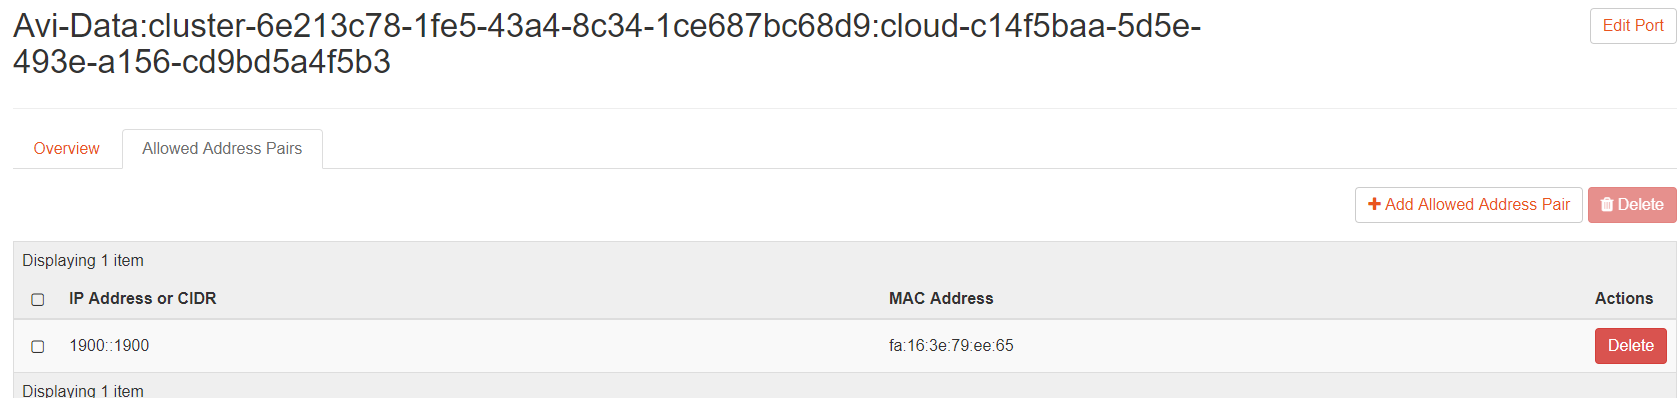
The following screenshot displays the AAP Entry for IPv4 (No-Orchestrator Cloud).
Configuring NSX Advanced Load Balancer
Install NSX Advanced Load Balancer for OpenStack by following the instructions at Installing NSX Advanced Load Balancer for OpenStack.
Use suitable IP addressing mechanism for virtual services and pools IPv6 configuration, for instance, SLAACv6.
Obtain subnet IDs using OpenStack UI by navigating to openstack-horizon/networks/subnets/id or on OpenStack CLI as explained below:
root@openstack-ocata:/root# openstack subnet show client-v4-network
+-------------------+--------------------------------------+
| Field             | Value                                |
+-------------------+--------------------------------------+
| allocation_pools  | 192.168.10.2-192.168.10.254          |
| cidr              | 192.168.10.0/24                      |
| created_at        | 2017-12-08T13:06:54Z                 |
| description       |                                      |
| dns_nameservers   |                                      |
| enable_dhcp       | True                                 |
| gateway_ip        | 192.168.10.1                         |
| host_routes       |                                      |
| id                | 337c70de-3be5-4072-8e7f-04d61ee6ceb5 |
| ip_version        | 4                                    |
| ipv6_address_mode | None                                 |
| ipv6_ra_mode      | None                                 |
| name              | client-v4-network                    |
| network_id        | 85b861a8-7d87-4e03-8cfe-444082ff1412 |
| project_id        | 39155680f7d24b628d9752057527ccb9     |
| revision_number   | 4                                    |
| segment_id        | None                                 |
| service_types     |                                      |
| subnetpool_id     | None                                 |
| updated_at        | 2017-12-11T18:13:45Z                 |
+-------------------+--------------------------------------+
IPv4 Pool and IPv4 Virtual Service
To configure the IPv4 pool:
Navigate to .
Click CREATE POOL.
Specify the Name and Type details and click SET CLOUD & VRF.
Provide inputs for Cloud and VRF Context and click SET.
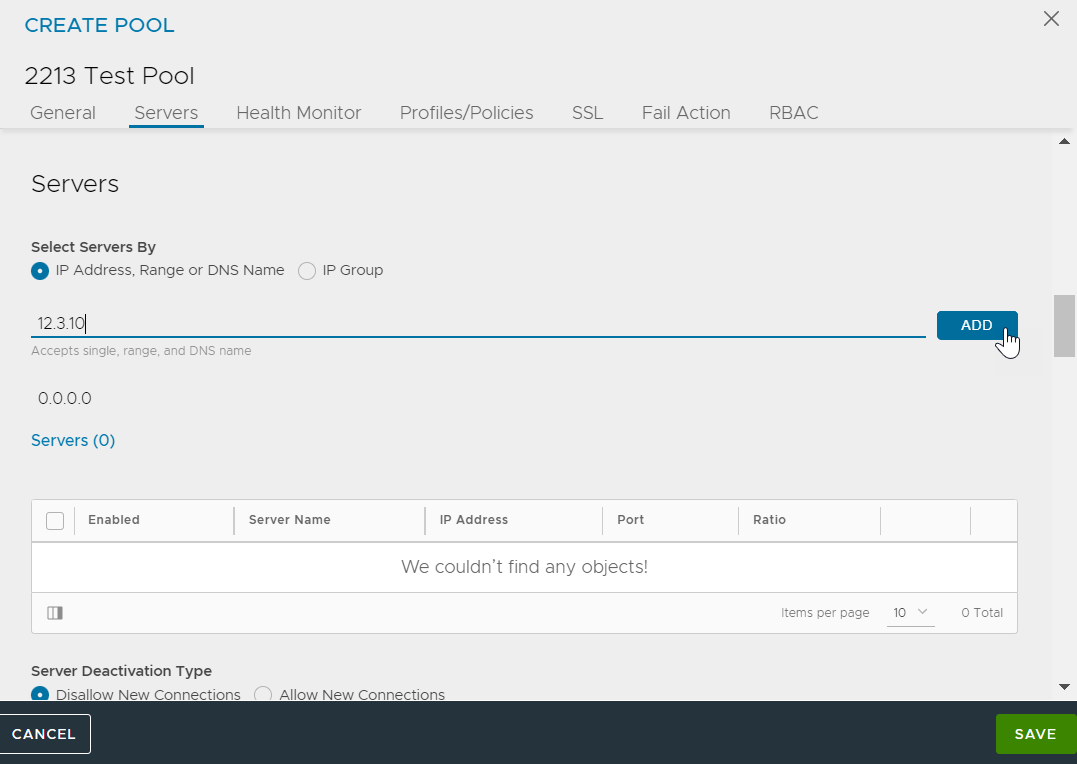
Click Servers tab.
Specify an IPv4 server IP address and click SAVE.
To configure an IPv4 virtual service:
Navigate to .
Click CREATE VIRTUAL SERVICE drop-down menu and select Advanced Setup.
In the New Virtual Service page, under the VIP Address section, click Create VS VIP from the VS VIP drop-down menu.
The CREATE VS VIP page is displayed as follows:
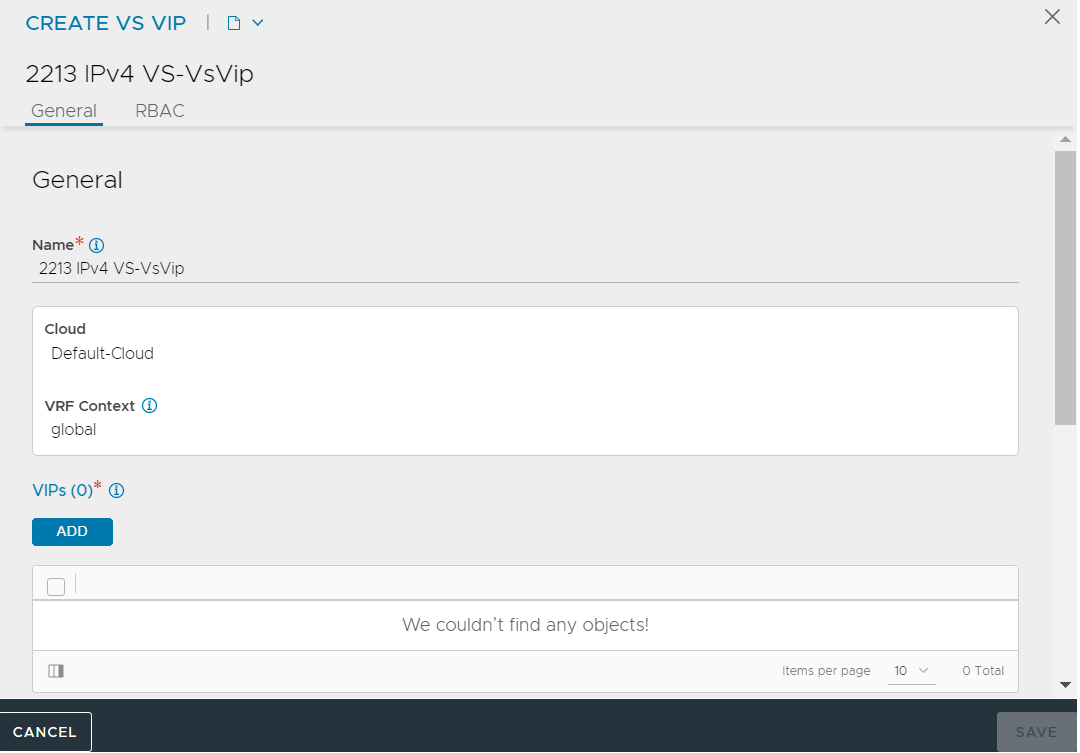
Click ADD under VIPs.
Specify the IPv4 address in the EDIT VIP page and click SAVE.
Click SAVE in the CREATE VS VIP screen.
You can enter optional inputs under the remaining tabs as required and click SAVE in the New Virtual Service window.
IPv4v6 pool and IPv4v6 Virtual Service (Dual Stack)
In a dual stack network, if a virtual service is created with a single VIP, using either IPv4 or IPv6 address, then converting it into a dual stack by adding an additional IP address will fail.
To configure the dual-stack pool:
Navigate to and click CREATE POOL.
In the CREATE POOL page, specify the Name and Type and SET CLOUD & VRF.
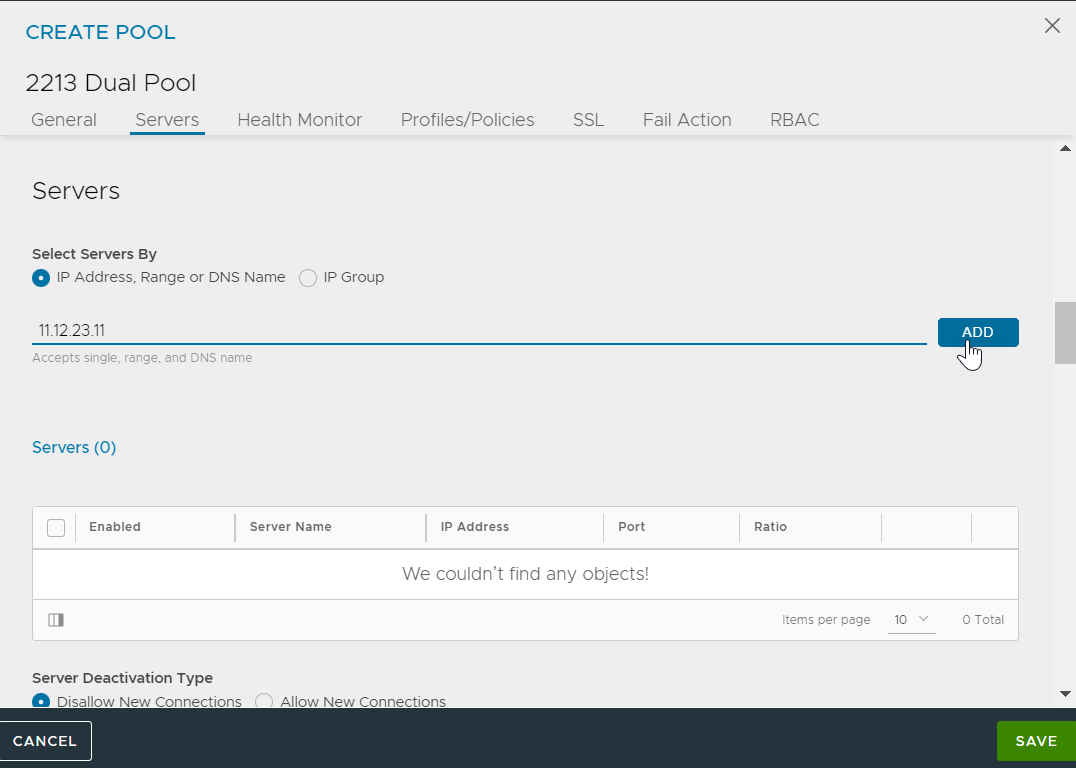
Under the Servers tab, provide either IPv4 or IPv6 server IP address as shown below:
Complete pool creation.
To configure a dual-stack virtual service:
Navigate to .
In CREATE VIRTUAL SERVICE drop-down menu, select Advanced Setup.
In the New Virtual Service screen, click Create VS VIP from the VS VIP drop-down menu.
In the CREATE VS VIP screen, click ADD under the VIPs field.
Specify values for IPv4 Address and IPv6 Address as shown below.

Click SAVE.
Troubleshooting: Traffic Capture
Use the tcpdump command to capture traffic for troubleshooting. The captures must be taken inside the qr interfaces’ of the respective qrouter namespace in OpenStack.
Temporary IP generation is disabled in SLAACv6 mode
In NSX Advanced Load Balancer Service Engine, where temporary IP generation is disabled for SLAACv6 mode, you will only have the global dynamic address.
5: eth2: mtu 1500 qdisc pfifo_fast state UP group default qlen 1000
link/ether fa:16:3e:10:7a:0c brd ff:ff:ff:ff:ff:ff
inet6 1100::f816:3eff:fe10:7a0c/64 scope global dynamic
valid_lft 86306sec preferred_lft 14306sec
inet6 fe80::f816:3eff:fe10:7a0c/64 scope link
valid_lft forever preferred_lft forever
