A complete uninstall of NSX removes host VIBs, the NSX Manager, controllers, all VXLAN configuration, logical switches, logical routers, NSX firewall, and the vCenter NSX plug in. Make sure to follow the steps for all hosts in the cluster. VMware recommends that you uninstall the network virtualization components from a cluster before removing the NSX plug-in from vCenter Server.

Note: Do not remove any appliances that were deployed by NSX Data Center for vSphere (such as NSX Controller and 
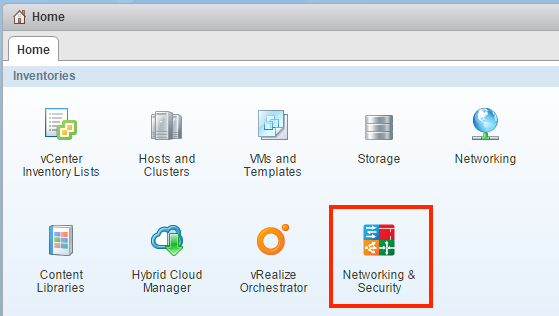
NSX Edge appliances) from vCenter directly. Always manage and remove NSX Data Center for vSphere appliances using the Networking & Security tab of the vSphere Web Client.

Prerequisites

Procedure

  1. Delete the transport zone.
  2. Delete the NSX Manager appliance and all NSX Controller appliance VMs from the disk.
  3. Delete any leftover VTEP VMkernel ports in your distributed switch by completing the following steps:
    1. Navigate to Hosts and Clusters > Select Host > Configure > Networking > Virtual Switches.
    2. In the Virtual switches table, select the vSphere Distributed Switch.
      A diagram appears that shows the various dvPortgroups that are assigned on this switch. Scroll down this diagram to find any leftover VTEP VMkernel ports on the switch.
    3. Select the leftover VMkernel port, and click the Delete (Delete) icon.
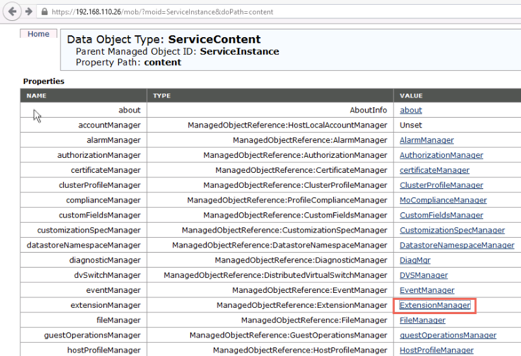
    Generally, the VTEP VMkernel interfaces are already deleted as a result of earlier uninstall operations.
  4. Delete any leftover dvPortgroups used for VTEPs in your distributed switch by completing the following steps:
    1. Navigate to Home > Networking.
    2. In the Navigator, click the datacenter, and then expand the vSphere Distributed Switches to view the leftover dvPortgroups.
    3. Right-click the leftover dvPortgroups and click Delete.
    In most situations, the dvPortgroups used for VTEPs are already deleted as a result of earlier uninstall operations.
  5. If you removed VTEP VMkernel interfaces or dvPortgroups, reboot the hosts.
  6. For the vCenter on which you want to remove the NSX Manager plug-in, log in to the managed object browser at https://your_vc_server/mob.
  7. Click Content.

    For example:

    Managed object browser page with content highlighted.
  8. Click ExtensionManager.

    ExtensionManager highlighted on the managed object browser page.

  9. Click UnregisterExtension.

    UnregisterExtension method highlighted on the managed object browser page.

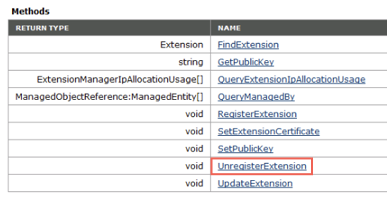
  10. Enter the string com.vmware.vShieldManager and click Invoke Method.

    Enter the value of the extensionKey parameter and click Invoke Method.

  11. Enter the string com.vmware.nsx.ui.h5 and click Invoke Method.
  12. If you are running the vSphere 6 vCenter Appliance, start the console and enable the BASH shell under Troubleshooting Mode Options.

    The Troubleshooting Mode Options screen in the vCenter Appliance console shows that the Bash shell is enabled.

    Another way to enable the BASH shell is to log in as root and run the shell.set --enabled true command.
  13. Delete the vSphere Web Client directories and vSphere Client (HTML5) directories for NSX Data Center for vSphere and then restart the client services.
    The vSphere Web Client directories for NSX Data Center for vSphere are called com.vmware.vShieldManager.* and com.vmware.nsx.ui.h5.*, and are at:
    • VMware vCenter Server for Windows - C:\ProgramData\VMware\vCenterServer\cfg\vsphere-client\vc-packages\vsphere-client-serenity\
    • VMware vCenter Server Appliance - /etc/vmware/vsphere-client/vc-packages/vsphere-client-serenity/
    The vSphere Client directories are called com.vmware.nsx.ui.h5.* and com.vmware.vShieldManager.*, and are at:
    • VMware vCenter Server for Windows – C:\ProgramData\VMware\vCenterServer\cfg\vsphere-ui\vc-packages\vsphere-client-serenity\
    • VMware vCenter Server Appliance - /etc/vmware/vsphere-ui/vc-packages/vsphere-client-serenity/
    Note: Starting in vSphere 7.0, vSphere Web Client is deprecated. So, the com.vmware.vShieldManager.* directory is not created.

    Restart the client services on vCenter Server Appliance or vCenter Server on Windows:

    Table 1. Client Service Commands
    Client Service vCenter Server Appliance vCenter Server for Windows
    Restart vSphere Web Client

    On vSphere 6.0, 6.5, and 6.7

    > shell.set --enabled True
    > shell
    # service-control --stop vsphere-client
    # service-control --start vsphere-client
    
    > cd C:\Program Files\VMware\vCenter Server\bin
    > service-control --stop vspherewebclientsvc
    > service-control --start vspherewebclientsvc
    
    Restart vSphere Client

    On vSphere 6.5, and 6.7

    > shell.set --enabled True
    > shell
    # service-control --stop vsphere-ui
    # service-control --start vsphere-ui
    
    > cd C:\Program Files\VMware\vCenter Server\bin
    > service-control --stop vsphere-ui
    > service-control --start vsphere-ui
    Restart vSphere Client

    On vSphere 7.0

    > shell.set --enabled True
    > shell
    # service-control --stop vsphere-ui
    # service-control --start vsphere-ui
    

    vSphere 7.0 does not support vCenter Server for Windows

Results

The NSX Manager plug-in is removed from vCenter. To confirm, log out of vCenter and log back in.

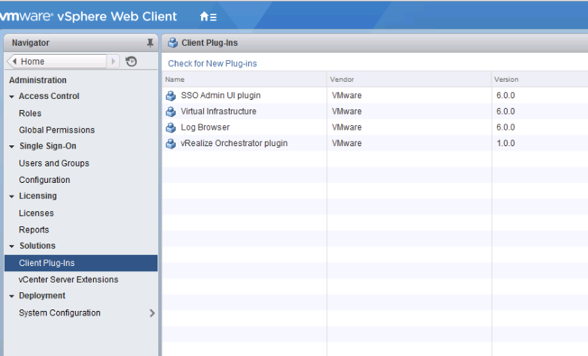
The NSX Manager plug-in Networking & Security icon no longer appears on the Home screen in the vCenter Web Client or vSphere Client.

Networking & Security icon is highlighted on the Home page.

Go to Administration > Client Plug-Ins and verify that the list of plug-ins does not include the vShield Manager plugin.
Note:
  • Prior to NSX 6.4.5, the name of the client plugin in the vSphere Web Client is vShield Manager. In NSX 6.4.5 and later, the plugin name is NSX user interface plugin.
  • In the HTML5-based vSphere Client, the plugin name is NSX user interface plugin.

The Client Plugins page of the vSphere Web Client shows that the vShield Manager plugin is removed.