NAT64 is a mechanism for translating IPv6 packets to IPv4 packets, and vice versa. NAT64 allows IPv6-only clients to contact IPv4 servers using unicast UDP or TCP. NAT64 only allows an IPv6-only client to initiate communications to an IPv4-only server. To perform IPv6-to-IPv4 translation, binding and session information is saved. NAT64 is stateful.

The following diagram shows details of NAT64 translation.
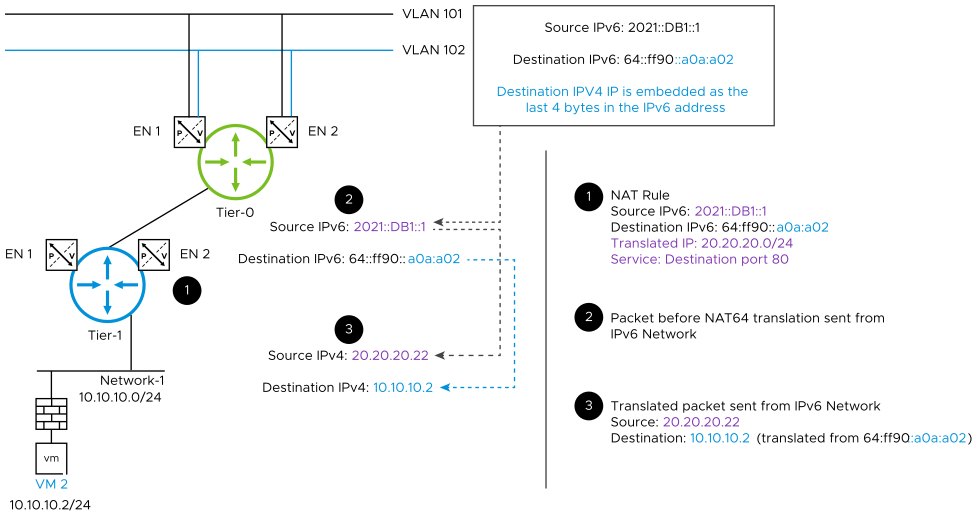
Details of how NAT64 translates an IPv6 address to an IPv4 address.

Note:
  • NAT64 is only supported for external IPv6 traffic coming in through the NSX Edge uplink to the IPv4 server in the overlay.
  • NAT64 supports TCP and UDP. Packets of all other protocol types are discarded. NAT64 does not support ICMP, fragmentation, or IPV6 packets that have extension headers.
  • When a NAT64 rule and an NSX load balancer are configured on the same Edge node, using the NAT64 rule to direct IPv6 packets to the IPv4 load balancer is not supported.

Procedure

  1. With admin privileges, log in to NSX Manager.
  2. Select Networking > NAT.
  3. Select a gateway from the Gateway dropdown list.
  4. Next to View, select NAT64.
  5. Click Add NAT 64 Rule.
  6. Enter a Name.
  7. Enter a Source.
    Specify an IPv6 address, or an IPv6 address range in CIDR format. For example, 2001:DB7:1::1 or 2001:DB7:1::/64.

    If this text box is left blank, the NAT rule applies to all sources outside of the local subnet.

  8. Enter a Destination.
    Specify an IPv6 address, or an IPv6 address range in CIDR format with subnet size 96. For example, 64:ff9b::0B01:0101 or 2001:DB8::/96.
  9. Enter a value for Translated IP.
    Specify an IPv4 address, an IPv4 address range, or a comma-separated list of IPv4 addresses. For example, 10.1.1.1, 10.1.1.1-10.1.1.2, or 10.1.1.1,10.1.1.2.
  10. Toggle Enable to enable the rule.
  11. (Optional) In the Service column, click Set to select services.
  12. (Optional) Enter a value for Translated Port.
  13. (Optional) For Apply To, click Set and select objects that this rule applies to.
    The only option available is Interfaces.
  14. (Optional) Toggle the logging button to enable logging.
  15. (Optional) Specify a priority value.
    A lower value means a higher priority. The default is 0.
  16. The Firewall setting is set to Bypass and cannot be changed.
  17. Click Save.