


Use the instructions in this documentation to add user role assignments for a project from the User Management page.
The User Management page is available only to the Enterprise Admin. A Project Admin cannot use this page even if an Enterprise Admin has granted permissions to the Project Admin role to do user role assignments in projects.
The following procedure explains the steps for adding role assignments in projects for local user accounts and LDAP user accounts. The steps to add role assignments for vIDM and OpenID Connect user accounts are almost similar, and therefore not covered in this procedure.
Prerequisites
- Local user accounts are added in the system and they are activated.
- NSX Manager is configured to authenticate users from any of these identity management providers:
- VMware Identity Manager (vIDM)
- LDAP-based directory service, for example, Active Directory.
- OpenID Connect (starting in NSX 4.1.2)
Procedure
- To add role assignments in projects for a local user account, do these steps:
- Next to the local user account name, click the
 icon, and then click Edit.
 - Click the link under the Roles column.
The Set Roles/Scope dialog box opens.
- Click Add Role, and then select any one of these roles to assign to the local user:
- Project Admin
- Network Admin
- Security Admin
- Network Operator
- Security Operator
- Under the Scope column, click Set.
(In NSX 4.1): For all the roles in the project, the scope can be set to one or more projects.
(Starting in NSX 4.1.1): A project can optionally contain one or more NSX VPCs. If you have assigned the Project Admin role to the user, the scope can be set to one or more projects. If you have assigned any of the following roles to the user, the scope can be set to all projects and VPCs, or to selected projects and VPCs:- Network Admin
- Security Admin
- Network Operator
- Security Operator
- Click Add, and then click Apply.
- Click Apply again to close the Set Roles/Scope dialog box.
- Click Save to save the role assignment.
- Next to the local user account name, click the
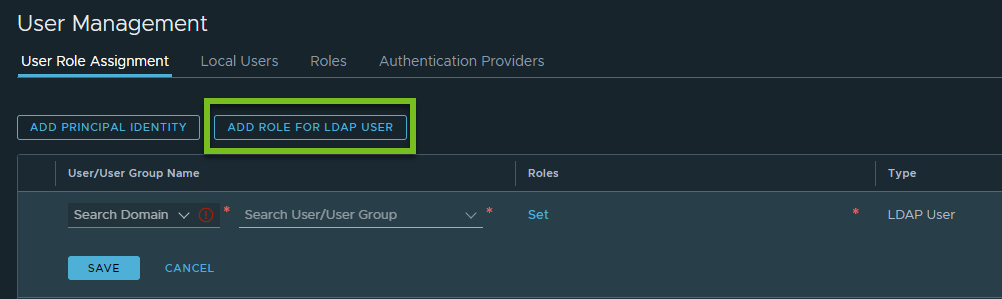
- To add role assignments in projects for an LDAP user account, do these steps:
- Ensure that you are in the User Role Assignment tab.
- Click Add Role for LDAP User.
For example:
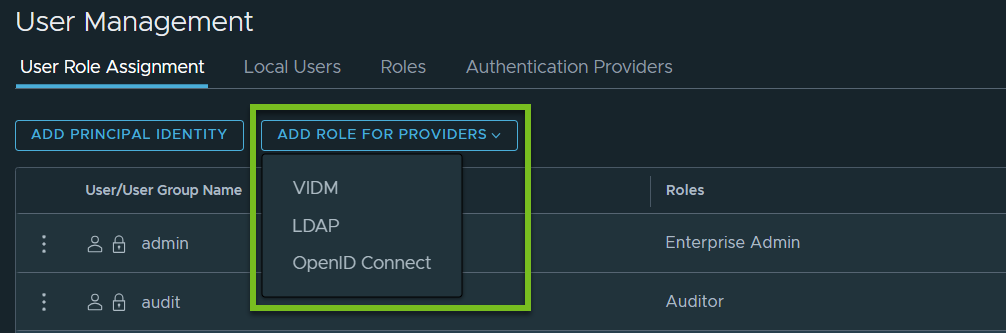
If you have configured NSX Manager to authenticate users from all supported identity service providers (LDAP, vIDM, and OpenID Connect), the button caption is as shown in the following screen capture.
- Select a domain from the drop-down menu.
- Enter the first few characters of the user or group name.
System displays a list of matching user or group names. Select a user or a group name from the list.
- Under the Roles column, click Set.
The Set Roles/Scope dialog box opens.
- Click Add Role and follow the same process, as explained in steps 3(c) though 3(e), to assign roles to the LDAP user in the project.
Results
Project users can now log in to NSX Manager with their login credentials. Observe that the Project drop-down menu shows only those project names that the logged-in user has access to.
