If a cluster of ESXi hosts is registered to a VMware vCenter, you can apply transport node profiles on the VMware vCenter cluster to prepare all hosts part of the cluster as NSX transport nodes or you can prepare each host individually.

Note: (Host in lockdown mode) If your exception list for vSphere lockdown mode includes expired user accounts, NSX installation on vSphere fails. If your host is part of the vLCM-enabled cluster, several users such as lldp-vim-user, nsx-user, mux-user, and da-user, are created automatically and added to the exception users list on an ESXi host when NSX VIBS are installed. Ensure that you delete all expired user accounts before you begin installation. For more information on accounts with access privileges in lockdown mode, refer to Specifying Accounts with Access Privileges in Lockdown Mode in the vSphere Security Guide. For more details on these NSX user accounts on the ESXi host, refer to the KB article, https://ikb.vmware.com/s/article/87795.

Prerequisites

  • Verify all hosts that you want to configure as transport nodes are powered on in VMware vCenter.

  • Verify all hosts are members of VDS in VMware vCenter with correct uplinks.

  • Verify that the system requirements are met. See System Requirements.
  • Verify vCenter is added as compute manager to NSX Manager.
  • Verify NSX Manager cluster is up and stable.
    • UI: Go to System → Appliances → NSX Appliances.
    • CLI: SSH to one of the NSX Manager nodes as an admin and run get cluster status.
  • The reverse proxy service on all nodes of the NSX Manager cluster must be Up and running.

    To verify, run get service http. If the service is down, restart the service by running restart service http on each NSX Manager node. If the service is still down, contact VMware support.

  • If you deployed VMware vCenter on a custom port or a non-default port, apply these rules to NSX Manager:
    • IPv4 rules must be applied on NSX Manager manually before starting the host preparation.
      • iptables -A INPUT -p tcp -m tcp --dport <CUSTOM_PORT> --tcp-flags FIN,SYN,RST,ACK SYN -j ACCEPT
      • iptables -A OUTPUT -p tcp -m tcp --dport <CUSTOM_PORT> --tcp-flags FIN,SYN,RST,ACK SYN -j ACCEPT
    • IPv6 table rules must be applied on NSX Manager manually before starting the host preparation.
      • ip6tables -A OUTPUT -o eth0 -p tcp -m tcp --dport <CUSTOM_PORT> --tcp-flags FIN,SYN,RST,ACK SYN -j ACCEPT
      • ip6tables -A INPUT -p tcp -m tcp --dport <CUSTOM_PORT> --tcp-flags FIN,SYN,RST,ACK SYN -j ACCEPT

Procedure

  1. From a browser, log in with admin privileges to an NSX Manager at https://<nsx-manager-ip-address> or https://<nsx-manager-fqdn>.
  2. Select System > Fabric > Hosts.
  3. On the Cluster tab, select a cluster and click Configure NSX.
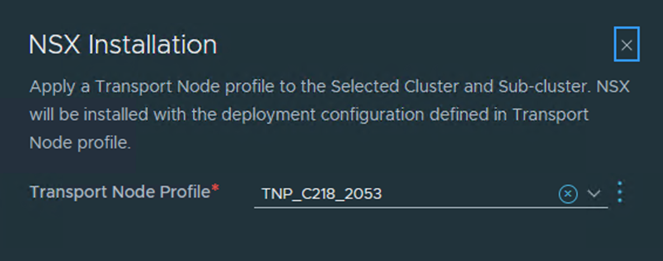
  4. In the NSX Installation pop-up window, from the Transport Node Profile drop-down menu, select the transport node profile to apply to the cluster. If a transport node is not created, click Create New Transport Node Profile to create a new one.

  5. Click Apply to begin the process of transport node creation of all hosts in the cluster.
  6. If you only want to prepare individual hosts as transport nodes, click the menu icon (dots) for the host and select Configure NSX.
  7. Verify the host name in the Host Details panel, and click Next.
    Optionally, you can add a description.
  8. In the Configure NSX panel, click Add Host Switch.
  9. Configure the following fields:
    Option Description
    Name

    (Hosts managed by a vSphere cluster) Select the VMware vCenter that manages the host switch.

    Select the VDS that is created in VMware vCenter and attached to your ESXi hosts.

    Transport Zones

    Shows transport zones that are realized by associated host switches.

    Supported transport zone configurations:
    • You can add multiple VLAN transport zones per host switch.
    • You must add only one overlay transport zone per host switch. NSX Manager UI does not allow adding multiple overlay transport zones.
    Uplink Profile Select an existing uplink profile from the drop-down menu or create a custom uplink profile. You can also use the default uplink profile.

    If you keep the MTU value empty, the NSX takes the global default MTU value 1700. If you enter a MTU value in NSX uplink profile, that MTU value will override the global default MTU value. See Guidance to Set Maximum Transmission Unit.

    Note: Link Aggregation Groups defined in an uplink profile cannot be mapped to VDS uplinks.
    IPv4 Assignment

    This field appears when the forwarding mode of the selected transport zones are set to IPv4. For details on configuring the forwarding mode of transport zones, see Create Transport Zones.

    Choose how IPv4 addresses are assigned to the TEPs. The options are:

    • Use DHCP: IPv4 addresses are assigned from a DHCP server.
    • Use IPv4 Pool: IPv4 addresses are assigned from an IP pool. Specify the IPv4 pool name to be used for TEPs.
    • Use Static List: IPv4 addresses are assigned from a static list. Specify the static list, IPv4 gateway, and the subnet mask.
    IPv6 Assignment
    Important: For ESXi host TEPs to use IPv6, is it required that the ESXi version be 8.0 Update 1 or later.

    This field appears when the forwarding mode of the selected transport zones are set to IPv6. For details on configuring the forwarding mode of transport zones, see Create Transport Zones.

    Choose how IPv6 addresses are assigned to the TEPs. The options are:

    • Use DHCPv6: IPv6 addresses are assigned from a DHCP server.
    • Use IPv6 Pool: IPv6 addresses are assigned from an IP pool. Specify the IPv6 pool name to be used for TEPs.
    • Use AutoConf: IPv6 addresses are assigned from Router Advertisement (RA).
    Advanced Configuration

    Mode (NSX 4.0.0.1 only)

    Choose between the following mode options:
    • Standard: Is the standard mode that is available to all supported hypervisors by NSX.
    • ENS Interrupt: Is a variant of the Enhanced Datapath mode.
    • Enhanced Datapath: Is the mode that provides accelerated networking performance. This mode requires nodes to use VMXNET3 vNIC enabled network cards. It is not supported on NSX Edge nodes and Public Gateways. The supported hypervisor is ESXi. It is recommended to run ESXi v6.7 U2 and later versions.

    Mode (Starting with NSX 4.0.1.1)

    Choose between the following mode options:
    • Standard: This mode applies to all transport nodes. The data-plane in the transport node automatically selects the host switch mode as per the uplink capabilities.
    • Enhanced Datapath - Standard: This mode is a variant of the Enhanced Data Path mode. It is available only on ESXi hypervisor 7.0 and later versions. Please consult your account representative for applicability.
    • Enhanced Datapath - Performance: This is the Enhanced Data Path switch mode for ESXi host transport node. This mode provides accelerated networking performance. It requires nodes to use VMXNET3 vNIC enabled network cards. It is not supported on NSX Edge nodes and Public Gateways. The supported hypervisor is ESXi. It is recommended to run ESXi v6.7 U2 and later versions.
    • Legacy: This mode was formerly called Standard. You can select this mode only through API, since the Legacy field is read-only in NSX Manager UI. It applies to all transport nodes. When the host switch mode is set to Legacy, the packet handler stack is enabled. On NSX Manager UI, you will see this mode set to Standard and the Legacy field to 'Yes'.
      You can run the following Host Transport Node or Transport Node Profile policy API to set the host switch mode to Legacy:
      • Create or update Host Transport Node:
        PUT https://<NSX-Manager-IP-ADDRESS>/POST/policy/api/v1/infra/sites/<site-id>/enforcement-points/<enforcementpoint-id>/host-transport-nodes/<host-transport-node-id>
      • Create or update policy Host Transport Node Profile:
        PUT https://<NSX-Manager-IP-ADDRESS>/POST/policy/api/v1/infra/host-transport-node-profiles/<transport-node-profile-id>
    CPU Config
    You can configure the CPU Config field only when the Mode is set to Enhanced Datapath.
    1. Click Set.
    2. In the CPU Config window, click Add.
    3. Enter values for the NUMA Node Index and LCores per NUMA Node fields.
    4. To save the values, click Add and Save.
    Teaming Policy Uplink Mapping

    Before you map uplinks profiles in NSX with uplinks in VDS, ensure uplinks are configured on the VDS switch. To configure or view the VDS switch uplinks, go to VMware vCentervSphere Distributed Switch. Click Actions → Settings → Edit Settings.

    Map uplinks defined in the selected NSX uplink profile with VDS uplinks. The number of NSX uplinks that are presented for mapping depends on the uplink profile configuration.

    For example, in the upink-1 (active) row, go to the Physical NICs column, click the edit icon, and type in the name of VDS uplink to complete mapping it with uplink-1 (active). Likewise, complete mapping for the other uplinks.

  10. If you have selected multiple transport zones, click + Add Switch again to configure the switch for the other transport zones.
  11. Click Add to complete the configuration.
  12. (Optional) View the ESXi connection status.
    # esxcli network ip connection list | grep 1235
    tcp   0   0  192.168.210.53:20514  192.168.110.34:1234   ESTABLISHED  1000144459  newreno  nsx-proxy
    

  13. On the Cluster tab, verify that the NSX Manager connectivity status of hosts in the cluster is Up and NSX configuration state is Success. During the configuration process, each transport node displays the percentage of progress of the installation process. If installation fails at any stage, you can restart the process by clicking the Resolve link that is available against the failed stage of the process.
    You can also see that the transport zone is applied to the hosts in the cluster.
    Note:
    • If you individually prepare a host that is already prepared using TNP, then the configuration state of the node shows a Configuration Mismatch since configuration does not match the applied TNP.
    • The Host Transport Node page displays TEP addresses of the host in addition to management IP addresses. TEP address is the address assigned to the VMkernel NIC of the host.
  14. (Optional) Remove an NSX VIBs on the host.
    1. Select one or more hosts or cluster with applied TNP and click Actions > Remove NSX.
    The uninstallation takes up to three minutes. Uninstallation of NSX removes the transport node configuration on hosts and the host is detached from the transport zone(s) and switch. Similar to the installation process, you can follow the percentage of the uninstallation process completed on each transport node. If uninstallation fails at any stage, you can restart the process by clicking the Resolve link that is available against the failed stage of the process.
  15. (Optional) Remove a transport node from the transport zone.
    1. Select a single transport node and click Actions > Manage Transport Zone and choose the transport zone to remove.

What to do next

When the hosts are transport nodes, you can create transport zones, logical switches, logical routers, and other network components through the NSX Manager UI or API at any time. When NSX Edge nodes and hosts join the management plane, the NSX logical entities and configuration state are pushed to the NSX Edge nodes and hosts automatically. You can create transport zones, logical switches, logical routers, and other network components through the NSX Manager UI or API at any time. When the hosts are transport nodes, these entities gets realized on the host.

Create a logical switch and assign logical ports. See the Advanced Switching section in the NSX Administration Guide.