A transport node profile is a template to define configuration that is applied to a group of hosts that are part of a VMware vCenter cluster. It is not applied to prepare standalone hosts. Prepare VMware vCenter cluster hosts as transport nodes by applying a transport node profile. Transport node profiles define transport zones, member hosts, switch configuration including uplink profile, IP assignment, mapping of physical NICs to uplink virtual interfaces and so on.

Note: Transport node profiles are only applicable to ESXi hosts member of VMware vCenter cluster. It cannot be applied to NSX Edge transport nodes.

Transport node creation begins when a transport node profile is applied to a VMware vCenter cluster. NSX Manager prepares the hosts in the cluster and installs the NSX components on all the hosts. Transport nodes for the hosts are created based on the configuration specified in the transport node profile.

On a cluster prepared with a transport node profile, these outcomes are true:

  • When you move an unprepared host into a cluster applied with a transport node profile, NSX automatically prepares the host as a transport node using the transport node profile.
  • When you move a transport node from the cluster to an unprepared cluster or directly as a standalone host under the data center, first the transport node configuration applied to the node is removed and then NSX VIBs are removed from the host. See Triggering Uninstallation from the vSphere Web Client.
To delete a transport node profile, you must first detach the profile from the associated cluster. The existing transport nodes are not affected. New hosts added to the cluster are no longer automatically converted into transport nodes.
Points to note when you create a Transport Node Profile:
  • You can add a maximum of four VDS switches for each configuration: enhanced VDS created for VLAN transport zone, standard VDS created for overlay transport zone, enhanced VDS created for overlay transport zone.
  • There is no limit on the number of standard VDS switches created for VLAN transport zone.
  • In a single host cluster topology running multiple standard overlay VDS switches and edge VM on the same host, NSX provides traffic isolation such that traffic going through the first VDS is isolated from traffic going through the second VDS and so on. The physical NICs on each VDS must be mapped to the edge VM on the host to allow the north-south traffic connectivity with the external world. Packets moving out of a VM on the first transport zone must be routed through an external router or an external VM to the VM on the second transport zone.
  • Each VDS switch name must be unique. NSX does not allow use of duplicate switch names.
  • Each transport zone ID associated with each VDS host in a transport node configuraiton or transport node profile configuration must be unique.

Prerequisites

Procedure

  1. From a browser, log in with admin privileges to an NSX Manager at https://<nsx-manager-ip-address> or https://<nsx-manager-fqdn>.
  2. Select System > Fabric > Hosts > Transport Node Profile > Add Transport Node Profile.
  3. Enter a name to identify the transport node profile.

    You can optionally add the description about the transport node profile.

  4. Click Set under Host Switch to add details of the new switch.
  5. Before you proceed, decide which type of host switch you want to configure on nodes of a cluster.
  6. Configure the following fields:
    Option Description
    Name

    (Hosts managed by a vSphere cluster) Select the VMware vCenter that manages the host switch.

    Select the VDS that is created in VMware vCenter and attached to your ESXi hosts.

    Transport Zones

    In the Show section, select Overlay, VLAN or All to view and select the type of transport zones you want for the host switch.

    These transport zones are realized by associated host switches.

    Supported transport zone configurations:
    • You can add multiple VLAN transport zones per host switch.
    • You must add only one overlay transport zone per host switch. NSX Manager UI does not allow adding multiple overlay transport zones.
    Uplink Profile Select an existing uplink profile from the drop-down menu or create a custom uplink profile. You can also use the default uplink profile.

    If you keep the MTU value empty, the NSX takes the global default MTU value 1700. If you enter a MTU value in NSX uplink profile, that MTU value will override the global default MTU value.

    Note: Link Aggregation Groups defined in an uplink profile cannot be mapped to VDS uplinks.
    IP Address Type (TEP) Select between IPv4 and IPv6 to specify the IP version for the tunnel endpoints (TEPs) of the transport node.
    IPv4 Assignment

    Choose how IPv4 addresses are assigned to the TEPs. The options are:

    • Use DHCP: IPv4 addresses are assigned from a DHCP server.
    • Use IPv4 Pool: IPv4 addresses are assigned from an IP pool. Specify the IPv4 pool name to be used for TEPs.
    IPv6 Assignment

    Choose how IPv6 addresses are assigned to the TEPs. The options are:

    • Use DHCPv6: IPv6 addresses are assigned from a DHCP server.
    • Use IPv6 Pool: IPv6 addresses are assigned from an IP pool. Specify the IPv6 pool name to be used for TEPs.
    • Use AutoConf: IPv6 addresses are assigned from Router Advertisement (RA).
    Advanced Configuration

    Mode (NSX 4.0.0.1 only)

    Choose between the following mode options:
    • Standard: Is the standard mode that is available to all supported hypervisors by NSX.
    • ENS Interrupt: Is a variant of the Enhanced Datapath mode.
    • Enhanced Datapath: Is the mode that provides accelerated networking performance. This mode requires nodes to use VMXNET3 vNIC enabled network cards. It is not supported on NSX Edge nodes and Public Gateways. The supported hypervisor is ESXi. It is recommended to run ESXi v6.7 U2 and later versions.

    Mode (Starting with NSX 4.0.1.1)

    Choose between the following mode options:
    • Standard: This mode applies to all transport nodes. The data-plane in the transport node automatically selects the host switch mode as per the uplink capabilities.
    • Enhanced Datapath - Standard: This mode is a variant of the Enhanced Data Path mode. It is available only on ESXi hypervisor 7.0 and later versions. Please consult your account representative for applicability.
    • Enhanced Datapath - Performance: This is the Enhanced Data Path switch mode for ESXi host transport node. This mode provides accelerated networking performance. It requires nodes to use VMXNET3 vNIC enabled network cards. It is not supported on NSX Edge nodes and Public Gateways. The supported hypervisor is ESXi. It is recommended to run ESXi v6.7 U2 and later versions.
    • Legacy: This mode was formerly called Standard. You can select this mode only through API, since the Legacy field is read-only in NSX Manager UI. It applies to all transport nodes. When the host switch mode is set to Legacy, the packet handler stack is enabled. On NSX Manager UI, you will see this mode set to Standard and the Legacy field to 'Yes'.
      You can run the following Host Transport Node or Transport Node Profile policy API to set the host switch mode to Legacy:
      • Create or update Host Transport Node:
        PUT https://<NSX-Manager-IP-ADDRESS>/POST/policy/api/v1/infra/sites/<site-id>/enforcement-points/<enforcementpoint-id>/host-transport-nodes/<host-transport-node-id>
      • Create or update policy Host Transport Node Profile:
        PUT https://<NSX-Manager-IP-ADDRESS>/POST/policy/api/v1/infra/host-transport-node-profiles/<transport-node-profile-id>
    CPU Config
    You can configure the CPU Config field only when the Mode is set to Enhanced Datapath.
    1. Click Set.
    2. In the CPU Config window, click Add.
    3. Enter values for the NUMA Node Index and LCores per NUMA Node fields.
    4. To save the values, click Add and Save.
    Teaming Policy Uplink Mapping

    Before you map uplinks profiles in NSX with uplinks in VDS, ensure uplinks are configured on the VDS switch. To configure or view the VDS switch uplinks, go to VMware vCentervSphere Distributed Switch. Click Actions → Settings → Edit Settings.

    Map uplinks defined in the selected NSX uplink profile with VDS uplinks. The number of NSX uplinks that are presented for mapping depends on the uplink profile configuration.

    For example, in the upink-1 (active) row, go to the Physical NICs column, click the edit icon, and type in the name of VDS uplink to complete mapping it with uplink-1 (active). Likewise, complete mapping for the other uplinks.

    Note: Uplinks/LAGs, NIOC profile, LLDP profile are defined in VMware vCenter. These configurations are not available in NSX Manager. To manage VMkernel adapters on a VDS switch, go to VMware vCenter to attach VMkernel adapters to Distributed Virtual port groups or NSX port groups.
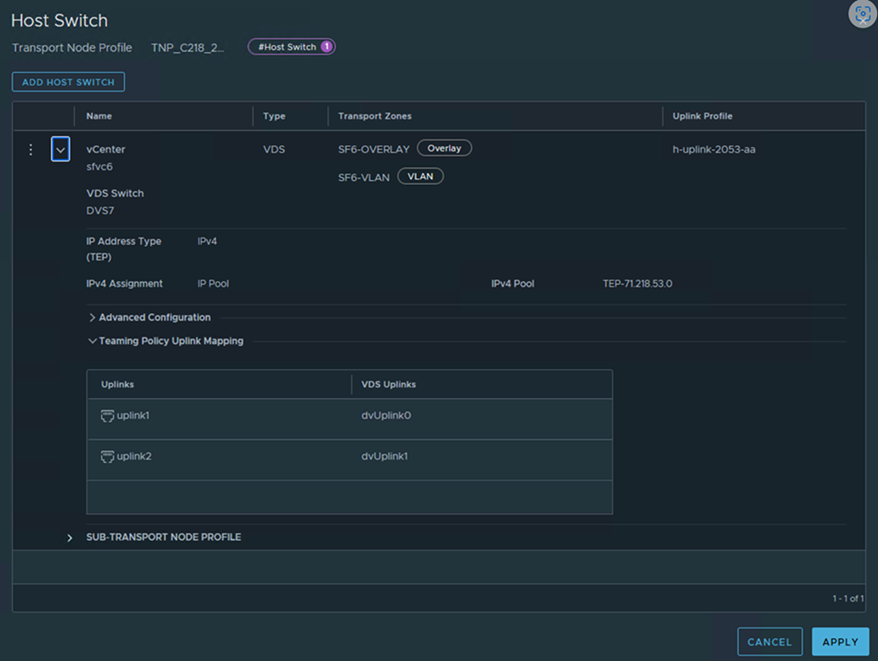
  7. If you have selected multiple transport zones, you can add them to the same switch. To add a new switch, click Add Switch again to configure a new switch for the other transport zones.
    NSX switches can attach to a single overlay transport zone and multilpe VLAN transport zones at the same time.

  8. Click Add to complete the configuration.

What to do next

Apply the transport node profile to an existing vSphere cluster. See Prepare ESXi Cluster Hosts as Transport Nodes by Using TNP.