


NSX Malware Prevention on a Distributed Firewall uses the NSX Guest Introspection (GI) framework. To detect and prevent malware on the guest endpoints (VMs), you must deploy the NSX Distributed Malware Prevention service on the ESXi host clusters that are prepared for NSX.
- 4 vCPU
- 6 GB RAM
- 80 GB Disk space
Before deploying the NSX Distributed Malware Prevention service on host clusters, you must complete the prerequisites that are explained in the following sections. If some prerequisites are already completed, skip those, and proceed with the pending prerequisites.
Add an Appropriate License in NSX
To use the NSX Malware Prevention feature, NSX must use an appropriate license. For information about licenses that support NSX Malware Prevention, see System Requirements for NSX IDS/IPS and NSX Malware Prevention.
- In NSX Manager, navigate to .
- Enter the license key.
Verify All Hosts are Managed by VMware vCenter
NSX Malware Prevention feature is supported only on vSphere host clusters that are managed by one or multiple vCenter Servers.
- In NSX Manager, navigate to .
- Ensure that you are in the Clusters tab.
A list of vSphere host clusters is displayed. Verify that this list includes the host clusters that are of interest to you for enabling malware protection.
Configure Hosts as Transport Nodes
Apply a Transport Node Profile to the vSphere host clusters to configure the vSphere hosts as Host Transport Nodes.
Generate Public-Private Key Pair for SSH Access to SVM
To download log file from the SVM for troubleshooting purposes, read-only SSH access to the NSX Malware Prevention SVM is required.
SSH access to the admin user of the SVM is key-based (public-private key pair). A public key is needed when you are deploying the service on an ESXi host cluster, and a private key is needed when you want to start an SSH session to the SVM.
You can generate the public-private key pair by using any SSH key generation tool. However, the public key must adhere to a specific format, as described in the following subsection. Examples of SSH key generation tools are: ssh-keygen, PuTTY Key Generator, and so on. Supported key sizes are 1024 bits, 2048 bits, and 4096 bits.
- Public Key Format
-
The public key must adhere to the following format:
Example:
ssh-rsa A1b2C3d4E5+F6G7XxYyZzaB67896C4g5xY9+H65aBUyIZzMnJ7329y94t5c%6acD+oUT83iHTR870973TGReXpO67U= rsa-key-20121022
If you are using PuTTY Key Generator, ensure that the public key is copied directly from the UI. If the key pair exists, first load the private key file in the PuTTY Key Generator UI, and then copy the public key that is displayed in the Key text box. Avoid copying the contents from a public key file. The copied contents can take a different format and might not work for the SVM.
If you are generating the key pair by using ssh-keygen utility on Linux systems, the key format always includes ssh-rsa in the public key. Therefore, on Linux systems, you can copy the contents from a public key file.
- Recommended Practice
-
NSX Distributed Malware Prevention service deployment is done at the level of a host cluster. So, a key pair is tied to a host cluster. You can create either a new public-private key pair for a service deployment on each cluster, or use a single key pair for service deployments on all the clusters.
If you plan to use a different public-private key pair for service deployment on each cluster, ensure that the key pairs are named correctly for easy identification.
A good practice is to identify each service deployment with a "compute cluster id" and specify the cluster id in the name of the key pair. For example, let us assume that the cluster id is "1234-abcd". For this cluster, you can specify the service deployment name as "MPS-1234-abcd", and name the key pair to access this service deployment as "id_rsa_1234_abcd.pem". This practice makes it easy for you to maintain and associate keys for each service deployment.
Important: Store the private key securely. Loss of the private key can lead to a loss of SSH access to the NSX Malware Prevention SVM.
Deploy NSX Application Platform
NSX Application Platform is a modern microservices platform that hosts several NSX features that collect, ingest, and correlate network traffic data.
For detailed instructions about deploying the platform, see the Deploying and Managing the VMware NSX Application Platform publication at https://docs.vmware.com/en/VMware-NSX/index.html. From the left navigation pane at this link, expand version 4.0 or later, and then click the publication name.
Activate NSX Malware Prevention Feature
For detailed instructions, see Activate NSX Malware Prevention.
When this feature is activated, the microservices that are required for NSX Malware Prevention start running in the NSX Application Platform.
- In NSX Manager, navigate to .
- Scroll down the page until you see the Features section.
- Verify that the NSX Malware Prevention feature card shows Status as Up.
If the status is Down, wait until the status changes to Up, and then proceed to the next step.
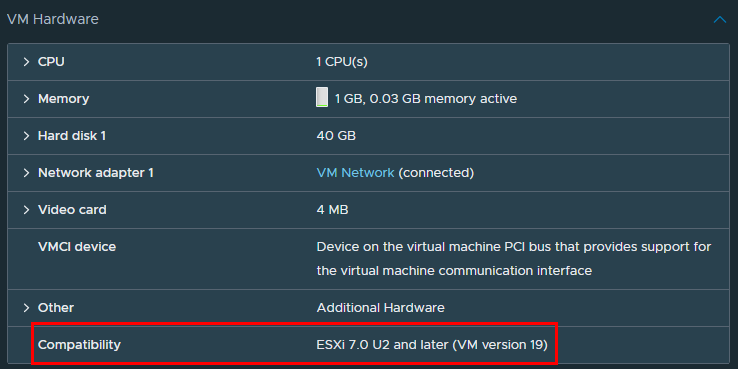
Verify VM Hardware Configuration on Guest VMs
- Log in to the vSphere Client.
- Go to Hosts and Clusters and navigate to the cluster.
- Click the VMs in the cluster, one at a time.
- On the Summary page, expand the VM Hardware pane, and observe the Compatibility information of the VM. The VM version number must be 9 or later.
Install NSX File Introspection Driver
NSX File Introspection driver is included with VMware Tools for Windows. However, this driver is not a part of the default VMware Tools installation. To install this driver, you must do a custom or a complete installation and select the NSX File Introspection driver.
The File Introspection driver for Linux is available as part of the operating system specific packages (OSPs). The packages are hosted on VMware packages portal. Enterprise or Security Administrator (non-NSX Administrator) can install the Guest Introspection thin agent on Linux guest VMs outside of NSX. Installing open-vm-tools or VM Tools is not required for Linux.
