Projects help you to isolate networking and security configurations across tenants in a single NSX deployment.

Prerequisites

You must be assigned the Enterprise Admin role.

Procedure

  1. From your browser, log in to an NSX Manager at https://nsx-manager-ip-address.
  2. Click Default, and then click Manage.
  3. Click Add Project.
  4. (Required) Enter a name for the project.
  5. Select a tier-0 or a tier-0 VRF gateway that the workloads in this project can use for north-south connectivity with the physical network outside NSX.

    You can select multiple gateways if required. If no gateway is selected, the workloads in the project will not have north-south connectivity.

    Note: By default, the project is created in the default overlay transport zone of the system. Therefore, the tier-0/VRF gateways that are associated with the default transport zone are displayed in the drop-down menu.

    A tier-0 or a tier-0 VRF gateway can be assigned to multiple projects. That is, allocating a tier-0/VRF gateway to one project (say project 1) does not prevent you from allocating it to other projects (say project 2 and project 3).

  6. Select an edge cluster to associate with this project.

    The selected edge clusters can be consumed inside the project in the future. For example, the edge clusters can be consumed for running centralized services such as NAT, Gateway Firewall, DHCP, and so on, that you configure on the tier-1 gateways inside the project. The edge clusters that are associated with the project need not necessarily run the tier-0 gateways that are associated with the project.

    Edge Clusters specified at the Project level are required for centralized services (NAT, Gateway firewall, VPN, DHCP). If no services are required, Edge Cluster can be skipped.

    An Edge Cluster can be assigned to multiple projects. That is, allocating an edge cluster to one project (say project 1) does not prevent you from allocating it to other projects (say project 2 and project 3).

    Note: The edge clusters that are associated with the default overlay transport zone are displayed in the drop-down menu.
  7. In the External IPv4 Blocks field, select one or more existing IPv4 blocks.

    The selected IPv4 blocks will become available to you when you add public subnets in the NSX VPCs within the project. The system will assign CIDR blocks to the public subnets in the NSX VPCs from these external IPv4 blocks. VPC users can also use the external IP blocks for adding NAT rules in the NSX VPCs.

    If no IPv4 blocks are available for selection, click Actions menu, and then click Create New to add an IP address block.

    The external IPv4 blocks must not overlap each other within a project, and they must not overlap on the same tier-0 gateway.

    For example, let us assume that Project A is connected to tier-0 gateway A, Project B is connected to tier-0 gateway B. The tier-0 gateways of these two projects are isolated. In this case, projects A and B can use the same or overlapping external IP blocks because they are connected to separate tier-0 gateways.

  8. In the Short log identifier text box, enter a string that the system can use to identify the logs that are generated in the context of this project.

    The short log identifier is applied to the security logs and audit logs.

    If you have dedicated a tier-0/VRF gateway to a project by configuring the dedicated_resources parameter in the project API, the short log identifier is appended to the log messages that are generated in the edge syslog for the centralized services, which are running on the tier-0/VRF gateway. To learn more, see Enabling Project Context in NSX Edge Syslog.

    The identifier must be unique across all the projects in your NSX environment.

    The identifier must not exceed eight alphanumeric characters. If it is not specified, the system autogenerates it when you save the project. After the identifier is set, you cannot modify it.

  9. Turn on the Organize NSX Portgroups in vCenter folders toggle if you want the system to create folders for this project on the VMware vCenter Server®.

    By default, this toggle is turned off.

    Note: This toggle is applicable only when VMware vCenter servers that are registered to your NSX deployment are at version 8.0 Update 3 or later.
    If this toggle is turned on, and the system detects that VMware vCenter is at a version lower than 8.0 Update 3, a warning message is displayed, and this setting is not enforced in the project. That is, folders are not created for the project in VMware vCenter.
    Important:
    • If Multi NSX is activated for any of the VMware vCenter servers that are registered with your NSX deployment, folders cannot be created for the project in VMware vCenter.
    • Conversely, if you have created a project in NSX with the Organize NSX Portgroups in vCenter folders toggle turned on, you cannot activate Multi NSX for the VMware vCenter servers that are registered as compute managers in your NSX deployment.

    When you turn on this toggle, the setting is propagated to all the NSX VPCs that are added in this project. However, this setting is read-only in an NSX VPC, and cannot be overridden in the VPC.

    To understand the folder hierarchy that is created in VMware vCenter when this toggle is turned on for the project, see Example: Organizing NSX Port Groups in VMware vCenter Folders.

    The hierarchical organization of Project and VPC folders helps the vSphere administrator easily manage the NSX port groups in VMware vCenter. For example, let us assume that the vSphere admin wants to assign a read-only permission to a vSphere user named "Tom" for all the 10 NSX port groups in VPC X. The vSphere admin can assign the read-only permission to Tom on the VPC X folder, and choose to propagate this permission to all the children in this folder.

    Another advantage of the folder hierarchy is that if NSX segments are created with the same name in the default space, project, and VPC, these segments are easier to find in the Inventory pane of the vSphere Client UI. The reason is that the NSX port groups corresponding to segments in Project and subnets in the VPC are grouped under their respective project and VPC folders.

    NSX port groups corresponding to segments in the default space are not organized in VMware vCenter folders. These NSX port groups are placed under the vSphere Distributed Switch (VDS) object.

    The lifecycle of the project and VPC folders is managed by NSX. vSphere users cannot rename, move, or delete the project or VPC folders because these folders are owned by NSX. When a project or VPC is deleted in NSX, the corresponding folder is deleted from VMware vCenter. On similar lines, when projects or VPCs are renamed in NSX, the corresponding folder names change in VMware vCenter.

    In VMware vCenter, the following actions are permitted on folders and port groups that are created by NSX:
    • Assign permissions to vSphere users or groups.

      For example, by associating the Assign Network privilege to users or groups for a folder, a vSphere Admin can restrict or limit the users that can connect workload VMs to the port groups, which belong to NSX projects or VPCs.

    • Add/enable/disable alarms.
    • Assign or remove vSphere tags.
    • Edit NSX port groups by using the NSX Manager UI.

    After the project is saved, you can turn off this toggle, if required. This action does not impact the workloads that are connected to the project segments or NSX VPC subnets. Only the placement of the NSX port groups change in VMware vCenter. That is, when this toggle is turned off, the project and VPC folders are deleted, and the NSX port groups are moved under the VDS object in VMware vCenter.

  10. Use the Activate Default Distributed Firewall Rules toggle to turn on or turn off the default distributed firewall rules for this project.

    The default DFW rules allow communication between workload VMs within the project, including communication with the DHCP server. All other communication is blocked.

    This toggle is editable only when you apply an appropriate security license in your NSX deployment that entitles the system to the distributed firewall security feature.. This setting only turns on/off the default distributed firewall rules for the project. It does not turn off the distributed firewall in the project.

    For instance, if a distributed firewall service is activated in your NSX platform, you can still deactivate the default firewall rules of the project. In this case, the system-wide default distributed firewall rules that are configured in the default space will be applied to the project.

    For an explanation of the default state of the Activate Default Distributed Firewall Rules toggle in the project under various scenarios, see NSX Project Default Firewall Rules: Licensing Considerations.

  11. Optionally, enter a description for the project.
  12. Optionally, enter any tags for this project.
  13. Click Save.

What to do next

If you have turned on the Organize NSX Portgroups in vCenter folders toggle for the project, do these steps:

  1. Check the status of the project. When folders are created successfully in VMware vCenter, the status is a Success. This status represents the overall or consolidated status of all the folders that were created by NSX in VMware vCenter when this project was created.

    If the overall status next to the toggle is displayed as Failed, check the error details to learn the reason for the failure.

    Examples of failure situations:
    • If the VMware vCenter server is down when the folders are being realized, the folder creation can fail. NSX will not be able to communicate with VMware vCenter. In this case, the overall folder status for the project is Failed. NSX will attempt to create the folders again at predefined intervals until the status changes to Success.
    • If the cm-inventory service on the NSX Manager node is down, the folder creation can fail.

      NSX Manager uses this service to retrieve information about the VDS or hosts dynamically from VMware vCenter. When the group members of this service are down, an alarm belonging to the Clustering feature is displayed in NSX Manager.

  2. Log in to the vSphere Client, open the Inventory pane, and verify that the project and VDS folders are created.

    For example, assume that you have added two projects named Project-1, Project-2, and Project-3 in your NSX deployment, and the Organize NSX Portgroups in vCenter folders toggle is turned on for these projects. The following screen capture shows that a root folder called NSX Managed Folders is created inside the Datacenter object. The Project folders and folders are created inside the root folder.

    Each of these project folders will have folders inside them for each of their VPCs and Segments. Each VPC will then have sub-folders for each subnet. Inside Segment and Subnet folders user can find all the NSX port groups mapped to this Segment/Subnet.
    Note: A single NSX Segment or Subnet creates one NSX port group per VDS, all with the same name. All those port groups are regrouped under the folder regrouping the Segment or Subnet.
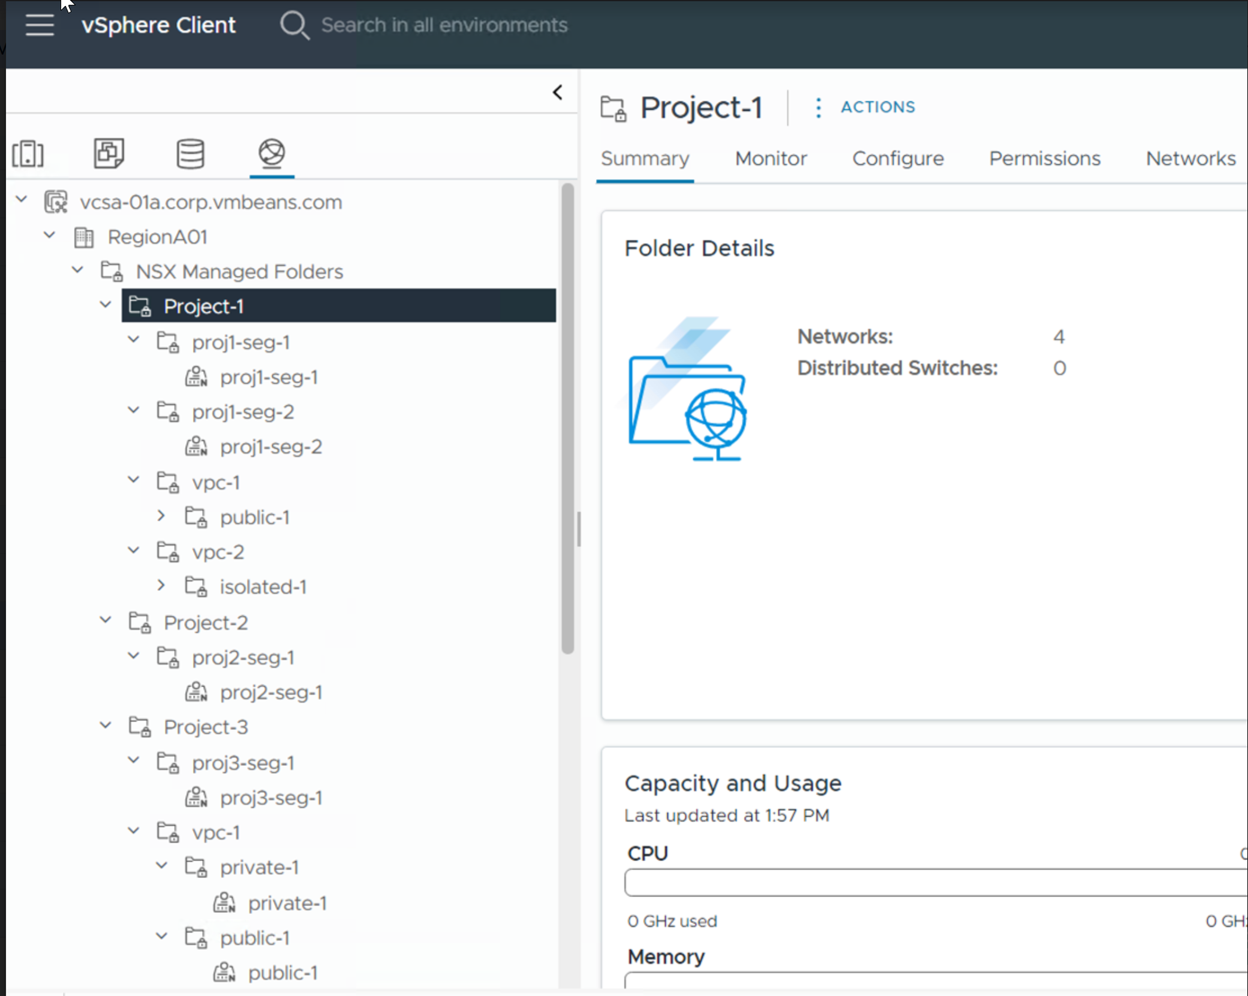
    This screen capture is described in the surrounding text.

    Later, when you add segments in the projects, or add NSX VPCs in the projects, or add subnets in the VPCs, they get organized inside folders in VMware vCenter.