


The NSX Application Platform Automation Appliance wizard provides an integrated experience of installing Tanzu Kubernetes Grid and NSX Application Platform.
The wizard simplifies deployment by connecting to the VMware vCenter, discovering environment parameters, and validating settings before making deployment changes.
Prerequisites
Allocate the required IP and VIP addresses for the number of NSX Application Platform instances in your deployment.
Note: NSX Application Platform instances can be used to deploy multiple NSX Application Platform to manage distinct NSX Manager cluster and guest clusters that use the same Supervisor cluster. The maximum number of supported NSX Application Platform instances is 5 per Supervisor cluster. This option cannot be modified after you deploy an initial NSX Application Platform instance.Multiple instances require additional IP addresses in the Workload and Frontend networks. Refer to the following table for the requirements based on the number of deployed NSX Application Platform instances.Instance Number Min Frontend Subnet Size Min Workload Subnet Size 1 /25 /27 2 /24 /26 3 /24 /26 4 /23 /25 5 /23 /25 Note: The in the deployment wizard setting for instances cannot be changed after deployment.- Familiarize yourself with the deployment process. Watch the Deploy NSX Application Platform using Automation Appliance video.
- If you do not have internet connectivity, configure the NSX proxy to route internet traffic. Make sure that the proxy is activated and port number is accurate. For HTTPS proxy, you must have a proxy server self-signed certificate available.
See the Configure Proxy Settings topic in the Operations and Management section of the NSX Administration Guide, which is delivered with the VMware NSX Documentation set.
- If you plan to configure no proxy setting for a TKG cluster, you must configure it before you deploy Tanzu Kubernetes Grid. See Configure No Proxy for Tanzu Kubernetes Guest Cluster.
Check whether you are using proxy with NSX Manager 4.2 version.
Configuring proxy with earlier versions of NSX Manager is not supported.
Procedure
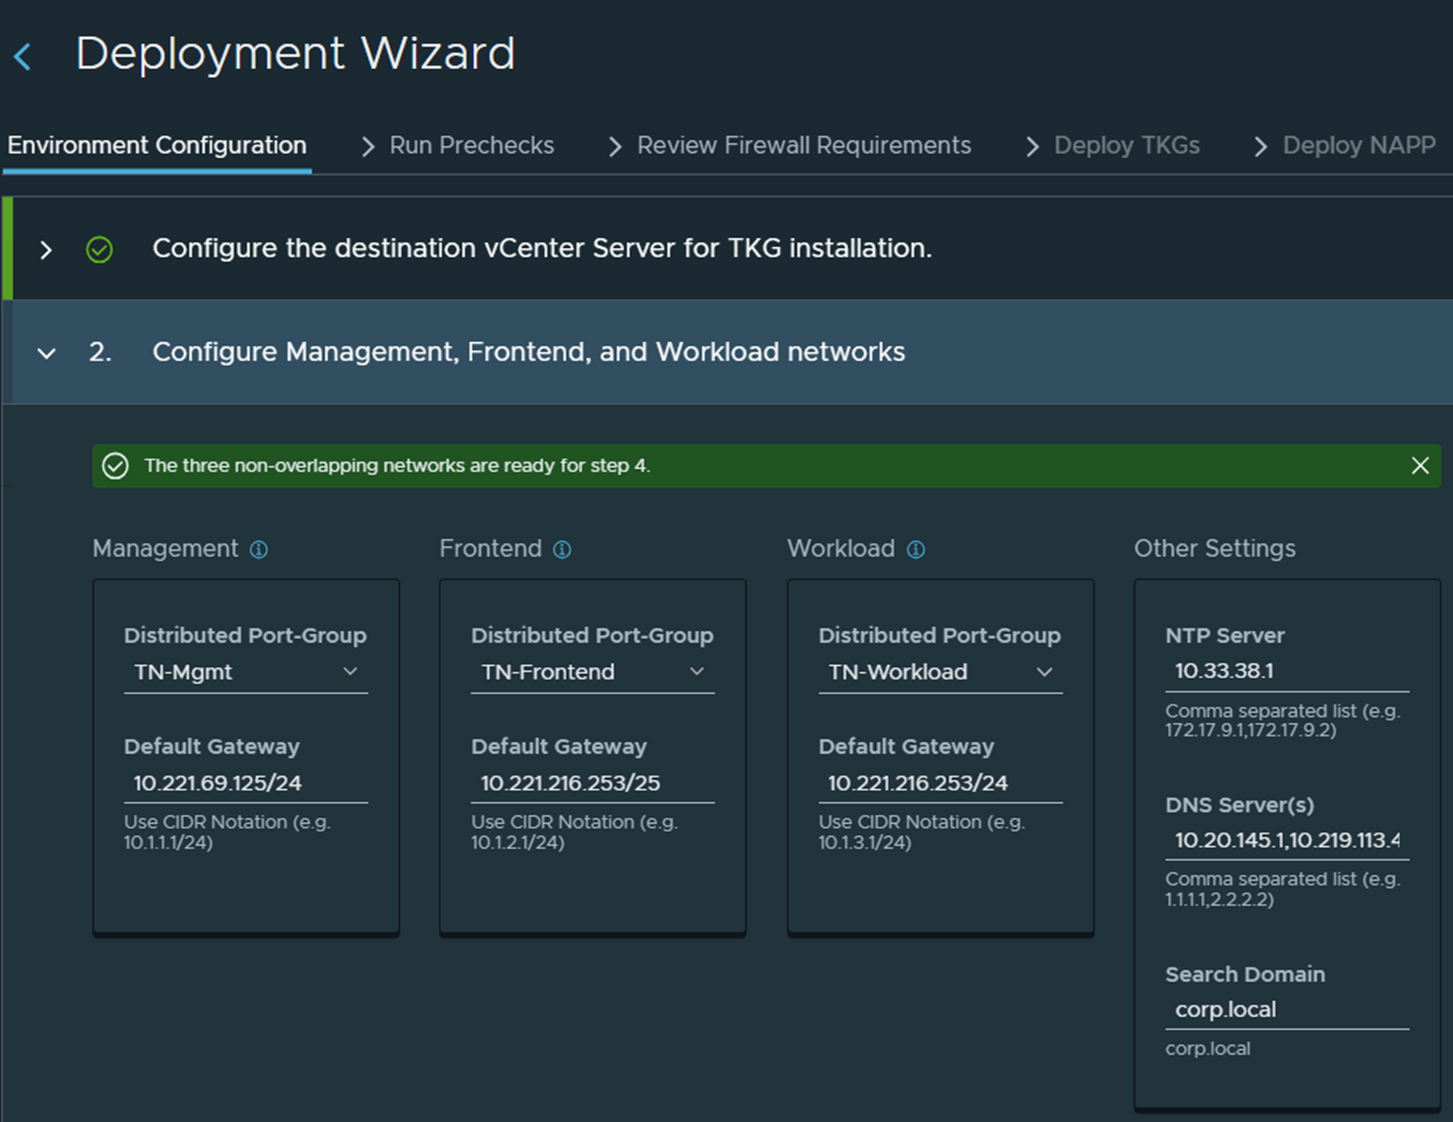
- Configure the Management, Frontend, and Workload network details and click Next.
Option Description Management
Frontend
Workload
Designate a distributed port group, NSX VLAN or NSX overlay network, and default gateway. Use the CIDR notation for the default gateway.
For example: 10.221.216.253/24
Other Settings Assign an NTP Server, single or multiple DNS Server IP addresses, and Search Domain.
Search Domain should be a public top-level domain such as .com or .info. Private top-level domain such as .lab or .local are not supported.
Note:You cannot use FQDN for DNS servers.
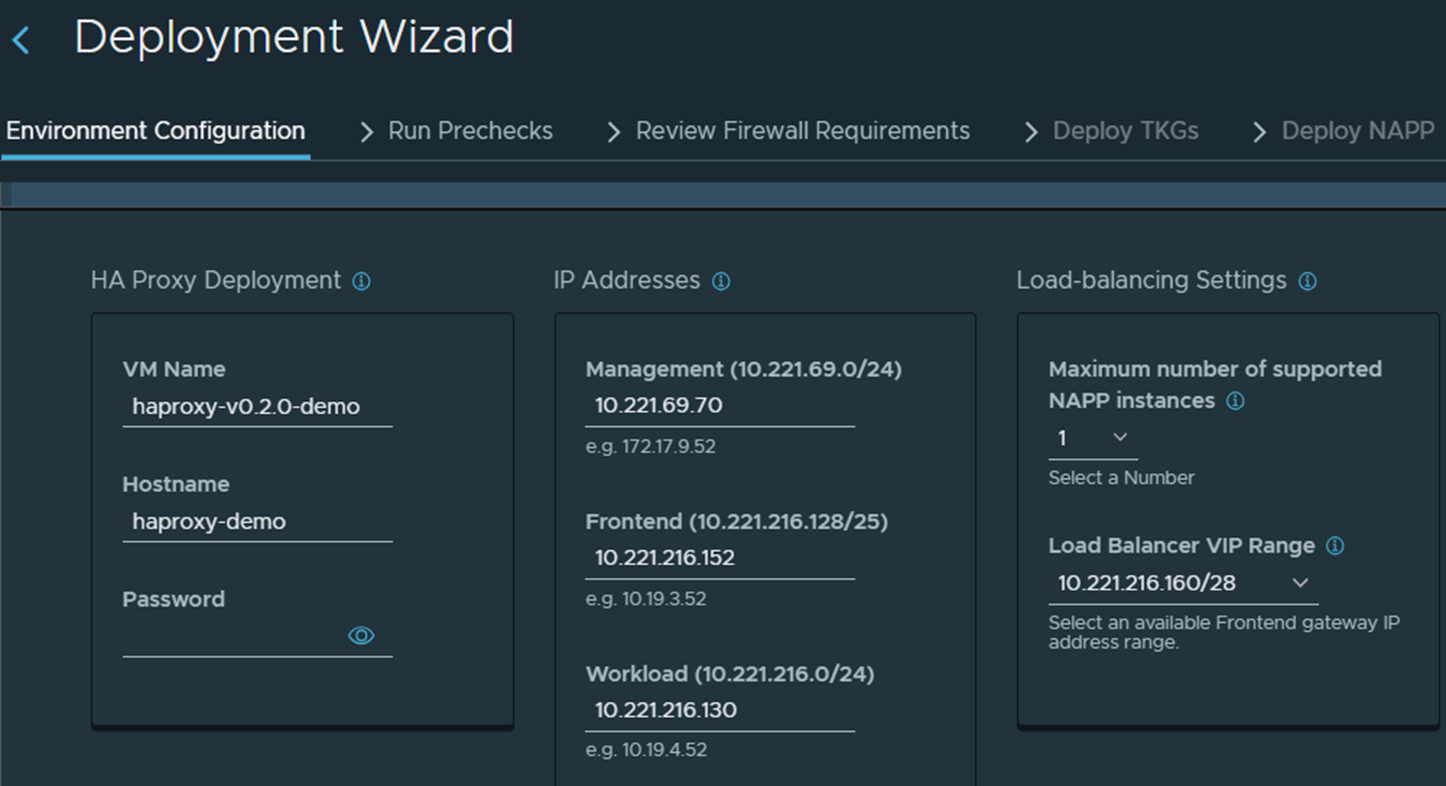
- Configure the load balancer details and click Next.
Option Description HA Proxy Deployment Enter the VM name, host name, and password. Management
Frontend
Workload
Provide the Management, Frontend, and Workload IP addresses assigned to the HA proxy.
You must have one IP address in each Management and Workload network.
Load Balancing Settings Assign the supported number of NSX Application Platform instances. Note: The maximum number of supported instances is 5. The number of instances cannot be changed after deployment.For example, if you have configured for two instances during deployment, after deployment you cannot change the number of instances to 5.
The VIP IP address range is pre-populated after you provide the Management, Frontend, and Workload IP addresses.Caution:You must carefully assign the Management, Frontend, and Workload IP addresses. The load balancer VIP IP address range setting cannot be changed after deploying the NSX Application Platform.
 The inputs are validated to ensure the required IP ranges and subnets are valid, non-overlapping, and in the correct subnets.
After the validation is successfully completed, the Next button is activated. If one of the required options has an error, you must fix the problem before proceeding.
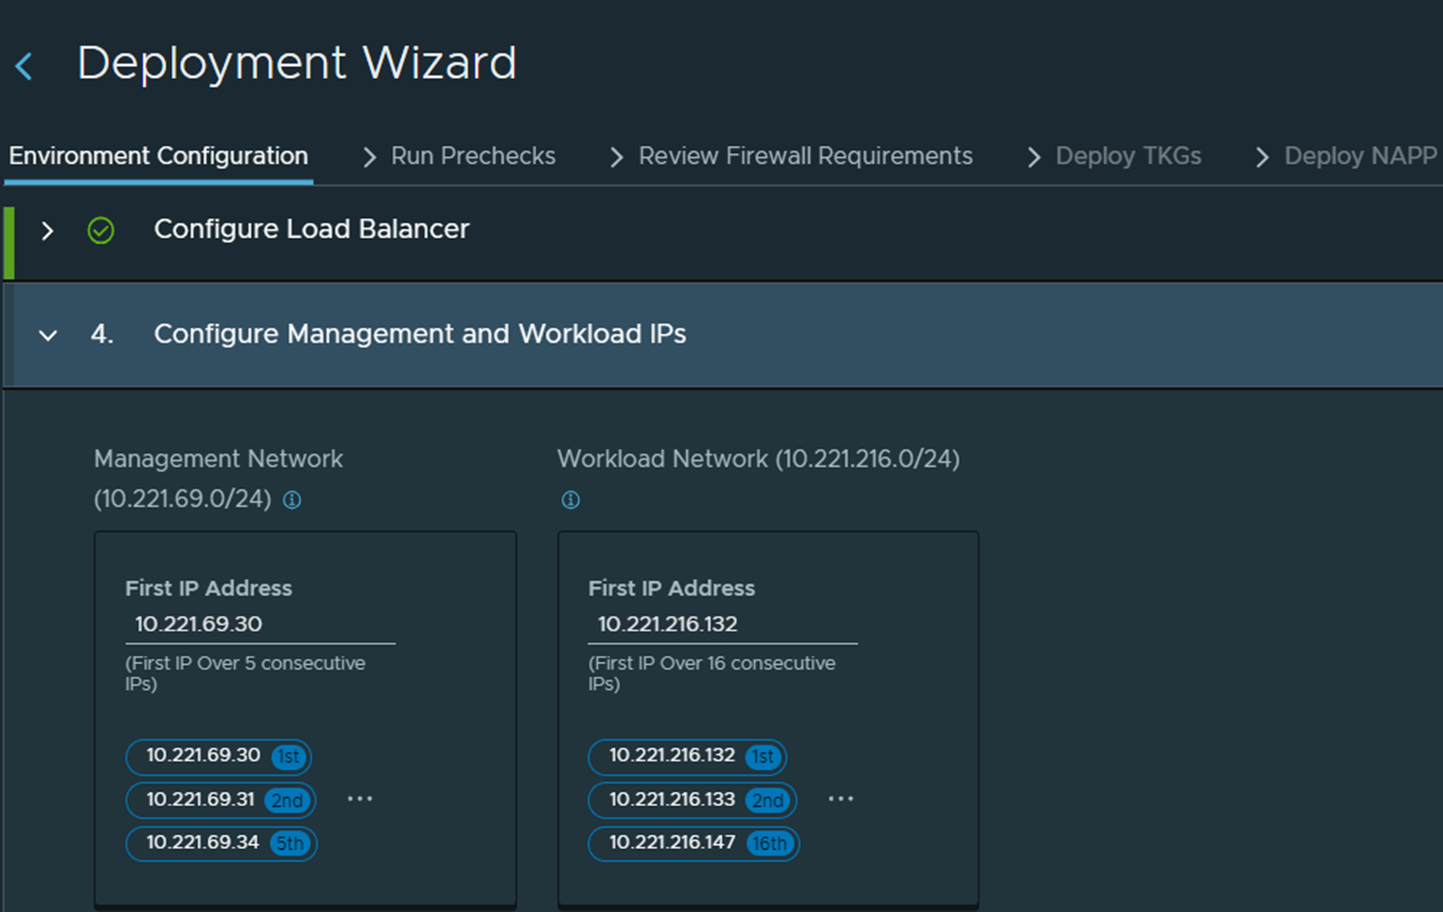
- Configure the Management and Workload IP address details and click Next.
Option Description Management Network
The Management network requires a pool of five consecutive IP addresses.
Enter the first IP of the pool, and the UI shows the range of the IP addresses that must be available.
Workload Network The Workload network requires a minimum pool of 25 consecutive IP addresses. The system calculates the exact number of required IP addresses based on the MAXIMUM NUMBER OF NAPP INSTANCES setting.
Enter the first IP of the pool, and the UI shows the range of the IP addresses that must be available.
- Configure NSX Application Platform installation sources and click Next.
Option Description URL Public Hosted
Enter a secure URL for the public Helm and Docker repository. It is recommended that you use the default public VMware-hosted installation source.
URL Local
Enter a URL for the locally stored Helm and Docker repository.
Sample Helm Repository - oci://<local-harbor-repo-url>/nsx_application_platform/helm-charts .
Sample Docker Registry - <local-harbor-repo-url>/nsx_application_platform/clustering.
Toggle the Certificate is trusted by a Public CA option and add the non-public CA certificate details in the dialog box.
Connectivity Settings Using a Proxy
Toggle the Using a proxy option to activate proxy server configuration if you do not have internet connectivity to route internet traffic. This option is available only in the NSX Application Platform Automation Appliance 4.2 release.
Note: Provide all the proxy server details accurately to avoid an error during verification.- Scheme - Select HTTP or HTTPS from the drop-down menu.
If you use HTTPS, you must upload the proxy server certificate.
- Host IP or FQDN - Enter an IP address or FQDN.
- Port - Enter a port number.
The default port is 3128, you can configure a different port if needed. This port number should be unique and not in use by other services on the network. The port must allow incoming traffic from the NSX Application Platform components that must use the proxy server.
- Username - Enter a user name.
This is optional.
- Password - Enter a password.
This is optional.
- Certificate - Add the proxy server certificate. If self-signed or Private CA certificate is used for the proxy, the certificate should include Subject Alternative Name (SAN).
- No Proxy - Add no proxy setting for a TKG cluster in the NSX Application Platform Automation Appliance and specify IP addresses for which the proxy should not be used. See Configure No Proxy for Tanzu Kubernetes Guest Cluster.
Note: You must add the no proxy details before the Tanzu Kubernetes Grid deployment.
Figure 1. Local Connectivity Setting 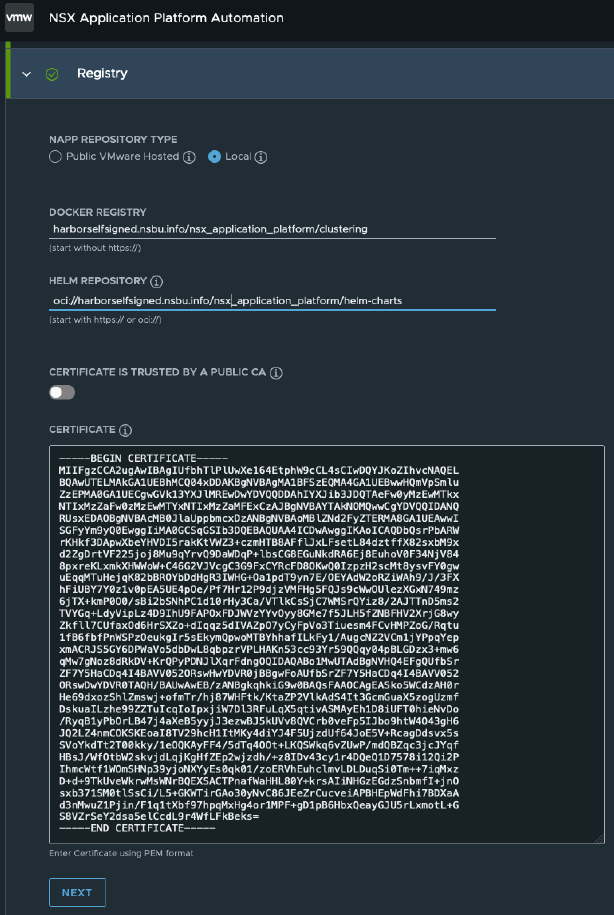
Figure 2. Proxy Server Settings 
- Scheme - Select HTTP or HTTPS from the drop-down menu.
- Configure NSX Application Platform instances details.
- Click the three dots under the Instance Name.
- Click Edit.
The Edit NAPP instance page opens.
- Enter the NSX Application Platform instance name, NSX IP address or FQDN, and password.
- If you configured public Helm repository and Docker registry location for your proxy sever in the previous step, click Apply Proxy to NSX and Continue to propagate the proxy details you entered to NSX.
The newly added proxy server details and applied certificate are available in the NSX Manager, under .
- Click Ignore and Continue to skip propagating the public Helm repository and Docker registry location proxy server details to NSX.
If there is proxy server already configured in NSX, the NSX Application Platform Automation Appliance verifies whether there are any configuration inconsistencies.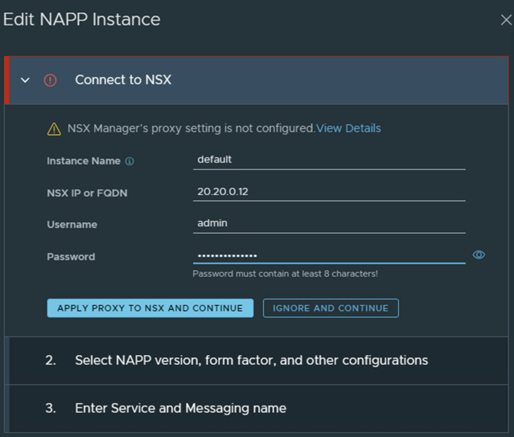
If a proxy is configured on NSX Manager but deactivated, you must activate the proxy with the same proxy details as configured on NSX Manager to proceed. Different proxy details are not accepted.
- If you configured public Helm repository and Docker registry location for your proxy sever in the previous step, click Apply Proxy to NSX and Continue to propagate the proxy details you entered to NSX.
- Verify that the release version is accurate.
To change the release version, click the drop-down arrow and select the version to deploy.Note: If you are using NSX Application Platform Automation Appliance 4.2, NSX Application Platform 4.2, and private Harbor with an earlier than NSX 4.2 version, manually add the private Harbor certificate to the trusted store on all three NSX Managers. If the certificate is not manually added, the NSX Application Platform versions do not appear in the drop-down menu.
- Select a form factor.
- Advanced (all services) - has four Kubernetes worker nodes and three supported control plane nodes.
- Evaluation - has one Kubernetes worker node and one supported control plane node.
Note: Scale-out operations are not supported on the Evaluation form factor.
- Use the default number for the control plane, Kubernetes worker nodes, and resource reservation settings.
Note: You must set the resource reservation settings for a production environment and the setting must have three control plane nodes.
- Click Next.
- Enter the service and messaging name to set the appropriate DNS records and click Update.
The service and messaging names must be configured with the IP address in the DNS server.
- Click Next.
