VMware Pulse IoT Center is distributed as an Open Virtual Appliance (OVA) and can be deployed on a VMware vCenter instance through the vSphere Web Client. For supported versions of vSphere, see the VMware Product Interoperability Matrix at https://www.vmware.com/resources/compatibility/sim/interop_matrix.php#interop.
Perform the following steps to deploy a server node using the OVA deployed on a VMware vCenter instance through the vSphere Web Client.
Prerequisites
- Enable the time synchronization in guests deployed from OVF templates. For more information, see https://kb.vmware.com/s/article/1014038.
- You must have a valid URL or OVA of the VMware Pulse IoT Center.
Procedure
- Log in to your vCenter environment with administrator privileges.
- Right-click any inventory object that is a valid parent object of a virtual machine, such as a data center, folder, cluster, resource pool, or host. Select Deploy OVF Template.
The
Deploy OVF Template wizard opens.
- On the Select an OVF template page, specify the location of the source OVA template and click Next. The options available are as described in the following table:
| Option |
Action |
| URL |
Type a URL to the OVA template on the Internet. Supported URL sources are HTTP and HTTPS. |
| Local file |
Click Choose Files and select all the files associated with the OVA file. This includes files such as .ovf, .vmdk, and so on. If you do not select all the required files, a warning message is displayed. |
- On the Select a name and folder page, enter a unique name for your virtual machine, select a deployment location, and click Next.
Note:
- The default name for the virtual appliance is the same as the name of the selected OVA template. The default deployment location is the inventory object where you started the wizard.
- The names of multiple nodes are referred in a chronological order (Node 1, Node 2, Node 3) throughout the guide.
- On the Select a compute resource page, select a resource where to run the deployed virtual appliance template, and click Next.
- On the Review details page, verify the version, required disk space on the datastore, and click Next.
- On the Select storage page, define where and how to store the files for the deployed OVA template.
- Select a disk format for the virtual machine virtual disks.
| Format |
Description |
| Thick Provision Lazy Zeroed |
Creates a virtual disk in a default thick format. Space required for the virtual disk is allocated when the virtual disk is created. Data remaining on the physical device is not erased during creation, but is zeroed out later, on demand, on first write from the virtual machine. |
| Thick Provision Eager Zeroed |
A type of thick virtual disk that supports clustering features such as Fault Tolerance. Space required for the virtual disk is allocated at the time of creation. In contrast to the flat format, the data remaining on the physical device is zeroed out when the virtual disk is created. It might take much longer to create disks in this format than to create other types of disks. |
| Thin Provision |
Note: It is recommended to use the thin provision format.
Use this format to save hard disk space. For the thin disk, you provision as much datastore space as the disk requires based on the value that you enter for the disk size. However, the thin disk starts small and at first, uses only as much datastore space as the disk needs for its initial operations. |
- Select a VM Storage Policy. This option is available only if storage policies are enabled on the destination resource.
- (Optional) Enable the show datastores from Storage DRS clusters check box to select individual datastores from Storage DRS clusters for the initial placement of the virtual machine.
- Select a datastore for storing the deployed OVA template.
The configuration file and virtual disk files are stored on the datastore. Select a datastore large enough to accommodate the virtual appliance and all associated virtual disk files.
- Click Next.
- On the Select networks page, select a source network and map it to a destination network. Ensure that you select the correct virtual machine network to set up the static IP/DHCP as defined by your network administrator. Click Next.
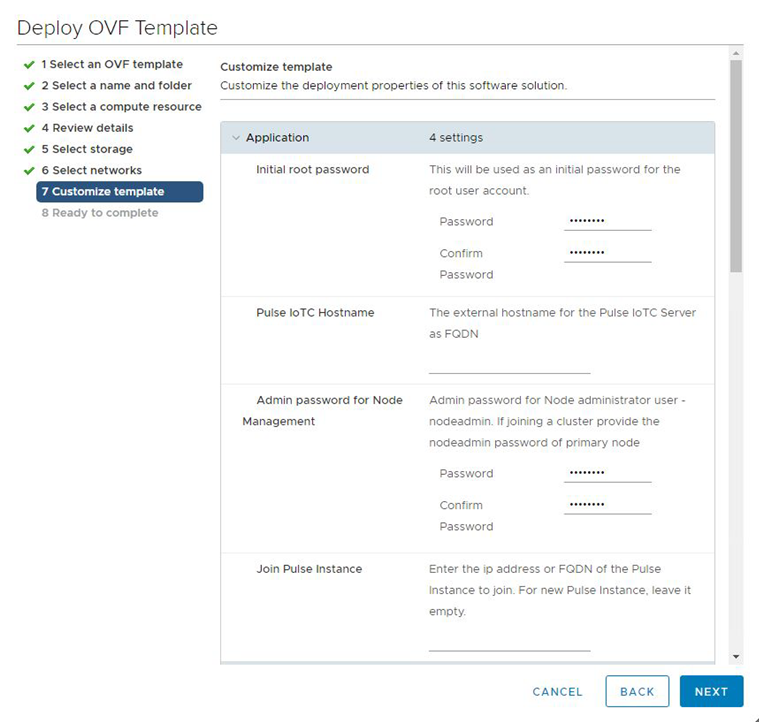
- On the Customize template page:
- Enter and confirm the Admin Password for Node Management and Initial root password. These text boxes are mandatory.
- Leave the Pulse IoTC Hostname text box blank if the DNS is configured.
- If your network type is Static IP, scroll down to see the Network Properties.
- If you are deploying Server Node 1, leave the Join Pulse Instance text box empty. If you are deploying Server Node 2 and Server Node 3, provide the FQDN name of Server Node 1 in the Join Pulse Instance text box.
- Scroll down and expand the Networking Properties drop-down menu and enter the details.
Table 1.
Customize Template - Networking Properties
| Field |
Description |
| Default Gateway |
The default gateway address for this VM. Leave blank if DHCP is preferred. |
| Domain Name |
The domain name for the VM. Leave blank if DHCP is preferred. |
| Organization Domain Name |
The domain name of the organization. Leave blank if DHCP is preferred. |
| Domain Search Path |
The domain search path (Use comma or space separated domain names). Leave blank if DHCP is preferred. |
| Domain Name Servers |
The domain name server IP addresses for the VM. Leave blank if DHCP is preferred. |
| Network 1 IP Address |
The IP address for this interface. Leave blank if DHCP is preferred. |
- Click Next.
- On the Ready to complete page, review the configuration details of your VMware Pulse IoT Center virtual appliance and click Finish.
Results
A new task for creating the virtual machine appears in the Recent Tasks pane. The deployment time depends on your network speed and infrastructure setup. After the task is complete, the new virtual machine is created on the selected resource.
What to do next
- Enable the time synchronization settings on the newly created server node. See Enable the Time Synchronization Settings.
- Power on the newly created node and start the web console.
- After the virtual machine is powered on, refresh the page and note the IP address of the virtual appliance.
- Use this IP address or DNS name/FQDN (if configured) to access the VMware Pulse IoT Center console.
- Log in to the VMware Pulse IoT Center console using SSH terminal with the root use name and password that you have set in the OVF properties, while deploying the OVA.
- Set up the nodes. See Set Up the VMware Pulse IoT Center Server Node.