When you have assigned a profile to an Edge, the Edge automatically inherits the cloud security service (CSS) and attributes configured in the profile. You can override the settings to select a different cloud security provider or modify the attributes for each Edge.
To override the CSS configuration for a specific Edge, perform the following steps:
- In the Enterprise portal, click .
- Select an Edge you want to override CSS settings and click the icon under the Device column. The Device Settings page for the selected Edge appears.
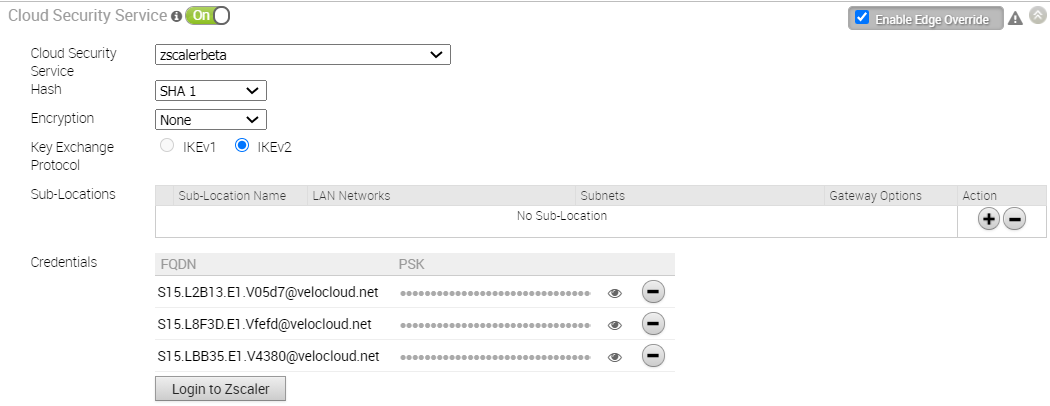
- In the Cloud Security Service area, the CSS parameters of the associated profile are displayed. Select Enable Edge Override to select a different CSS or to modify the attributes inherited from the profile associated with the Edge. For more information on the attributes, see Configure Cloud Security Services for Profiles.
 Note: For cloud security services with Zscaler login URL configured, Login to Zscaler button appears in the Cloud Security Service area. Clicking the Login to Zscaler button will redirect you to the Zscaler Admin portal of the selected Zscaler cloud.
 - If you choose to configure an IPsec tunnel at the Edge level, apart from the inherited attributes, you must configure a Fully Qualified Domain Name (FQDN) and Pre-Shared Key (PSK) for the IPsec session.
Note: For CSS of type Zscaler and Generic, you must create VPN credentials. For Symantec CSS type, the VPN credentials are not needed.
- If you choose to configure a GRE tunnel at the Edge level, then click Add Tunnel.

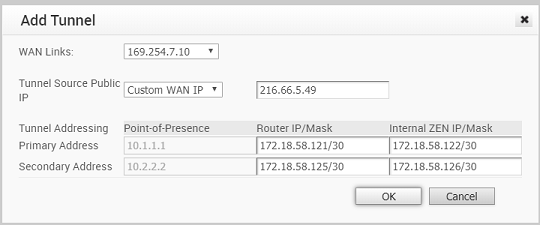
- In the Add Tunnel window appears, configure the following GRE tunnel parameters, and click OK.

Option Description WAN Links Select the WAN interface to be used as source by the GRE tunnel. Tunnel Source Public IP Choose the IP address to be used as a public IP address by the Tunnel. You can either choose the WAN Link IP or Custom WAN IP. If you choose Custom WAN IP, enter the IP address to be used as public IP. Primary Point-of-Presence Enter the primary Public IP address of the Zscaler Datacenter. Secondary Point-of-Presence Enter the secondary Public IP address of the Zscaler Datacenter. Primary Router IP/Mask Enter the primary IP address of Router. Secondary Router IP/Mask Enter the secondary IP address of Router. Primary ZEN IP/Mask Enter the primary IP address of Internal Zscaler Public Service Edge. Secondary ZEN IP/Mask Enter the secondary IP address of Internal Zscaler Public Service Edge. Note: The Router IP/Mask and ZEN IP/Mask are provided by Zscaler. - Click Save Changes in the Edges window to save the modified settings.
Automated Zscaler CSS Provider Configuration for Edges
At the Edge level, for a selected automated Zscaler CSS provider, you can override the settings inherited from the profile, create Sub-locations, configure Gateway options and Bandwidth controls for the Sub-locations.
Before creating a Sub-location, ensure that the selected Edge is activated, and VPN credentials are set up for the Edge. To create Sub-locations on a selected Edge, perform the following steps:
- In the Enterprise portal, click .
- Select an Edge you want to override CSS settings and create Sub-location.
- Click the icon under the Device column. The Device Settings page for the selected Edge appears.
- In the Cloud Security Service section, select Enable Edge Override.
- From the Cloud Security Service drop-down menu, for the selected automated CSS provider, modify the attributes (Hash, Encryption, and Key Exchange Protocol) inherited from the profile, if needed. For more information on the attributes, see Configure Cloud Security Services for Profiles.
Note: Changing to another CSS provider from an Automated Zscaler service provider is not allowed on a Segment. For the selected Edge on a segment, you must explicitly disable Cloud Security service and then re-enable CSS if you want to change to a new CSS provider from an Automated Zscaler service provider.

- To create a Sub-location, click the
 icon under the Action column.
Note: You will not be allowed to create a Sub-location if the VPN credentials are not set up for the Edge. Before configuring Sub-locations, ensure you understand about Sub-location and their limitations. See https://help.zscaler.com/zia/about-sub-locations.
icon under the Action column.
Note: You will not be allowed to create a Sub-location if the VPN credentials are not set up for the Edge. Before configuring Sub-locations, ensure you understand about Sub-location and their limitations. See https://help.zscaler.com/zia/about-sub-locations.- In the Sub-Location Name textbox, enter a unique name for the Sub-location. The Sub-location name should be unique across all segments for the Edge. The name can contain alphanumeric with a maximum word length of 32 characters.
- From the LAN Networks drop-down menu, select a VLAN configured for the Edge. The Subnet for the selected LAN network will be populated automatically.
Note: For a selected Edge, Sub-locations should not have overlapping Subnet IPs across all segments.
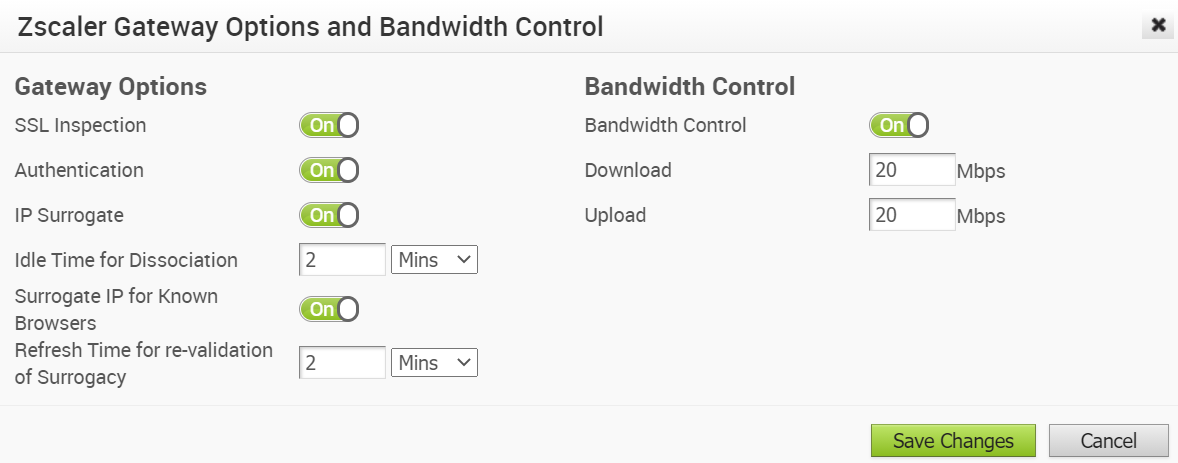
- To configure Gateway options and Bandwidth controls for the Sub-location, click Edit. The Zscaler Gateway Options and Bandwidth Control window appears.

- Configure the Gateway options and Bandwidth controls for the Sub-location, as needed, and click Save Changes. A Sub-location is created in the SD-WAN Orchestrator.
Note: Currently, the following Gateway options are not supported for the Sub-location configuration:
- Use XFF from Client Request
- Enable Caution
- Enable AUP
Note: After you create at least one Sub-location in the Orchestrator, Zscaler automatically creates an “other” Sub-location on the Zscaler side. The functionality to configure the “other” Sub-location’s Gateway options from the Orchestrator is not supported.Option Description Gateway Options SSL Inspection Enable to apply your SSL Inspection policy to HTTPS traffic in the Sub-location and inspect HTTPS transactions for data leakage, malicious content, and viruses. Authentication Enable to require users from the Sub-location to authenticate to the service. IP Surrogate If you enabled Authentication, select this option if you want to map users to device IP addresses. Idle Time for Dissociation If you enabled IP Surrogate, specify how long after a completed transaction, the service retains the IP address-to-user mapping. You can specify the Idle Time for Dissociation in Mins (default), or Hours, or Days. - If the user selects the unit as Mins, the allowable range is from 1 through 43200.
- If the user selects the unit as Hours, the allowable range is from 1 through 720.
- If the user selects the unit as Days, the allowable range is from 1 through 30.
Surrogate IP for Known Browsers Enable to use the existing IP address-to-user mapping (acquired from the surrogate IP) to authenticate users sending traffic from known browsers. Refresh Time for re-validation of Surrogacy If you enabled Surrogate IP for Known Browsers, specify the length of time that the Zscaler service can use IP address-to-user mapping for authenticating users sending traffic from known browsers. After the defined period of time elapses, the service will refresh and revalidate the existing IP-to-user mapping so that it can continue to use the mapping for authenticating users on browsers. You can specify the Refresh Time for re-validation of Surrogacy in minutes (default), or hours, or days. - If the user selects the unit as Mins, the allowable range is from 1 through 43200.
- If the user selects the unit as Hours, the allowable range is from 1 through 720.
- If the user selects the unit as Days, the allowable range is from 1 through 30.
Bandwidth Control Bandwidth Control Enable to enforce bandwidth controls for the Sub-location. Download If you enabled Bandwidth Control, specify the maximum bandwidth limits for Download in Mbps. The allowable range is from 0.1 through 99999. Upload If you enabled Bandwidth Control, specify the maximum bandwidth limits for Upload in Mbps. The allowable range is from 0.1 through 99999. Note: The gateway options for the Sub-locations are the same ones that one can configure on the Zscaler portal. For more information about Zscaler Gateway Options and Bandwidth Control parameters, see https://help.zscaler.com/zia/configuring-locations
- After creating a Sub-location, you can update the Sub-location configuration from the same page and click Save Changes. The Sub-location on the Zscaler side will be updated automatically.
- To delete a Sub-location, click the
 icon under the Action column.
 - Click Save Changes.