Enterprise Admins can provision a single Edge or multiple Edges, such as assigning a Profile configuration to an Edge or changing other Edge specific parameters. You must create a configuration for every Edge you will deploy to a specific site.
You can provision a new edge from the
Edges screen by performing the following steps:
Procedure
In the Enterprise portal, click Configure > Edges.
In the Edges screen, click New Edge at the top-right corner of the screen.
The
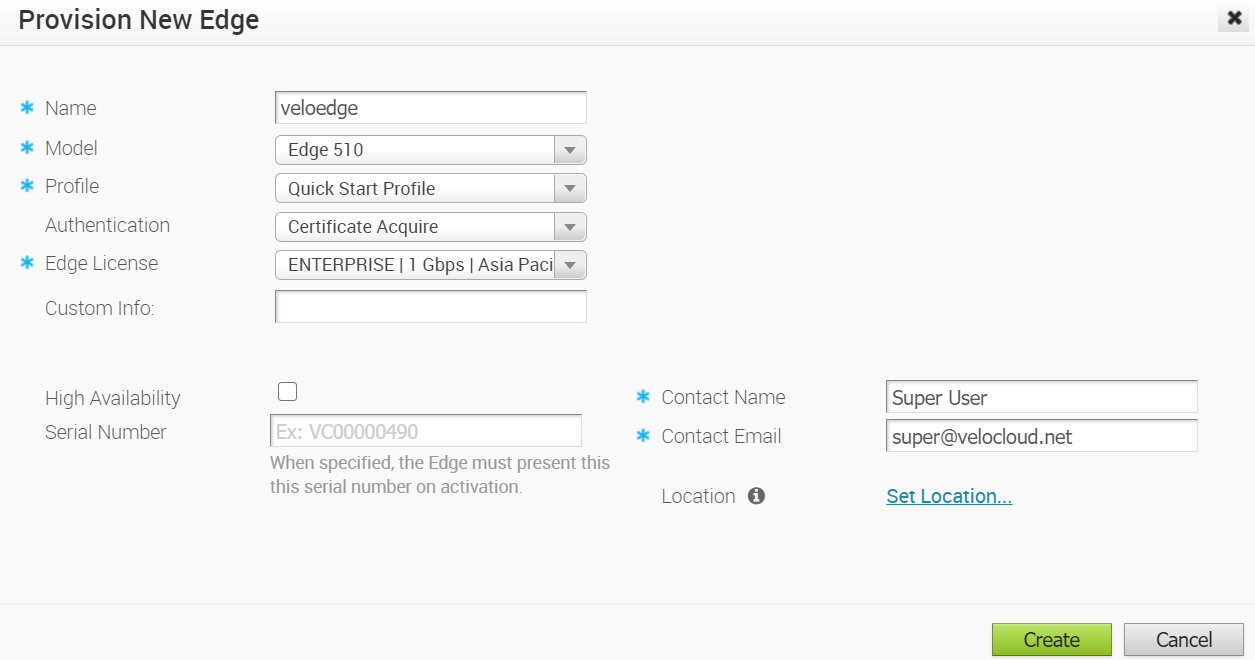
Provision New Edge dialog box appears.
In the Name textbox, enter a unique name for the Edge.
From the Model drop-down menu, select an Edge model.
From the Profile drop-down menu, select a profile to be assigned to the Edge.
Note: If an Edge Staging Profile is displayed as an option due to Zero Touch Provisioning, this profile is used by a newly assigned Edge, but has not been configured with a production Profile.
For more information about how to create a new profile, see Create a Profile.
From the Authentication drop-down menu, you can select one of the following certificate-based authentication options:
Certificate Disabled - Edge uses a pre-shared key mode of authentication.
Certificate Acquire - This option is selected by default, and instructs the Edge to acquire a certificate from the certificate authority of the Orchestrator, by generating a key pair and sending a certificate signing request to the Orchestrator. Once acquired, the Edge uses the certificate for authentication to the Orchestrator and for establishment of VCMP tunnels.
Note: After acquiring the certificate, the option can be updated to
Certificate Required.
Certificate Required - Edge uses the PKI certificate.
From the Edge License drop-down menu, select an Edge License from the available list. The list displays the licenses assigned to the Enterprise, by the Operator.
In the Custom Info textbox, enter custom information associated with the edge
Customer information must not exceed 255 characters.
Note: Super User and Standard Admin users of Enterprise/MSP/Operator roles (with UPDATE_EDGE privilege) can add or update the Custom Info for an edge.
To apply High Availability (HA), select the High Availability checkbox. (Edges can be installed as a single standalone device or paired with another Edge to provide High Availability (HA) support. For more information about HA, see the High Availability Options section).
In the Serial Number textbox, enter the serial number of the Edge . If specified, the serial number must match the serial number of the Edge that will be activated.
In the Contact Name and Contact Email textboxes, enter the name and email address of the site contact for the Edge.
Click the Set Location link to set the location of the Edge.
Click Create.
Results
The Edge gets provisioned with an activation key.
Note: The activation key expires in one month if the Edge device is not activated against it. For information on how to activate an Edge see the
Configure Edge Activation section in the
Edge Activation Quick Start Guide.
After you have provisioned an edge, the edge appears in the Edges screen.
If you have configured the Edge 510 LTE device, you can run the “LTE Modem Information” diagnostic test. The LTE Modem Information diagnostic test will retrieve diagnostic information, such as signal strength, connection information, and so on. For information on how to run a diagnostic test, see section titled, Remote Diagnostics
What to do next
To manage the provisioned edges, see Manage Edges.