


By default, the Routing BGP feature is enabled for an enterprise. You can configure the BGP per segment for a Profile or an Edge.
- As the ASN of SD-WAN Edge.
- Peer to a neighbor with 4-Byte ASN.
- Accept 4-Byte ASNs in route advertisements.
To enable BGP:
Procedure
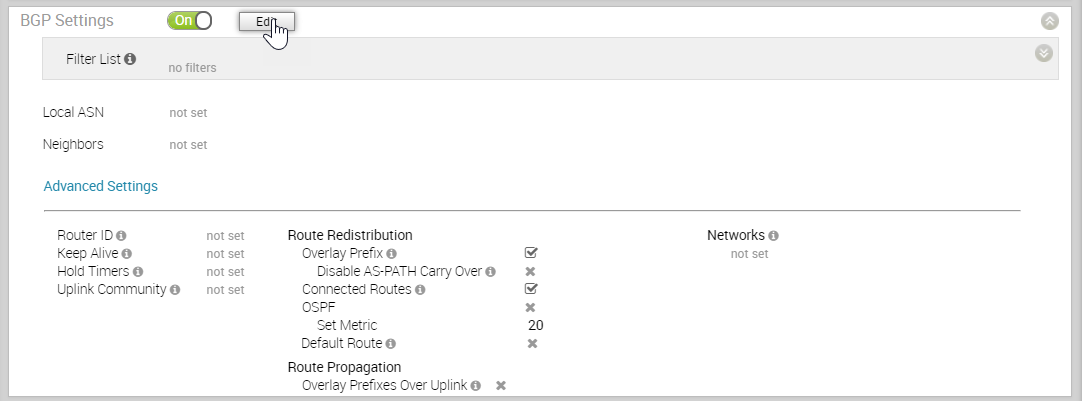
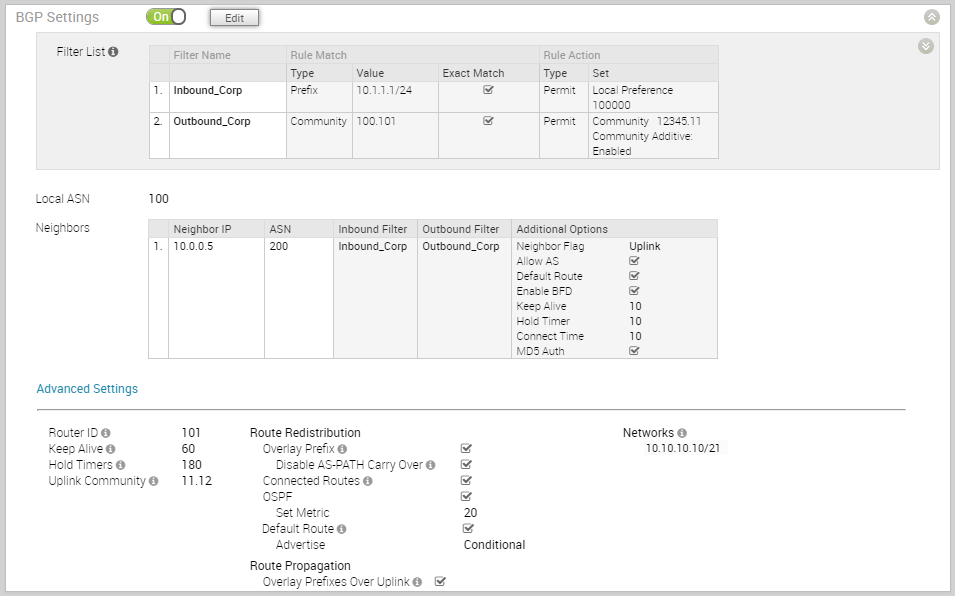
- In the Device tab, scroll down to the BGP Settings section, click the slider to ON position, and then click Edit.
- In the BGP Editor window, configure the following settings:
- Click Add Filter to create one or more filters. These filters are applied to the neighbor to deny or change the attributes of the route. The same filter can be used for multiple neighbors.
In the Create BGP Filter window, set the rules for the filter.
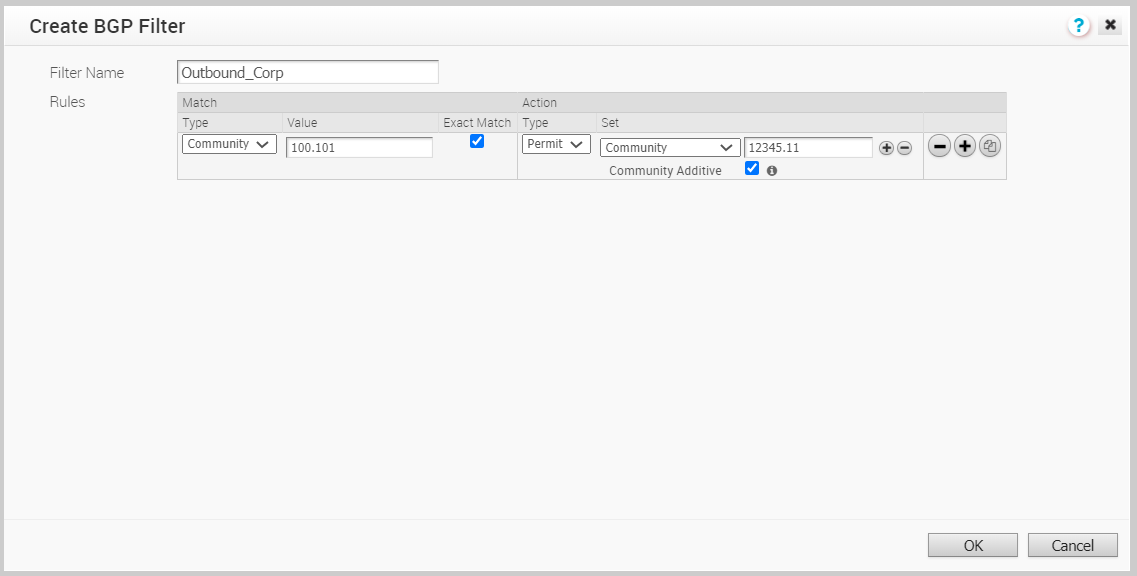
Option Description Filter Name Enter a descriptive name for the BGP filter. Match Type and Value Choose the type of the routes to be matched with the filter: - Prefix: Choose to match with a prefix and enter the prefix IP address in the Value field.
- Community: Choose to match with a community and enter the community string in the Value field.
Exact Match The filter action is performed only when the BGP routes match exactly with the specified prefix or community string. By default, this option is enabled. Action Type Choose the action to be performed when the BGP routes match with the specified prefix or the community string. You can either permit or deny the traffic. Set When the BGP routes match the specified criteria, you can set to route the traffic to a network based on the attributes of the path. Select one of the following options from the drop-down list: - None: The attributes of the matching routes remain the same.
- Local Preference: The matching traffic is routed to the path with the specified local preference.
- Community: The matching routes are filtered by the specified community string. You can also select the Community Additive checkbox to enable the additive option, which appends the community value to existing communities.
- Metric: The matching traffic is routed to the path with the specified metric value.
- AS-Path-Prepend: Allows prepending multiple entries of Autonomous System (AS) to a BGP route.
Click the Plus( +) Icon to add more matching rules for the filter.Click OK.Repeat the procedure to create more BGP filters.The configured filters are displayed in the BGP Editor window. - In the BGP Editor window, configure the following BGP settings:
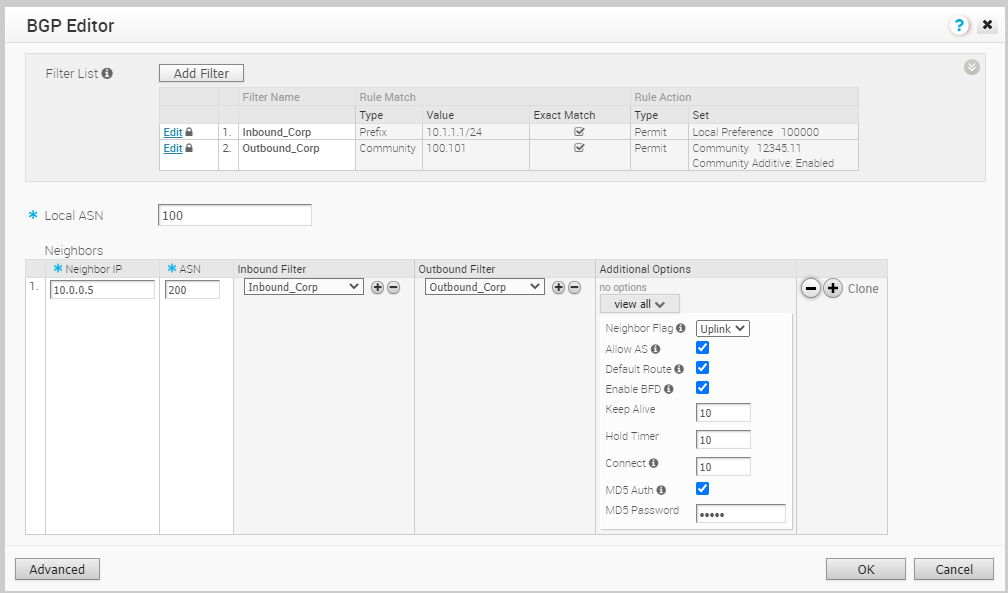
Option Description Local ASN Enter the local Autonomous System Number (ASN) Neighbor IP Enter the IP address of the BGP neighbor ASN Enter the ASN of the neighbor Inbound Filter Select an Inbound filer from the drop-down list Outbound Filter Select an Outbound filer from the drop-down list Additional Options – Click the view all link to configure the following additional settings: Neighbor Flag Flags the neighbor type. Choose one of the following options from the drop-down list: - None – Neighbor is not flagged.
- Uplink – Select this option if the Uplink is used as the WAN overlay towards MPLS. It is used as the flag to decide whether the site will become a transit site (For example, hub) by propagating routes learnt over SD-WAN overlay to WAN link towards MPLS. If you need to make a transit site, select the Overlay Prefixes over Uplink checkbox available in the Advanced section.
Allow AS Select the checkbox to allow the BGP routes to be received and processed even if the Edge detects its own ASN in the AS-Path. Default Route Default route is a static route that takes effect when no other route is available for a destination IP address. Select the checkbox to advertise a default route to the neighbor. Enable BFD Enables subscription to existing BFD session for the BGP neighbor. For more information, see BFD Settings. Keep Alive Enter the keepalive timer in seconds, which is the duration between the keepalive messages that are sent to the peer. The range is from 0 to 65535 seconds. The default value is 60 seconds. Hold Timer Enter the hold timer in seconds. When the keepalive message is not received for the specified time, the peer is considered as down. The range is from 0 to 65535 seconds. The default value is 180 seconds. Connect Enter the time interval to try a new TCP connection with the peer if it detects the TCP session is not passive. The default value is 120 seconds. MD5 Auth Select the checkbox to enable BGP MD5 authentication. This option is used in a legacy network or federal network, and it is common that BGP MD5 is used as a security guard for BGP peering. MD5 Password Enter a password for MD5 authentication. Click the Plus ( +) Icon to add more BGP neighbors. - Click Advanced to configure the following advanced settings, which are globally applied to all the BGP neighbors.
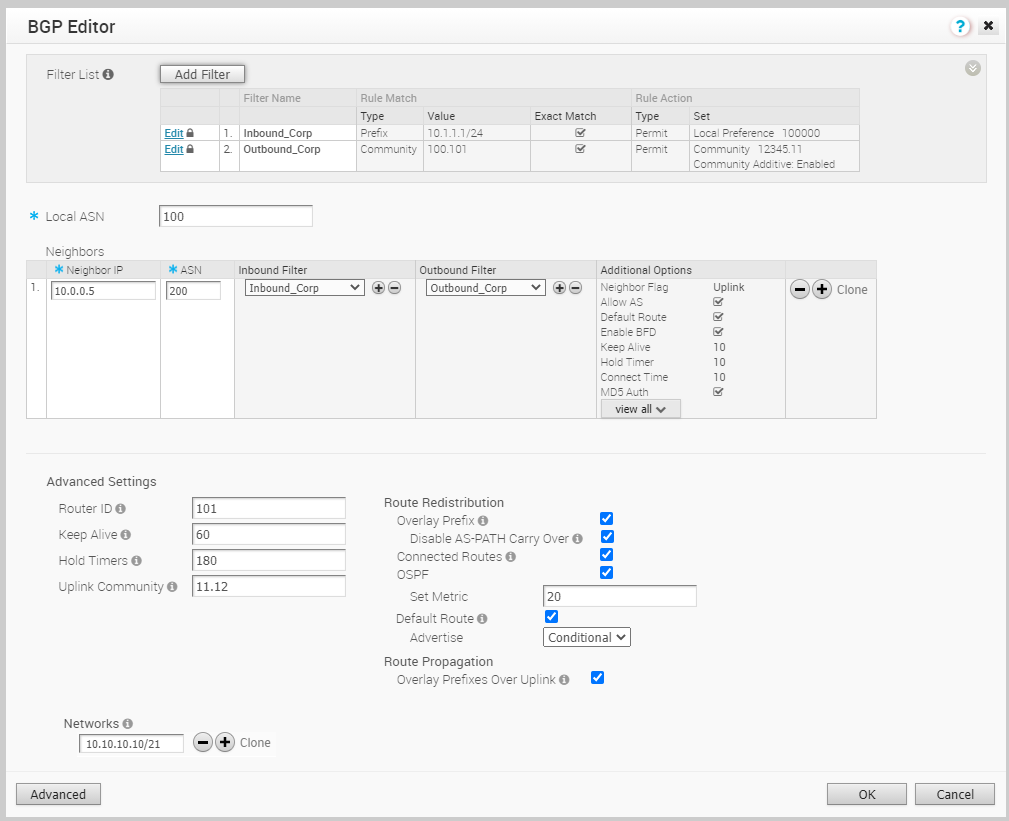
Option Description Router ID Enter the global BGP router ID. If you do not specify any value, the ID is automatically assigned. Keep Alive Enter the keepalive timer in seconds, which is the duration between the keepalive messages that are sent to the peer. The range is from 0 to 65535 seconds. The default value is 60 seconds. Hold Timer Enter the hold timer in seconds. When the keepalive message is not received for the specified time, the peer is considered as down. The range is from 0 to 65535 seconds. The default value is 180 seconds. Uplink Community Enter the community string to be treated as uplink routes.
Uplink refers to link connected to the Provider Edge (PE). Inbound routes towards the Edge matching the specified community value will be treated as Uplink routes. The Hub/Edge is not considered as the owner for these routes.
Enter the value in number format ranging from 1 to 4294967295 or in AA:NN format.
Overlay Prefix Select the checkbox to redistribute the prefixes learned from the overlay. Disable AS-Path carry over By default, this should be left unchecked. Select the checkbox to disable AS-PATH Carry Over. In certain topologies, disabling AS-PATH Carry Over will influence the outbound AS-PATH to make the L3 routers prefer a path towards an Edge or a Hub. Warning: When the AS-PATH Carry Over is disabled, tune your network to avoid routing loops.Connected Routes Select the checkbox to redistribute all the connected Interface subnets. OSPF Select the checkbox to enable OSPF redistribute into BGP. Set Metric When you enable OSPF, enter the BGP metric for the redistributed OSPF routes. The default value is 20. Default Route Select the checkbox to redistribute the default route only when Edge learns the BGP routes through overlay or underlay.
When you select the Default Route option, the Advertise option is available as Conditional.
Overlay Prefixes over Uplink Select the checkbox to propagate routes learned from overlay to the neighbor with uplink flag. Networks Enter the network address that BGP will be advertising to the peers. Click the Plus (+) Icon to add more network addresses. When you enable the Default Route option, the BGP routes are advertised based on the Default Route selection globally and per BGP neighbor, as shown in the following table:Default Route Selection Advertising Options Global Per BGP Neighbor Yes Yes The per BGP neighbor configuration overrides the global configuration and hence default route is always advertised to the BGP peer. Yes No BGP redistributes the default route to its neighbor only when the Edge learns an explicit default route through the overlay or underlay network. No Yes Default route is always advertised to the BGP peer. No No The default route is not advertised to the BGP peer. - Click OK.
- Click Add Filter to create one or more filters. These filters are applied to the neighbor to deny or change the attributes of the route. The same filter can be used for multiple neighbors.
Results
The BGP Settings section displays the BGP configuration settings.
Click Save Changes in the Device screen to save the configuration.
When you configure BGP settings for a profile, the configuration settings are automatically applied to the Edges that are associated with the profile. If required, you can override the configuration for a specific Edge as follows:
- In the Enterprise portal, click .
- Click the Device Icon next to an Edge, or click the link to an Edge and then click the Device tab.
- In the Device tab, scroll down to the BGP Settings section.
- Select the Enable Edge Override checkbox.
- Click Edit to modify the BGP configuration settings for the selected Edge.

- Click Save Changes in the Device page to save the modified configuration.
