


You can deploy and forward traffic through VNF on the SD-WAN Edge, using third-party firewalls.
Only an Operator can enable the Security VNF configuration. If the Security VNF option is not available for you, contact your Operator.
Prerequisites
Ensure that you have the following:
- SD-WAN Orchestrator and activated SD-WAN Edge running software versions that support deploying a specific security VNF. For more information on the supported software versions and Edge platforms, refer to the Support Matrix in Security VNFs.
- Configured VNF Management service. For more information, see Configure VNF Management Service.
Procedure
- In the Device tab, scroll down to the Security VNF section and click Edit.

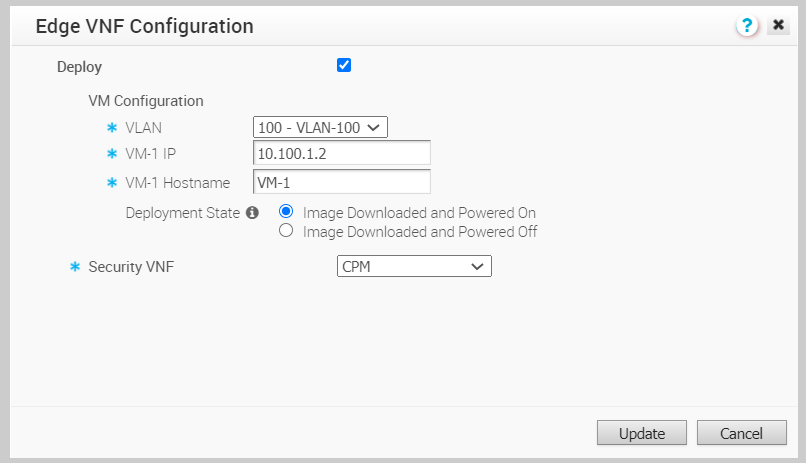
- Configure the following in VM Configuration:
- VLAN – Choose a VLAN, to be used for the VNF management, from the drop-down list.
- VM-1 IP – Enter the IP address of the VM and ensure that the IP address is in the subnet range of the chosen VLAN.
- VM-1 Hostname – Enter a name for the VM host.
- Deployment State – Choose one of the following options:
- Image Downloaded and Powered On – This option powers up the VM after building the firewall VNF on the Edge. The traffic transits the VNF only when this option is chosen, which requires at least one VLAN or routed interface be configured for VNF insertion.
- Image Downloaded and Powered Off – This option keeps the VM powered down after building the firewall VNF on the Edge. Do not select this option if you intend to send traffic through the VNF.
- Security VNF – Choose a pre-defined VNF management service from the drop-down list. You can also click New VNF Service to create a new VNF management service. For more information, see Configure VNF Management Service.
The following image shows an example of Check Point Firewall as the Security VNF type.
 If you choose Palo Alto Networks Firewall as Security VNF, configure the following additional settings:
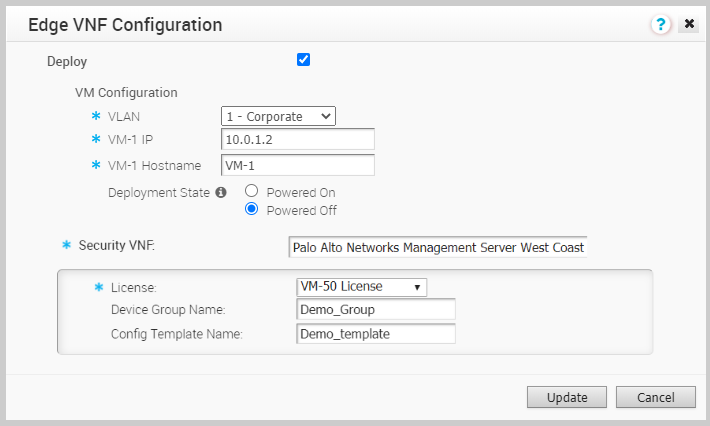
- License – Select the VNF License from the drop-down list.
- Device Group Name – Enter the device group name pre-configured on the Panorama Server.
- Config Template Name – Enter the configuration template name pre-configured on the Panorama Server.
Note: If you want to remove the deployment of Palo Alto Networks Firewall configuration from a VNF type, ensure that you have deactivated the VNF License of Palo Alto Networks before removing the configuration.If you choose Fortinet Firewall, configure the following additional settings: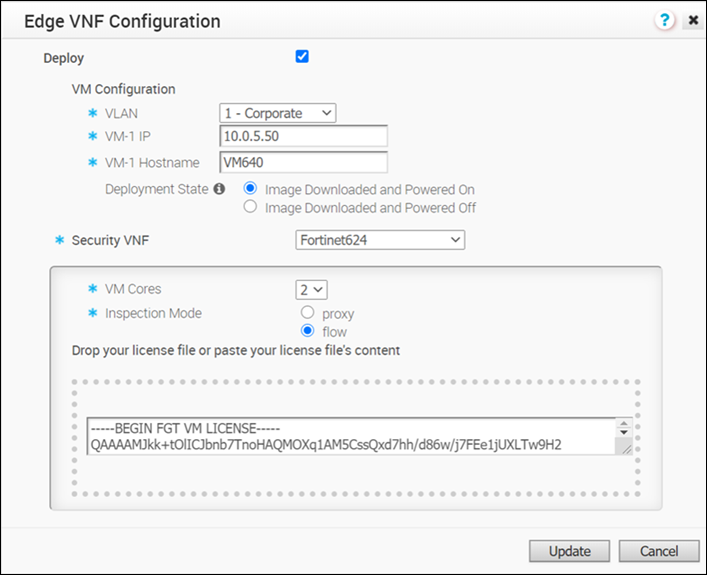
- VM Cores – Select the number of cores from the drop-down list. The VM License is based on the VM cores. Ensure that your VM License is compatible with the number of cores selected.
- Inspection Mode – Choose one of the following modes:
- Proxy – This option is selected by default. Proxy-based inspection involves buffering traffic and examining the data as a whole for analysis.
- Flow – Flow-based inspection examines the traffic data as it passes through the FortiGate unit without any buffering.
- License – Drag and drop the VM License.
- Click Update.
Results
The configuration details are displayed in the Security VNF section.

What to do next
If you want to redirect multiple traffic segments to the VNF, define mapping between Segments and service VLANs. See Define Mapping Segments with Service VLANs
You can insert the security VNF into both the VLAN as well as routed interface to redirect the traffic from the VLAN or the routed interface to the VNF. See Configure VLAN with VNF Insertion.
