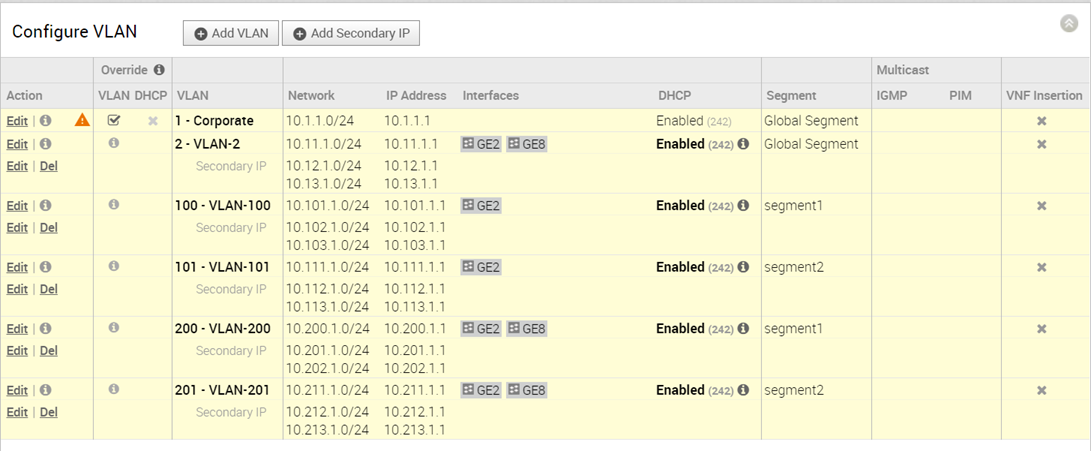
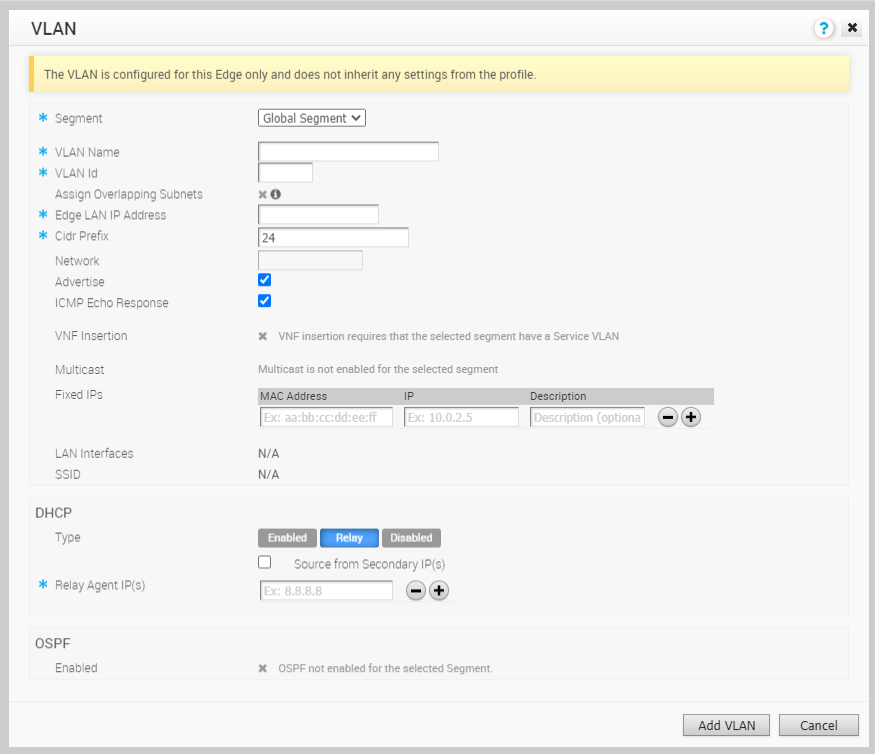
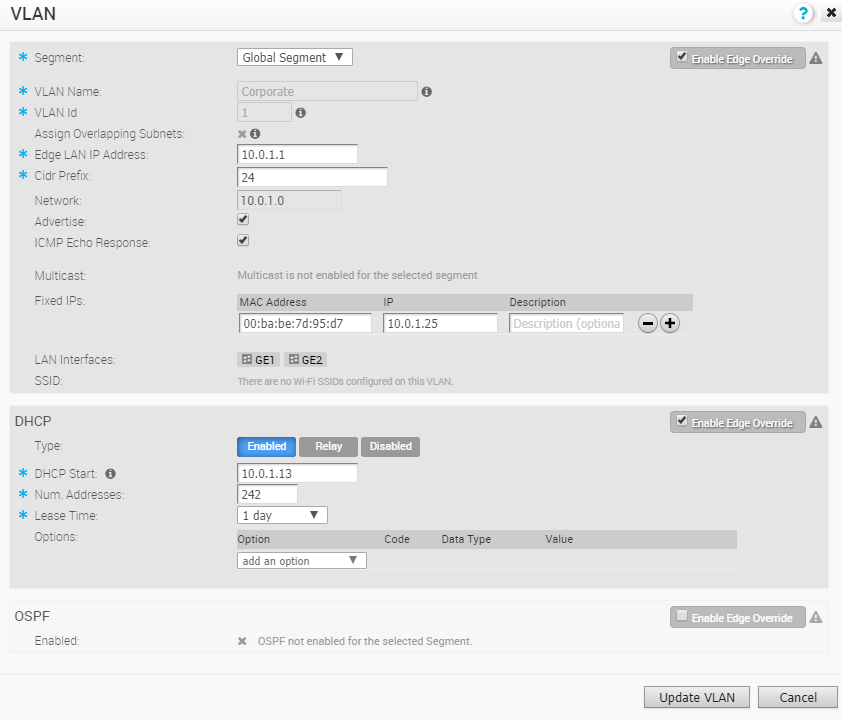
At an Edge level, you can add a new VLAN or update the existing VLAN settings inherited from the associated Profile. While configuring a new VLAN at the Edge level, SD-WAN Orchestrator allows you to configure additional Edge-specific VLAN settings such as Fixed IP addresses, LAN interfaces, and Service Set Identifier (SSID) of Wi-Fi interfaces.
- In the Enterprise portal, click .
- Click the Device Icon next to an Edge, or click the link to an Edge and then click the Device tab.
- In the Device tab, scroll down to the Configure VLAN section.

You can add or edit a VLAN and add multiple secondary IP addresses to the VLAN.
Add VLANs
To add a VLAN, click Add VLAN.

Configure the following settings:
| Option | Description |
|---|---|
| Segment | Select a segment from the drop-down list. The VLAN belongs to the selected segment. |
| VLAN Name | Enter a unique name for the VLAN |
| VLAN Id | Enter the VLAN ID. |
| Assign Overlapping Subnets | The LAN IP Addressing is managed from the assigned Profile of the Edge. When this checkbox is selected, the values for Edge LAN IP Address, Cidr Prefix, and DHCP are inherited from the associated Profile and are read-only. The Network address is automatically set based on the subnet mask and CIDR value. |
| Edge LAN IP Address | Enter the LAN IP address of the Edge. |
| Cidr Prefix | Enter the CIDR prefix for the LAN IP address. |
| Network | Enter the IP address of the Network. |
| Advertise | Select the checkbox to advertise the VLAN to other branches in the network. |
| ICMP Echo Response | Select the checkbox to enable the VLAN to respond to ICMP echo messages. |
| VNF Insertion | Select the checkbox to insert a VNF to the VLAN, which redirects traffic from the VLAN to the VNF. To enable VNF Insertion, ensure that the selected segment is mapped with a service VLAN. |
| Multicast | This option is enabled only when you have configured multicast settings for the Edge. You can configure the following multicast settings for the VLAN.
Click
toggle advanced multicast settings to set the timers:
|
| Fixed IPs | Enter the IP addresses tied to specific MAC Addresses for the VLAN. |
| LAN Interfaces | Configure the LAN Interfaces for the VLAN. |
| SSID | Configure the Wi-Fi SSID details for the VLAN. |
| DHCP Type | Choose one of the following DHCP settings:
Enabled – Enables DHCP with the Edge as the DHCP server. Configure the following details:
Relay – Enables DHCP with the DHCP Relay Agent installed at a remote location. If you choose this option, configure the following:
Disabled – Disables DHCP. |
| OSPF | This option is enabled only when you have configured OSPF for the Edge. Select the checkbox and choose an OSPF from the drop-down list. |
After configuring the required parameters, click Add VLAN.
Edit VLANs
To update the existing VLAN settings inherited from the Profile, click the Edit link corresponding to the VLAN.

Click the Enable Edge Override checkboxes to override the VLAN settings inherited from the Profile.
After modifying the required parameters, click Update VLAN.
For Configuring VLANs at the Profile level, see Configure VLAN for Profiles.
Secondary IP Addresses
The VLAN is configured with a primary IP address. You can add secondary IP addresses to the VLAN, to increase the number of host addresses for a network segment. To add secondary IP addresses to the VLAN, click Add Secondary IP.

In the Add Secondary IP window, select a VLAN from the drop-down list and click Next.
Configure the following settings:

| Option | Description |
|---|---|
| Addressing Type | By default, the addressing type is Static and you cannot modify the type. |
| IP Address | Enter the secondary IP address for the selected VLAN. |
| Cidr Prefix | Enter the CIDR prefix for the IP address. |
| Network | Displays the IP address of the Network, which is auto-generated from the secondary IP address and CIDR prefix. |
| Advertise | Select the checkbox to advertise the secondary IP address network of the VLAN to other branches in the network. |
| ICMP Echo Response | Select the checkbox to enable the VLAN with the secondary IP address to respond to ICMP echo messages. |
Click OK.
In the Device tab, click Save Changes to save the settings.