


In a Profile, you can configure Interface settings for various Edge models.
You can configure the Interface settings for each Edge model. Each Interface on an Edge can be a Switch Port (LAN) or a Routed (WAN) Interface. The Interface settings vary based on the Edge model. For more information on different Edge models and deployments, see Configure Interface Settings.
To configure the Interface settings for different Edge models in a Profile:
- In the SD-WAN service of the Enterprise portal, go to .
- The Profiles page displays the existing Profiles.
- Click the link to a Profile or click the View link in the Device column of the Profile. You can also select a Profile and click Modify to configure the Profile.
- The configuration options for the selected Profile are displayed in the Device tab.
- In the Connectivity category, click Interfaces. The Edge models available in the selected Profile are displayed:
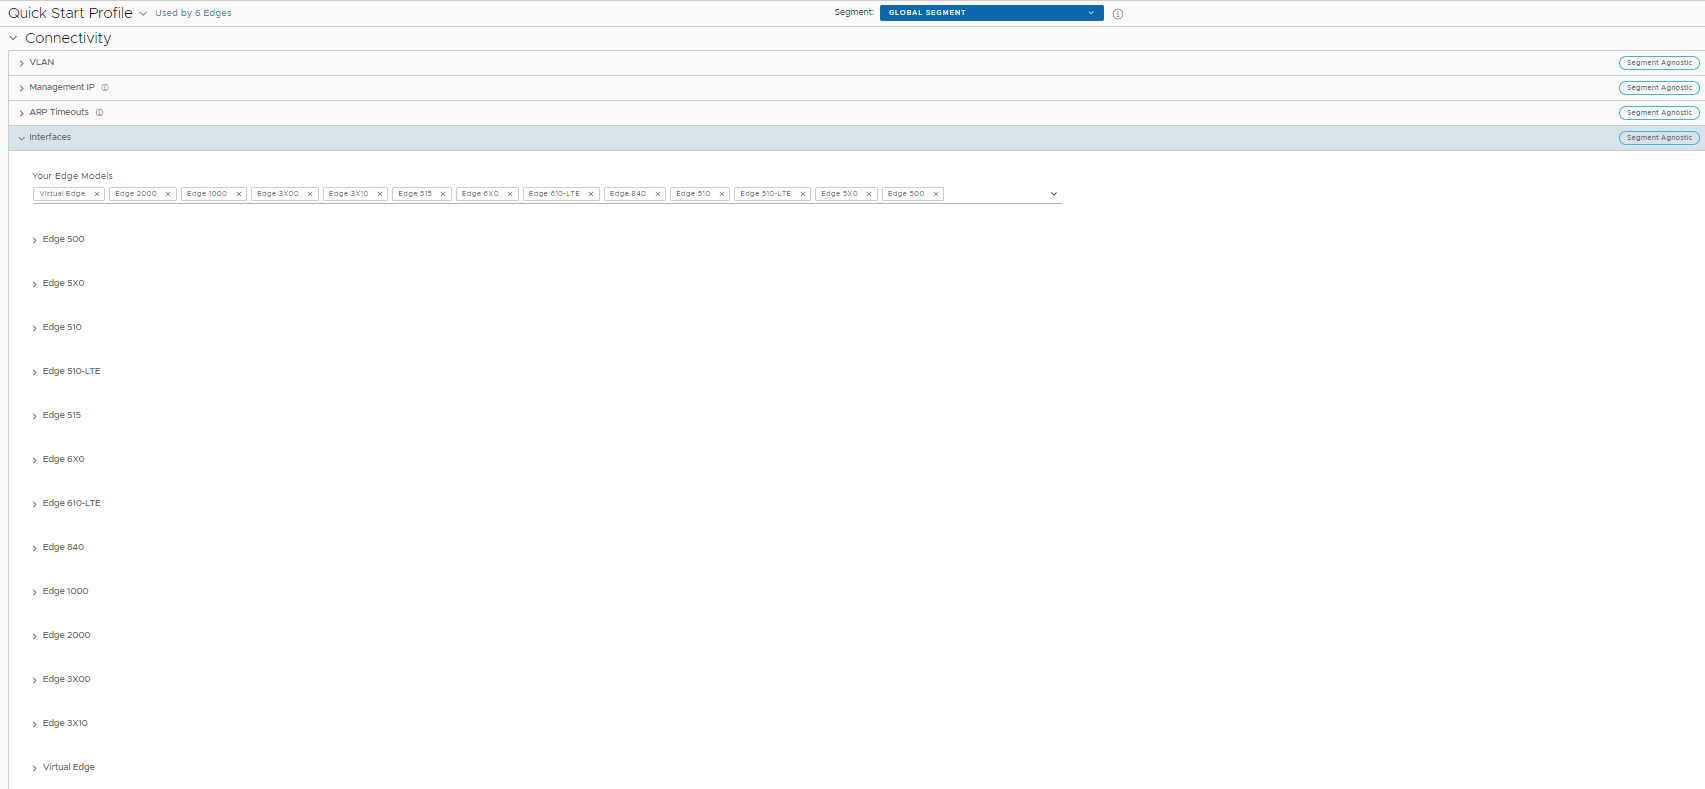
- Click an Edge model to view the Interfaces available in the Edge.
You can edit the settings for the following types of Interfaces, based on the Edge model:
- Switch Port
- Routed Interface
- WLAN Interface
You can also add Sub Interface, Secondary IP address, and Wi-Fi SSID based on the Edge model.

- Configure the settings for a Routed Interface. See the table below for a description of these configuration settings.
Note: The Interface settings in the table below can be overwritten at the Edge level.
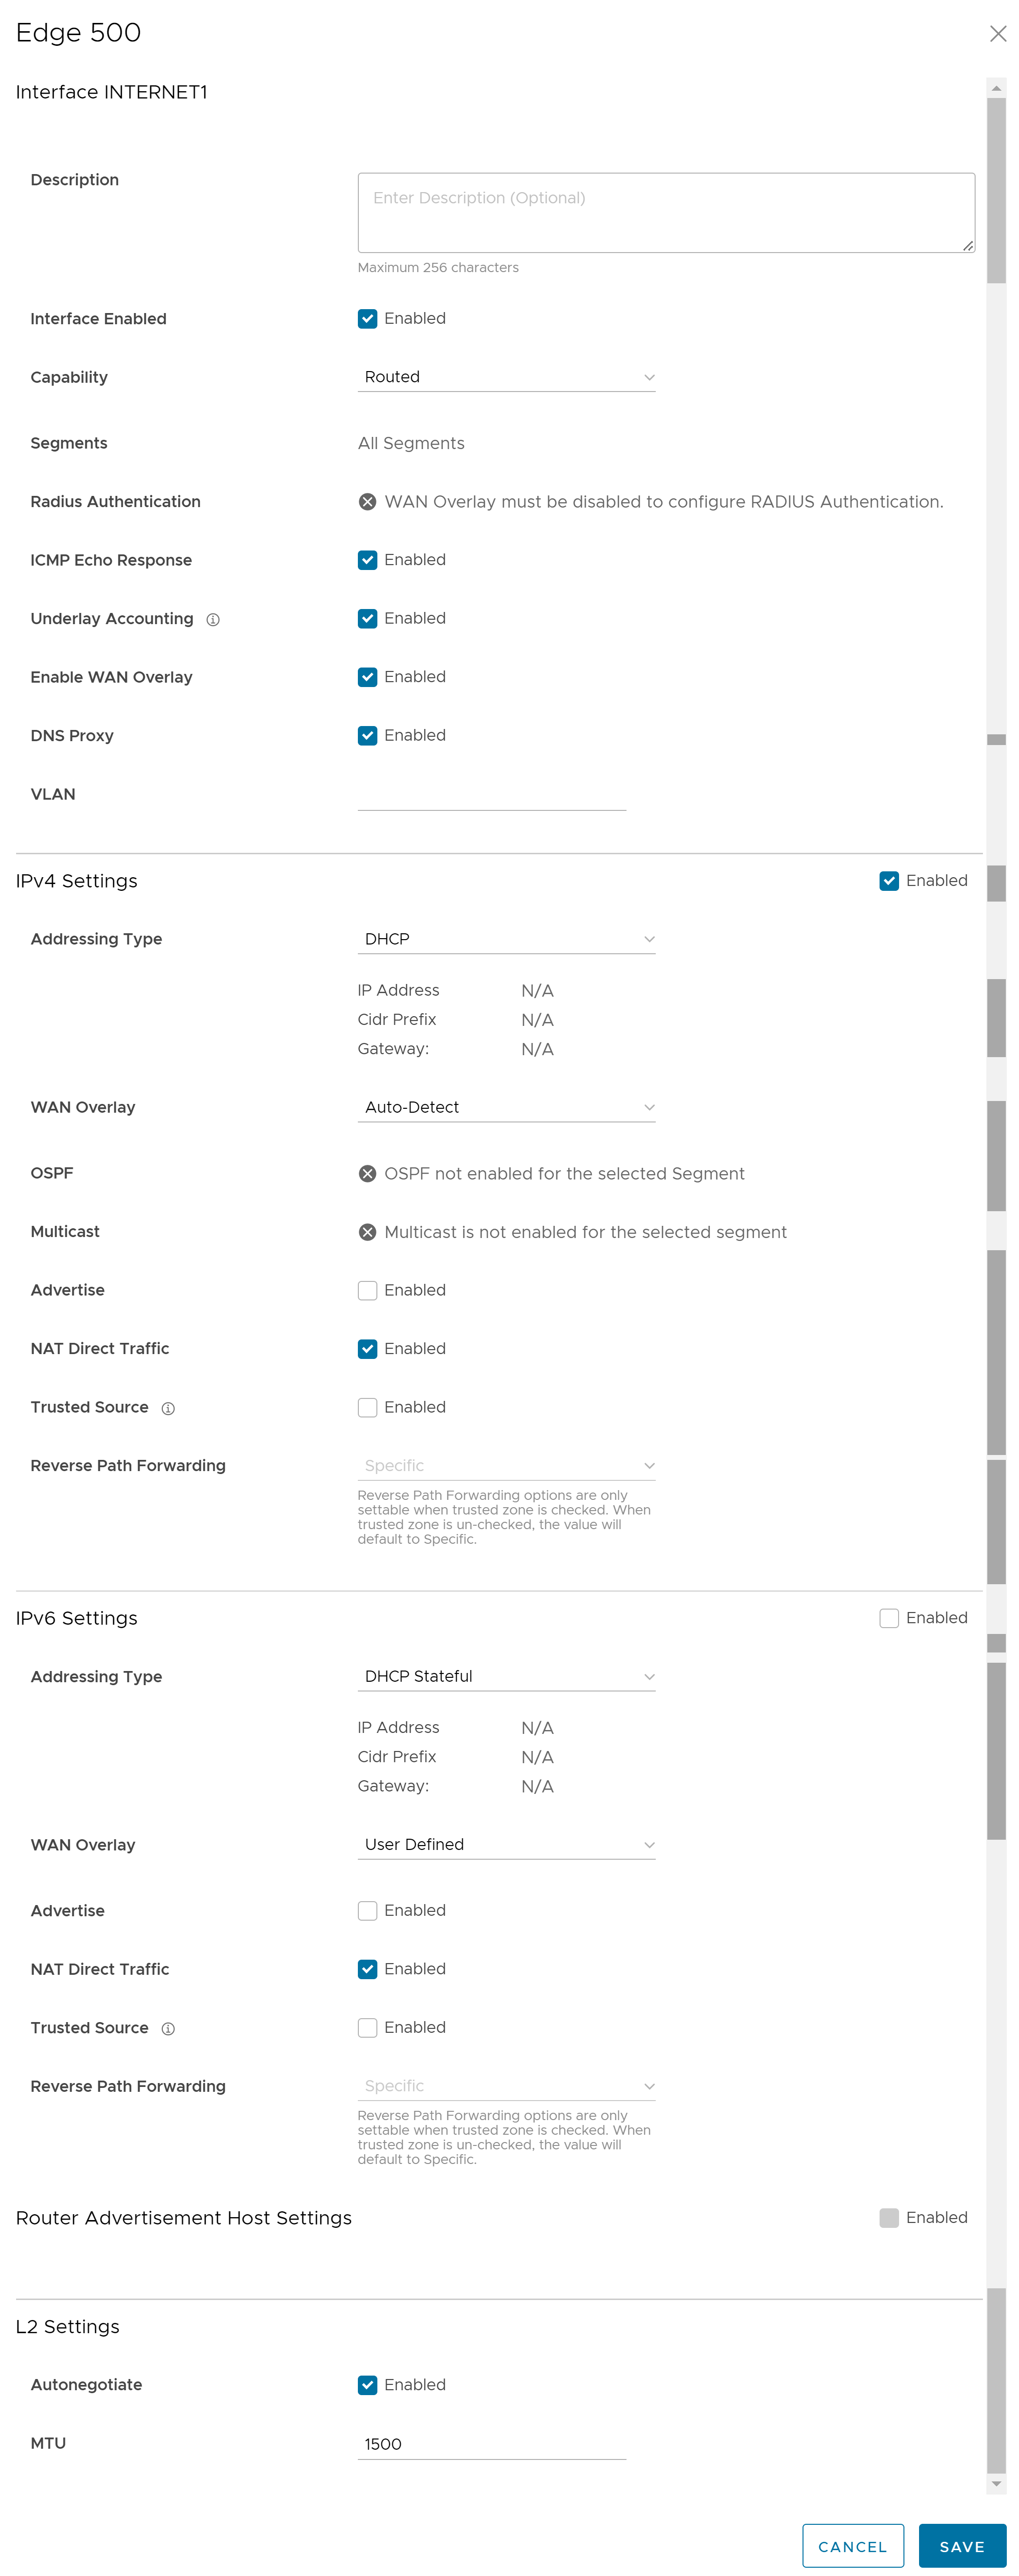
Option Description Description Type the description. This field is optional. Interface Enabled This check box is selected by default. If required, you can deactivate the Interface. When deactivated, the Interface is not available for any communication. Capability For a Routed interface, the option Routed is selected by default. You can choose to convert the port to a Switch Port Interface by selecting the option Switched from the drop-down list. Segments By default, the configuration settings are applicable to all the segments. This field cannot be edited. Radius Authentication Deactivate the Enable WAN Overlay check box to configure Radius Authentication. Select the Radius Authentication check box and add the MAC addresses of pre-authenticated devices. ICMP Echo Response This check box is selected by default. This helps the Interface to respond to ICMP echo messages. You can deactivate this option for security purposes. Underlay Accounting This check box is selected by default. If a private WAN overlay is defined on the Interface, all underlay traffic traversing the interface are counted against the measured rate of the WAN link to prevent over-subscription. Deactivate this option to avoid this behavior. Note: Underlay Accounting is supported for both, IPv4 and IPv6 addresses.Enable WAN Overlay This check box is selected by default. This helps to activate WAN overlay for the Interface. DNS Proxy The DNS Proxy feature provides additional support for Local DNS entries on the Edges associated with the Profile, to point certain device traffic to specific domains. You can activate or deactivate this option, irrespective of IPv4 or IPv6 DHCP Server setting. Note: This check box is available only for a Routed Interface and a Routed Sub Interface.Note: If IPv4/IPv6 DHCP Server is activated and DNS Proxy is deactivated then the DNS Proxy feature will not work as expected and may result in DNS resolution failure.VLAN For an Access port, select an existing VLAN from the drop-down list. For a Trunk port, you can select multiple VLANs and select an untagged VLAN. IPv4 Settings – Select the check box to activate IPv4 Settings. Addressing Type By default, DHCP is selected, which assigns an IPv4 address dynamically. If you select Static or PPPoE, you must configure the addressing details for each Edge. WAN Overlay By default, Auto-Detect Overlay is activated. You can choose the User Defined Overlay and configure the Overlay settings. For more information, see Configure Edge WAN Overlay Settings. Note: If you have a CSS GRE tunnel created for an Edge and if you change the WAN Overlay settings of the WAN link associated with the CSS tunnel interface from "Auto-Detect Overlay" to "User-Defined Overlay", the WAN link and the associated CSS tunnels are also removed from the CSS configuration at the Edge level.OSPF This option is available only when you have configured OSPF for the Profile. Select the check box and choose an OSPF from the drop-down list. Click toggle advance ospf settings to configure the Interface settings for the selected OSPF. Note: OSPF is not supported on Sub Interfaces, and it is not supported on non Global Segments.The OSPFv2 configuration supports only IPv4. The OSPFv3 configuration supports only IPv6, which is only available in the 5.2 release.For more information on OSPF settings and OSPFv3, see Activate OSPF for Profiles.Note: OSFPv3 is only available in the 5.2 release.Multicast This option is available only when you have configured multicast settings for the Profile. You can configure the following multicast settings for the selected Interface. - IGMP - Select the check box to activate Internet Group Management Protocol (IGMP). Only IGMP v2 is supported.
- PIM – Select the check box to activate Protocol Independent Multicast. Only PIM Sparse Mode (PIM-SM) is supported.
Click toggle advanced multicast settings to configure the following timers:- PIM Hello Timer – The time interval at which a PIM Interface sends out Hello messages to discover PIM neighbors. The range is from 1 to 180 seconds and the default value is 30 seconds.
- IGMP Host Query Interval – The time interval at which the IGMP querier sends out host-query messages to discover the multicast groups with members, on the attached network. The range is from 1 to 1800 seconds and the default value is 125 seconds.
- IGMP Max Query Response Value – The maximum time that the host has to respond to an IGMP query. The range is from 10 to 250 deciseconds and the default value is 100 deciseconds.
Note: Currently, Multicast Listener Discovery (MLD) is deactivated. Hence, Edge will not send the multicast listener report when IPv6 address is assigned to Interface. If there is a snooping switch in the network then not sending MLD report may result in Edge not receiving multicast packets which are used in Duplicate Address Detection (DAD). This would result in DAD success even with duplicate address.VNF Insertion You must deactivate WAN Overlay and select the Trusted Source check box to activate VNF Insertion. When you insert the VNF into Layer 3 interfaces or sub-interfaces, the system redirects traffic from the Layer 3 interfaces or sub interfaces to the VNF. Advertise Select the check box to advertise the Interface to other branches in the network. NAT Direct Traffic Select the check box to activate NAT Direct traffic for IPv4 on a routed interface. Caution:It is possible that an older version of the SASE Orchestrator inadvertently configured NAT Direct on a main interface with either a VLAN or subinterface configured. If that interface is sending direct traffic one or hops away, the customer would not observe any issues because the NAT Direct setting was not being applied. However, when an Edge is upgraded to 5.2.0 or later, the Edge build includes a fix for the issue (Ticket #92142) with NAT Direct Traffic not being properly applied, and there is a resulting change in routing behavior since this specific use case was not implemented in prior releases.
In other words, because a 5.2.0 or later Edge now implements NAT Direct in the expected manner for all use cases, traffic that previously worked (because NAT Direct was not being applied per the defect) may now fail because the customer never realized that NAT Direct was checked for an interface with a VLAN or subinterface configured.
As a result, a customer upgrading their Edge to Release 5.2.0 or later should first check their Profiles and Edge interface settings to ensure NAT Direct is configured only where they explicitly require it and to deactivate this setting where it is not, especially if that interface has a VLAN or subinterface configured.
Trusted Source Select the check box to set the Interface as a trusted source. Reverse Path Forwarding You can choose an option for Reverse Path Forwarding (RPF) only when you have selected the Trusted Source check box. This option allows traffic on the interface only if return traffic can be forwarded on the same interface. This helps to prevent traffic from unknown sources like malicious traffic on an enterprise network. If the incoming source is unknown, then the packet is dropped at ingress without creating flows. Select one of the following options from the drop-down list: - Not Enabled – Allows incoming traffic even if there is no matching route in the route table.
- Specific – This option is selected by default, even when the Trusted Source option is deactivated. The incoming traffic should match a specific return route on the incoming interface. If a specific match is not found, then the incoming packet is dropped. This is a commonly used mode on interfaces configured with public overlays and NAT.
- Loose – The incoming traffic should match any route (Connected/Static/Routed) in the routing table. This allows asymmetrical routing and is commonly used on interfaces that are configured without next hop.
IPv6 Settings – Select the check box to activate IPv6 Settings. Addressing Type Choose one of the options from the following to assign an IPv6 address dynamically. - DHCP Stateless – Allows the Interface to self-configure the IPv6 address. It is not necessary to have a DHCPv6 server available at the ISP. An ICMPv6 discover message originates from the Edge and is used for auto-configuration.
Note: In DHCP Stateless configuration, two IPv6 addresses are created at the Kernel Interface level. The Edge does not use the host address which matches the Link local address.
- DHCP Stateful – This option is similar to DHCP for IPv4. The Gateway connects to the DHCPv6 server of the ISP for a leased address and the server maintains the status of the IPv6 address.
Note: In stateful DHCP, when the valid lifetime and preferred lifetime are set with the infinite value (0xffffffff(4294967295)), the timer does not work properly. The maximum value that the valid and preferred timers can hold is 2147483647.
- Static – If you select this option, you should configure the addressing details for each Edge.
Note: For Cell Interfaces, the Addressing Type would be Static by default.WAN Overlay By default, Auto-Detect Overlay is activated. You can choose the User Defined Overlay and configure the Overlay settings. For more information, see Configure Edge WAN Overlay Settings. OSFP This option is available only when you have configured OSPF for the Profile. Select the check box and choose an OSPF from the drop-down list. Click toggle advance ospf settings to configure the Interface settings for the selected OSPF. Note: OSPF is not supported on Sub Interfaces, and it is not supported on non Global Segments.The OSPFv2 configuration supports only IPv4. The OSPFv3 configuration supports only IPv6.For more information on OSPF settings and OSPFv3, see Activate OSPF for ProfilesNote: OSFPv3 is only available in the 5.2 release.Advertise Select the check box to advertise the Interface to other branches in network. NAT Direct Traffic Select the check box to activate NAT Direct traffic for IPv6 on a routed interface. Caution:It is possible that an older version of the SASE Orchestrator inadvertently configured NAT Direct on a main interface with either a VLAN or subinterface configured. If that interface is sending direct traffic one or hops away, the customer would not observe any issues because the NAT Direct setting was not being applied. However, when an Edge is upgraded to 5.2.0 or later, the Edge build includes a fix for the issue (Ticket #92142) with NAT Direct Traffic not being properly applied, and there is a resulting change in routing behavior since this specific use case was not implemented in prior releases.
In other words, because a 5.2.0 or later Edge now implements NAT Direct in the expected manner for all use cases, traffic that previously worked (because NAT Direct was not being applied per the defect) may now fail because the customer never realized that NAT Direct was checked for an interface with a VLAN or subinterface configured.
As a result, a customer upgrading their Edge to Release 5.2.0 or later should first check their Profiles and Edge interface settings to ensure NAT Direct is configured only where they explicitly require it and to deactivate this setting where it is not, especially if that interface has a VLAN or subinterface configured.
Trusted Source Select the check box to set the Interface as a trusted source. Reverse Path Forwarding You can choose an option for Reverse Path Forwarding (RPF) only when you have selected the Trusted Source check box. This option allows traffic on the interface only if return traffic can be forwarded on the same interface. This helps to prevent traffic from unknown sources like malicious traffic on an enterprise network. If the incoming source is unknown, then the packet is dropped at ingress without creating flows. Select one of the following options from the drop-down list: - Not Enabled – Allows incoming traffic even if there is no matching route in the route table.
- Specific – This option is selected by default, even when the Trusted Source option is deactivated. The incoming traffic should match a specific return route on the incoming interface. If a specific match is not found, then the incoming packet is dropped. This is a commonly used mode on interfaces configured with public overlays and NAT.
- Loose – The incoming traffic should match any route (Connected/Static/Routed) in the routing table. This allows asymmetrical routing and is commonly used on interfaces that are configured without next hop.
Router Advertisement Host Settings - These settings are available only when you select the IPv6 Settings check box, and choose the Addressing Type as DHCP Stateless or DHCP Stateful. Select the check box to display the following RA parameters. These parameters are activated by default. If required, you can deactivate them. Note: When RA host parameters are deactivated and activated again, then the Edge waits for the next RA to be received before installing routes, MTU, and ND/NS parameters.MTU Accepts the MTU value received through Route Advertisement. If you deactivate this option, the MTU configuration of the Interface is considered. Default Routes Installs default routes when Route Advertisement is received on the Interface. If you deactivate this option, then there is no default routes available for the Interface. Specific Routes Installs specific routes when Route Advertisement receives route information on the Interface. If you deactivate this option, the Interface does not install the route information. ND6 Timers Accepts ND6 timers received through Route Advertisement. If you deactivate this option, default ND6 timers are considered. The default value for NDP retransmit timer is 1 second and NDP reachable timeout is 30 seconds. L2 Settings Autonegotiate This check box is selected by default. This allows the port to communicate with the device on the other end of the link to determine the optimal duplex mode and speed for the connection. Speed This option is available only when Autonegotiate is deactivated. Select the speed at which the port communicates with other links. By default, 100 Mbps is selected. Duplex This option is available only when Autonegotiate is deactivated. Select the mode of the connection as Full duplex or Half duplex. By default, Full duplex is selected. MTU The default MTU size for frames received and sent on all routed interfaces is 1500 bytes. You can change the MTU size for an Interface. Note: A warning message is displayed when DNS proxy check box is selected in the following scenarios:- Both IPv4 and IPv6 DHCP Servers are Deactivated.
- IPv4 DHCP Server is in Relay state and IPv6 DHCP Server is Deactivated.
If you are using USB Modem to connect to the network, to enable IPv6 addressing, configure the following manually in the Edge:- Add the global parameter
“usb_tun_overlay_pref_v6”:1to/etc/config/edged, to update the preference to IPv6 address. - Run the following command to update the IP type of the Interface to IPv6.
/etc/modems/modem_apn.sh [USB] [ACTION] [ACTION ARGS...]
Enter the parameters as follows:
- USB – Enter the USB Number
- Enter the APN settings as follows:
- apn – Enter the Access Point Name.
- username – Enter the username provided by the carrier.
- password – Enter the password provided by the carrier.
- spnetwork – Enter the name of the Service Provider Network.
- simpin – Enter the PIN number used to unlock the SIM card.
- auth – Specify the Authentication type.
- iptype – Enter the type of IP address.
The following is an example command with sample parameters:
/etc/modems/modem_apn.sh USB3 set ‘’vzwinternet’' ‘’ ‘VERIZON’ ‘’ ‘’ ‘ipv4v6’
- Configure the settings for a Switched Interface. See the table below for a description of these configuration settings.
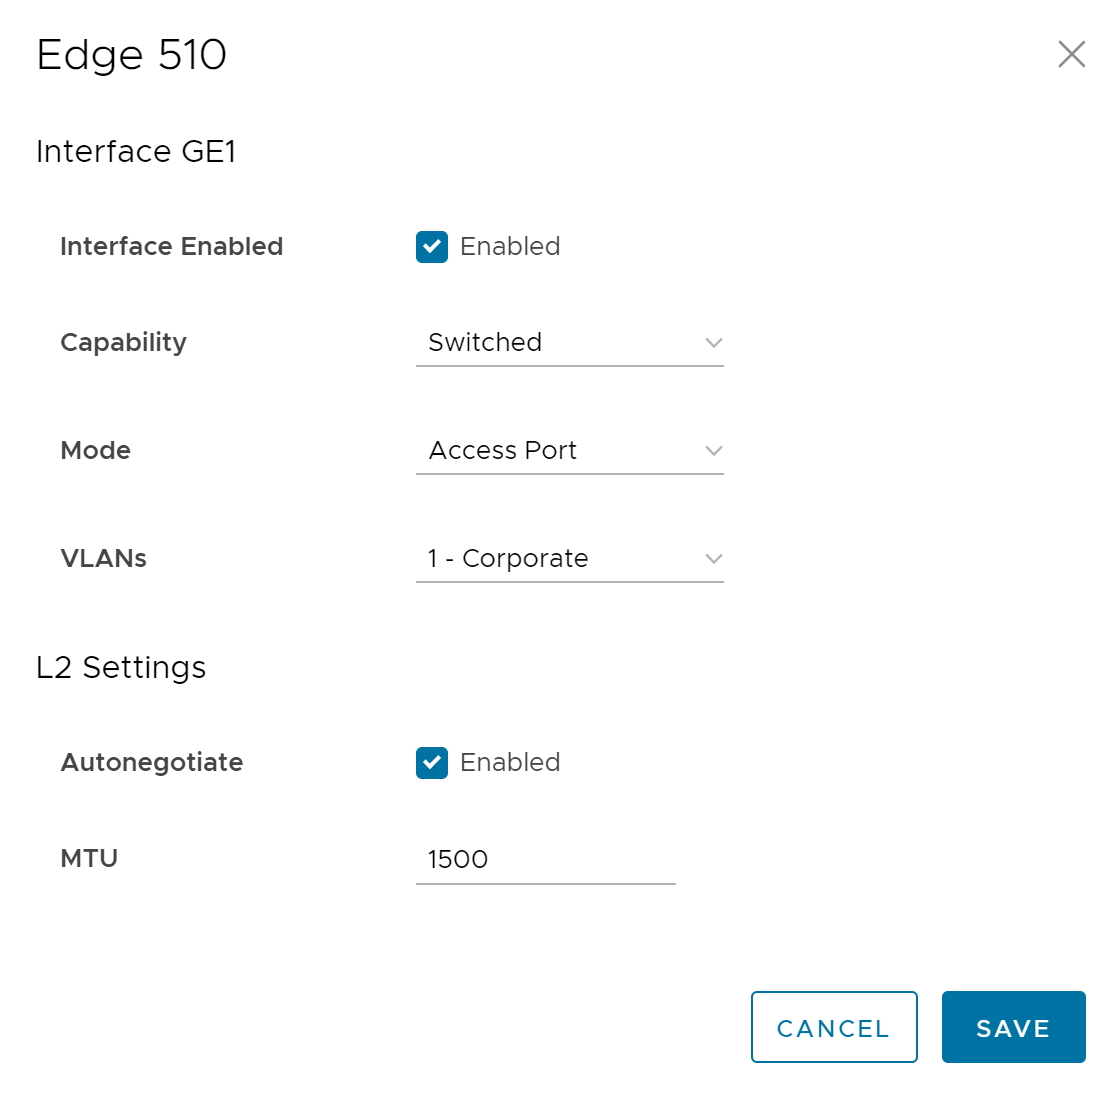
Option Description Interface Enabled This option is activated by default. If required, you can deactivate the Interface. When deactivated, the Interface is not available for any communication. Capability For a Switch Port, the option Switched is selected by default. You can choose to convert the port to a routed Interface by selecting the option Routed from the drop-down list. Mode Select the mode of the port as Access or Trunk port. VLANs For an Access port, select an existing VLAN from the drop-down list. For a Trunk port, you can select multiple VLANs and select an untagged VLAN.
L2 Settings Autonegotiate This option is activated by default. When activated, Auto negotiation allows the port to communicate with the device on the other end of the link to determine the optimal duplex mode and speed for the connection. Speed This option is available only when Autonegotiate is deactivated. Select the speed that the port has to communicate with other links. By default, 100 Mbps is selected. Duplex This option is available only when Autonegotiate is deactivated. Select the mode of the connection as Full duplex or Half duplex. By default, Full duplex is selected. MTU The default MTU size for frames received and sent on all switch interfaces is 1500 bytes. You can change the MTU size for an Interface. - You can also add a Sub Interface, Secondary IP address, and Wi-Fi SSID based on the Edge model. Click Delete to remove a selected interface.
- To add Sub Interfaces to an existing Interface:
- In the Interface section, click Add SubInterface.
- In the Select Interface window, select the Interface for which you want to add a Sub Interface.
- Enter the Subinterface ID and click Next.
- In the Sub Interface window, configure the Interface settings.
- To add Secondary IP addresses to an existing Interface:
- In the Interface section, click Add Secondary IP.
- In the Select Interface window, select the Interface for which you want to add a secondary IP address.
- Enter the Subinterface ID and click Next.
- In the Secondary IP window, configure the Interface settings.
- Some of the Edge models support Wireless LAN. To add Wi-Fi SSID to an existing Interface:
- In the Interface section, click Add Wi-Fi SSID. The WLAN Interface settings window appears.
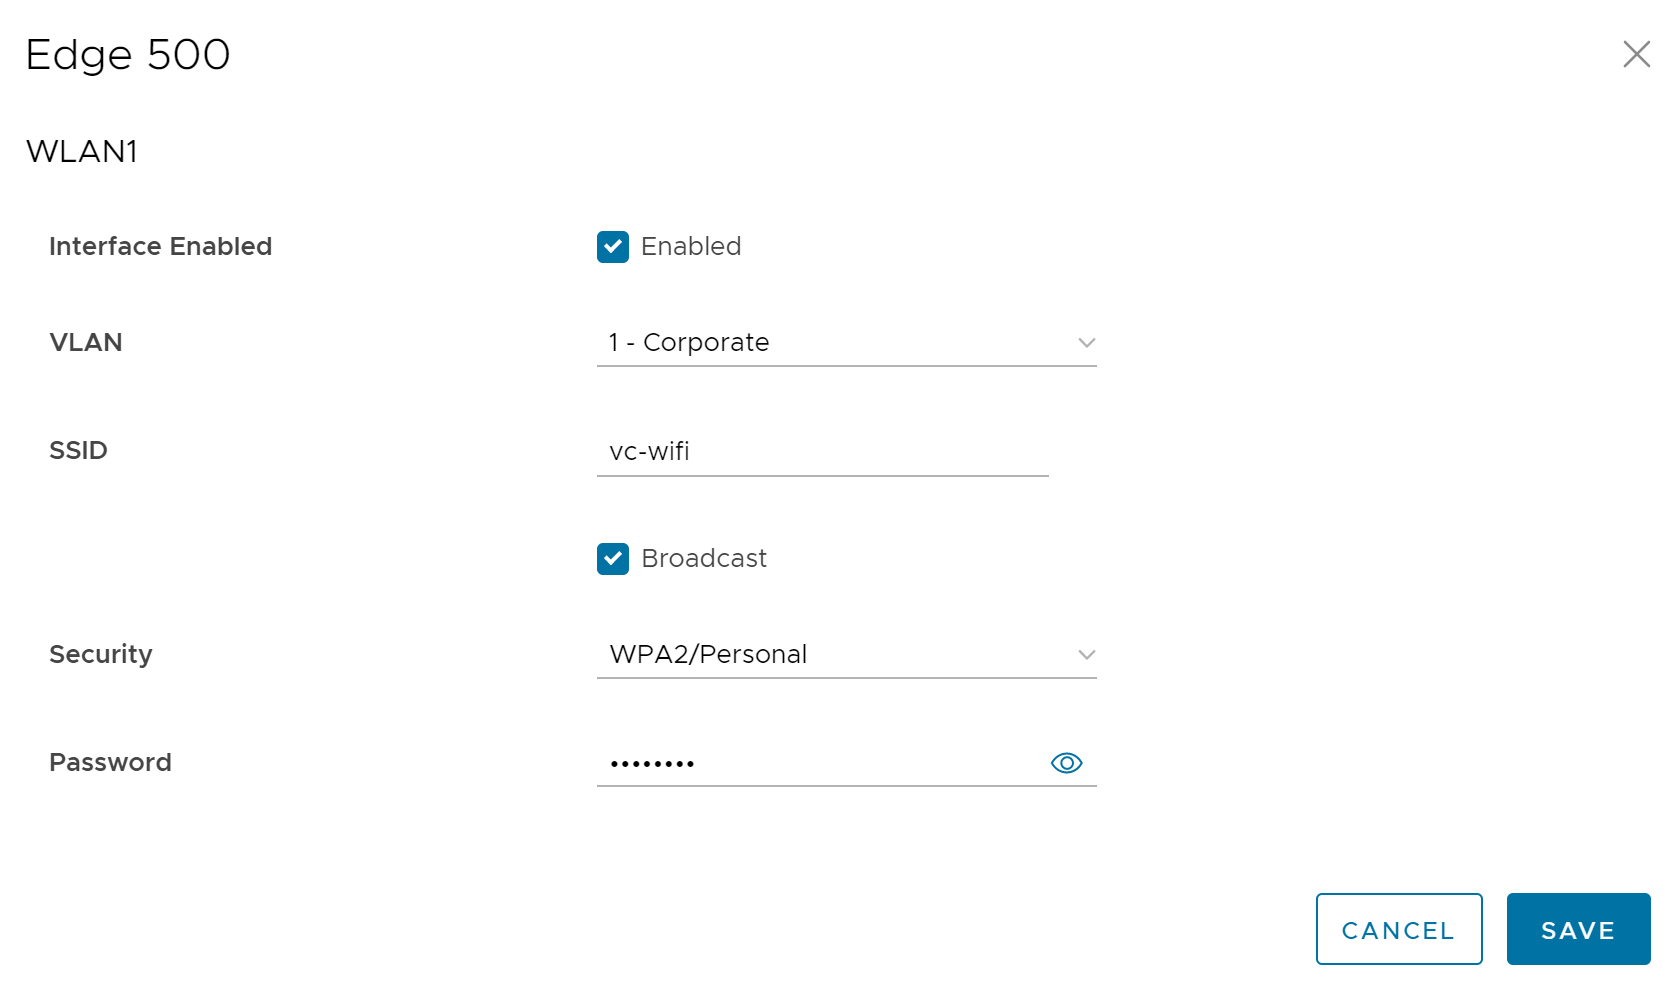
- Configure the following WLAN Interface settings:
Option Description Interface Enabled This option is enabled by default. If required, you can deactivate the Interface. When deactivated, the Interface is not available for any communication. VLAN Choose the VLAN to be used by the Interface. SSID Enter the wireless network name. Select the Broadcast check box to broadcast the SSID name to the surrounding devices.
Security Select the type of security for the Wi-Fi connection, from the drop-down list. The following options are available: - Open – No security is enforced.
- WPA2 / Personal – A password is required for authentication. Enter the password in the Passphrase field.
Note: Starting from the 4.5 release, the use of the special character "<" in the password is no longer supported. In cases where users have already used "<" in their passwords in previous releases, they must remove it to save any changes on the page.
- WPA2 / Enterprise – A RADIUS server is used for authentication. You should have already configured a RADIUS server and selected it for the Profile and Edge.
To configure a RADIUS server, see Configure Authentication Services.
To select the RADIUS server for a Profile, see Configure Authentication Settings for Profiles.
- In the Interface section, click Add Wi-Fi SSID. The WLAN Interface settings window appears.
- To add Sub Interfaces to an existing Interface:
- Click Save Changes in the Device window.
When you configure the Interface Settings for a Profile, the settings are automatically applied to the Edges that are associated with the profile. If required, you can override the configuration for a specific Edge. See Configure Interface Settings for Edges.
