


An Edge has different types of Interfaces. By default, the Interface configuration settings of an Edge are inherited from the associated Profile. You can modify and configure more settings for each Edge.
The Interface Settings options vary based on the Edge model. For more information on different Edge models and deployments, see Configure Interface Settings.
To configure Interface settings for a specific Edge, perform the following steps:
- In the SD-WAN Service of the Enterprise portal, click . The Edges page displays the existing Edges.
- Click the link to an Edge or click the View link in the Device column of the Edge. The configuration options for the selected Edge are displayed in the Device tab.
- In the Connectivity category, expand Interfaces.
- The different types of Interfaces available for the selected Edge are displayed. Click the link to an Interface to edit the settings. The Interface settings screen as shown below appears.
You can edit the settings for the following types of Interfaces, based on the Edge model:
- Switch Port
- Routed Interface
- WLAN Interface
You can also add Sub Interface, Secondary IP address, and Wi-Fi SSID based on the Edge model.
- You can configure the following settings for a Routed Interface of an Edge.
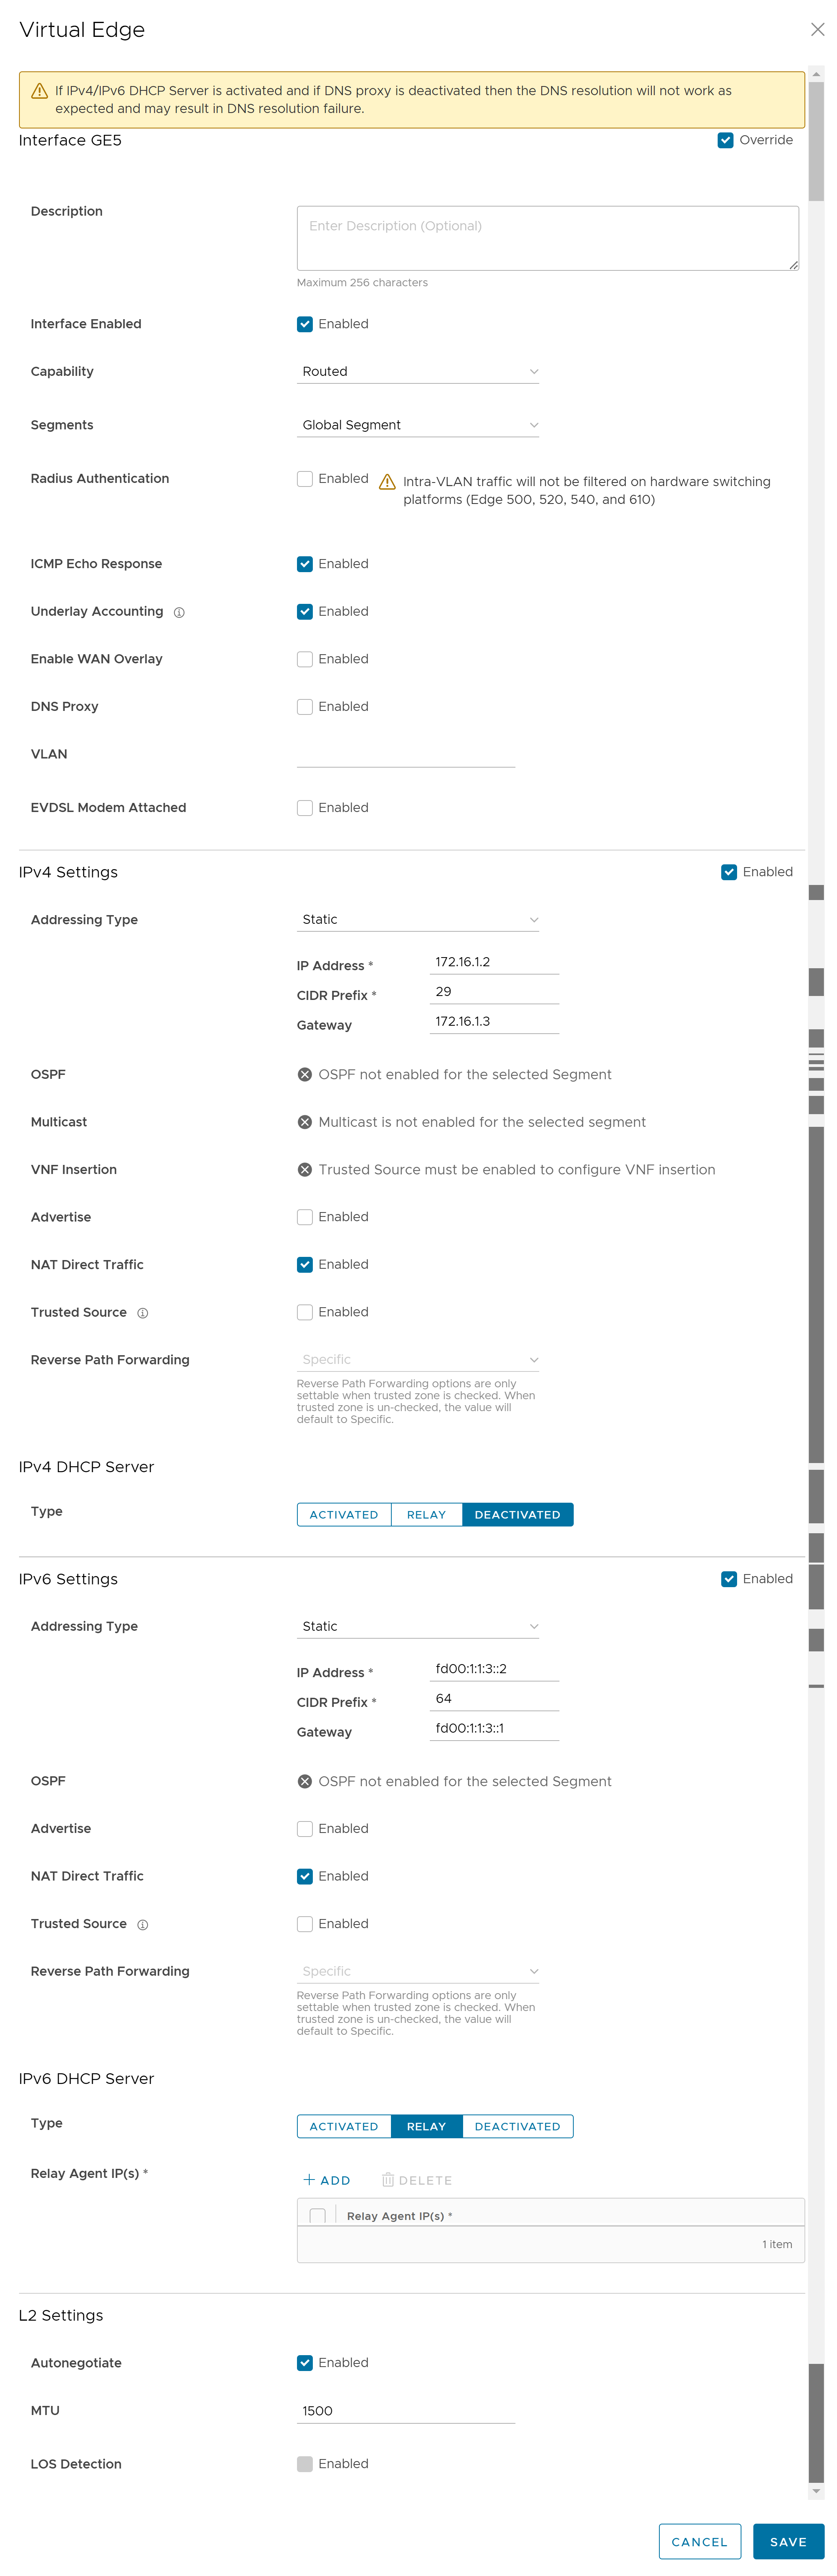
Option Description Description Enter a description. This field is optional. Interface Enabled This option is activated by default. If required, you can deactivate the Interface. When deactivated, the Interface is not available for any communication. Capability For a Switch Port, the option Switched is selected by default. You can choose to convert the port to a routed Interface by selecting the option Routed from the drop-down menu. Segments By default, the configuration settings are applicable to all the segments. Radius Authentication Deactivate the Enable WAN Overlay check box to configure Radius Authentication. Select the Radius Authentication check box and add the MAC addresses of pre-authenticated devices. ICMP Echo Response This check box is selected by default. This helps the Interface to respond to ICMP echo messages. You can deactivate this option for security purposes. Underlay Accounting This check box is selected by default. If a private WAN overlay is defined on the Interface, all underlay traffic traversing the interface are counted against the measured rate of the WAN link to prevent over-subscription. Deactivate this option to avoid this behavior. Note: Underlay Accounting is supported for both, IPv4 and IPv6 addresses.Enable WAN Overlay Select the check box to activate WAN overlay for the Interface. DNS Proxy The DNS Proxy feature provides additional support for Local DNS entries on the Edge, to point certain device traffic to specific domains. You can activate or deactivate this option, irrespective of IPv4 or IPv6 DHCP Server setting. Note: This check box is available only for a Routed Interface and a Routed Sub Interface.VLAN For an Access port, select an existing VLAN from the drop-down menu. For a Trunk port, you can select multiple VLANs and select an untagged VLAN. EVDSL Modem Attached Select this check box to activate an EVDSL Modem which is connected to one of the ethernet ports on the Edge. IPv4 Settings Select the Enable check box and configure the IPv4 settings. For more information, see IPv4 Settings section below. IPv6 Settings Select the Enable check box and configure the IPv6 settings. For more information, see IPv6 Settings section below. L2 Settings Autonegotiate This option is selected by default. When selected, Auto negotiation allows the port to communicate with the device on the other end of the link to determine the optimal duplex mode and speed for the connection. Speed This option is available only when Autonegotiate is not selected. Select the speed that the port has to communicate with other links. By default, 100 Mbps is selected. Note: Edge 720 and Edge 740 GE ports support an additional speed of 2500 Mbps.Duplex This option is available only when Autonegotiate is not selected. Select the mode of the connection as Full duplex or Half duplex. By default, Full duplex is selected. MTU The default MTU size for frames received and sent on all routed interfaces is 1500 bytes. You can change the MTU size for an Interface. LOS Detection This option is available only for a routed Interface of an Edge. Select the check box to activate Loss of Signal (LoS) detection by using ARP monitoring. For more information, see HA LoS Detection on Routed Interfaces. Note: You can select the check box only when you have activated High Availability on the Edge.
IPv4 Settings
Select the Enabled check box to configure the following IPv4 Settings:
| Option | Description |
|---|---|
| Addressing Type | Select an addressing type:
Note: 31-bit prefixes are supported for IPv4 as per RFC 3021.
|
| OSPF | This option is available only when you have configured OSPF for the selected Segment. Select the check box and choose an OSPF from the drop-down menu. Click toggle advance ospf settings to configure the Interface settings for the selected OSPF.
Note: OSPF is not supported on Sub Interfaces, and it is not supported on non Global Segments.
The OSPFv2 configuration supports only IPv4. The OSPFv3 configuration supports only IPv6.
For more information on OSPF settings and OSPFv3, see Activate OSPF for Profiles.
Note: OSFPv3 is only available in the 5.2 release.
|
| Multicast | This option is available only when you have configured multicast settings for the selected Segment. You can configure the following multicast settings for the selected Interface.
Click
toggle advanced multicast settings to configure the following timers:
Note: Currently, Multicast Listener Discovery (MLD) is deactivated. Hence, Edge does not send the multicast listener report when IPv6 address is assigned to Interface. If there is a snooping switch in the network then not sending MLD report may result in Edge not receiving multicast packets which are used in Duplicate Address Detection (DAD). This results in DAD success even with duplicate address.
|
| VNF Insertion | You must deactivate WAN Overlay and select the Trusted Source check box to activate VNF Insertion. When you insert the VNF into Layer 3 interfaces or sub-interfaces, the system redirects traffic from the Layer 3 interfaces or sub interfaces to the VNF. |
| Advertise | Select the check box to advertise the Interface to other branches in the network. |
| NAT Direct Traffic | Select the check box to apply NAT for IPv4 to network traffic sent from the Interface.
Caution:
It is possible that an older version of the SASE Orchestrator inadvertently configured NAT Direct on a main interface with either a VLAN or subinterface configured. If that interface is sending direct traffic one or hops away, the customer would not observe any issues because the NAT Direct setting was not being applied. However, when an Edge is upgraded to 5.2.0 or later, the Edge build includes a fix for the issue (Ticket #92142) with NAT Direct Traffic not being properly applied, and there is a resulting change in routing behavior since this specific use case was not implemented in prior releases. In other words, because a 5.2.0 or later Edge now implements NAT Direct in the expected manner for all use cases, traffic that previously worked (because NAT Direct was not being applied per the defect) may now fail because the customer never realized that NAT Direct was checked for an interface with a VLAN or subinterface configured. As a result, a customer upgrading their Edge to Release 5.2.0 or later should first check their Profiles and Edge interface settings to ensure NAT Direct is configured only where they explicitly require it and to deactivate this setting where it is not, especially if that interface has a VLAN or subinterface configured. |
| Trusted Source | Select the check box to set the Interface as a trusted source. |
| Reverse Path Forwarding | You can choose an option for Reverse Path Forwarding (RPF) only when you have selected the Trusted Source check box. This option allows traffic on the interface only if return traffic can be forwarded on the same interface. This helps to prevent traffic from unknown sources like malicious traffic on an Enterprise network. If the incoming source is unknown, then the packet is dropped at ingress without creating flows. Select one of the following options from the drop-down menu:
|
- Activated: Activates DHCP with the Edge as the DHCP server. If you choose this option, configure the following details:
- DHCP Start: Enter a valid IP address available within the subnet.
- Num. Addresses: Enter the number of IP addresses available on a subnet in the DHCP Server.
- Lease Time : Select the period of time from the drop-down menu. This is the duration the VLAN is allowed to use an IP address dynamically assigned by the DHCP server.
- Options: Click Add to add pre-defined or custom DHCP options from the drop-down menu. The DHCP option is a network service passed to the clients from the DHCP server. Choose a custom option and enter the code, data type, and value.
- Relay – Allows exchange of DHCPv4 messages between client and server. If you choose this option, configure the following:
- Relay Agent IP(s): Specify the IP address of Relay Agent. Click Add to add more IP addresses.
- Deactivated – Deactivates the DHCP server.
IPv6 Settings
| Option | Description |
|---|---|
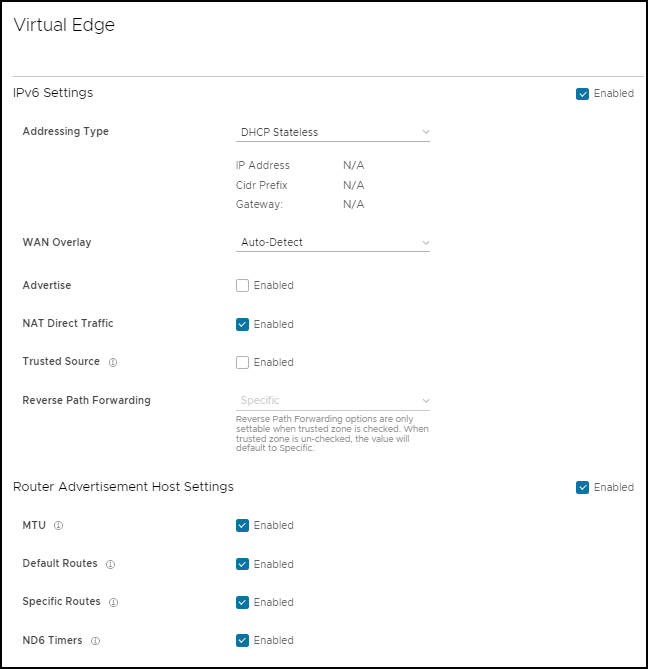
| Addressing Type | Select an addressing type:
|
| OSPF | This option is available only when you have configured OSPF for the selected Segment. Select the check box and choose an OSPF from the drop-down menu. Click toggle advance ospf settings to configure the Interface settings for the selected OSPF.
Note: OSPF is not supported on Sub Interfaces, and it is not supported on non Global Segments.
The OSPFv2 configuration supports only IPv4. The OSPFv3 configuration supports only IPv6, which is only available in the 5.2 release.
For more information on OSPF settings and OSPFv3, see Activate OSPF for Profiles.
Note: OSFPv3 is only available in the 5.2 release.
|
| Advertise | Select the check box to advertise the Interface to other branches in the network. |
| NAT Direct Traffic | Select the check box to apply NAT for IPv6 to network traffic sent from the Interface.
Caution:
It is possible that an older version of the SASE Orchestrator inadvertently configured NAT Direct on a main interface with either a VLAN or subinterface configured. If that interface is sending direct traffic one or hops away, the customer would not observe any issues because the NAT Direct setting was not being applied. However, when an Edge is upgraded to 5.2.0 or later, the Edge build includes a fix for the issue (Ticket #92142) with NAT Direct Traffic not being properly applied, and there is a resulting change in routing behavior since this specific use case was not implemented in prior releases. In other words, because a 5.2.0 or later Edge now implements NAT Direct in the expected manner for all use cases, traffic that previously worked (because NAT Direct was not being applied per the defect) may now fail because the customer never realized that NAT Direct was checked for an interface with a VLAN or subinterface configured. As a result, a customer upgrading their Edge to Release 5.2.0 or later should first check their Profiles and Edge interface settings to ensure NAT Direct is configured only where they explicitly require it and to deactivate this setting where it is not, especially if that interface has a VLAN or subinterface configured. |
| Trusted Source | Select the check box to set the Interface as a trusted source. |
| Reverse Path Forwarding | You can choose an option for Reverse Path Forwarding (RPF) only when you have selected the Trusted Source check box. This option allows traffic on the interface only if return traffic can be forwarded on the same interface. This helps to prevent traffic from unknown sources like malicious traffic on an Enterprise network. If the incoming source is unknown, then the packet is dropped at ingress without creating flows. Select one of the following options from the drop-down menu:
|
- Activated: Activates DHCPv6 with the Edge as the DHCPv6 server. If you choose this option, configure the following details:
- DHCP Start: Enter a valid IPv6 address available within the subnet.
- Num. Addresses: Enter the number of IP addresses available on a subnet in the DHCPv6 Server.
- Lease Time : Select the period of time from the drop-down list. This is the duration the VLAN is allowed to use an IPv6 address dynamically assigned by the DHCPv6 Server.
- DHCPv6 Prefix Delegation: Click Add to assign prefixes chosen from a global pool to DHCP clients. Enter the prefix pool name along with the prefix start and end details.
- Options – Click Add to add pre-defined or custom DHCP options from the drop-down menu. The DHCP option is a network service passed to the clients from the DHCP server. Choose a custom option and enter the code, data type, and value.
- Relay – Allows exchange of DHCPv6 messages between client and server. If you choose this option, configure the following:
- Relay Agent IP(s): Specify the IP address of Relay Agent. Click Add to add more IP addresses.
Starting from the 5.2.0 release, VMware SD-WAN Edge supports the DHCPv6 Relay feature. This allows the DHCPv6 clients to communicate with a remote DHCPv6 server. It is mostly similar to the DHCPv4 Relay feature, except that DHCPv6 uses separate message types to allow the Relay agents to insert their own options or to identify the outgoing interface for the reply packet. To activate this feature on an Edge, you must activate IPv6 on the LAN interface of that Edge.
Note:- You must provide the Server IP address as the Relay Agent IP address on the customer-facing Interface.
- If this Interface belongs to a non-global segment, the Server must be reached through the same non-global segment.
- Relay Agent IP(s): Specify the IP address of Relay Agent. Click Add to add more IP addresses.
- Deactivated: Deactivates the DHCP server.
Router Advertisement Host Settings: The Router Advertisement (RA) parameters are available only when you activate IPv6 Settings, and then choose the Addressing Type as DHCP Stateless or DHCP Stateful.
| Option | Description |
|---|---|
| MTU | Accepts the MTU value received through Route Advertisement. If you turn off this option, the MTU configuration of the Interface is considered. |
| Default Routes | Installs default routes when Route Advertisement is received on the Interface. If you turn off this option, then there are no default routes available for the Interface. |
| Specific Routes | Installs specific routes when Route Advertisement receives route information on the Interface. If you turn off this option, the Interface does not install the route information. |
| ND6 Timers | Accepts ND6 timers received through Route Advertisement. If you turn off this option, default ND6 timers are considered. The default value for NDP retransmit timer is 1 second and NDP reachable timeout is 30 seconds. |
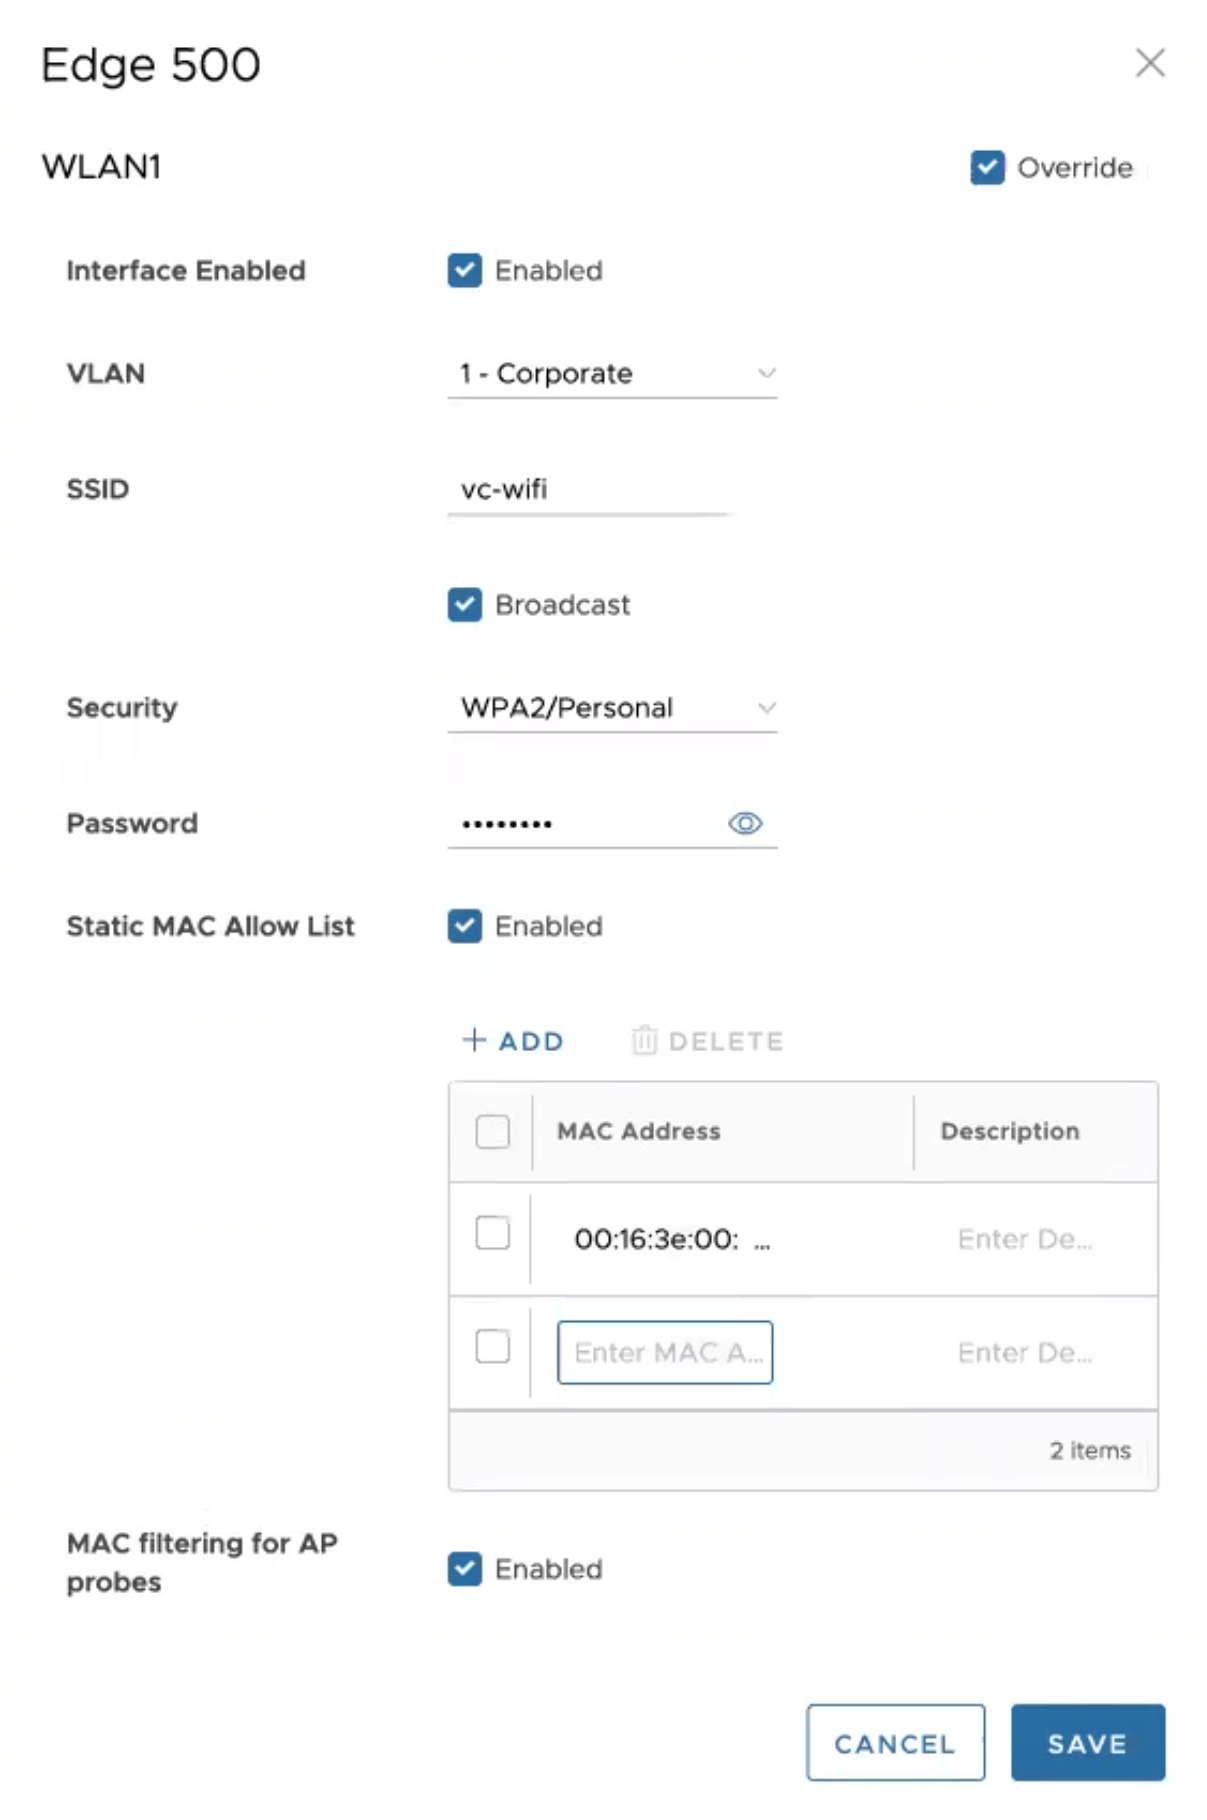
Wi-Fi Access Control based on MAC Address
Wi-Fi Access Control can be used as an additional layer of security for wireless networks. When activated, only known and approved MAC addresses are permitted to associate with the base station.
- In the SD-WAN Service of the Enterprise portal, click and choose an existing WLAN interface to configure the following parameters.
| Option | Description |
|---|---|
| Interface Enabled | Select the check box to activate the interface. |
| VLAN | Choose the VLAN ID from the drop-down menu. |
| SSID | Enter the SSID. |
| Security | Select either WPA2/Enterprise or WPA2/Personal as the Security option. |
| Static MAC Allow List | Select the check box to permit only the listed MACs to associate with the access point. When Static MAC Allow List is configured, only the Mac addresses specified in the list are permitted to associate with the access point. . |
| Radius ACL Check | Select the check box to associate the MAC address with a RADIUS server. If an access-accept is received, the MAC is allowed to associate with the access point.
Note: RADIUS ACL checks are limited to
WPA2/Enterprise security mode.
|
| Add | Click to enter a new MAC address. |
| Delete | Click to remove an existing MAC address. |
| MAC filtering for AP Probes | Enabling MAC Filtering for AP probes prevents probes from unapproved MAC Addresses from actively discovering AP parameters. When the SSID is not broadcast, this can assist in preventing unknown stations from connecting to the network. Some devices are known to use random MAC addresses for probing regardless of AP settings and probe filtering may cause these devices to fail to discover or connect to the network even if their device MAC has been approved. |
- Both, MAC filtering for AP Probes and RADIUS ACL Check cannot happen at the same time.
- VMware SD-WAN Edge does not support Link Layer Discovery Protocol (LLDP).
