


At Edge level, you can add a new VLAN or update the existing VLAN settings inherited from the associated Profile. While configuring a new VLAN at the Edge level, SASE Orchestrator allows you to configure additional Edge-specific VLAN settings such as Fixed IP addresses, LAN interfaces, and Service Set Identifier (SSID) of Wi-Fi interfaces.
- In the SD-WAN service of the Enterprise portal, click .
- Click the link to an Edge or click the View link in the Device column of the Edge.
- In the Device tab, under Connectivity, expand the VLAN section.
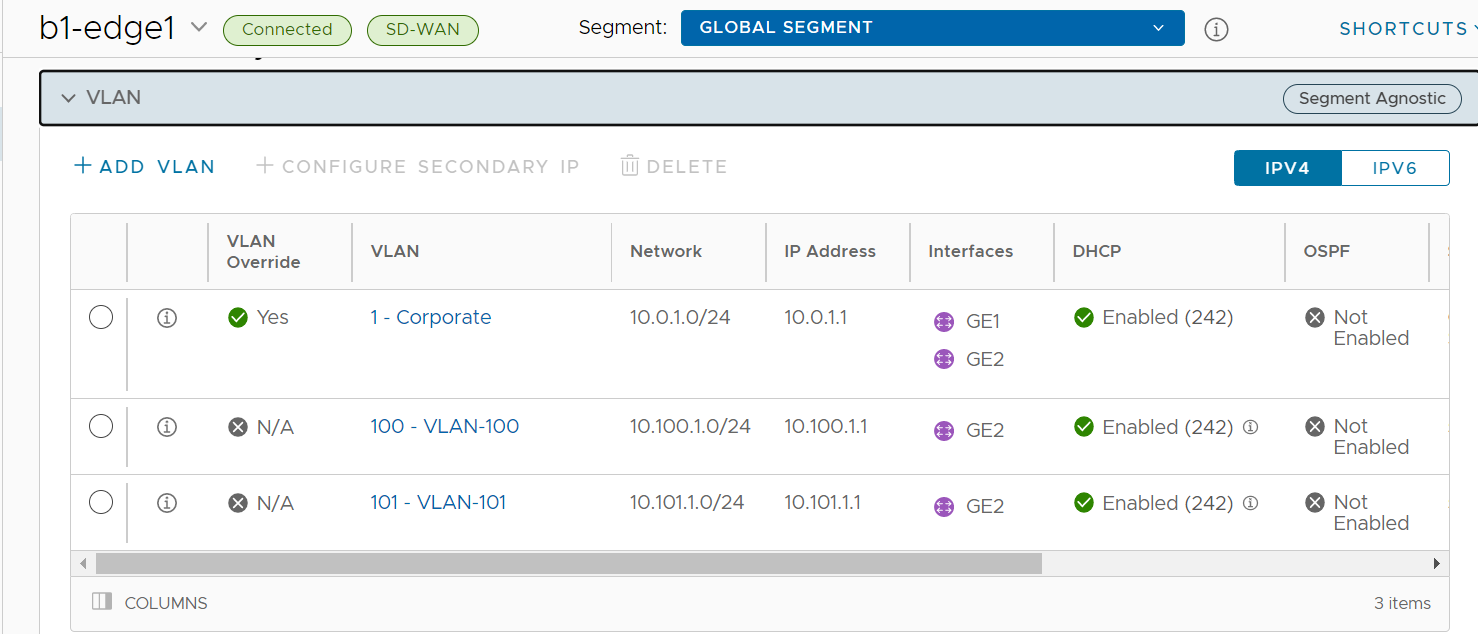
You can add or edit VLANs, or add secondary IP addresses. You can also delete the selected VLAN.
- Click IPv4 or IPv6 button to display the respective list of VLANs.
- To add a VLAN, click + Add VLAN.
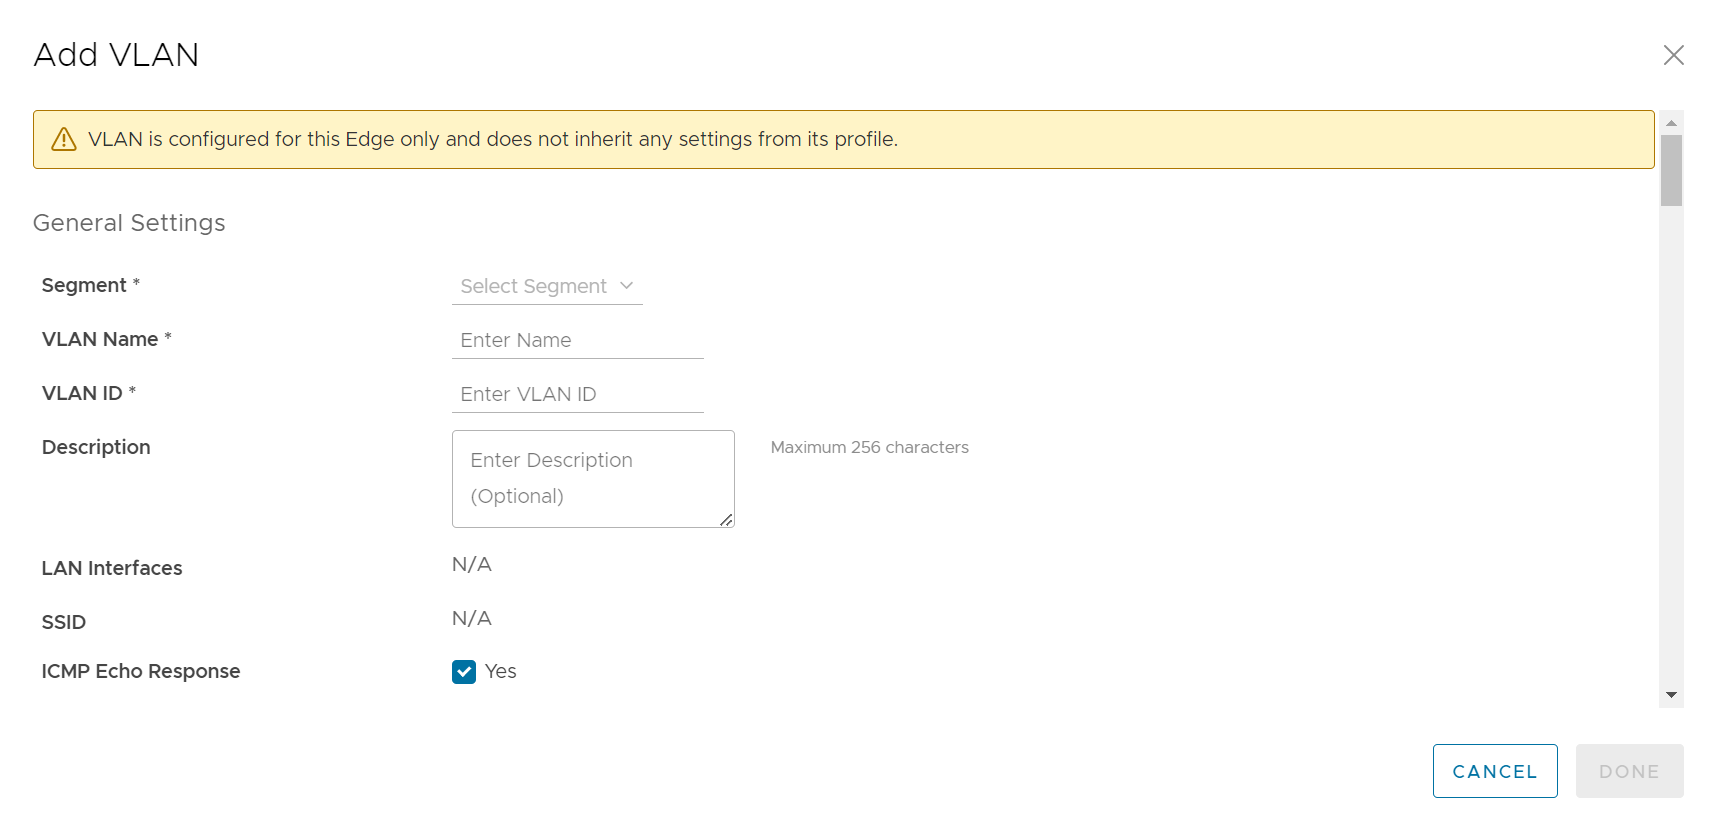
- Configure the Add VLAN settings from the table below.
Option Description Segment Select a segment from the drop-down menu. This assigns the VLAN to the selected segment. VLAN Name Enter a unique name for the VLAN. VLAN Id Enter the VLAN ID. Assign Overlapping Subnets LAN IP Addressing can be managed from the assigned Profile of the Edge. When this check box is selected, the values for Edge LAN IP Address, Cidr Prefix, and DHCP are inherited from the associated Profile and are read-only. The Network address is automatically set based on the subnet mask and CIDR value.
Note: Overlapping subnets for the VLAN are supported only for SD-WAN to SD-WAN traffic and SD-WAN to Internet traffic. Overlapping subnets are not supported for SD-WAN to Cloud Web Security traffic.Edge LAN IP Address Enter the LAN IP address of the Edge. Cidr Prefix Enter the CIDR prefix for the LAN IP address. Network Enter the IP address of the Network. Advertise Select the check box to advertise the VLAN to other branches in the network. ICMP Echo Response Select the check box to enable the VLAN to respond to ICMP echo messages. VNF Insertion Select the check box to insert a VNF to the VLAN, which redirects traffic from the VLAN to the VNF. To enable VNF Insertion, ensure that the selected segment is mapped with a service VLAN. Multicast This option is enabled only when you have configured multicast settings for the Edge. You can configure the following multicast settings for the VLAN. - IGMP
- PIM
Click toggle advanced multicast settings to set the timers:- PIM Hello Timer
- IGMP Host Query Interval
- IGMP Max Query Response Value
Fixed IPs Enter the IP addresses tied to specific MAC Addresses for the VLAN. LAN Interfaces Configure VLAN LAN Interfaces. SSID Configure VLAN Wi-Fi SSIDs. DHCP Type Choose one of the following DHCP settings: Enabled – Enables DHCP with the Edge as the DHCP server. Configure the following details:- DHCP Start – Enter a valid IP address available within the subnet.
- Num. Addresses – Enter the number of IP addresses available on a subnet in the DHCP Server.
- Lease Time – Select the period of time from the drop-down list. This is the duration the VLAN is allowed to use an IP address dynamically assigned by the DHCP Server.
- Options – Add pre-defined or custom DHCP options from the drop-down list. The DHCP option is a network service passed to the clients from the DHCP server. For a custom option, enter the code, data type, and value.
Relay – Enables DHCP with the DHCP Relay Agent installed at a remote location. If you choose this option, configure the following:- Source from Secondary IP(s) – When you select this check box, the DHCP discover/Request packets from the client will be relayed to the DHCP Relay servers sourced from the primary IP address and all the secondary IP addresses configured for the VLAN. The reply from the DHCP Relay servers will be sent back to the client after rewriting the source and destination. The DHCP server will receive the request from both the primary and secondary IP addresses and the DHCP client can get multiple offers from primary subnet and secondary subnets.
When this option is not selected, the DHCP discover/Request packets from the client will be relayed to the DHCP Relay servers sourced only from the primary IP address.
- Relay Agent IP(s) – Specify the IP address of Relay Agent. Click the Plus(+) Icon to add more IP addresses.
Not Enabled – Deactivates DHCP.
OSPF This option is enabled only when you have configured OSPF for the Edge. Select the check box and choose an OSPF from the drop-down list. Note: The OSPFv2 configuration supports only IPv4. The OSPFv3 configuration supports only IPv6, which is only available in the 5.2 release. .For more information on OSPF settings and OSPFv3, see Activate OSPF for Edges.
- After configuring the required parameters, click the Add VLAN button.
Edit VLANs
- To edit the existing VLAN settings inherited from the Profile, click the Edit link corresponding to the VLAN.
- Click the Override check boxes to override the VLAN settings inherited from the Profile.
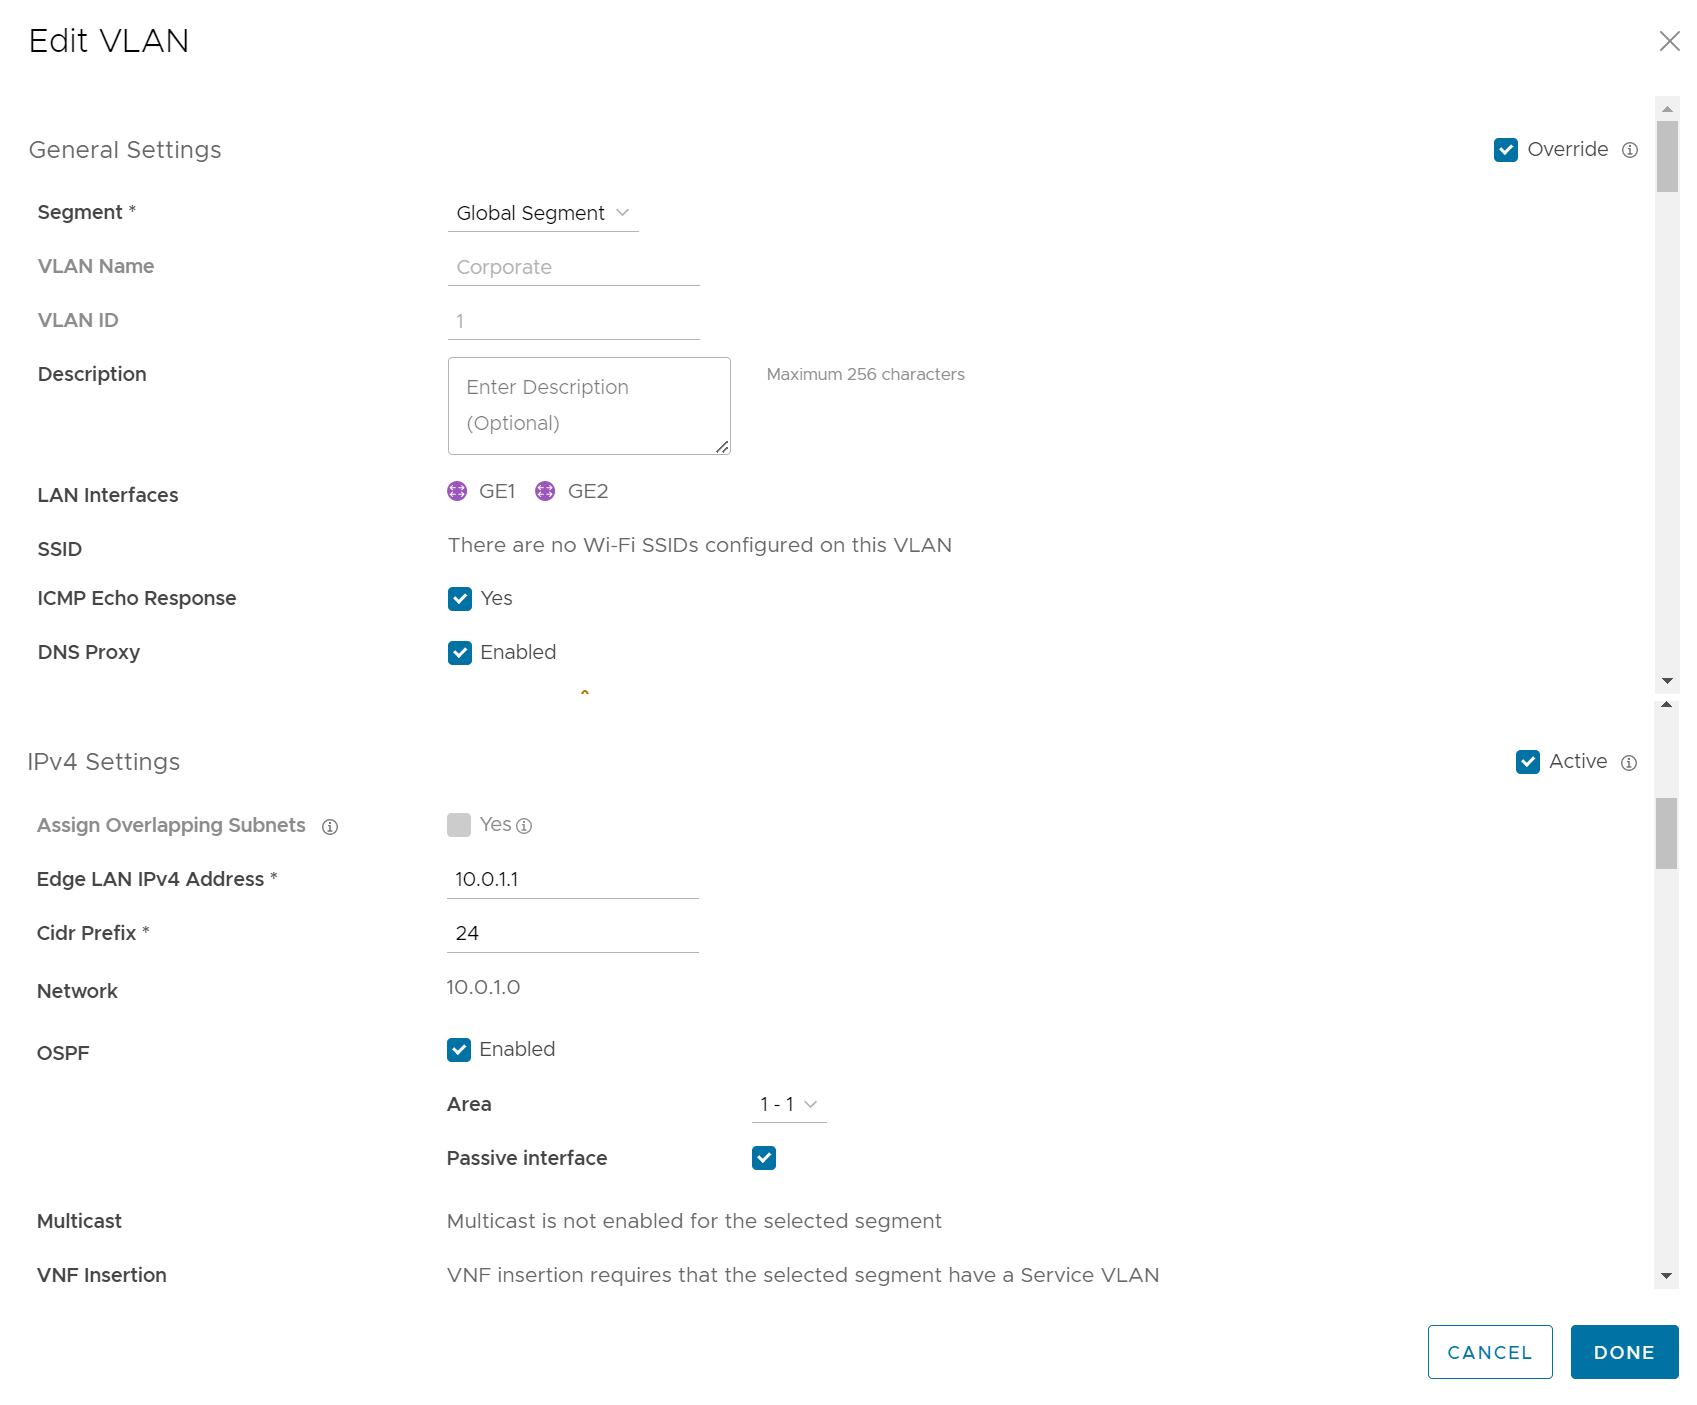 Note: You cannot override the Profile VLAN name and ID.
 - After modifying the required parameters, click Done VLAN.
For Configuring VLANs at the Profile level, see Configure VLAN for Profiles.
Secondary IP Addresses
The VLAN is configured with a primary IP address. You can add secondary IP addresses to the VLAN, to increase the number of host addresses for a network segment. To add secondary IP addresses to the VLAN, click Add Secondary IP.
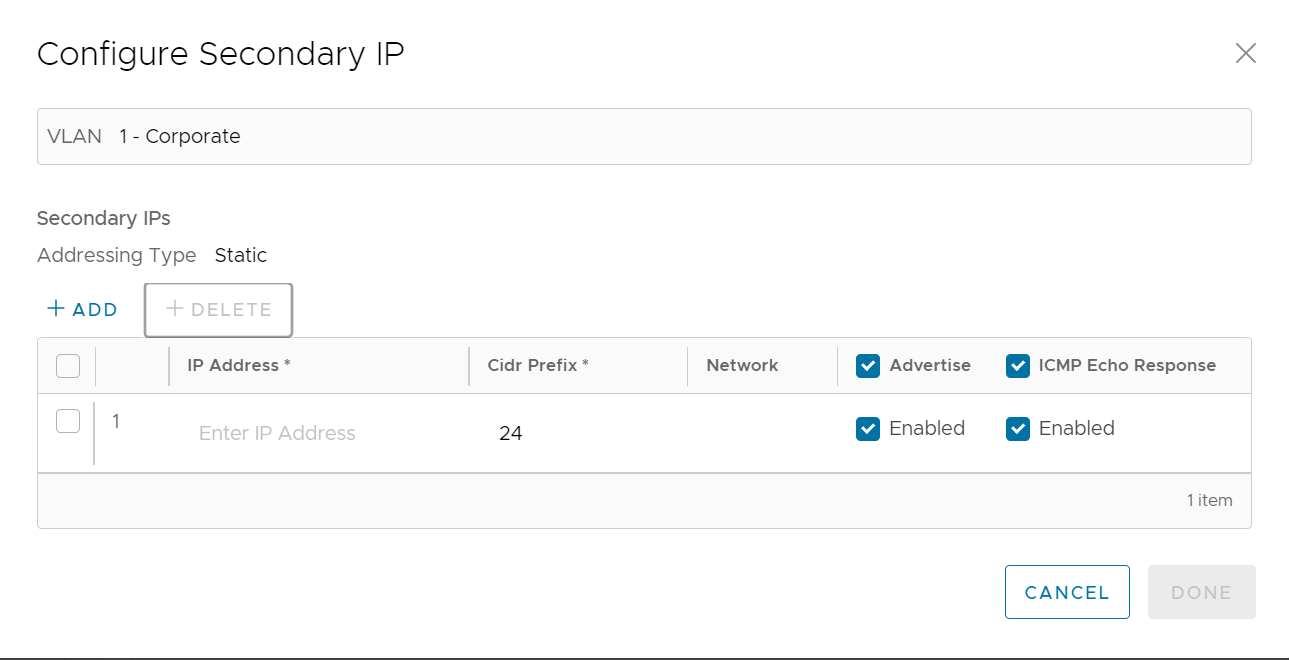
A row to configure a secondary IP displays, as shown in the image above. Configure the Secondary IP VLAN settings from the table below.
| Option | Description |
|---|---|
| Addressing Type | By default, the addressing type is Static and you cannot modify the type. |
| IP Address | Enter the secondary IP address for the selected VLAN. |
| Cidr Prefix | Enter the CIDR prefix for the IP address. |
| Network | Displays the IP address of the Network, which is auto-generated from the secondary IP address and CIDR prefix. |
| Advertise | Select the check box to advertise the secondary IP address network of the VLAN to other branches in the network. |
| ICMP Echo Response | Select the check box to enable the VLAN with the secondary IP address to respond to ICMP echo messages. |
Click Done when complete. On the Device settings screen, click Save Changes to save the settings.
