


The Authentication feature allows you to set the authentication modes for both, Operators and Enterprise users. You can also view the existing API tokens.
- In the Operator portal, click Administration from the top menu.
- From the left menu, click User Management, and then click the Authentication tab. The following screen appears:
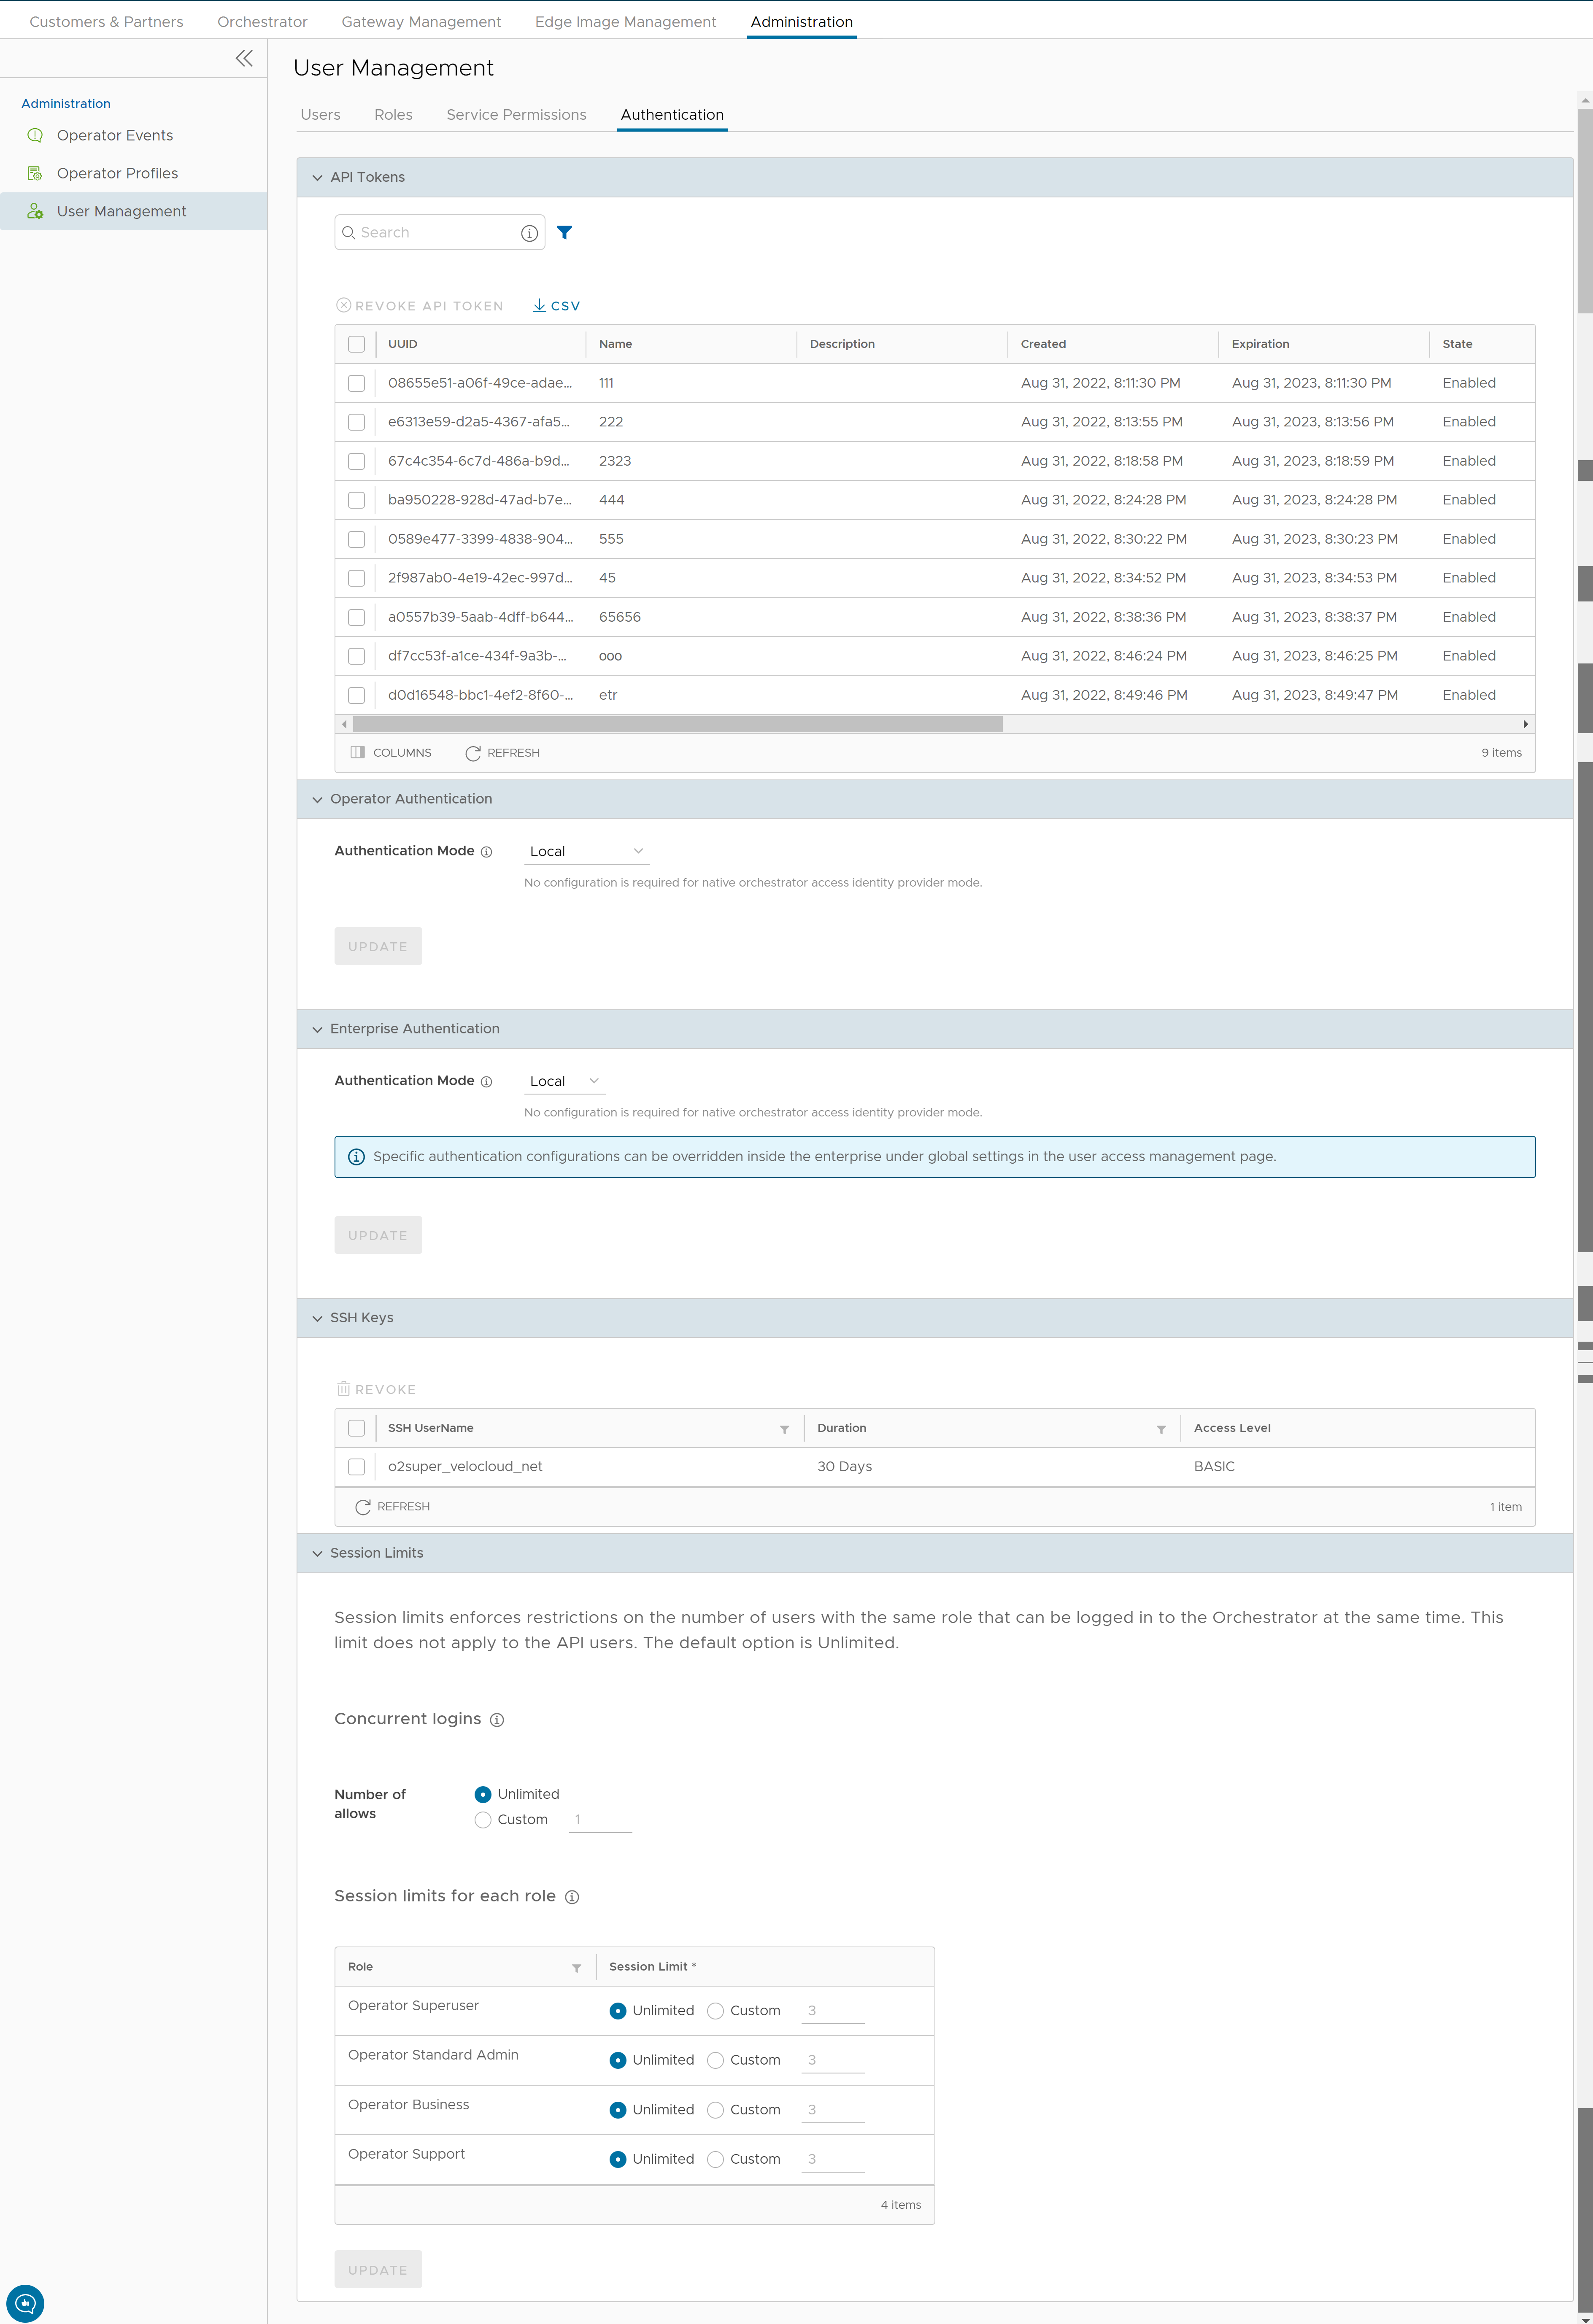
API Tokens
You can access the Orchestrator APIs using token-based authentication, irrespective of the authentication mode. Operator Administrators with right permissions can view the API tokens issued to Orchestrator users, including tokens issued to the Partner and Customer users. If required, an Operator Administrator can revoke the API tokens.
By default, the API Tokens are activated. If you want to deactivate them, go to , and set the value of the system property session.options.enableApiTokenAuth as False.
| Option | Description |
|---|---|
| Search | Enter a search term to search for the matching text across the table. Use the advanced search option to narrow down the search results. |
| Revoke API Token | Select the token and click this option to revoke it. Only an Operator Super User or the user associated with an API token can revoke the token. |
| CSV | Click this option to download the complete list of API tokens in a .csv file format. |
| Columns | Click and select the columns to be displayed or hidden on the page. |
| Refresh | Click to refresh the page to display the most current data. |
As an Operator Super User, you can manage the API tokens for Enterprise users. For information on creating and downloading API tokens, see API tokens.
Operator Authentication / Enterprise Authentication
- Local: This is the default option and does not require any additional configuration.
- Single Sign-On: Operator users with Superuser permission can set up and configure Single Sign On (SSO) in SASE Orchestrator. Single Sign-On (SSO) is a session and user authentication service that allows users to log in to multiple applications and websites with one set of credentials. Integrating an SSO service with SASE Orchestrator enables SASE Orchestrator to authenticate users from OpenID Connect (OIDC)-based Identity Providers (IdPs).
Pre-requisites:
- Ensure that you have the Operator Superuser permission.
- Before setting up the SSO authentication in SASE Orchestrator, make sure that you have set up Users, Service Permissions, and OpenID connect (OIDC) application for SASE Orchestrator in your preferred identity provider’s website.
Note:- Single Sign-On mode is available only for Operator Authentication in the Operator portal.
- Token-based authentication is deactivated for SSO users.
- SSO integration at the Operator management level of a VMware hosted Orchestrator is reserved for the VMware VMware SD-WAN TechOPS Operators. Partners with Operator level access of a hosted Orchestrator do not have the option to integrate to an SSO service.
To enable Single Sign On (SSO) for SASE Orchestrator, you must enter the Orchestrator application details into the Identity Provider (IdP). Click each of the following links for step-by-step instructions to configure the following supported IdPs:You can configure the following options when you select the Authentication Mode as Single Sign-on.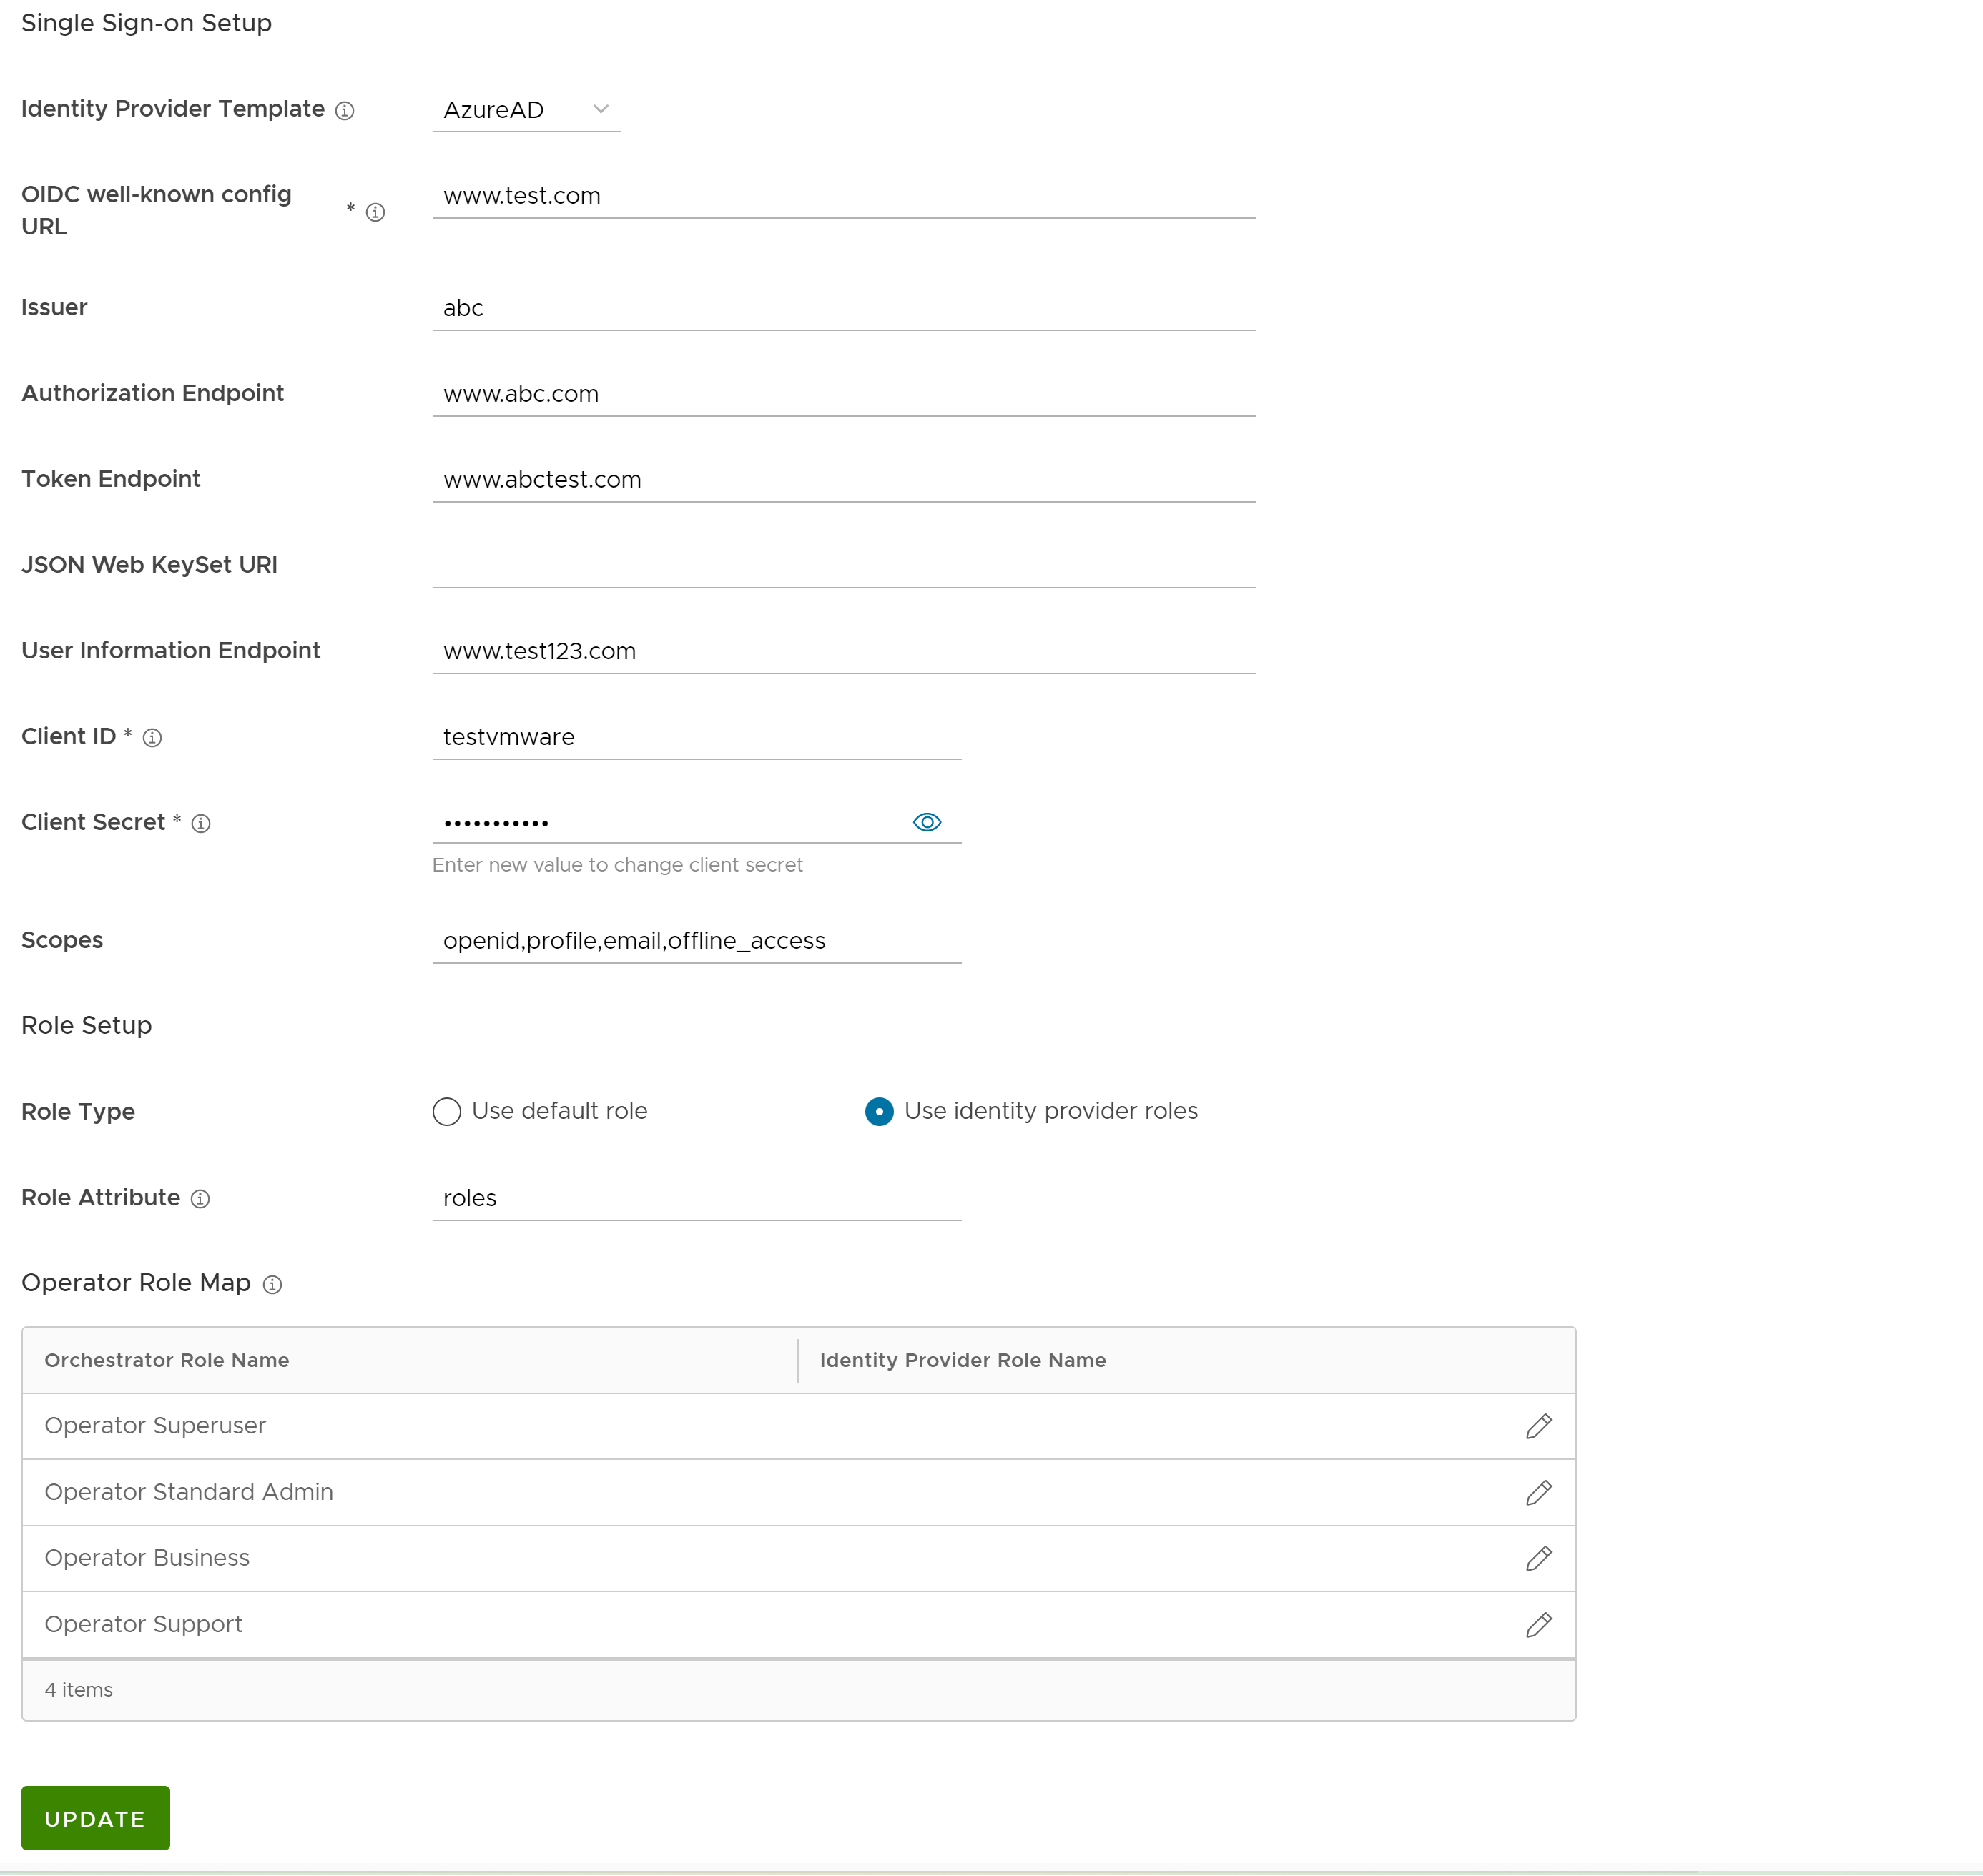
Option Description Identity Provider Template From the drop-down menu, select your preferred Identity Provider (IdP) that you have configured for Single Sign On. This pre-populates fields specific to your IdP. Note:- When you select VMwareCSP as your preferred IdP, ensure to provide your Organization ID in the following format: /csp/gateway/am/api/orgs/<full organization ID>
- When you sign in to VMware CSP console, you can view the organization ID you are logged into by clicking on your username. This information also appears under Organization details. Use the "Long Organization ID".
You can also manually configure your own IdPs by selecting Others from the drop-down menu.
Organization Id This field is available only when you select the VMware CSP template. Enter the Organization ID provided by the IdP in the format: /csp/gateway/am/api/orgs/<full organization ID>. When you sign in to VMware CSP console, you can view the organization ID you are logged into by clicking on your username. A shortened version of the ID is displayed under the organization name. Click the ID to display the full organization ID.OIDC well-known config URL Enter the OpenID Connect (OIDC) configuration URL for your IdP. For example, the URL format for Okta will be: https://{oauth-provider-url}/.well-known/openid-configuration.Issuer This field is auto-populated based on your selected IdP. Authorization Endpoint This field is auto-populated based on your selected IdP. Token Endpoint This field is auto-populated based on your selected IdP. JSON Web KeySet URI This field is auto-populated based on your selected IdP. User Information Endpoint This field is auto-populated based on your selected IdP. Client ID Enter the client identifier provided by your IdP. Client Secret Enter the client secret code provided by your IdP, that is used by the client to exchange an authorization code for a token. Scopes This field is auto-populated based on your selected IdP. Role Type Select one of the following two options: - Use default role
- Use identity provider roles
Role Attribute Enter the name of the attribute set in the IdP to return roles. Operator Role Map Map the IdP-provided roles to each of the Operator user roles. Click Update to save the entered values. The SSO authentication setup is complete in the SASE Orchestrator.
- RADIUS: Remote Authentication Dial-In User Service (RADIUS) is a client-server protocol that enables remote access servers to communicate with a central server. RADIUS authentication provides a centralized management for users. You can configure the Orchestrator Authentication in RADIUS mode, so that the Operator and Enterprise Customers log into the portals using the RADIUS servers. Enter appropriate details in the following fields:
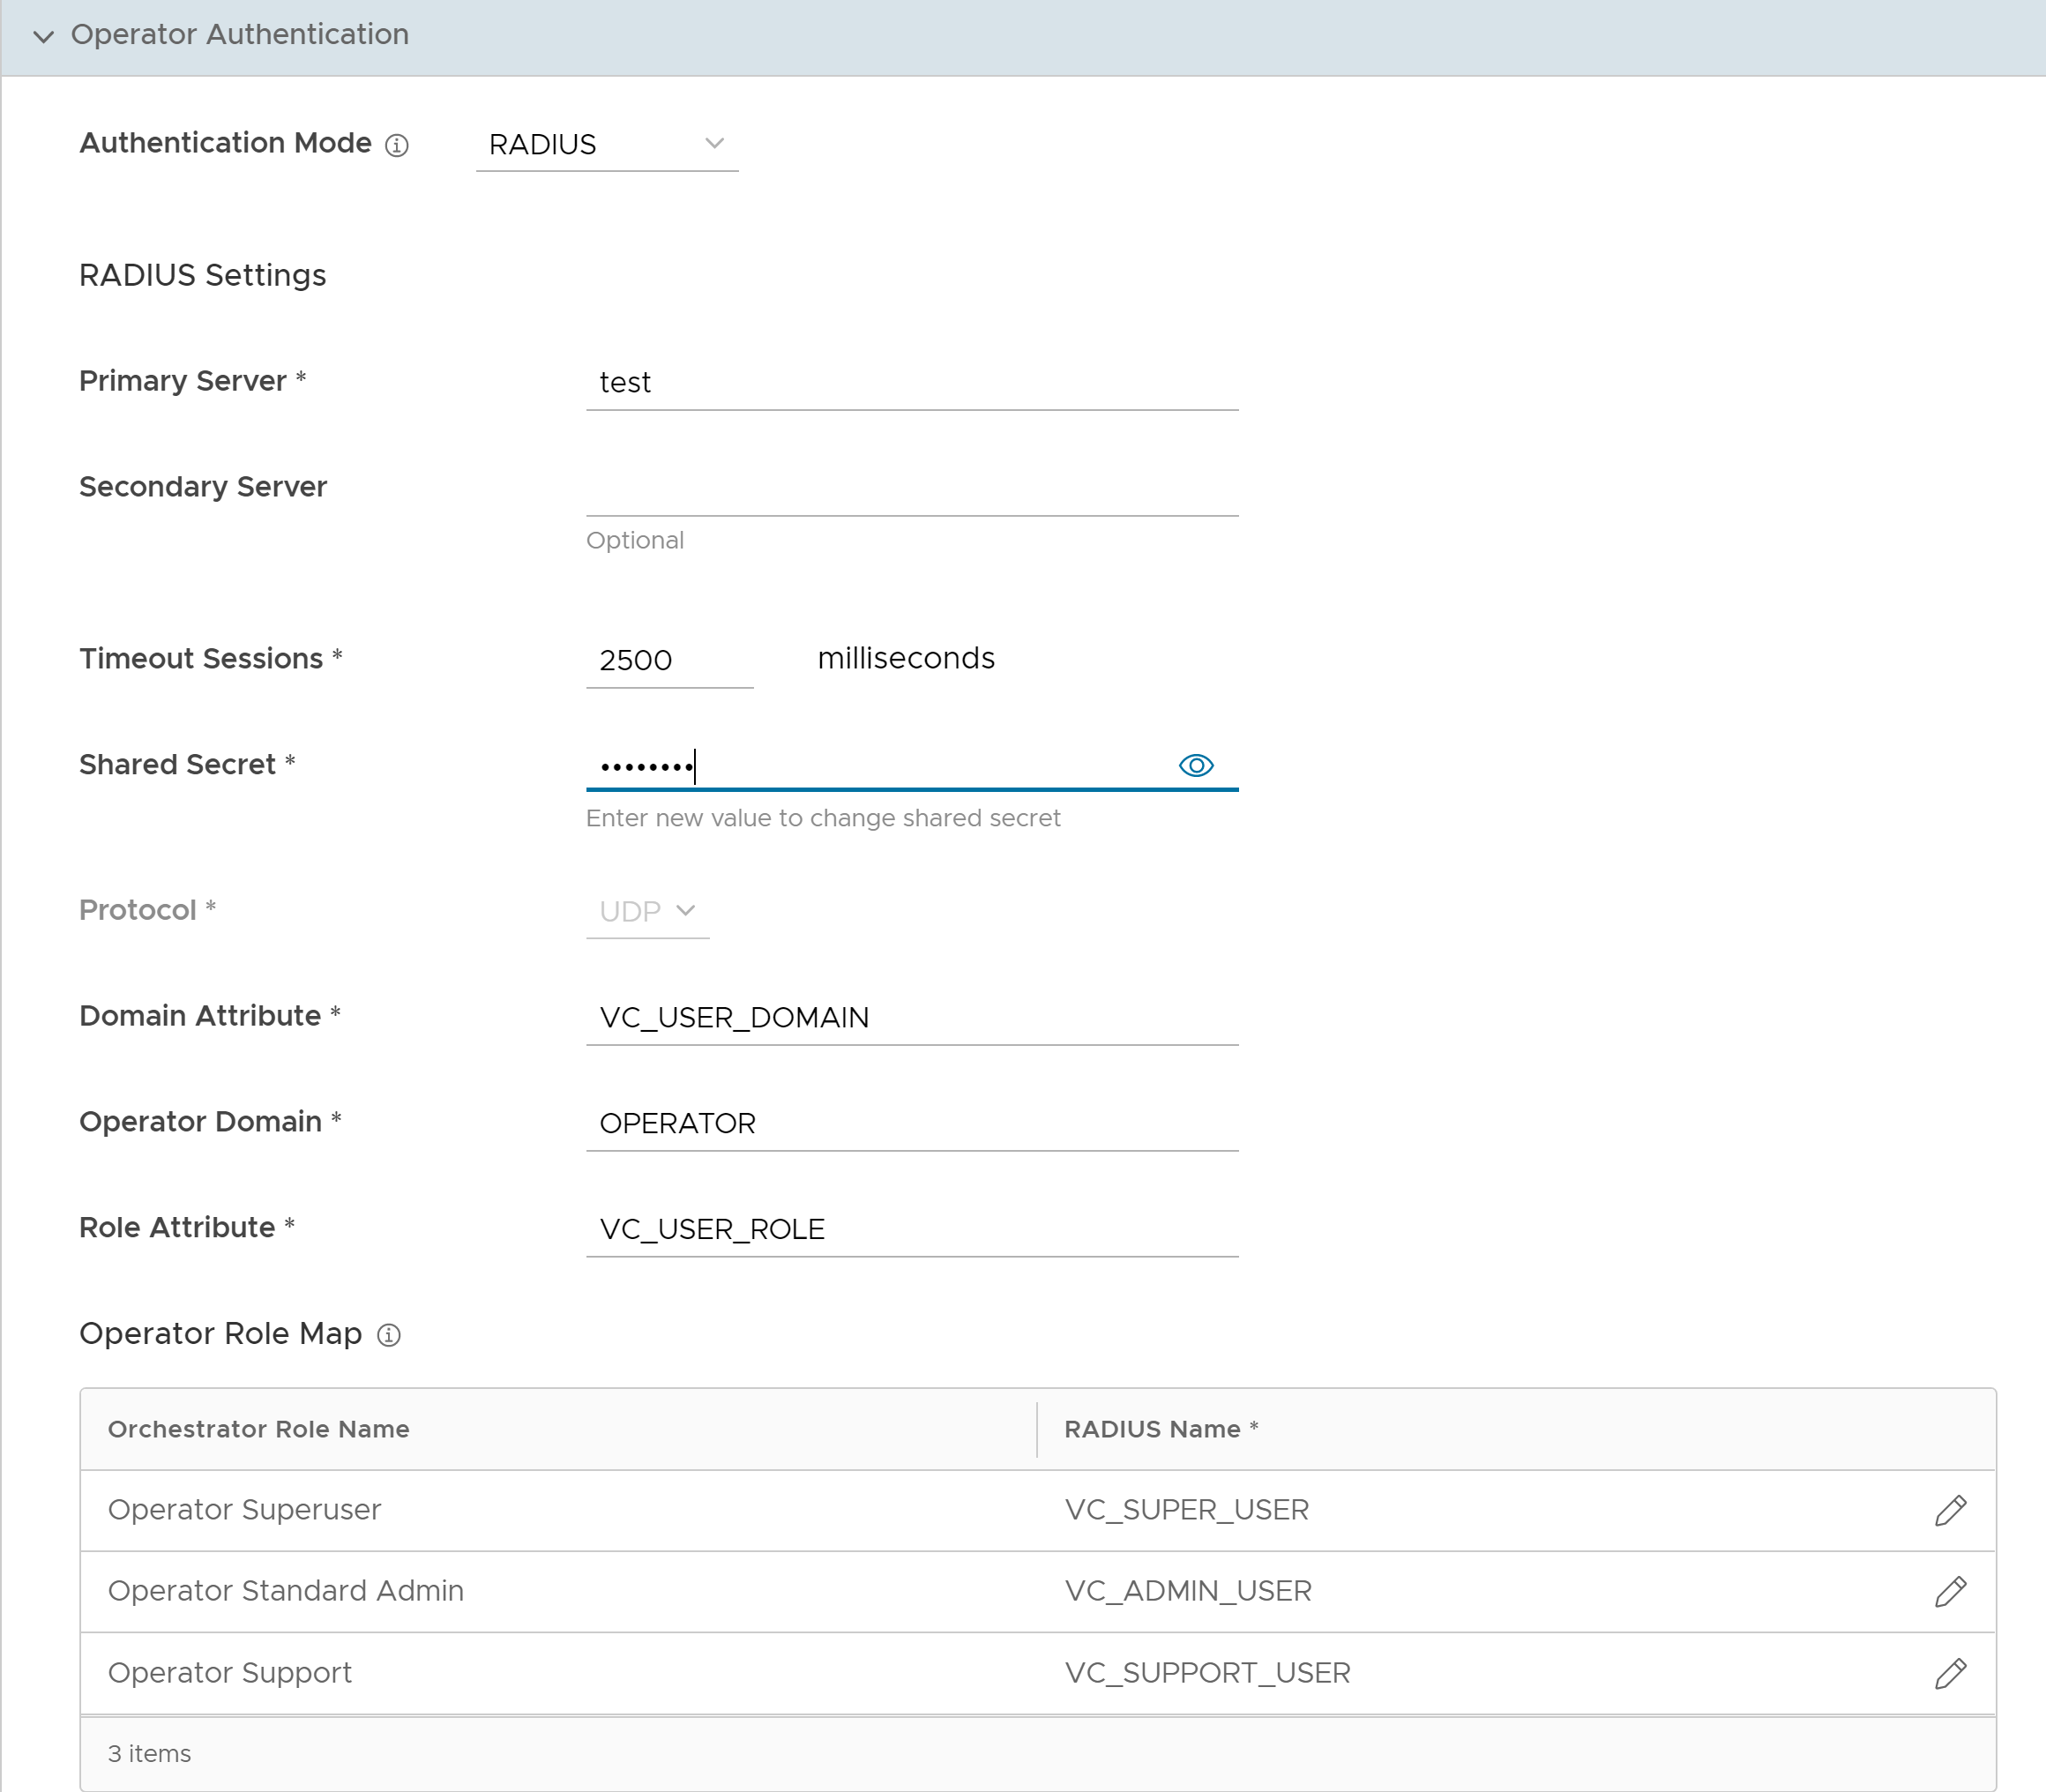
- You can edit the Protocol value only in the System Properties. Navigate to , and edit the protocol in the Value field of the system property
vco.operator.authentication.radius. - Operator Domain field is available only for Operators.
- In the Operator Role Map / Enterprise Role Map section, map the RADIUS server attributes to each of the Operator or Enterprise user roles. This role mapping is used to determine the role the users would be assigned when they login to the Orchestrator using the RADIUS server for the first time.
- Click Update to save the entered values.
- You can edit the Protocol value only in the System Properties. Navigate to , and edit the protocol in the Value field of the system property
SSH Keys
You can create only one SSH Key per user. Click the User Information icon located at the top right of the screen, and then click to create an SSH Key.
As an Operator, you can also revoke an SSH Key.
Click the Refresh option to refresh the section to display the most current data.
For more information, see Configure User Account details.
Session Limits
session.options.enableSessionTracking to
True.
The following are the options available in this section:
| Option | Description |
|---|---|
| Concurrent logins | Allows you to set a limit on concurrent logins per user. By default, Unlimited is selected, indicating that unlimited concurrent logins are allowed for the user. |
| Session limits for each role | Allows you to set a limit on the number of concurrent sessions based on user role. By default, Unlimited is selected, indicating that unlimited sessions are allowed for the role.
Note: The roles that are already created by the Operator in the
Roles tab, are displayed in this section.
|
Click Update to save the selected values.
