


Instructions on how to deploy a Virtual Edge with CloudFormation templates are described below. However, make sure to adhere to the prerequisite requirements prior to deployment.
As part of the VMware SD-WAN solution, Customers deploy the Velocloud Virtual Edges in AWS, typically in a VPC. Edge(s) can be deployed via few methods, namely AWS console and Cloud Formation Template. Total provisioning time typically takes around ~30 minutes.
Prerequisites
The following are required before you begin to deploy the Virtual Edge with CloudFormation templates:
- AWS account and login information
- Familiarity with AWS networking concepts (see: https://docs.aws.amazon.com/vpc/latest/userguide/VPC_Networking.html)
- RSA Public Key (see: https://docs.aws.amazon.com/AWSEC2/latest/UserGuide/ec2-key-pairs.html)
- VMware CloudFormation Template (one of the following):
- Green Field Deployment (download here)
- Brown Field Deployment (download here)
- SASE Orchestrator target and admin account to login
Basic Topology
In a basic topology example, the AWS VPC (10.0.0.0/16) is divided into a Public subnet (10.0.0.0/24) and a Private subnet (10.0.1.0/24). The Virtual Edge routes between the two subnets. The Public VPC Routes will forward all offnet traffic to the Internet Gateway. The VPC Router in the Private subnet will forward all traffic to the LAN facing interface on the Virtual Edge (ENI of GE3). In this example, a default route is used to forward all traffic from the workloads, but is not necessary. RFC1918 summarization or specific branch/hub prefixes can be used to narrow what is sent to the Virtual Edge. For example, if the workloads in the Private Subnet need to be accessible via the SSH from publicly sourced IPs, then the VPC Router could be configured to point the default route (0.0.0.0/0) to the Internet Gateway and RFC1918 summarization to the Virtual Edge.

Procedures:
Step 1: Add the Virtual Edge to the Enterprise via the SASE Orchestrator
- Login to the VMware SASE Orchestrator.
- Go to Configure > Edges from the navigation panel, and in the Edges screen, click Add Edge. The Provision an Edge screen appears with the SD-WAN Edge mode selected by default.

- In the Provision New Edge dialog box:
- In the Name text box, enter a unique name for the Edge.
- From the Model drop-down menu, choose Virtual Edge.
- From the Profile drop-down menu, choose a profile for the Virtual Edge.
- From the Edge License drop-down menu, select an Edge license. The list displays the licenses assigned to the Enterprise, by the Operator.
- Enter all the required details and click Next to configure the additional paramters like Serial number, Location, and so on.
- Click Add Edge.
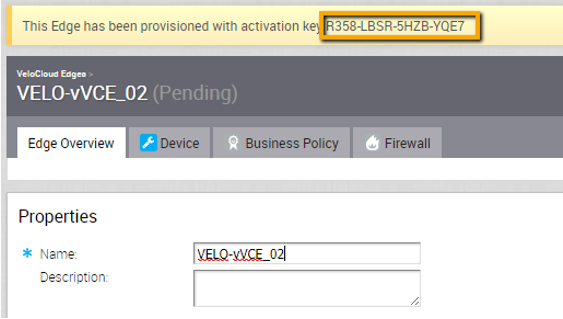
- The Virtual Edge will be provisioned with an activation key. Make a note of the activation key, as it will be used when you deploy the CloudFormation template.
For more information, see the "Provision a New Edge" section in the Administration Guide.
Step 2: Add VLAN IP
The VLAN configuration must have an IP address assigned to it in order to save the Device Settings, but the IP address will not be used. For example, use IP address 169.254.0.1. Follow the steps below to add the VLAN IP address.
- For the Virtual Edge that was just created, click the Device tab on the SASE Orchestrator.
- Scroll down to the Configure VLAN section, and click the Add VLAN button.
The Add VLAN dialog box displays.
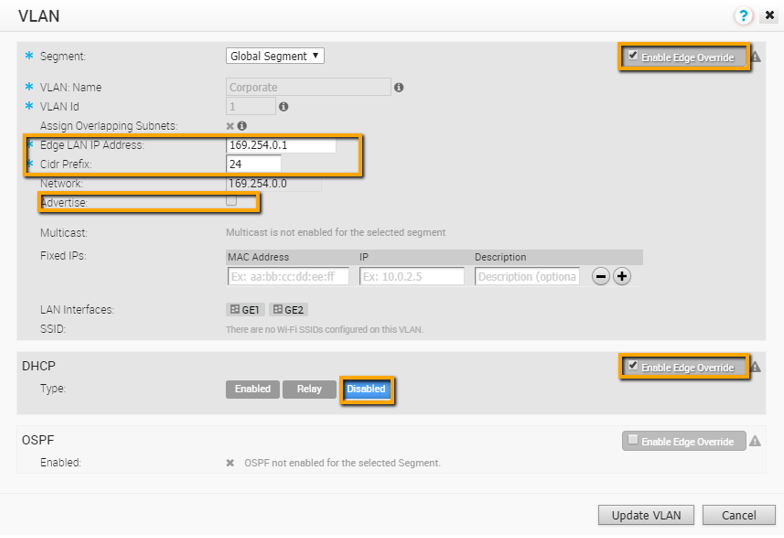
- In the Add VLAN dialog box complete the following:
- From the Segment drop-down menu, select a segment.
- In the VLAN Name text box, enter a unique name for the VLAN.
- In the VLAN ID text box, enter a VLAN ID.
- To configure IPv4 settings, under IPv4 Settings select the Active check box.
- In the Edge LAN IP Address text box, enter an IP address (for example:169.254.0.1).
- In the Cidr Prefix text box, enter 24.
- The Network value will be configured based on the Cidr Prefix.
- Deselect the Advertise check box.
- Under IPv4 DHCP Server, select Deactivated as the DHCP Type.
- After configuring the required parameters, click Done.
For more information, see the "Configure VLAN for Edges" section in the Administration Guide.
Step 3: Configure Virtual Edge Interfaces
WARNING: The Device Settings must be configured first in the SASE Orchestrator first before SD-WAN Edge activation. If you skip this step, the Virtual Edge will activate, but will go offline a few minutes later.
- Navigate to the Virtual Edge's Device Settings (Configure > Edge > Device tab).
- Scroll down to the Interfaces section.
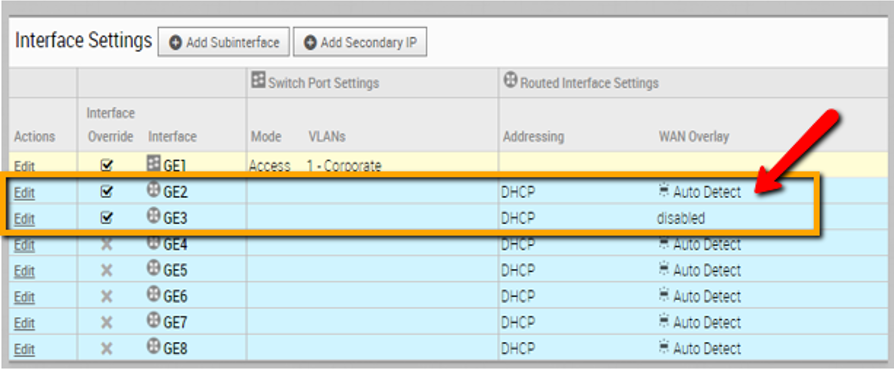
- Click the Edit link for the GE2 interface to change the interface settings.
The dialog box for the GE2 interface settings displays.
- In the GE2 Interface Settings dialog box, click the Override Interface check box and complete the following steps:
- In the Capability drop-down menu, change the GE2 interface capability from Switched to Routed.
- Choose DHCP from the Addressing Type drop-down menu.
- Activate the WAN Overlay by checking the Enable WAN Link check box.
- Click the Edit link for the GE3 interface to change the interface settings.
The dialog box for the GE3 interface settings displays.
- In the GE3 interface settings dialog box, click the Override Interface check box and complete the following steps:
- Deactivate the WAN Overlay by unchecking the Enable WAN Link check box, as this interface will be used for the LAN-side gateway.
- Uncheck the NAT Direct Traffic check box to deactivate NAT direct traffic.
Step 4: Launch Virtual Edge via CloudFormation
- Log into the AWS console.
- Create or Import a Key Pair.

NOTE: For additional information regarding AWS EC2 Instance Keys see: https://docs.aws.amazon.com/AWSEC2/latest/UserGuide/ec2-key-pairs.html
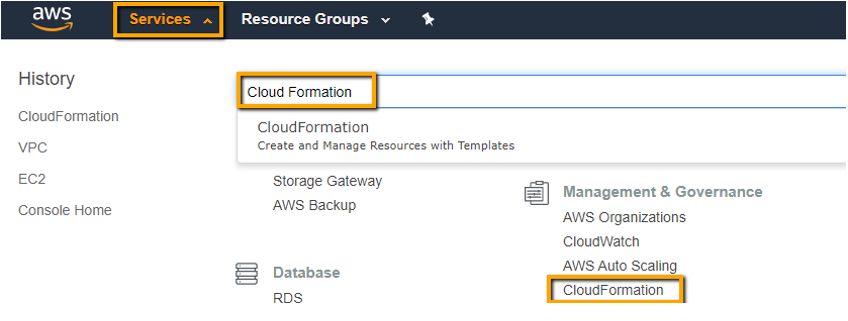
- Navigate to CloudFormation.
- Create a CloudFormation stack.

- Upload the CloudFormation template.

- Specify the stack details as indicated in the image below.

For the few remaining screens, you can leave those parameters, fields, or text boxes as default settings unless you have a specific need to change them. The final step is to create the stack.
- Review and create the stack.
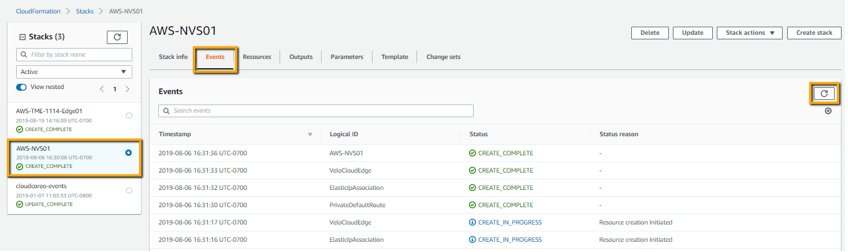
- Monitor your deployment progress.
Available Regions
The Velocloud Edge AMI is available in all AWS commercial regions with EC2 service, with China being the exception.
