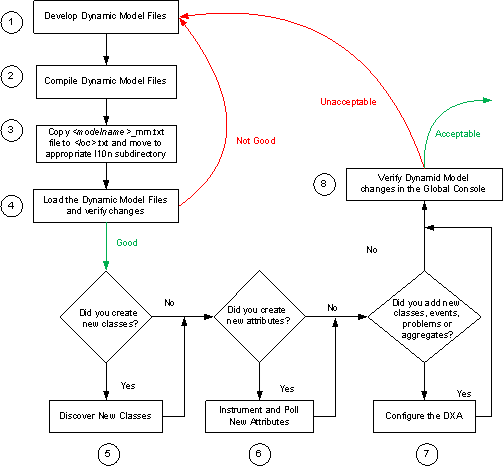
Several steps are involved in the development cycle of extending a model of a Domain Manager, by using dynamic modeling. Steps involved in developing dynamic models illustrates the development cycle.

The first five steps are common to all dynamic modeling development.
-
Add the new model elements to either a new dynamic model text file (.mdl) or an existing one. Appendix A, “Guidelines and Syntax for Dynamic Model Files,” contains additional information.
-
Compile the dynamic model text file into a file (those with extension .ldm) that can be loaded into a Manager. The command used to compile the dynamic model file is described in Appendix B, “The dynmodel Command Syntax and Options.”
-
If you require the string literals in the dynamic model text file to be of a language other than the language in the dynamic model text file:
-
Copy the <modelname>_mm.txt file to <loc>.txt, and move it to the appropriate l10n subdirectory. The <loc> refers to a locale such as, fr_FR for French as spoken in France.
-
Edit <loc>.txt. Change the “root {“ to “<loc> {“ in the first line. Translate the string literals as required. Return to step 2 on page 22 .
-
From the BASEDIR/smarts/model directory, copy the following files to the SM_SITEMOD/l10n directory:
-
Example1_mmbe.dat
-
Example1_mmle.dat
-
-
-
Load the compiled dynamic model file into a Domain Manager. Verify that the new model elements have been added to the list of classes or the list of properties by using the Global Console.
If you encounter errors, go back to step 1 on page 22 and make the appropriate modifications to your .mdl file. “Loading errors” on page 112 provides additional troubleshooting information.
-
If you have defined new classes, create or discover instances of those classes. Appendix C, “Methods of Creating Classes and Populating Attributes,” provides additional information.
-
If you have defined new attributes, populate the values of those attributes, either manually or by using the discovery mechanism. Appendix C, “Methods of Creating Classes and Populating Attributes,” provides additional information.
-
If you want to view the new classes, attributes, problems, aggregates or events in the Global Manager, then configure the appropriate DXA. Appendix D, “Updating the Global Manager,” describes DXA configuration.
-
If you added new events, then add a subscription to the event in the appropriate bootstrap.conf files.
-
Verify the topology in the Global Console.
If you encounter errors, go back to step 1 on page 22 and make the appropriate modifications. Appendix E, “Troubleshooting,” provides additional information.