


There are five of Shared Credentials:
-
Account
-
Privilege password
-
SNMP V1/V2c
-
SNMP v3
-
RSA
Creating Shared Credential - Account Class
To Create a shared credential with the class type of Account, follow these steps:
-
From the menu bar, select Tools -> System Administration.
-
Next, select Global -> Credentials.
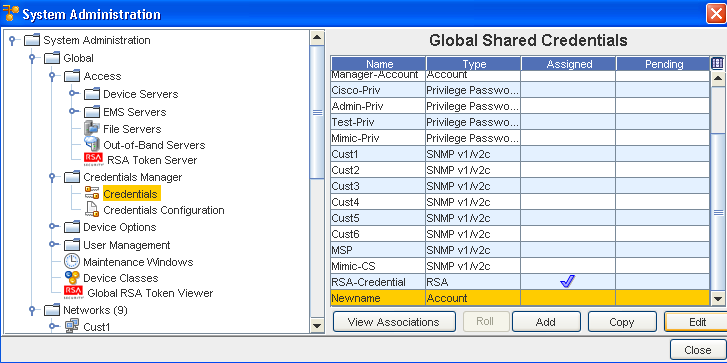
The Global Shared Credentials window displays with a listing of pre-assigned, shared credentials. At the bottom of the window are the View Associations, Roll, Add, Edit, and Remove buttons, along with the Close option.
-
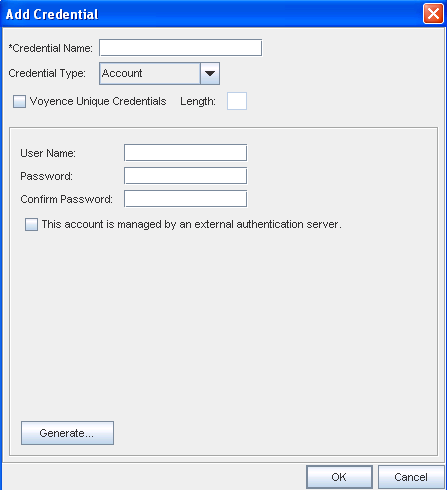
Click Add to display the Add Credential window.
Note: You can also Copy the Shared Credential using the Copy button. -
Enter the Credential Name .
-
From the Credential Type section, select Account type from the options shown (using the drop-down arrow to display your selection).
Note: Depending on the credential type you select, additional information is displayed in the lower portion of the window. For example, when you select Account as the credential type, additional fields display where you enter information. See Unique Credentials for more information.Credentials provide you the option to generate unique, random passwords of user definable length when using the Generate button.
-
Complete the following steps:
-
Enter the User Name .
-
Enter a Password. Confirm the Password.
-
Select the check box if this account is managed by an external authentication server.
-
-
Click OK when you have completed these steps.
Creating Shared Credential - Privilege Password Class
With the Network Shared Credentials window displayed showing a listing of pre-assigned, shared credentials:
-
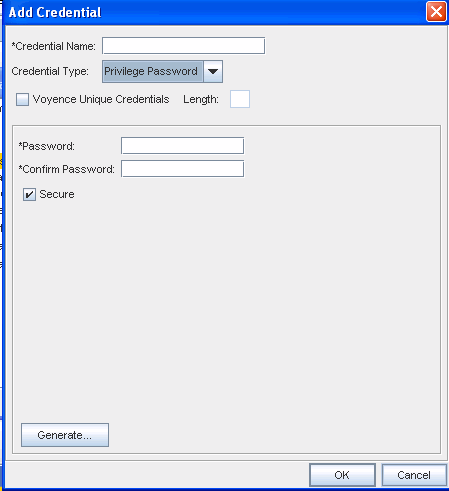
Click Add to display the Add Credential window.
-
Enter the Credential Name.
-
From the Credential Type section, select Privilege Password from the options shown (using the drop-down arrow). See Unique Credentials for more information.
To use Unique passwords per device, creating a Unique Credential eases the deployment of device passwords. A Unique credential is a placeholder that tells the system there are unique individual passwords on each device associated with the credential. Unique credentials have no passwords stored with them, but create a different password for each device associated with them. Unique credentials must be coupled with an update to devices.
-
Note: Enter a Password. Confirm the Password you just entered. You can also click the Secure check box, then click Generate to have the application generate a system-only-known password. Secure passwords will generate the appropriate enable-secure command when used to update a Cisco IOS device.
-
Click OK when you have completed these steps.
Creating Shared Credential - SNMP v1/v2c
With the Network Shared Credentials window displayed showing a listing of pre-assigned, shared credentials:
-
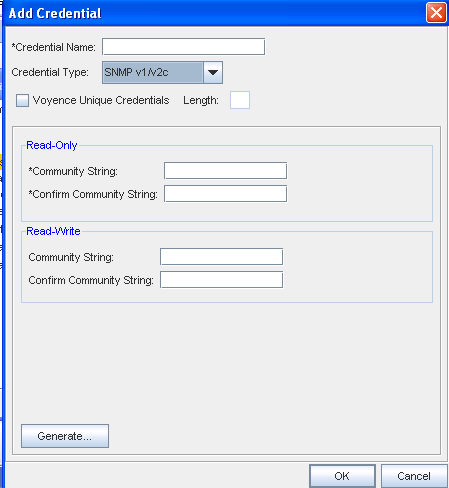
Click Add to display the Add Credential window.
-
Enter the Credential Name.
-
From the Credential Type section, select Community String from the options shown (using the drop-down arrow). See Unique Credentials for more information.
-
Complete the following steps for the Read-Only section:
-
Enter the Community String.
-
Confirm the Community String entered.
-
-
Complete the following steps for the Read-Write section:
-
Enter the Community String.
-
Confirm the Community String entered.
-
-
Click OK when you have completed these steps.
Creating Shared Credential - SNMP v3
With the Network Shared Credentials window displayed showing a listing of pre-assigned, shared credentials:
-
Click Add to display the Add Credential window.
-
Enter the Credential Name.
-
From the Credential Type section, select SNMP v3 from the options shown (using the drop-down arrow). See Unique Credentials for more information.
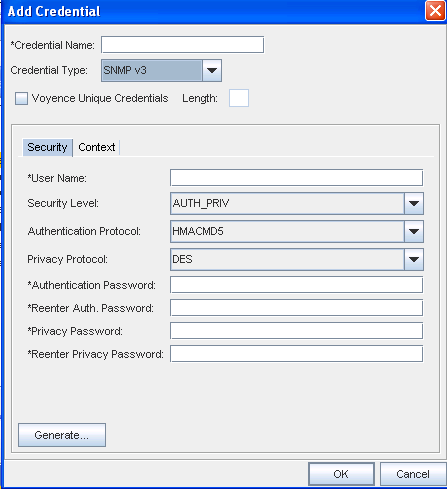
When SNMP v3 is selected as the Credential Type, the information you need to select and enter is divided between two tabs; Security and Context.
-
From the Security tab, complete the following steps:
-
Enter a User Name
-
From the drop-down arrow, select Security Level. Depending on the Security Level you select, Authentication Protocol and Privacy Protocol may not be selectable.
-
From the drop-down arrow, select a Authentication Protocol (if appropriate).
-
From the drop-down arrow, select a Privacy Protocol (if appropriate).Note: You can select AES192W3DESKEYExt and AES256W3DESKEYExt protocols, only for the Cisco specific device(s).
-
Enter an Authentication Password, then re-enter the password.
-
Enter a Privacy Password, then re-enter the password. Note that you can click Generate to have Network Configuration Manager create passwords for you.
-
Once your passwords are verified, click Ok.
-
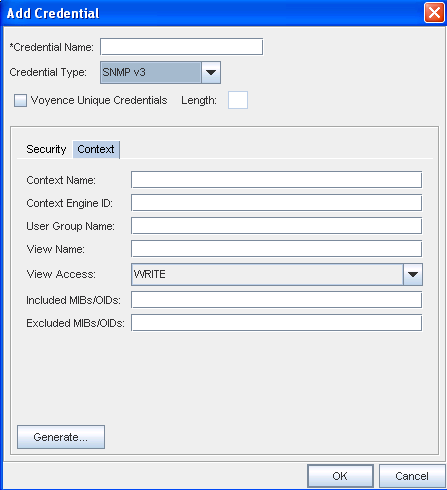
From the Context tab, compete the following steps:
-
Enter the Context Name
-
Enter the Context Engine ID
-
Enter a User Group Name
-
Enter a View Name
-
Select a View Access from the drop-down arrow
-
Enter the Mibs/Oids you want included
-
Enter the Mibs/Oids you want to be excluded from these credentials
-
Click Ok to keep your selections
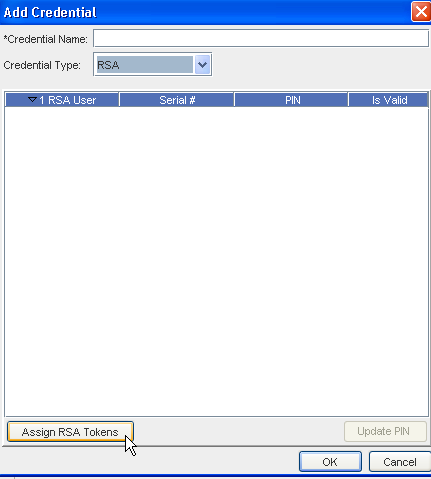
Creating Shared Credential - RSA
With the Network Shared Credentials window displayed showing a listing of pre-assigned, shared credentials:
-
Click Add to display the Add Credential window.
-
Enter the Credential Name.
-
From the Credential Type section, select RSA from the options shown (using the drop-down arrow). See Unique Credentials for more information.
-
Assign RSA tokens using the steps in the Assigning RSA Tokens section below.
-
Set the PINs for the RSA tokens using the steps in the Setting RSA Token PINs section below.
-
Click OK when you have completed these steps.
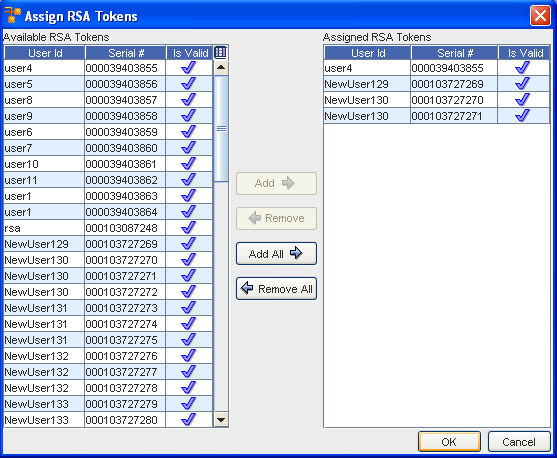
Assigning RSA Token
-
Select Assign RSA Tokens. The Assign RSA Tokens window pens.
-
The Available RSA Tokens column is a list of all unassigned RSA tokens. Select the RSA tokens to which the user or group will have permissions.
Note: A sequence of RSA tokens can be selected by holding down the Shift-key while clicking RSA tokens. Or, multiple, non-sequential RSA tokens can be selected by holding the Ctrl key while clicking the RSA token. -
When you have finished selecting RSA tokens, click Add or Add all.
-
If you are unassigning RSA tokens, in the Assigned RSA Tokens column, select the RSA tokens to which the user will no longer be associated, then click Remove All.
-
Once you have completed selecting the RSA tokens for the user, click OK. The Assign RSA Tokens window closes.
-
You can now proceed with setting RSA token PINs for the user or group.
Setting RSA Token PINs
-
From the list of RSA tokens, select an RSA token. RSA tokens that have not had the PIN set, show as Required under the PIN column.
-
At the bottom of the Manage RSA Tokens pane, select Set PIN . The Set PIN window (for the user you selected) now opens.
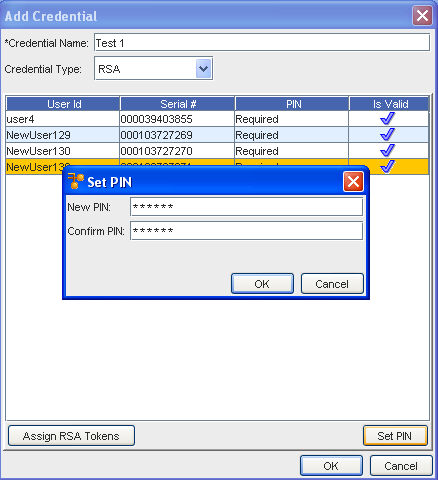
-
At the Set PIN screen, enter a valid PIN in the New PIN field.
-
Enter the PIN again in the Confirm PIN field.
-
Click Ok.
