


From the Update window you can select each device to be updated, select the target location for the image, determine if there is adequate space for the upgrade, and set the device, memory, and partition preferences.
OS updates are scheduled in the same manner as any other job - through the Scheduler.
Prerequisites to Updating OS Images
Prior to updating the OS Image you must ensure the following tasks have been completed:
If the most current information is not displayed, you can complete a Hardware Pull on the devices. Go to the Devices View, and right-click to get to the Pull option, then select Pull Hardware Spec from the options list.
To update the OS Image,
The Update OS Image option allows you to replace the device's current OS Image.
From the Devices View (in either the table or diagram format), you can access the Select OS Image window to update the OS image for the device.
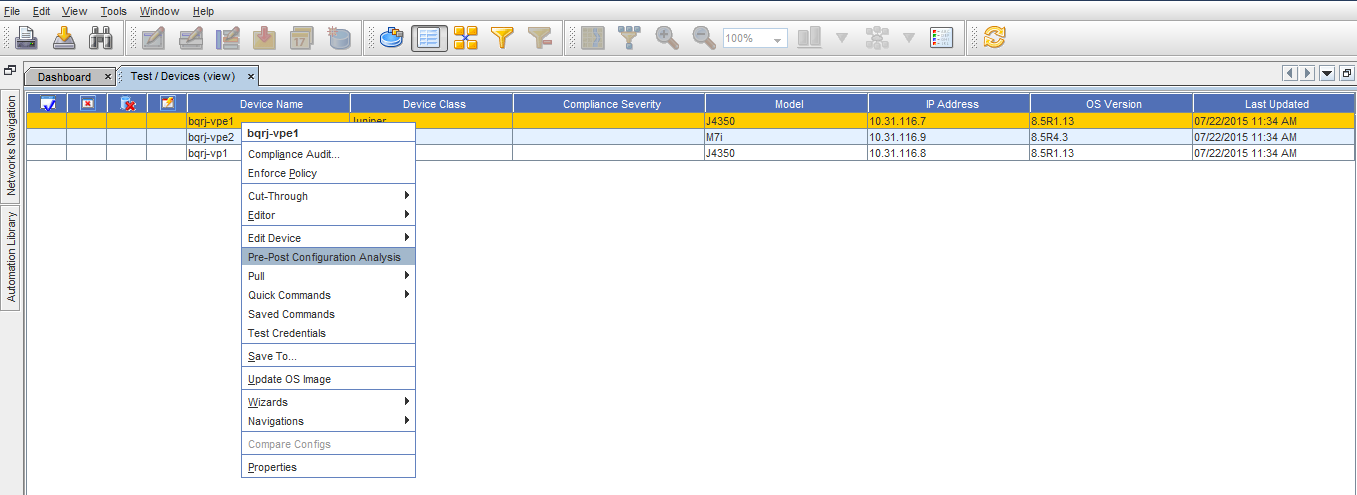
Device (or a number of devices) from the listing of devices, then right-click to see the menu.
- From the menu, select Update OS Image.
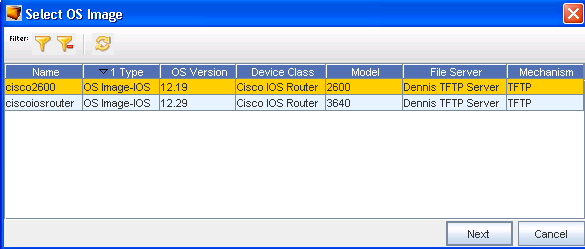
- From the Select OS image window, select any existing OS Image . You can also create a new OS Image (if needed).
- Click Next. The Update OS Image window is displayed. You may get an informational message, inquiring if you want to continue. Click Yes if appropriate. Note that there are three sections to this window.
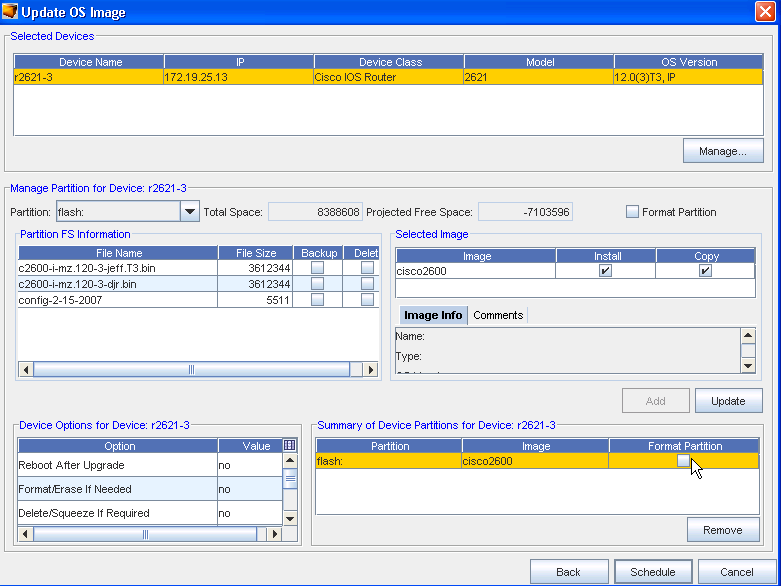
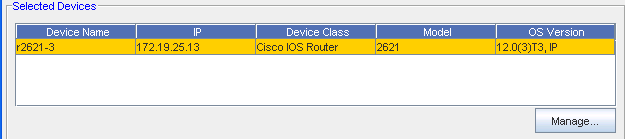
- At the first section, you can view the Selected Devices , and the information for that device.
Note: From this window you can also click Manage to see a listing of devices to add more devices to the Selected Device list (from the Update Device).
- If more than one device was selected (from the Devices View) and is displayed, select a Device from the list.
- In the next area ( Manage Partition for Device:) there are several steps that need to be completed.
- In the Partition section, either accept the default Partition , or click the drop-down arrow to select another Partition. This area of the window also shows the Space; both Total and Projected Free. Note that you can select to Format the selected Partition if needed from this area. If you select to Format the Partition, you will start with a clean partition and all the available free space.
- To force a format of the partition during the OS upgrade, click within the Format Partition check box.
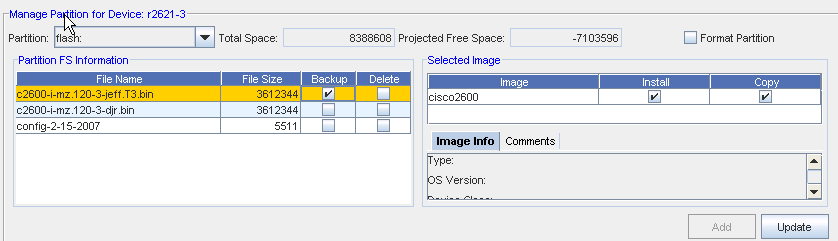
Important!! If you select the Format Partition, you will lose all data on the specific partition of the device.
Important: Do not use a partition where there is insufficient Projected Free Space for the OS Image. The Image size is noted in the Image Info tab.- From the Partition FS (file system) Information section, you can determine if you want to Backup or Delete existing files. If Backup is selected, these files will be backed up before the new OS Image is installed. If you select to Delete these files, they will be deleted before the new OS Image is installed.
- To add a selection from this partition information, first select the File Name from the list, then click Add. This adds the information into the Summary section (at the bottom of the window).
Note: To ensure that the displayed information contained within the Partition FS Information section is the most current information, complete a Hardware Pull on the device. Go to the Devices View and right-click to get to the Pull option, then select Hardware Spec pull from the options list.- At the Selected Image part , you can select the OS Image by clicking on the image name , and see the Image Info and Comments tab. This information and the comments were created when the OS image was created. Once the Image is selected, the Image Info and Comments tabs are displayed. Use the scroll bars to go to the top and bottom of the Image Info data. Click the Comments tab to view any comments previously recorded.
- Once you have determined the Partition, Partition FS Information, and the Selected Image, click Add. This ensures that the OS image is now added and designated as the Selected Image . The selected image is now shown in the last portion of the Update OS Image window.
The Update button is used if you make changes to the Install or Copy check boxes in the OS Image section, or if you decide to use the Format Partition checkbox (and force a partition) in the Partition section. Once changes to existing selections are made, click Update to make sure the current selections are used.
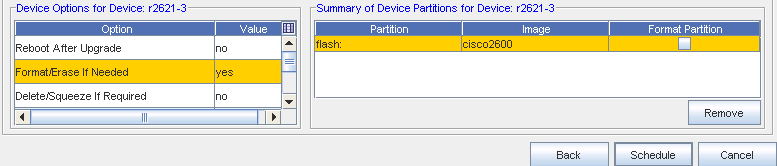
- At the Device Options for device: section you can view the options, and then make any changes to the Value if needed. Click within the Value column to see and select options.
Note: Some Device Options (in the Option section) may vary from Device Class to Device Class. For example, the following options are currently supported for CISCO IOS Routers and CISCO IOS Switches, but not supported for Juniper Device Classes.
Option Meaning Reboot after upgrade
This reboots/reload the device at the end of the OS Image upgrade process.
Format/Erase If Needed
If yes is selected, this option allows Verifying Installation.
After the installer completes, you can verify the installation (if desired) by completing the following steps:
-
From any Network Node Manager sub-map window, select Tools. You should see a Network Configuration Manager menu item.
-
From any Network Node Manager sub-map window, select Tools->SNMP MIB Browser. Then double-click Private and Enterprises. You should see voyence listed.
-
From any Network Node Manager sub-map window, select Options->Event Configuration. You should see voyence (Enterprise ID .1.3.6.1.4.1.6615) listed in the Enterprise Identification window. (You may need to scroll through the window.) Selecting voyence populates the Event Identification window with all the Network Configuration Manager events.
-
From the Event Configuration window, complete the following: Network Configuration Manager to reformat the partition to create more free space (if needed).
Note: If the Format Partition check box is checked, the partition will always automatically be formatted, whether you select Yes or No as the value for this option.Delete/Squeeze If Required
If yes is selected, this option allows Voyence to delete and squeeze the partition to create more free space (if needed).
Delete Old Image After Upgrade
This deletes the old OS Image from the device partition.
Backup Current Image
This backs up the current OS Image to the Network Configuration Manager Device Server directory ($VOYENCE_HOME/data/devserver/cm/devxfr) before the OS Image upgrade process begins.
Note: Specifically for CISCO IOS Class B and Class C devices are supported.Supported Options for Compacting CISCO IOS Non-Volatile Memory:
Class A - squeeze/format <partition> - Delete/Squeeze If Required or Format/Erase If Needed
Class B - erase <partition> - Format/Erase If Needed
Class C - format <partition> - Format/Erase If Needed
If there is not enough free space available, and you have not checked the Format Partition check box, but you want Network Configuration Manager to free the space needed, select the Format/Erase option, or the OS Image upgrade will fail.
At the Summary of Device Partition for Device section, this information automatically displays a summary of the selections made for this device, after the Add or Update button has been selected. From this section, you can also Add or Remove partitions, and the eventual ending information is once again displayed within the Summary section.
To change the information contained with the Summary section, begin again from the Selected Devices section of the window, and then re-select options, then click Update. These new selections (options) are now displayed in the Summary section.
Note: In the Partition section of the Summary of Device Partitions (for a specific device) there may be more than one default, however, the highest priority of the default is displayed. For example, the highest priority default for CISCO IOS devices is flash.
You can select information within the Summary section, then click Remove to completely remove any updates to a partition on a device. This removes the partition from the Summary listing, as well as from the Partition FS section.
- You can also use the Back button to return to the previous screen to begin the process again by selecting a different OS Image.
- If you previously checked the Format Partitions check box, the check is also displayed as checked in this Summary section.
-
- With all the selections made from this window, you can now click Schedule to schedule this OS Image Upgrade (Schedule a Push Job).
