


Getting started with VMware Tanzu Application Catalog
This guide will walk you through the basics of VMware Tanzu Application Catalog:
- Pre-requisites
- Signing in
- Browsing the Library page
- Adding a new registry
- Obtaining registry credentials
- Creating custom catalogs
- Browsing your catalog
- Consuming artifacts
- Knowledge Graph
- Summary
- Useful Links
Pre-requisites
To access VMware Tanzu Application Catalog, ensure that:
- You have a [Tanzu Platform cloud services account]also known as VMware Account.
- You have access to the Tanzu Platform cloud services Portal (CSP).
- You have a subscription to the VMware Tanzu Application Catalog service. Contact your VMware sales representative to learn more on subscribing to any of the available editions that best suit your team’s requirements. To get a free 90-day trial:
- All Trial licenses must be requested via Broadcom Support Portal which is a self-service portal.
- Trial product details are available in the portal via the Trials & Beta tab. Click on the dropdown on the top right corner next to your name, select “Tanzu”, and request a trial of “VMware Tanzu Application Catalog”, listed under “All Trials”.
- You have the necessary roles assigned to create or view application requests and manage or view base images and registries. These roles are defined in your Tanzu Platform cloud services Console toolbar (under “My Account” > “My Roles”). Under Service Roles, expand VMware Tanzu Application Catalog to view the type of role assigned to you:
- App Catalog Admin: This role allows users to manage the catalog and see all the information regarding it. Users with this role can create application requests and manage base images and registries.
- App Catalog User: This role allows users to see data through the catalog but not make any changes to it. They cannot perform application requests or manage registries and base images.
- For the environment and prerequisites necessary to create your custom catalog, you must have an account with at least one of the Registries supported in VMware Tanzu application Catalog.
- In order to consume the Artifacts created, you need to have:
- a Docker environment installed and configured. For more information on installing Docker, see Install Docker Engine.
- Kubernetes cluster. For more information, see Get Started with Bitnami Charts using Minikube.
- Helm v3.x installed in your local machine or the operator workstation.
Signing in
Go to VMware Tanzu Application Catalog and sign in using your VMware Account.

Browsing the Library page
To browse the Library page:
-
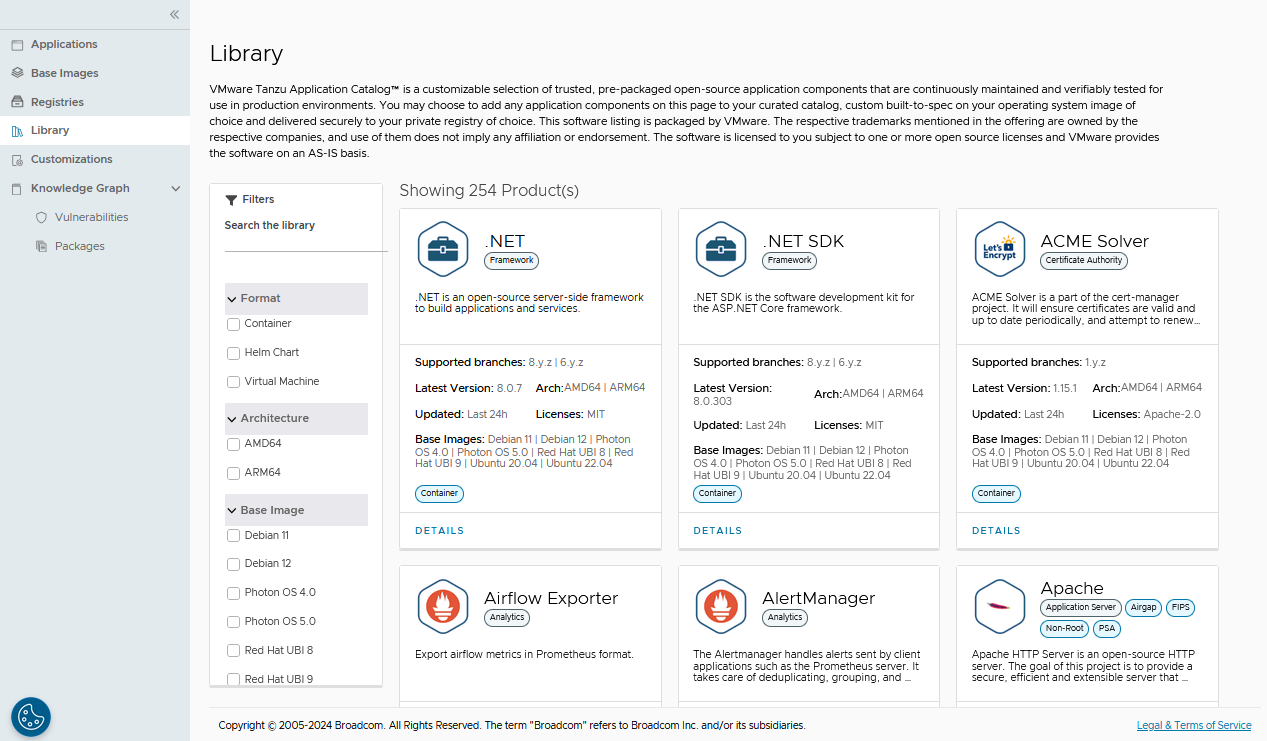
In the left navigation panel, click “Library”. A list of all the applications available on VMware Tanzu Application Catalog will appear.
You can use the “Search the library” filter to search for specific software components, format, architecture, base image, application category, security verifications, and license. List of all containers, Helm charts, VMs, or both based on your filter criteria available on VMware Tanzu Application Catalog are displayed.
-
To get more information on any of the applications listed in the library, click “Details”. In the resulting screen, you will see the following information:
- Latest version: Refers to the latest version of the container images, Helm charts, and virtual machines.
- Base Image: Indicates the different base images available for this application depending on the format.
- Format: Format serves as a standardized way to package, distribute, and deploy software components with VMware Tanzu Application Catalog packages applications in the form of container images, Helm charts, and virtual machines.
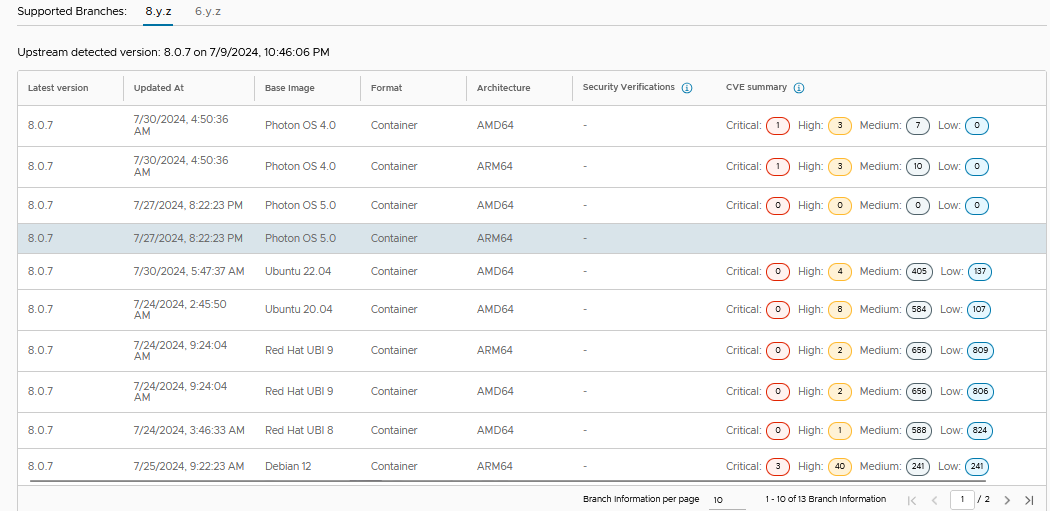
- Architecture: VMware Tanzu Application Catalog distributes its artifacts in either AMD64, ARM64 or both. Security Verification: Checks whether Helm charts are compliant with security standards, including validation for air-gapped environments, FIPS-enabled environment, non-root configuration for containers, and adherence to Pod Security Standards (PSA enforced) through the Pod Security admission controller.
- CVE summary: Displays a summary of all the Common Vulnerabilities and Exposures (CVEs) classified by severity: critical, high, medium or low. This provides vital insights into potential vulnerabilities. It also enhances security awareness, helps in risk management, and ensures compliance before users add applications to the catalog. CVE summary is only displayed for container images and virtual machines. By being aware of the CVEs associated with each base image and version, users can make informed decisions before adding applications into the catalog. For more information, see FAQs.
Adding a new registry
To add a new registry:
- In the left navigation panel, click ’Registries".
- In the “Registries” page that appears, click “Add Registry”.
-
In the “Add Registry” dialog, provide the required information and click “ADD”.
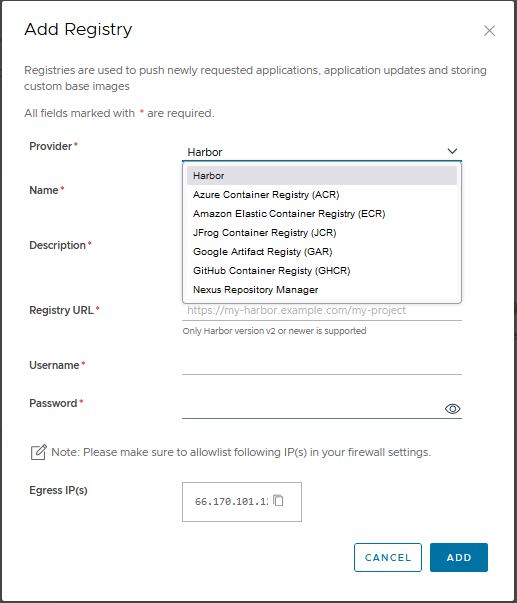
To see specific guides for each provider, see below:
- VMware Tanzu Application Catalog will verify the configuration of the registry you are attempting to set up. Upon successful verification, a confirmation message will indicate that your request to add a new registry has been submitted successfully.
- Click “OK”.
The newly added registry will appear in the "My Registries section.
If you do not have any of the previously mentioned registries, or have any networking restrictions, you can request a VMware hosted registry by opening a support ticket in VMware Tanzu Application Catalog.
Obtaining registry credentials
If you added a hosted registry, you would need to obtain its credentials before using VMware Tanzu Application Catalog. These credentials allow you to access the registry, and pull the container images and Helm charts.
To obtain registry credentials:
- On the left navigation panel, click “Registries”.
- Under the “My Registry” tab, click “DETAILS” of the newly added registry.
- In the “Registry Credentials” tab, click “GENERATE NEW CREDENTIALS”.
-
In the resulting dialog box, enter a description for the new credentials, and click “GENERATE THE NEW CREDENTIALS”. The credentials are generated and displayed. Make a note of the username and token, or click “Download as JSON file” to download them as a JSON file. The default name of the file that is downloaded is called ‘_json_key.json’.
Note
These credentials will not be displayed again, so ensure that you download or copy them to a secure location, as you will need them in subsequent steps.
For a cluster to use the registry, it must have a secret that contains the registry key that was created. When deploying a helm chart, it’s necessary to instruct the pods to pull images using the registry secret. This is done by setting the imagePullSecrets value in the helm command.
See the section Consuming artifacts for further information.
Creating custom catalogs
VMware Tanzu Application Catalog allows you to create your own custom catalog.
To create a custom catalog:
-
In the left navigation panel, click “Applications”. In the page that displays, click “ADD NEW APPLICATIONS”. The “Add New Applications” page displays.
-
Select a platforms, the associated base image options, and then click “NEXT”. You can deploy VMware Tanzu Application Catalog on Kubernetes or virtual machine platforms.

-
Select the applications for your catalog and then click “NEXT”
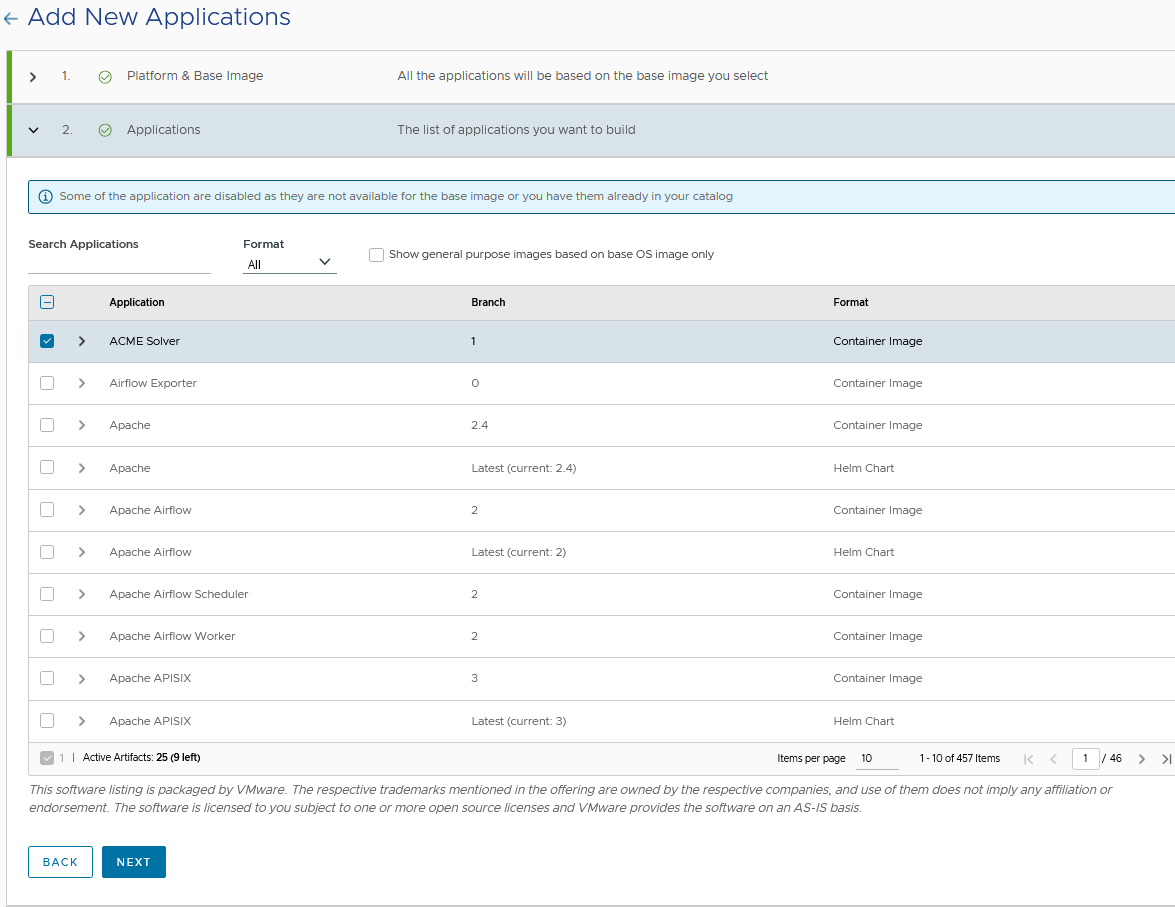
The “Active Artifacts” counter, below the application list, displays the number of artifacts selected, the total number of artifacts eligible for your subscription quota, and the number of artifacts remaining in your subscription quota.
-
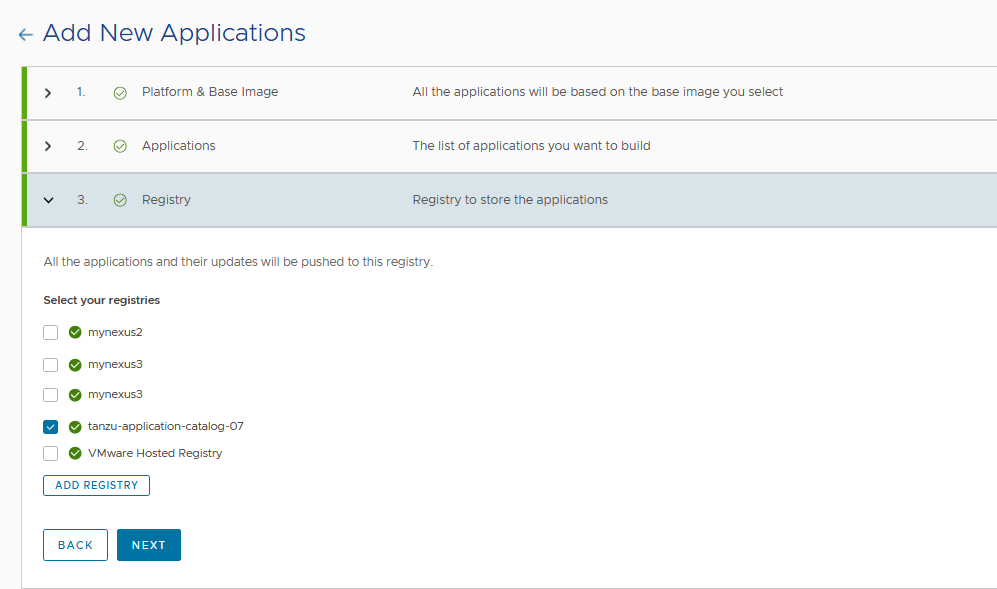
You will see a list of all the registries you have previously added. Select the registry or registries from the list where you want to push the applications and click “NEXT”. After your request is processed, all the applications and their updates will be pushed to the registry or registries you have selected. To add a registry, see the section Adding a new registry.
-
Provide a name and an optional description for your request and then click “NEXT”
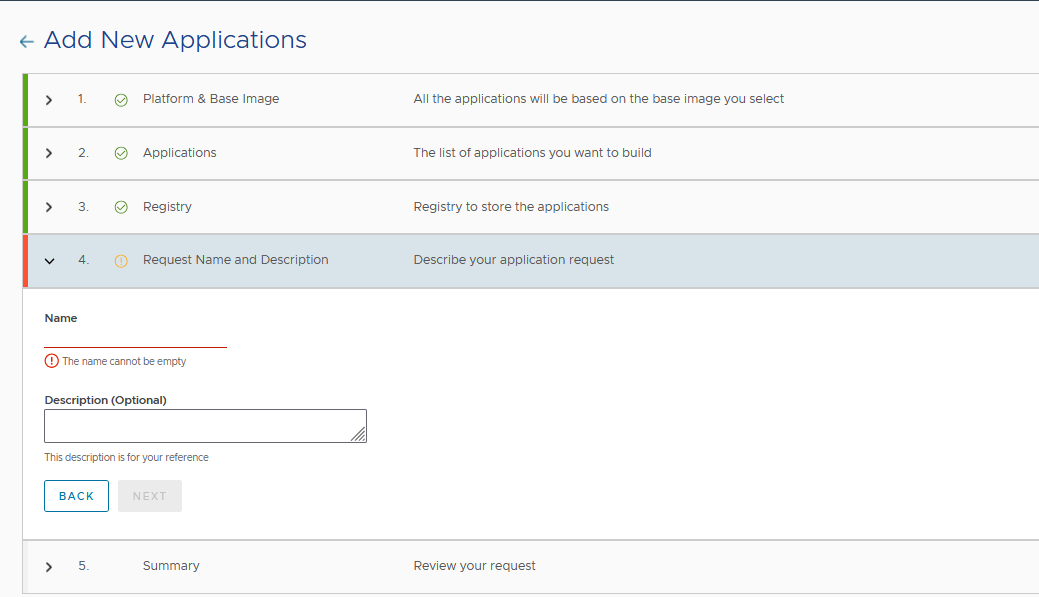
- Review the summary of your request, make appropriate changes if required and, then click “SUBMIT”. A message appears confirming that your new application request has been successfully submitted.
NoteWhile non-custom base images are processed within minutes, it may take up to 1-2 hours for the system to review and process custom ones. You can monitor the status of your request in the “My Requests” tab. It displays the list of all the requests you have submitted along with the status. It also displays the statistics of your active artifacts and requests. You can view the details by clicking the arrow next to each request.
After your request is processed, the application will appear in the “My Applications” tab. It also shows the list of registries used for each request.
Browsing your catalog
Sign into VMware Tanzu Application Catalog, and from the left navigation page, click “Applications”.
A list of all the applications available on VMware Tanzu Application Catalog will be shown along with the following information in graphs and tabular format: 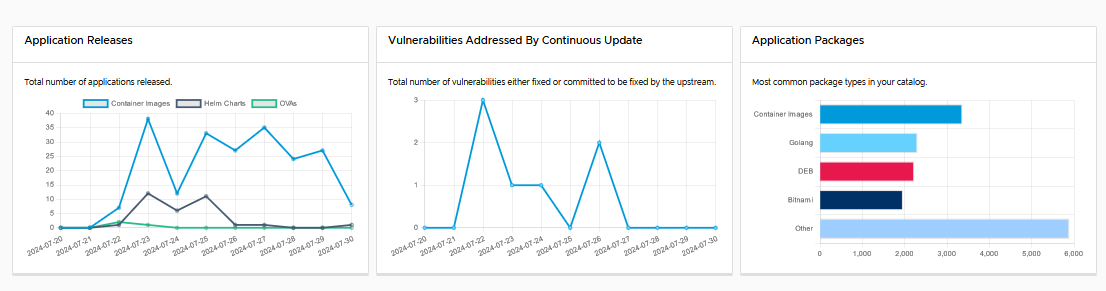
-
Application releases: This is the number of new application versions that have been built, verified, and delivered into your registry or registries per day.
-
Vulnerabilities addressed by continuous update: The number of vulnerabilities that we have patched every day by releasing those updates into your registries. This number also includes future patches that upstream providers have officially committed to delivering.
-
Application packages: Shows the top package manager contributions to your OSS ecosystem to give you a sense of your reliance on and exposure to various open source ecosystems.
Below the three charts, you will see a list of the applications and components in your custom catalog.
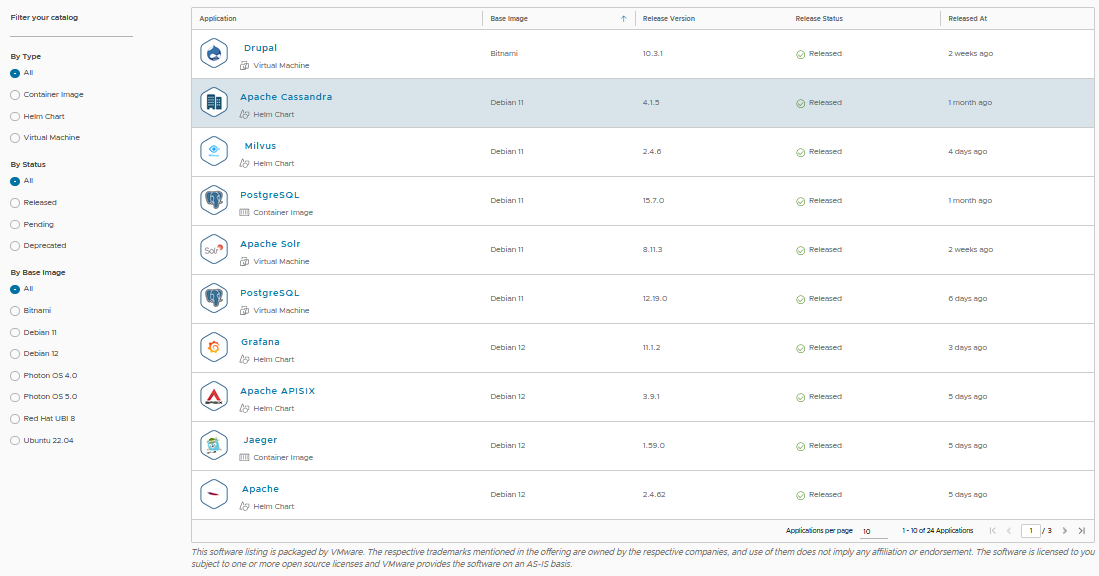
You can use the filters on the left side to filter by name, type, status, or base image. The listed artifacts will display the following information:
-
Base image
-
Release version
-
Release status
-
Date of the latest release
These applications are continuously updated, so that you can consume them for development and deployment. Click on any individual artifact to see information specific to their application.
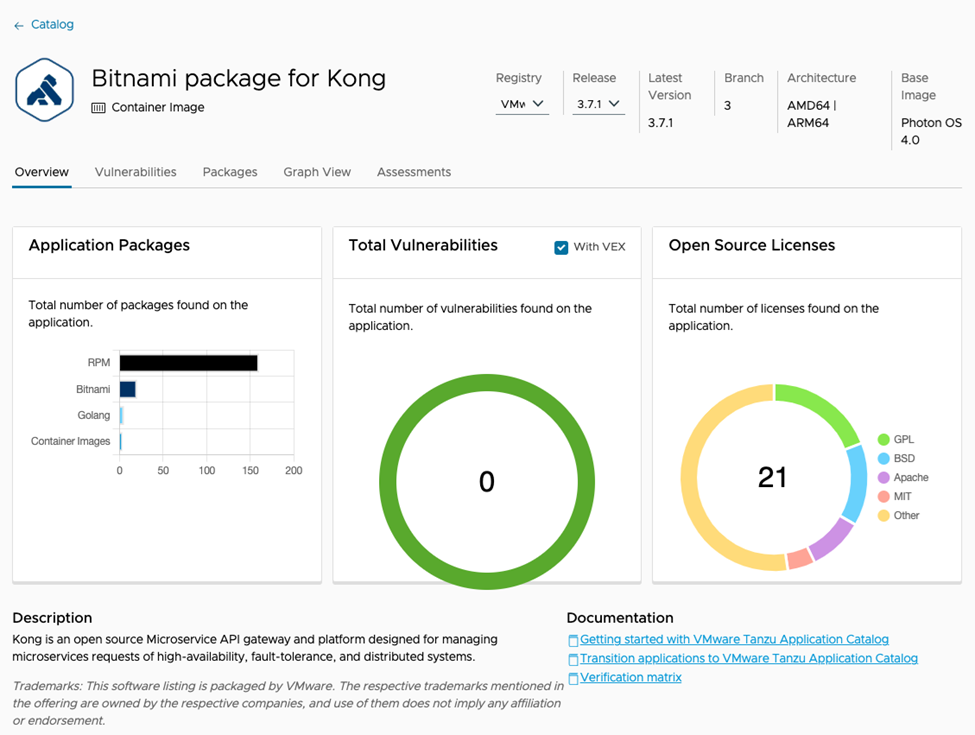
Each application contains an overview tab with:
-
Graphs with the number of packages, vulnerabilities, and Open Source licenses
-
Release info with instructions to consume your Container Image or Helm Chart, or to download you Virtual Machine
-
Downloadable validation reports and build time reports
Additional tabs will provide further information on vulnerabilities, packages, artifact structure, and so on.
Consuming artifacts
VMware Tanzu Application Catalog builds trusted and continuously maintained content that can be consumed in many different ways. The easiest way to get started is to useVMware Tanzu Application Catalog container images and Helm charts in your local development environment using the Docker or Helm CLI.
Consuming container images
To use a container image from VMware Tanzu Application Catalog:
- Find the container image in the catalog listing and click its name.
- Select the release version you wish to use (if more than one release is available).
- Copy and execute the commands found for that release, in the “Consume your Container Image” section, as shown below:

Here is an example of how to run a VMware Tanzu Application Catalog container image for MySQL. When prompted, you would need to enter the registry credentials obtained in the “Obtaining registry credentials” section earlier.
$ cat _json_key.json | docker login -u _json_key --password-stdin us-east1-docker.pkg.dev/vmw-app-catalog/YOUR_HOSTED_REGISTRY
$ docker run --rm
us-east1-docker.pkg.dev/vmw-app-catalog/YOUR_HOSTED_REGISTRY/containers/ubuntu-22/mysql:latest
Consuming Helm charts
Before deploying a Helm chart from VMware Tanzu Application Catalog, it is necessary to create a Kubernetes ImagePullSecret for us-east1-docker.pkg.dev/vmw-app-catalog/YOUR_HOSTED_REGISTRY with the registry credentials obtained in the “Obtaining registry credentials” section earlier.
Here is an example of how to create an ImagePullSecret. Make sure the “_json_key.json” file obtained in the “Obtaining registry credentials” section earlier is available in the folder you run the command below.
$ kubectl create secret docker-registry your-registry \
--docker-server https://us-east1-docker.pkg.dev/vmw-app-catalog/YOUR_HOSTED_REGISTRY \
--docker-username "_json_key" \
--docker-password "$(cat _json_key.json)"
Charts can then be deployed either by adding the global.imagePullSecrets[0]=your-registry parameter to each Helm deployment command, or by configuring the ImagePullSecret globally.
To use a Helm chart from the VMware Tanzu Application Catalog:
- Find the Helm chart in the catalog listing and click its name.
- Select the release version you wish to use (if more than one release is available).
- Copy and execute the commands found for that release, in the “Consume your Helm chart” section, as shown below:

Here is an example of how to deploy a VMware Tanzu Application Catalog Helm chart for Apache Kafka using the ImagePullSecret created earlier:
If you are using Helm CLI version 3.8.0 or later
$ cat "_json_key" | helm registry login -u _json_key --password_stdin us-east1-docker.pkg.dev/vmw-app-catalog/YOUR_HOSTED_REGISTRY/charts/ubuntu-22
$ helm chart pull us-east1-docker.pkg.dev/vmw-app-catalog/YOUR_HOSTED_REGISTRY/charts/ubuntu-22/kafka:28.0.3
$ helm chart export us-east1-docker.pkg.dev/vmw-app-catalog/YOUR_HOSTED_REGISTRY/charts/ubuntu-22/kafka:28.0.3
$ helm install kafka/ --generate-name --set "global.imagePullSecrets[0]=your-registry"
If you are using an older Helm CLI version
$ cat "_json_key" | helm registry login -u _json_key --password_stdin us-east1-docker.pkg.dev/vmw-app-catalog/YOUR_HOSTED_REGISTRY/charts/ubuntu-22
$ helm install oci://us-east1-docker.pkg.dev/vmw-app-catalog/YOUR_HOSTED_REGISTRY/charts/ubuntu-22/kafka --version 28.0.3 --generate-name --set "global.imagePullSecrets[0]=your-registry"
Knowledge Graph
The Knowledge Graph enables you to browse a comprehensive view of catalog vulnerabilities and all packages included in your Open Source software catalog.
Vulnerabilities
To access the Vulnerabilities page, from the left navigation panel, click on the “Vulnerabilities” section under the Knowledge Graph menu. This global view lets you explore all the different vulnerabilities that have been detected by VMware Tanzu Application Catalog’s continuous SBOM scanning.

You can do the following in the Vulnerabilities page:
Filtering Critical Vulnerabilities
To focus on the most critical issues, click on the funnel icon in the Severity column header. This allows you to filter vulnerabilities by severity levels, such as Critical, High, Medium, Low, or Unknown. This filtered view provides a list of the most pressing vulnerabilities affecting your applications.
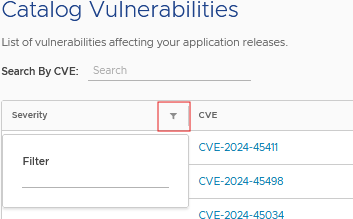
Searching for Specific CVEs
If you need to check whether your catalog is affected by a particular CVE, use the search box at the top of the Vulnerabilities page. Enter the CVE identifier to quickly determine if the vulnerability impacts any applications in your catalog.
Assessing Affected Containers, Helm Charts, or Virtual Machines
For a more detailed examination, click on the CVE identifier within the main Vulnerabilities page. This opens a global view with comprehensive information about the vulnerability, including a list of affected containers, Helm charts, or Virtual Machines.
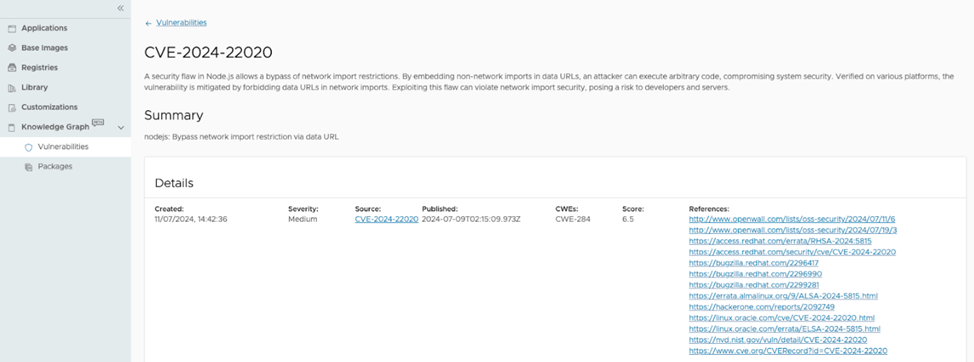
Scrolling further will reveal the specific releases and packages impacted by the CVE, as well as any assessments related to it. This section is particularly useful for understanding the blast radius of the vulnerability. Additionally, you can check if there is a newer version of the application available that resolves the issue.
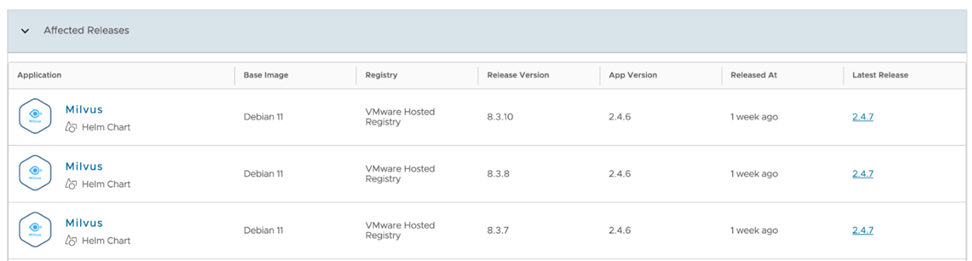
For instance, if a vulnerability affects Helm charts in Milvus version 2.4.6, but not version 2.4.7, this indicates an immediate need to upgrade to the latest version to ensure your applications remain secure.
Packages
To access the Packages page, from the left navigation panel, click on the “Packages” section under the Knowledge Graph menu. This page provides a comprehensive overview of all packages included in your catalog, allowing you to sort and filter by various criteria such as package name, kind, version, distribution, or architecture.
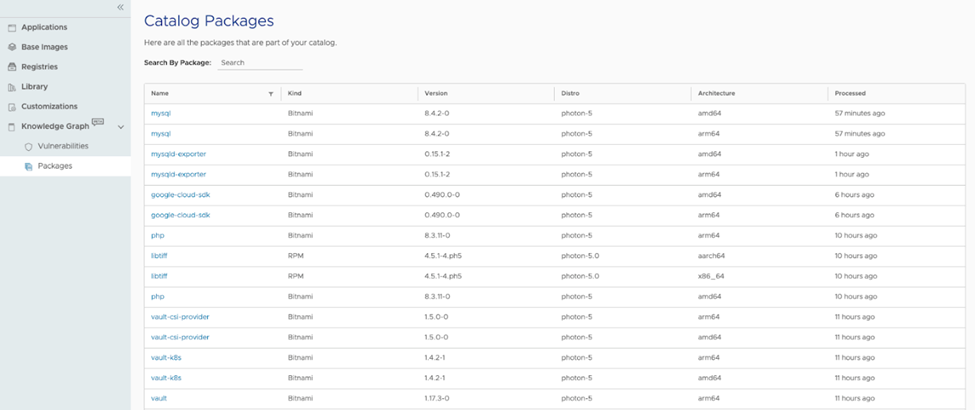
You can do the following in the Packages page:
Searching for Specific Package and Version
If you need to check if a specific package and version are included in any of your applications, use the search box at the top. For instance, if you want to find out whether Log4j is present in your Helm charts, container images, or virtual machines from VMware Tanzu Application Catalog, simply enter the package name into the search box. The search results will display all instances where the package is included in the catalog.
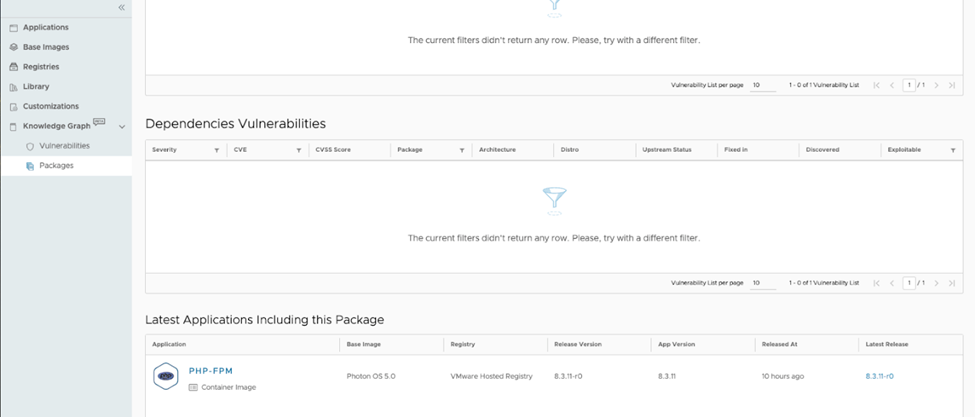
Viewing Package Information
Clicking on a package will give you detailed information, including any associated vulnerabilities, licensing details, and transitive dependencies. You can also see which applications incorporate the package, helping you quickly evaluate its impact on your open source software dependencies.
Summary
Upon completion of this guide using your account credentials, you will gain visibility into the constructed catalog examples, understand how to access antivirus and CVE results, and effectively utilize artifacts available in the VMware Tanzu Application Catalog. For customized testing experiences, please reach out to a VMware sales representative. They will collaborate with you to develop a Proof of Concept (POC) that integrates your specified target format, base image, and chosen applications.
Useful links
- VMware Tanzu Application Catalog
- VMware Tanzu Application Catalog documentation
- VMware Tanzu Application Catalog FAQs
- Consume VMware Tanzu Application Catalog Helm charts in your local machine
- Consume VMware Tanzu Application Catalog Images using a Private Harbor Registry
- Transition Applications to VMware Tanzu Application Catalog
- Tanzu Platform cloud services documentation
- Tanzu Platform cloud services Portal (CSP)
