


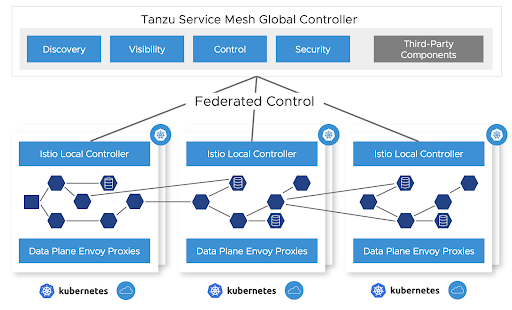
Set up Tanzu Service Mesh
This topic tells you how to set up a Tanzu Application Platform application deployed on Kubernetes with Tanzu Service Mesh (commonly called TSM).
Sample applications are used to demonstrate how a global namespace can provide a network for Kubernetes workloads that are connected and secured within and across clusters, and across clouds.
NoteYou can also use Tanzu Mission Control (commonly called TMC) to install Tanzu Application Platform (commonly called TAP) on a managed cluster. For more information, see the Tanzu Mission Control documentation.
Prerequisites
Meet the prerequisites, which includes having
- A supported Kubernetes platform
- The correct resource configuration (number of nodes, CPUs, RAM, and so on)
- The required connectivity requirements
Connectivity is only required from your local clusters out to Tanzu Service Mesh and not inwards. This can traverse a corporate proxy as well. In addition, connectivity in the data plane is required between the clusters that must communicate, specifically egress to ingress gateways. No data plane traffic needs to reach the Tanzu Service Mesh software as a service (SaaS) management plane.
Activate your Tanzu Service Mesh subscription
Activate your Tanzu Service Mesh subscription at cloud.vmware.com. After purchasing your Tanzu Service Mesh subscription, the VMware Cloud team sends you instructions. If you don’t receive them, you can follow these instructions.
Onboard your clusters to Tanzu Service Mesh as described later in this topic. This deploys the Tanzu Service Mesh local control plane and OSS Istio on your Kubernetes cluster and connects the local control plane to your Tanzu Service Mesh tenant.
Set up Tanzu Application Platform
To enable Tanzu Service Mesh support in Tanzu Application Platform Build clusters:
-
Add the following key to
tap-values.yamlunder thebuildservicetop-level key:buildservice: injected_sidecar_support: true -
Install Tanzu Application Platform on the run cluster.
End-to-end workload build and deployment scenario
The following sections describe how to build and deploy a workload.
Apply a workload resource to a build cluster
Workloads can be built by using a Tanzu Application Platform supply chain by applying a workload resource to a build cluster. At this time, Tanzu Service Mesh and Tanzu Application Platform cannot use the Knative resources that are the default runtime target when using the web resource type.
In Tanzu Application Platform v1.4 and later, two workload types support a Tanzu Service Mesh and Tanzu Application Platform integration: server and worker.
To work with Tanzu Service Mesh, web workloads must be converted to the server or worker workload type. Server workloads cause a Kubernetes Deployment resource to be created with a Service resource that uses port 8080 by default.
-
If the service port that you want is 80 or some other port, add port information to
workload.yaml. The following example YAML snippets show the changes to make from thewebtoserverworkload type. This is an example before applying the changes:apiVersion: carto.run/v1alpha1 kind: Workload metadata: name: where-for-dinner labels: apps.tanzu.vmware.com/workload-type: web app.kubernetes.io/part-of: where-for-dinner-api-gateway spec: params: - name: annotations value: autoscaling.knative.dev/minScale: "1" source: git: url: https://github.com/vmware-tanzu/application-accelerator-samples.git ref: branch: tap-1.6.x subPath: where-for-dinner/where-for-dinner-api-gatewayThis is an example modified for Tanzu Service Mesh, which includes the removal of the autoscaling annotation:
apiVersion: carto.run/v1alpha1
kind: Workload
metadata:
  name: where-for-dinner
  labels:
  apps.tanzu.vmware.com/workload-type: server # modification
  app.kubernetes.io/part-of: where-for-dinner-api-gateway
spec:
  params:
  - name: ports # modification
  value:
  - port: 80 # modification
    containerPort: 8080 # modification
    name: http # modification
  source:
  git:
      url: https://github.com/vmware-tanzu/application-accelerator-samples.git
    ref:
        branch: tap-1.6.x
  subPath: where-for-dinner/where-for-dinner-api-gateway
This results in a deployment and a service that listens on port 80 and forwards traffic to port 8080 on the pod’s workload container.
-
Submit the modified YAML to your build cluster by running:
tanzu apps NAMESPACE apply --file WORKLOAD-YAML-FILEWhere:
NAMESPACEis the namespace that the build cluster uses for building.WORKLOAD-YAML-FILEis the name of your workload YAML file, such asworkload.yaml.
After your workload is built a
Deliverableresource is created.
Configure egress for Tanzu Build Service
For Tanzu Build Service to properly work, provide egress to access the registry where Tanzu Build Service writes application images, and define the registry in the kp_default_repository key and the Tanzu Application Platform install registry.
Additionally, configure egress for buildpack builds to download any required dependencies. This configuration varies with different buildpacks and language environments. For example, Java builds might need to download dependencies from Maven central.
Create a global namespace
Using the Tanzu Service Mesh portal or API, create a global namespace (GNS) that includes the namespaces where your application components are deployed. For more information, see Global Namespaces
Whether in a single cluster or multiple clusters, or within the same site or across clouds, after you add a namespace selection to the GNS, the services that Tanzu Application Platform deploys are connected based on the GNS configuration for service discovery and connectivity policies.
If a service must be accessible through the ingress from the outside, it can be configured through the public service option in Tanzu Service Mesh or directly through Istio on the clusters where that service resides. It’s best practice to configure the service’s accessibility through the GNS.
Run cluster deployment
Before deploying a workload to a run cluster, ensure that any prerequisite resources have already been created on the run cluster. This includes concepts such as data, messaging, routing, security services, RBAC, ResourceClaims, and so on.
After a successful build in a build cluster, workloads can be deployed to the run cluster by applying resulting deliverable resources to the run cluster as described in Getting Started with Multicluster Tanzu Application Platform.
Another option is to create a kapp application that references a GitOps repository to include all deliverable resources for a given cluster. See the following example of a kapp definition that points to a GitOps repository:
apiVersion: kappctrl.k14s.io/v1alpha1
kind: App
metadata:
  name: deliverable-gitops
  namespace: where-for-dinner
spec:
  serviceAccountName: default
  fetch:
  - git:
    url: https://github.com/gm2552/tap-play-gitops
    ref: origin/deliverables-tap-east01
    subPath: config
  template:
  - ytt: {}
  deploy:
  - kapp: {}
The advantage of this model is that applications can be deployed or uninstalled from a cluster by managing the contents of the deliverable resources from within the GitOps repository and enabling a GitOps workflow for application and service change control.
Deployment use case: Where For Dinner
The following instructions describe an end-to-end process for configuring, building, and deploying the Where For Dinner application into a Tanzu Service Mesh global namespace.
These instructions use the default configuration of Where For Dinner, which consists of only needing a single-node RabbitMQ cluster, an in-memory database, and no security. The application is deployed across two Tanzu Application Platform run clusters. It requires the ytt command to execute the build and deployment commands.
The configuration resources referenced in this scenario are located in the where-for-dinner-tap-tsm GitHub repository.
Create an initial set of configuration files from the accelerator
This use case deployment includes a pre-built set of configuration files in a Git repository. However, they were created from a set of configuration files by using a bootstrapped process that uses the Where For Dinner accelerator, and were later modified.
For reference, you can create an initial set of configuration files from the Where For Dinner accelerator, which is available in Tanzu Application Platform v1.3 and later.
This section does not include instructions for modifying the configuration files from the accelerator into configuration files used in a later section.
From the accelerator, accept all of the default options with the following exceptions:
- Workload namespace: Update this field with the name of the namespace you will use to build the application in your build cluster
- Service namespace: Update this field with the name of the namespace you will use to deploy a RabbitMQ cluster on your Tanzu Application Platform run cluster
Apply the workload resources to your build cluster
To build the application services, run the following command to apply the workload resources to your build cluster. You can also clone or fork the repository in this command to either use the YAML files locally or point to your own Git repository.
ytt -f workloads.yaml -v workloadNamespace=WORKLOAD-NAMESPACE | kubectl apply -f-
Where WORKLOAD-NAMESPACE is the name of your build namespace
For example:
ytt -f https://raw.githubusercontent.com/gm2552/where-for-dinner-tap-tsm/main/workloads.yaml \
-v workloadNamespace=workloads | kubectl apply -f-
If you are using a GitOps workflow with your build cluster, after the workloads are built the deployment information is pushed to your GitOps repository.
If you follow these instructions without pull requests in the GitOps workflow, the config-writer pods that commit deployment information to the GtiOps repository might fail because of concurrency conflicts. A workaround for this is to delete the failed workloads from the build cluster and re-run the command provided in the instructions.
Install service claim resources on the cluster
Where For Dinner requires a RabbitMQ cluster installed on your run cluster. You must install RabbitMQ on the same run cluster that is named RunCluster01 in the following deployment section. Additionally, you must install service claim resources on this cluster.
-
If you haven’t already done so, install the RabbitMQ Cluster Operator on the run cluster by running:
kubectl apply -f "https://github.com/rabbitmq/cluster-operator/releases/download/v1.13.1/cluster-operator.yml" -
Spin up an instance of a RabbitMQ cluster by running:
kubectl create ns SERVICE-NAMESPACE

ytt -f rmqCluster.yaml -v serviceNamespace=SERVICE-NAMESPACE | kubectl apply -f-
Where
SERVICE-NAMESPACEis the namespace of where you want to deploy your RabbitMQ clusterFor example:
kubectl create ns service-instances ytt -f https://raw.githubusercontent.com/gm2552/where-for-dinner-tap-tsm/main/rmqCluster.yaml -v \ serviceNamespace=service-instances | kubectl apply -f- -
Create service toolkit resources for the RabbitMQ class and resource claim by running:
ytt -f rmqResourceClaim.yaml -v serviceNamespace=SERVICE-NAMESPACE -v \
workloadNamespace=WORKLOAD-NAMESPACE | kubectl apply -f-
Where
SERVICE-NAMESPACEandWORKLOAD-NAMESPACEare the namespaces where you deployed your RabbitMQ cluster and the namespace where the application service will run.For example:
ytt -f https://raw.githubusercontent.com/gm2552/where-for-dinner-tap-tsm/main/rmqResourceClaim.yaml \
-v serviceNamespace=service-instances -v workloadNamespace=where-for-dinner | kubectl apply -f-
Run cluster deployment
Workloads are deployed to the run cluster using deliverable resources. This section applies the deliverable resources directly to the run clusters instead of using a kapp application.
This deployment assumes that two clusters are part of the Tanzu Service Mesh GNS Where For Dinner. These example clusters are named RunCluster01 and RunCluster02. The majority of the workload is deployed to RunCluster01 while the crawler workload is deployed to RunCluster02.
The deliverable objects reference the GitOps repository, where the build cluster has written deployment information, and needs to reference this repository in the following commands.
Deploy the workloads to the run clusters by running these commands against their respective clusters:
ytt -f cluster01Deliverables.yaml -v workloadNamespace=WORKLOAD-NAMESPACE -v \
gitOpsSecret=GIT-OPS-SECRET -v gitOpsRepo=GIT-OPS-REPO | kubectl apply -f-
Where:
WORKLOAD-NAMESPACEis the namespace where the workloads are deployedGIT-OPS-SECRETis the GitOps secret used to access the GitOps repositoryGIT-OPS-REPOis the URL of the GitOps repository where the build cluster wrote out deployment configuration information
ytt -f cluster02Deliverables.yaml -v workloadNamespace=WORKLOAD-NAMESPACE -v \
gitOpsSecret=GIT-OPS-SECRET -v gitOpsRepo=GIT-OPS-REPO | kubectl apply -f-
Where:
WORKLOAD-NAMESPACEis the namespace where the workloads are deployedGIT-OPS-SECRETis the GitOps secret used to access the GitOps repositoryGIT-OPS-REPOis the URL of the GitOps repository where the build cluster wrote out deployment configuration information
To run this deployment on cluster RunCluster01, for example, you run:
ytt -f https://raw.githubusercontent.com/gm2552/where-for-dinner-tap-tsm/main/cluster01Deliverables.yaml -v \
workloadNamespace=where-for-dinner -v gitOpsSecret=tap-play-gitops-secret -v \
gitOpsRepo=https://github.com/gm2552/tap-play-gitops.git | kubectl apply -f-
To run this deployment on cluster RunCluster02, for example, you run:
ytt -f https://raw.githubusercontent.com/gm2552/where-for-dinner-tap-tsm/main/cluster02Deliverables.yaml -v \
workloadNamespace=where-for-dinner -v gitOpsSecret=tap-play-gitops-secret -v \
gitOpsRepo=https://github.com/gm2552/tap-play-gitops.git | kubectl apply -f-
You can create an Istio ingress resource on RunCluster01 if you do not plan on using the GNS capabilities to expose the application to external networks.
You must create a domain name system address (DNS A) record in your DNS provider’s configuration tool to point to the Istio load-balanced IP address of RunCluster01. The DNS configuration is out of the scope of this topic.
Create the ingress by running:
ytt -f ingress.yaml -v workloadNamespace=WORKLOAD-NAMESPACE -v domainName=DOMAIN-NAME | kubectl apply -f-
Where:
WORKLOAD-NAMESPACEis the namespace where the workload is deployedDOMAIN-NAMEis the public domain that will host your application
For example:
ytt -f https://raw.githubusercontent.com/gm2552/where-for-dinner-tap-tsm/main/ingress.yaml -v \
workloadNamespace=where-for-dinner -v domainName=tsmdemo.perfect300rock.com | kubectl apply -f-
Create a global namespace
The example clusters have the names RunCluster01 and RunCluster02, and they assume the workload and service namespaces of where-for-dinner and service-instances, respectively.
- Open the Tanzu Service Mesh console and create a new GNS.
-
Configure the following settings in each step:
- General details
- GNS Name: where-for-dinner
- Domain: where-for-dinner.lab
- Namespace mapping
- Namespace mapping Rule 1
- Cluster name: RunCluster01
- Namespace: where-for-dinner
- Namespace Mapping Rule 2
- Cluster name: RunCluster02
- Namespace: where-for-dinner
- Namespace Mapping Rule 3
- Cluster name: RunCluster01
- Namespace: service-instances
- Namespace mapping Rule 1
- Autodiscovery. Use the default settings.
- Public services
- Service name: where-for-dinner
- Service port: 80
- Public URL: http where-for-dinner . Select a domain.
- Service name: where-for-dinner
- Global server load balancing and resiliency. Use the default settings.
- General details
You can now access the Where For Dinner application with the URL configured earlier.
Deployment use case: ACME Fitness Store
The following instructions describe an end-to-end process for configuring, building, and deploying the ACME Fitness Store application into a Tanzu Service Mesh GNS. In this use case, the application is deployed across two Tanzu Application Platform run clusters. ytt is used to run the build and deployment commands.
The configuration resources referenced in this scenario are in the acme-fitness-tap-tsm Git repository.
Deploy AppSSO
ACME requires the use of an AppSSO authorization server and client registration resource. Install these resources on the same run cluster that is named RunCluster01 in the deployment section.
-
Deploy the authorization server instance by running:
ytt -f appSSOInstance.yaml -v workloadNamespace=WORKLOAD-NAMESPACE \
-v devDefaultAccountUsername=DEV-DEFAULT-ACCOUNT-USERNAME -v \
devDefaultAccountPassword=DEV-DEFAULT-ACCOUNT-PASSWORD | kubectl apply -f-
Where:
WORKLOAD-NAMESPACEis the namespace where the workloads will be deployedDEV-DEFAULT-ACCOUNT-USERNAMEis the user name for the ACME application authenticationDEV-DEFAULT-ACCOUNT-PASSWORDis the password for the ACME application authentication
For example:
ytt -f https://raw.githubusercontent.com/gm2552/acme-fitness-tap-tsm/main/appSSOInstance.yaml -v \ workloadNamespace=acme -v devDefaultAccountUsername=acme -v \ devDefaultAccountPassword=fitness | kubectl apply -f- -
Create a
ClientRegistrationresource by running:ytt -f appSSOInstance.yaml -v workloadNamespace=WORKLOAD-NAMESPACE -v \ appSSORedirectURI=APP-SSO-REDIRECT-URI | kubectl apply –f-Where:
WORKLOAD-NAMESPACEis the namespace where the workloads will be deployed.APP-SSO-REDIRECT-URIis the public URI that the authorization server redirects to after a login
For example:
ytt -f https://raw.githubusercontent.com/gm2552/acme-fitness-tap-tsm/main/clientRegistrationResourceClaim.yaml \ -v workloadNamespace=acme -v \ appSSORedirectURI=http://acme-fitness.tsmdemo.perfect300rock.com/login/oauth2/code/sso | kubectl apply -f- -
Obtain the appSSO Issuer URI by running:
kubectl get authserver -n WORKLOAD-NAMESPACEWhere
WORKLOAD-NAMESPACEis the name of the namespace where the workloads will be deployed. -
Record the Issuer URI because you need it for the next section.
Apply the workload resources to your build cluster
To build the application services, run the following command to apply the workload resources to your build cluster. You can also clone or fork the repository in the following command to either use the YAML files locally or point to your own Git repository.
ytt -f workloads.yaml -v workloadNamespace=WORKLOAD-NAMESPACE -v \
appSSOIssuerURI=APP-SSO-ISSUER-URL | kubectl apply -f-
Where:
WORKLOAD-NAMESPACEis the name of your build namespaceAPP-SSO-ISSUER-URLis the URL of the AppSSO authorization server that you deployed earlier
For example:
ytt -f https://raw.githubusercontent.com/gm2552/acme-fitness-tap-tsm/main/workloads.yaml -v \
workloadNamespace=workloads -v \
appSSOIssuerURI=http://appsso-acme-fitness.acme.tsmdemo.perfect300rock.com | kubectl apply -f-
If you are using a GitOps workflow with your build cluster then, after building the workloads, the deployment information is pushed to your GitOps repository.
If you follow these instructions without pull requests in the GitOps workflow, the config-writer pods that commit deployment information to the GitOps repository might fail because of concurrency conflicts. A workaround for this is to delete the failed workloads from the build cluster and re-run the command provided in these instructions.
Create the Istio ingress resources
The authorization server requires a publicly accessible URL and must be available before the Spring Cloud Gateway can deploy properly. The authorization server is deployed at the URI authserver app domain.
You must create a domain name system address (DNS A) record in your DNS provider’s configuration tool to point to the Istio load-balanced IP address of RunCluster01. The DNS configuration is out of the scope of this topic.
Create the Istio ingress resources by running:
ytt -f istioGateway.yaml -v workloadNamespace=WORKLOAD-NAMESPACE -v \
appDomainName=APP-DOMAIN | kubectl apply -f-
Where:
WORKLOAD-NAMESPACEis the name of your build namespaceAPP-DOMAINis the application’s DNS domain
For example:
ytt -f https://raw.githubusercontent.com/gm2552/acme-fitness-tap-tsm/main/istioGateway.yaml -v \
workloadNamespace=acme -v appDomainName=tsmdemo.perfect300rock.com | kubectl apply -f-
Deploy Redis
A Redis instance is needed for caching the ACME fitness store cart service. Deploy the Redis instance by running:
ytt -f https://raw.githubusercontent.com/gm2552/acme-fitness-tap-tsm/main/redis.yaml -v \
workloadNamespace=WORKLOAD-NAMESPACE -v redisPassword=REDIS-PASSWORD | kb apply -f-
Where:
WORKLOAD-NAMESPACEis the namespace where the workloads will be deployedREDIS-PASSWORDis your password
For example:
ytt -f https://raw.githubusercontent.com/gm2552/acme-fitness-tap-tsm/main/redis.yaml -v \
workloadNamespace=acme -v redisPassword=fitness | kubectl apply -f-
Run cluster deployment
Workloads are deployed to the run cluster by using deliverable resources. In this section you apply the deliverable resources directly to the run clusters, instead of using a kapp application. This deployment assumes that two clusters are part of the Tanzu Service Mesh GNS ACME. In this example these clusters are named RunCluster01 and RunCluster02.
The deliverable objects reference the GitOps repository, where the build cluster has written deployment information, and need to reference this repository in the following commands.
To deploy the workloads to the run clusters, run these commands against their respective clusters:
ytt -f cluster01Deliverables.yaml -v workloadNamespace=WORKLOAD-NAMESPACE -v \
gitOpsSecret=GIT-OPS-SECRET -v gitOpsRepo=GIT-OPS-REPO | kubectl apply -f-
Where:
WORKLOAD-NAMESPACEis the namespace where the workloads will be deployedGIT-OPS-SECRETis the GitOps secret used to access the GitOps repositoryGIT-OPS-REPOis the URL of the GitOps repository where the build cluster wrote out deployment configuration information
ytt -f cluster02Deliverables.yaml -v workloadNamespace=WORKLOAD-NAMESPACE -v \
gitOpsSecret=GIT-OPS-SECRET -v gitOpsRepo=GIT-OPS-REPO | kubectl apply -f-
Where:
WORKLOAD-NAMESPACEis the namespace where the workloads will be deployedGIT-OPS-SECRETis the GitOps secret used to access the GitOps repositoryGIT-OPS-REPOis the URL of the GitOps repository where the build cluster wrote out deployment configuration information
For the RunCluster01 example, run:
ytt -f https://raw.githubusercontent.com/gm2552/acme-fitness-tap-tsm/main/cluster01Deliverables.yaml \
-v workloadNamespace=acme -v gitOpsSecret=tap-play-gitops-secret -v \
gitOpsRepo=https://github.com/gm2552/tap-play-gitops.git | kubectl apply -f-
For the RunCluster02 example, run:
ytt -f https://raw.githubusercontent.com/gm2552/acme-fitness-tap-tsm/main/cluster02Deliverables.yaml \
-v workloadNamespace=acme -v gitOpsSecret=tap-play-gitops-secret -v \
gitOpsRepo=https://github.com/gm2552/tap-play-gitops.git | kubectl apply -f-
Deploy Spring Cloud Gateway
The following sections describe how to deploy Spring Cloud Gateway.
Install the Spring Cloud Gateway package
The section requires the Spring Cloud Gateway for Kubernetes package to be installed on RunCluster01. If Spring Cloud Gateway is already installed on the run cluster, skip these install steps.
In Tanzu Application Platform v1.5 and later, Spring Cloud Gateway is included as an optional package in the Tanzu Application Platform Carvel bundle. Install the Spring Cloud Gateway package with the default settings by using this Tanzu CLI template:
tanzu package install scg –-package spring-cloud-gateway.tanzu.vmware.com \
-version VERSION-NUMBER -n TAP-INSTALL-NAMESPACE
For example:
tanzu package install scg --package spring-cloud-gateway.tanzu.vmware.com \
--version 2.0.0-tap.3 -n tap-install
Configure the Spring Cloud Gateway instance and route
The Tanzu Application Platform fork of the ACME fitness store uses Spring Cloud Gateway for routing API classes from the web front end to the microservices.
CautionThe Spring Cloud Gateway
spec.service.nameconfiguration was not built with multicluster or cross-cluster support. The configuration for the gateway routes currently implements a workaround, which is brittle in terms of where certain services are deployed. Future releases of the gateway might have better support for this use case.
Deploy the gateway and applicable routes by running:
ytt -f scgInstance.yaml -v workloadNamespace=WORKLOAD-NAMESPACE
Where WORKLOAD-NAMESPACE is the namespace where the workload is deployed.
ytt -f scgRoutes.yaml -v workloadNamespace=WORKLOAD-NAMESPACE
Where WORKLOAD-NAMESPACE is the namespace where the workload is deployed.
For example:
ytt -f https://raw.githubusercontent.com/gm2552/acme-fitness-tap-tsm/main/scgInstance.yaml -v \
workloadNamespace=acme | kubectl apply -f-
ytt -f https://raw.githubusercontent.com/gm2552/acme-fitness-tap-tsm/main/scgRoutes.yaml -v \
workloadNamespace=acme | kubectl apply -f-
Create a global namespace
The example clusters are named RunCluster01 and RunCluster02, and they assume a workload namespace of ACME.
- Open the Tanzu Service Mesh console and create a new global namespace.
-
Configure the following settings in each step:
- General details
- GNS name: acme-tap
- Domain: acme-tap.lab
- Namespace mapping
- Namespace mapping Rule 1
- Cluster name: RunCluster01
- Namespace: acme
- Namespace Mapping Rule 2
- Cluster name: RunCluster02
- Namespace: acme
- Namespace mapping Rule 1
- Autodiscovery. Use the default settings.
- Public Services
- No Public service
- Global server load-balancing and resiliency. Use the default settings.
- General details
You can access the application by going to the URL http://acme-fitness.
