This topic tells you how Diego stages buildpack apps and Docker images in VMware Tanzu Application Service for VMs (TAS for VMs).
TAS for VMs uses Diego to manage app containers. It is a self-healing system that attempts to keep the correct number of instances running in Diego Cells to avoid network failures and crashes. For more information about Diego, see Diego Components and Architecture.
Learn about tasks and long-running processes (LRPs).
TAS for VMs uses Diego to manage app containers. It is a self-healing system that attempts to keep the correct number of instances running in Diego Cells to avoid network failures and crashes. For more information about Diego, see Diego Components and Architecture.
This topic references tasks and long-running processes (LRPs). For more information about these, see the Tasks and Long-Running Processes section of the How Diego Balances App Processes topic.
To better understand the flow and caching of source bits during staging, see the How Staging Uses the Blobstore section of the Cloud Controller blobstore topic.
How Diego stages buildpack apps
This section describes how Diego stages buildpack apps.
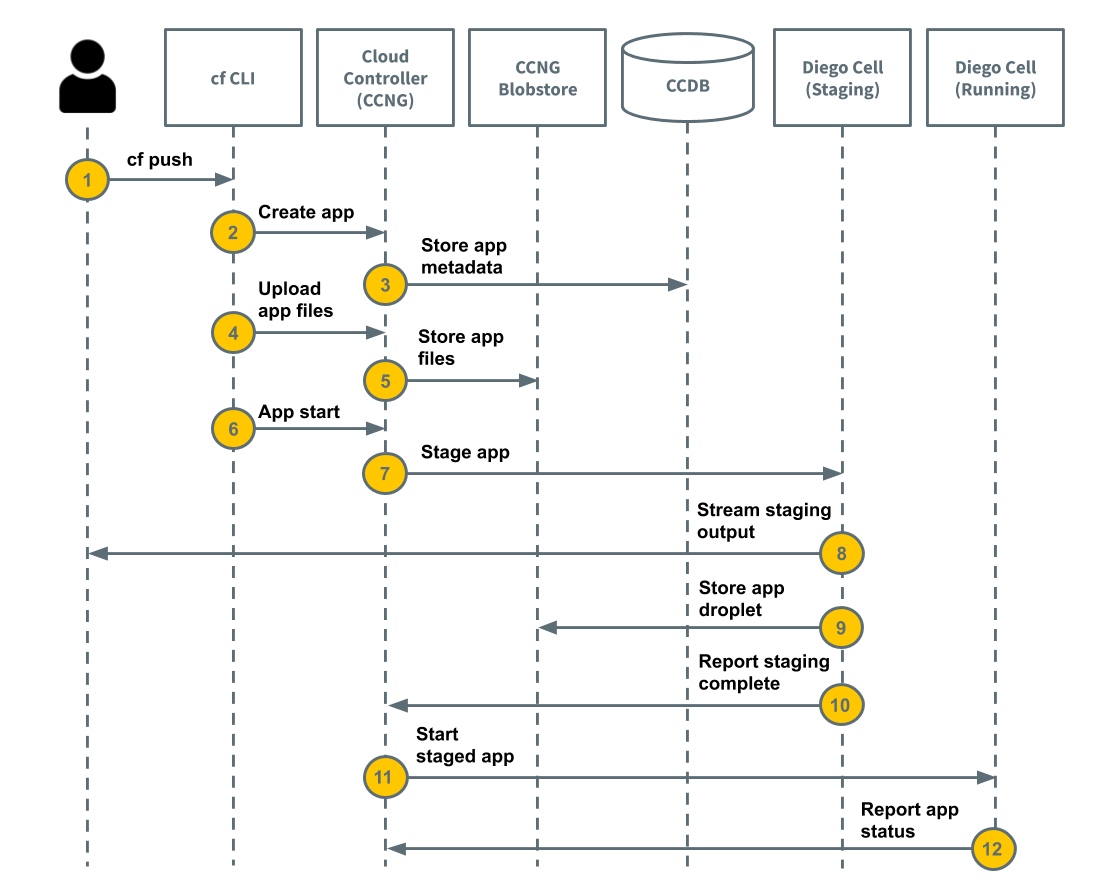
The following diagram illustrates the steps and components involved in the process of staging a buildpack app. The staging process for buildpack apps includes a developer and the following components: CF Command Line, Cloud Controller (CCNG), CCNG Blobstore, CCDB, Diego Cell (Staging), and Diego Cell (Running). Step 1: cf push from Developer to CF Command Line. Step 2: Create App from CF Command Line to Cloud Controller (CCNG). Step 3: Stores App Metadata from CCNG to the CCDB. Step 4: Upload App Files from the CF Command Line to CCNG. Step 5: Store App Files from CCNG to CCNG Blobstore. Step 6: App Start from CF Command Line to CCNG. Step 7: Stage App from CCNG to Diego Cell (Staging). Step 8: Stream Staging Output from Diego Cell (Staging) to the Developer. Step 9: Store App Droplet from Diego Cell (Staging) to CCNG Blobstore. Step 10: Report Staging Complete from Diego Cell (Staging) to CCNG. Step 11: Start Staged App from CCNG to Diego Cell (Running). Step 12: Report App Status from Diego Cell (Running) to CCNG.

The following steps describe the process of staging a buildpack app:
-
A developer runs
cf push. -
The Cloud Foundry Command Line Interface (cf CLI) tells the Cloud Controller to create a record for the app. For more information about the Cloud Controller, see Cloud Controller.
-
Cloud Controller stores the app metadata. App metadata can include the app name, number of instances, buildpack, and other information about the app.
-
This step includes:
- The cf CLI requests a resource match from the Cloud Controller.
- The cf CLI uploads the app source files, omitting any app files that already exist in the resource cache.
- The Cloud Controller combines the uploaded app files with files from the resource cache to create the app package.
-
Cloud Controller stores the app package in the blobstore. For more information, see the Blobstore section of the TAS for VMs Components topic.
-
The cf CLI issues a request to start the app.
-
This step includes:
- The Cloud Controller issues a staging request to Diego.
- Diego schedules a Diego Cell to run the staging task.
- The task downloads buildpacks and the app buildpack cache, if present.
- The task uses the buildpack to compile and stage the app.
-
Diego Cell streams the output of the staging process. You might need to view the output to troubleshoot staging problems.
-
This step includes:
- The task creates a tarball, or droplet, with the compiled and staged app.
- The Diego Cell stores the droplet in the blobstore.
- The task uploads the buildpack cache to the blobstore for use the next time the app is staged.
-
The Diego Bulletin Board System (BBS) reports to the Cloud Controller that staging is complete. If staging does not complete within 15 minutes, it fails.
-
Diego schedules the app as a LRP on one or more Diego Cells.
-
Diego Cells report the status of the app to the Cloud Controller.
How Diego stages Docker images
This section describes how Diego stages Docker images.
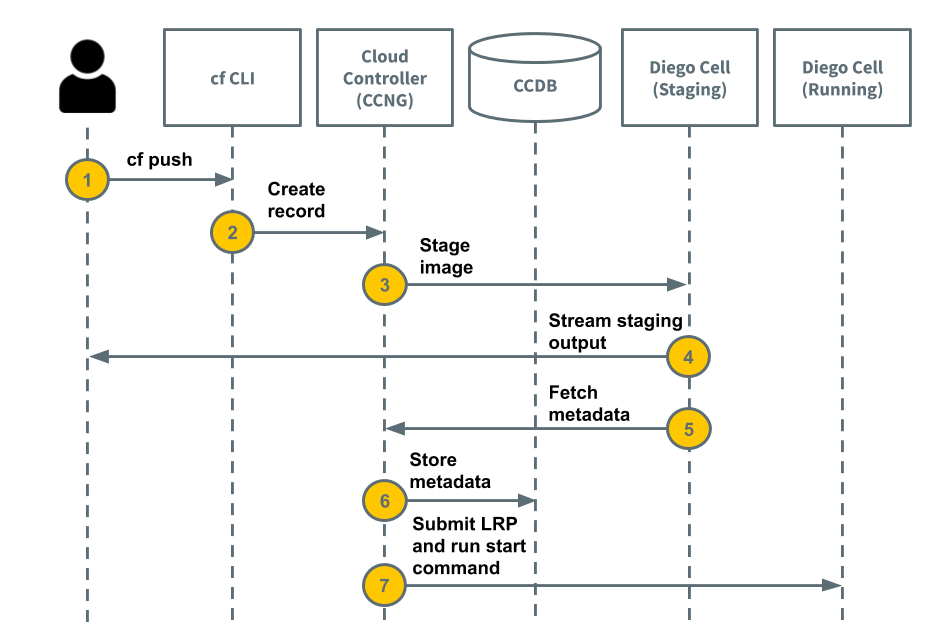
The following diagram illustrates the steps and components involved in the process of staging a Docker image. The staging process for Docker images includes a developer and the following components: CF Command Line, Cloud Controller (CCNG), CCDB, Diego Cell (Staging), and Diego Cell (Running). Step 1: CF Push from Developer to CF Command Line. Step 2: Create Record from CF Command Line to CCNG. Step 3: Stage Image from CCNG to CCDB. Step 4: Stream Staging Output from Diego Cell (Staging) to Developer. Step 5: Fetch Metadata from Diego Cell (Staging) to CCNG. Step 6: Store Metadata from CCNG to CCDB. Step 7: Submit LRP an Run Start Command from CCNG to Diego Cell (Running).

The following describe each step in the process of staging a Docker image:
-
Run
cf pushand include the name of a Docker image in an accessible Docker Registry. -
The cf CLI tells the Cloud Controller to create a record for the Docker image.
-
This step includes:
- The Cloud Controller issues a staging request to Diego.
- Diego schedules a Diego Cell to run the task.
-
Diego Cell streams the output of the staging process. You might need to view the output to troubleshoot staging problems.
-
The task fetches the metadata associated with the Docker image and returns a portion of it to the Cloud Controller.
-
Cloud Controller stores the metadata in the Cloud Controller database.
-
This step includes:
- Cloud Controller uses the Docker image metadata to construct a LRP that runs the start command specified in the Dockerfile.
- Cloud Controller submits the LRP to Diego.
- Diego schedules the LRP on one or more Diego Cells.
- Cloud Controller instructs Diego and the Gorouter to route traffic to the Docker image.
Cloud Controller takes into account any user-specified overrides specified in the Dockerfile, such as environment variables.