


You can configure load balancing for VMware Tanzu Application Service for VMs (TAS for VMs) by entering the names of your Load Balancers in the Resource Config pane of the TAS for VMs tile. This procedure varies by your IaaS and how you prepared (“paved”) it for installing TAS for VMs.
See the following section that corresponds to your use case.
AWS
AWS with Terraform
To set up load balancing for TAS for VMs on AWS using Terraform:
-
Create a file named
vm_extensions_config.ymlwith the following content, depending on which release you are using:-
VMware Tanzu Application Service for VMs (TAS for VMs):
--- product-name: cf resource-config: diego_brain: elb_names: - alb:SSH_TARGET_GROUP_1 - alb:SSH_TARGET_GROUP_2 additional_vm_extensions: - ssh-lb-security-groups router: elb_names: - alb:WEB_TARGET_GROUPS_1 - alb:WEB_TARGET_GROUPS_2 additional_vm_extensions: - web-lb-security-groups tcp_router: elb_names: - alb:TCP_TARGET_GROUP_1 - alb:TCP_TARGET_GROUP_2 additional_vm_extensions: - tcp-lb-security-groups -
Small Footprint TAS for VMs:
---
product-name: cf
resource-config:
  control:
    elb_names:
    - alb:SSH_TARGET_GROUP_1
    - alb:SSH_TARGET_GROUP_2
    additional_vm_extensions:
    - ssh-lb-security-groups
  router:
    elb_names:
    - alb:WEB_TARGET_GROUPS_1
    - alb:WEB_TARGET_GROUPS_2
    additional_vm_extensions:
    - web-lb-security-groups
  tcp_router:
    elb_names:
    - alb:TCP_TARGET_GROUP_1
    - alb:TCP_TARGET_GROUP_2
    additional_vm_extensions:
    - tcp-lb-security-groups
-
-
Replace values in the file as follows:
-
SSH_TARGET_GROUP_X: Enter your SSH target groups. You can find these values by running:terraform output ssh_target_groups -
WEB_TARGET_GROUPS_X: Enter your web target groups. You can find these values by running:terraform output web_target_groups -
TCP_TARGET_GROUP_X: Enter your TCP target groups. You can find these values by running:terraform output tcp_target_groups
-
-
Apply the VM extension configuration using the
omCLI. For more information aboutom, see the Om repository on GitHub.om -k \ -t "OPS-MANAGER-FQDN" \ -u "USERNAME" \ -p "PASSWORD" \ configure-product \ -c vm_extensions_config.ymlWhere:
OPS-MANAGER-FQDNis the URL at which you access your VMware Tanzu Operations Manager instance. This corresponds toops_manager_dnsin the Terraform output.USERNAMEis the user name you entered when configuring internal authentication.-
PASSWORDis the password you entered when configuring internal authentication.Note If you did not configure internal authentication, you must edit this command to use a client ID and secret instead of user name and password. For more information, see Authentication in the Om repository on GitHub.
AWS paved manually
To configure the Gorouter to use AWS Elastic Load Balancers:
-
Record the names of your ELBs. If you followed the procedures in Preparing to deploy Tanzu Operations Manager on AWS, you created:
-
-ssh-elb: An SSH load balancer. This is a Classic Load Balancer. -tcp-elb: A TCP load balancer. This is a Classic Load Balancer.-
-web-elb: A web load balancer. This is an Application Load Balancer.-web-elb-target-group: A target group for the web load balancer.
-
In the TAS for VMs tile, select Resource Config.
-
Enter the name of your SSH load balancer.
- Show the Load Balancers field underneath the job that handles SSH requests. This depends on the TAS for VMs release you are using:
- TAS for VMs: Click the icon next to the Diego Brain job name to expand the row.
- Small Footprint TAS for VMs: Click the icon next to the Control job name to expand the row.
-
In the Load Balancers field, enter the name of your SSH load balancer:
-ssh-elb. -
Click to expand the Router row, and fill in the Load Balancers field with a value determined by the type of load balancer you are using:
-
Application Load Balancer: Enter a comma-separated list of the names of the target group of your web load balancer, prefixed with
alb::alb:-web-elb-target-group. The prefix indicates to Tanzu Operations Manager that you entered the name of a target group. The prefix is required for AWS Application Load Balancers and Network Load Balancers. -
Classic Load Balancer: Enter the name of the load balancer:
-web-elb. -
If you activated TCP routing, expand the TCP Router row and enter the name of your TCP load balancer:
-tcp-elb.
Azure
Azure with Terraform
To configure the Gorouter to use Azure Load Balancers:
-
Select Resource Config.
-
Ensure a
StandardVM type is selected for the Router VM. The TAS for VMs deployment fails if you select aBasicVM type. -
Click the icon next to the Router job name to expand the row, showing a Load Balancers field and INTERNET CONNECTED check box underneath.
-
Enter the value of
web_lb_namefrom your Terraform output in the Resource Config pane under Load Balancers for the Router job. -
Expand the row for the job that handles SSH requests. This depends on the TAS for VMs release you are using:
- TAS for VMs: Click the icon next to Diego Brain.
- Small Footprint TAS for VMs: Click the icon next to Control.
-
For the SSH load balancer, enter the value of
diego_ssh_lb_namefrom your Terraform output. -
Ensure that the INTERNET CONNECTED check boxes are deselected for all jobs.
-
Scale the number of instances as appropriate for your deployment.
Note For a high availability deployment of Tanzu Operations Manager on Azure, VMware recommends scaling the number of each TAS for VMs job to a minimum of three instances. Using three or more instances for each job creates a sufficient number of availability sets and fault domains for your deployment. For more information, see Azure reference architecture
Azure paved manually
To configure the Gorouter to use Azure Load Balancers:
-
Select Resource Config.
-
Ensure a
StandardVM type is selected for the Router VM. The TAS for VMs deployment fails if you select aBasicVM type. -
Retrieve the name(s) of your external Azure Load Balancer (ALB) by navigating to the Azure portal, clicking All resources, and locating your Load balancer resource.
The Azure portal sometimes displays the names of resources with incorrect capitalization. Always use the Azure CLI to retrieve the correctly capitalized name of a resource. To see the list of resources, run
az network lb list. -
In the Resource Config pane of the TAS for VMs tile, click the icon next to the Router job name to expand the row, showing a Load Balancers field and INTERNET CONNECTED check box underneath.
-
Enter the name of your external ALB in the field under Load Balancers. If you have multiple external ALBs this field accepts a comma separated list.
-
Retrieve the name of your Diego SSH Load Balancer by navigating to the Azure portal, clicking All resources, and locating your Load balancer resource.
-
In the Resource Config pane of the TAS for VMs tile, expand the row for the job that handles SSH requests. This depends on the TAS for VMs release you are using:
- TAS for VMs: Click the icon next to Diego Brain.
- Small Footprint TAS for VMs: Click the icon next to Control.
-
Enter the name of the Diego SSH Load Balancer in the field under Load Balancers.
-
Ensure that the INTERNET CONNECTED check boxes are deselected for all jobs.
-
Scale the number of instances as appropriate for your deployment.
Note For a high availability deployment of Tanzu Operations Manager on Azure, VMware recommends scaling the number of each TAS for VMs job to a minimum of three instances. Using three or more instances for each job creates a sufficient number of availability sets and fault domains for your deployment. For more information, see Azure reference architecture.
GCP with Terraform
To configure the Gorouter to use GCP Load Balancers:
-
Select Resource Config.
-
Click the icon next to the Router job name to expand the row, showing a Load Balancers field and INTERNET CONNECTED check box underneath.
-
In the Load Balancers field, enter a comma-separated list consisting of the values of
ws_router_poolandhttp_lb_backend_namefrom your Terraform output. For example,tcp:-cf-ws,http:-httpslb. These are the names of the TCP WebSockets and HTTP(S) Load Balancers for your deployment.Do not add a space between key and value pairs in the
LOAD BALANCERfield, or it fails. -
If you activated TCP routing in the Networking pane of the TAS for VMs tile, add the value of
tcp_router_poolfrom your Terraform output, prepended withtcp:, to the Load Balancers column of the TCP Router row. For example,tcp:-cf-tcp. -
Expand the row for the job that handles SSH requests. This depends on the TAS for VMs release you are using:
- TAS for VMs: Click the icon next to Diego Brain.
- Small Footprint TAS for VMs: Click the icon next to Control.
-
Under Load Balancers for the SSH job, enter the value of
ssh_router_poolfrom your Terraform output, prepended withtcp:. For example,tcp:PCF-ssh-proxy. -
Verify that the Internet Connected check box for every job is activated. The Terraform templates do not provision a Network Address Translation (NAT) box for Internet connectivity to your VMs, so they are provided with ephemeral public IP addresses to allow the jobs to reach the Internet. If you want to provision a Network Address Translation (NAT) box to provide Internet connectivity to your VMs instead of providing them with public IP addresses, deactivate the Internet Connected check boxes. For more information about using NAT in GCP, see VPC network overview in the GCP documentation.
-
Click Save.
GCP paved manually
To configure the Gorouter to use GCP Load Balancers:
-
Go to the GCP Console and select Load balancing.
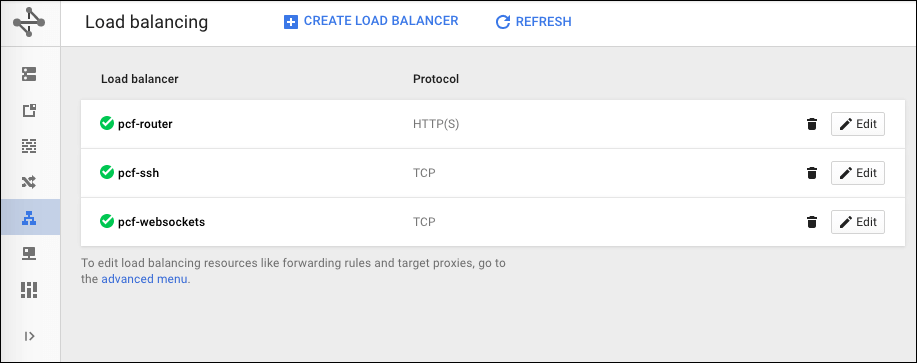
You can see the SSH load balancer, the HTTP(S) load balancer, the TCP WebSockets load balancer, and the TCP router that you created in Preparing to Deploy Tanzu Operations Manager on GCP.
-
Record the name of your SSH load balancer and your TCP WebSockets load balancer,
PCF-wss-logsandPCF-ssh-proxy. -
Click your HTTP(S) load balancer,
PCF-global-.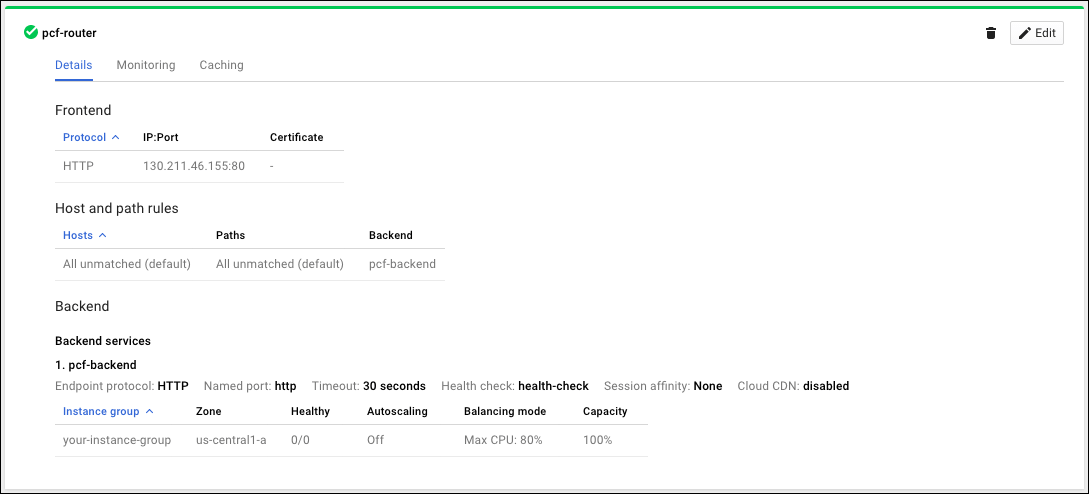
-
Under Backend services, record the name of the back end service of the HTTP(S) load balancer,
PCF-http-lb-backend. -
In the TAS for VMs tile, select Resource Config.
-
Click the icon next to the Router job name to expand the row, showing a Load Balancers field and INTERNET CONNECTED check box underneath.
-
In the Load Balancers field, enter a comma separated list consisting of the name of your TCP WebSockets load balancer and the name of your HTTP(S) load balancer back end with the protocol prepended. For example,
tcp:PCF-wss-logs,http:PCF-http-lb-backend.Important Do not add a space between key and value pairs in the
LOAD BALANCERfield, or it fails. -
If you activated TCP routing in the Networking pane of the TAS for VMs tile and set up the TCP load balancer in GCP, add the name of your TCP load balancer, prepended with
tcp:, to the Load Balancers column of the TCP Router row. For example,tcp:-tcp-router. -
Expand the row for the job that handles SSH requests. This depends on the TAS for VMs release you are using:
- TAS for VMs: Click the icon next to Diego Brain.
- Small Footprint TAS for VMs: Click the icon next to Control.
-
Under Load Balancers for the SSH job, enter the value of
ssh_router_poolfrom your Terraform output, prepended withtcp:. For example,tcp:PCF-ssh-proxy. -
Verify that the Internet Connected check box for every job is deactivated.
When preparing your GCP environment, you provisioned a Network Address Translation (NAT) box to provide Internet connectivity to your VMs instead of providing them with public IP addresses to allow the jobs to reach the Internet.
If you want to provision a Network Address Translation (NAT) box to provide internet connectivity to your VMs instead of providing them with public IP addresses, deactivate the Internet Connected check boxes. For more information about using NAT in GCP, see VPC network overview in the GCP documentation.
-
Click Save.
vSphere with NSX-T or NSX-V
In the Resource Config pane of the TAS for VMs tile, you configure vSphere NSX-T or NSX-V load balancing and security group membership for TAS for VMs jobs.
To configure load balancing and security group membership for TAS for VMs jobs:
-
Select Resource Config.
-
For each TAS for VMs job that you want to load-balance, click the down arrow to reveal its configuration fields. The external-facing job instance groups in TAS for VMs are:
-
Diego Brain in TAS for VMs, or Control in Small Footprint TAS for VMs, for SSH traffic
- Router for web traffic
-
TCP Router for TCP traffic
-
Enter a load balancer configuration for each job:
-
NSX-T:
- In the vSphere NSX Manager > Advanced Networks & Security > Groups pane, define an NSGroup to include VMs running each load-balanced job, such as
pas-ssh-group,pas-tcp-group, andpas-web-group. - In the NS Groups field in Resource Config, enter a comma-separated list of the NSGroups you defined.
- In the Logical Load Balancer: Enter a JSON-formatted structure defining a list of
server_poolsas pairs ofnameandportdefinitions.
- In the vSphere NSX Manager > Advanced Networks & Security > Groups pane, define an NSGroup to include VMs running each load-balanced job, such as
-
NSX-V:
- Security Groups: Enter a comma separated list of Security Groups defined in NSX-V to include each load-balanced job, such as
pas-ssh-group,pas-tcp-group, andpas-web-group. - Edge Load Balancers: Enter a JSON-formatted structure listing edge Load Balancers, each defined by
edge_name,pool_name,security_group,port, andmonitor_portdefinitions.
- Security Groups: Enter a comma separated list of Security Groups defined in NSX-V to include each load-balanced job, such as
-
Click Save.
